Automatic and Explicit Format Selection in WCF WebHttp Services
This is part four of a twelve part series that introduces the features of WCF WebHttp Services in .NET 4. In this post we will cover:
- Configuring automatic format selection for a WCF WebHttp Service
- Setting the response format explicitly in code per request
Over the course of this blog post series, we are building a web service called TeamTask. TeamTask allows a team to track tasks assigned to members of the team. Because the code in a given blog post builds upon the code from the previous posts, the posts are intended to be read in-order.
Downloading the TeamTask Code
At the end of this blog post, you’ll find a link that will allow you to download the code for the current TeamTask Service as a compressed file. After extracting, you’ll find that it contains “Before” and “After” versions of the TeamTask solution. If you would like to follow along with the steps outlined in this post, download the code and open the "Before" solution in Visual Studio 2010. If you aren’t sure about a step, refer to the “After” version of the TeamTask solution.
Note: If you try running the sample code and see a Visual Studio Project Sample Loading Error that begins with “Assembly could not be loaded and will be ignored…”, see here for troubleshooting.
Getting Visual Studio 2010
To follow along with this blog post series, you will need to have Microsoft Visual Studio 2010 and the full .NET 4 Framework installed on your machine. (The client profile of the .NET 4 Framework is not sufficient.) At the time of this posting, the Microsoft Visual Studio 2010 Ultimate Beta 2 is available for free download and there are numerous resources available regarding how to download and install, including this Channel 9 video.
Step 1: Handling Requests in JSON
So far in this blog post series we’ve been sending and receiving HTTP messages with XML content only. But WCF WebHttp Services also provides first-class support for JSON. In fact, by default a WCF WebHttp Service will handle requests in JSON automatically. Just to prove this, we’ll have our client send an HTTP PUT request to the TeamTask service in JSON.
If you haven't already done so, download and open the “Before” solution of the code attached to this blog post.
Open the Program.cs file from the TeamTask.Client project in the code editor and add the following static method to the Program class:
static void WriteOutContent(HttpContent content)
{
content.LoadIntoBuffer();
Console.WriteLine(content.ReadAsString());
Console.WriteLine();
}This static WriteOutContent() method will allow us to easily write out the body of a request or response message to the console. The content is streamed by default, so we call the LoadIntoBuffer() method to give us the ability to read the content multiple times.
Change the UpdateTask() method to serialize the request to JSON instead of XML by replacing:
HttpContent content = HttpContentExtensions.CreateDataContract(task);
With:
HttpContent content = HttpContentExtensions.CreateJsonDataContract(task);
Add a call to the WriteOutContent() method after the request content is created so that we can verify the request really is in JSON like so:
HttpContent content = HttpContentExtensions.CreateJsonDataContract(task);
Console.WriteLine("Request:");
WriteOutContent(content);Open the Web.Config file from the TeamTask.Service project and change the value of the “automaticFormatSelectionEnabled” setting from “true” to “false” like so:
<webHttpEndpoint>
<standardEndpoint name="" helpEnabled="true"
automaticFormatSelectionEnabled="false"/>
</webHttpEndpoint>Note: The default value for automaticFormatSelectionEnabled is actually false, so we could simply delete the attribute altogether. However, we’ll be re-enabling it soon so it is easier to keep it around.
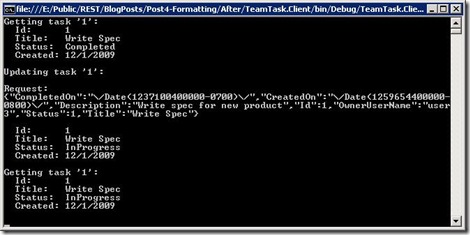
Start without debugging (Ctrl+F5) to get the TeamTask service running and then start the client by right clicking on the TeamTask.Client project in the “Solution Explorer” window and selecting “Debug”—>”Start New Instance”. The console should contain the following output:
Notice that the HTTP PUT request is in JSON, and yet the TeamTask service handles it without any problem.
Note: Throughout this blog post, we’ll be running both the service and the client projects together a number of times. You might find it convenient to configure the TeamTask solution to automatically launch the server and then the client when you press (F5). To do this, right click on the TeamTask solution in the Solution Explorer (Ctrl+W,S) and select “Properties” from the context menu that appears. In the Solution Properties window, select the “Multiple startup projects” radio button. Make sure that the TeamTask.Service project is the top project in the list by selecting it and clicking on the up arrow button. Click on the “Action” cell for the TeamTask.Service project and select “Start without Debugging”. Then click on the “Action” cell for the TeamTask.Client project and select “Start”.
Helpful Tip: It might seem counterintuitive that we set “automaticFormatSelectionEnabled” to false when we were explicitly trying to demonstrate how our service could automatically handle a JSON request. You would probably assume that “automaticFormatSelectionEnabled” needs to be set to “true” to handle a JSON request. But this isn’t the case, as we saw when we executed the client. The “automaticFormatSelectionEnabled” setting applies to outgoing responses only and we'll discuss exactly what it does in next step. All incoming requests in either XML or JSON are automatically handled, and in fact, there is no way to disable this behavior to accept only one format or the other. |
Step 2: Setting the Response Format Automatically
In step one, we wrote the request message body to the console to show that it was in fact JSON. But what about the response message? We didn’t write it out to the console, but it happens to be in XML. You can see for yourself by adding a call to the WriteOutContent() method and passing in the response content.
Of course this is odd—a client sends JSON and gets XML back. This occurs because the default response format of the UpdateTask() operation is XML. You specify the default response format for an operation using the ResponseFormat property on the [WebGet] or [WebInvoke] attributes, but the ResponseFormat property isn’t explicitly set with the UpdateTask() operation and it defaults to XML.
We could set the ResponseFormat for the UpdateTask() operation to JSON, but that wouldn’t really solve our problem. If a client were to send a request in XML, it would get back a response in JSON. What we really want is for the WCF infrastructure to be smart enough to choose the correct response format given the request itself. And in fact, this is exactly the behavior the new automatic format selection feature in WCF WebHttp Services provides.
Enabling automatic format selection is as easy as setting “automaticFormatSelectionEnabled” to “true” in the Web.config for the service. With the online templates it is set to “true” by default, which is why we had to set it to “false” in step one.
When automatic format selection is enabled, the WCF infrastructure will try to determine the appropriate response format using:
The value of the HTTP Accept header of the request. If the request doesn’t provide an Accept header or the Accept header doesn’t list an appropriate format, the WCF infrastructure will try to use…
The content-type of the request. If the request doesn’t have a body or if the content-type of the request isn’t an appropriate format, the WCF infrastructure will use…
The default response format for the operation.
Now we’ll re-enable automatic format selection and demonstrate how it works by sending an HTTP GET request with an Accept header indicating a preference for JSON. We’ll also update our client to write out the response from the HTTP PUT request and show that the response format matches that of the request (even without an Accept header).
Open the Web.Config file from the TeamTask.Server project and change the value of the “automaticFormatSelectionEnabled” setting from “false” to “true” like so:
<webHttpEndpoint>
<standardEndpoint name="" helpEnabled="true"
automaticFormatSelectionEnabled="true"/>
</webHttpEndpoint>Open the Program.cs file from the TeamTask.Client project in the code editor and replace the static GetTask() method implementation with the implementation below. You’ll also need to add “using System.Runtime.Serialization.Json;” to the code file:
static Task GetTask(HttpClient client, int id)
{
Console.WriteLine("Getting task '{0}':", id);
using (HttpRequestMessage request =
new HttpRequestMessage("GET", "Tasks"))
{
request.Headers.Accept.AddString("application/json");
using (HttpResponseMessage response = client.Send(request))
{
response.EnsureStatusIsSuccessful();
WriteOutContent(response.Content);
return response.Content.ReadAsJsonDataContract<List<Task>>()
.FirstOrDefault(task => task.Id == id);
}
}
}This implementation of the static GetTask() method is very similar to the client code we wrote in part two of this blog post series. However, we are now instantiating an HttpRequestMessage so that we can set the Accept header to “application/json”. We are also using the ReadAsJsonDataContract() extension method instead of the ReadAsDataContract() extension method since the content is now JSON instead of XML.
If you try to build you’ll find that the ReadAsJsonDataContract() extension method has a dependency, so in the “Solution Explorer” window, right click on the TeamTask.Client project and select “Add Reference…”. In the “Add Reference” window, select the “.NET” tab and choose the System.ServiceModel.Web assembly.
In the UpdateTask() method, also write the response out to the console and replace the ReadAsDataContract() call with a ReadAsJsonDataContract() call like so:
using (HttpResponseMessage response = client.Put(updateUri, content))
{
response.EnsureStatusIsSuccessful();
Console.WriteLine("Response:");
WriteOutContent(response.Content);
return response.Content.ReadAsJsonDataContract<Task>();
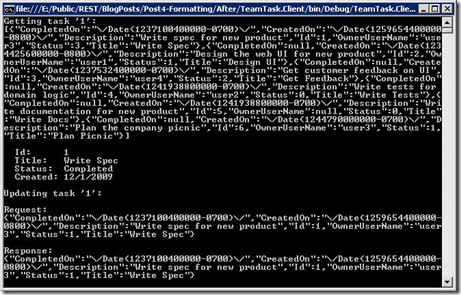
}Start without debugging (Ctrl+F5) to get the TeamTask service running and then start the client by right clicking on the TeamTask.Client project in the “Solution Explorer” window and selecting “Debug”—>”Start New Instance”. The console should contain the following output:
Notice that JSON was used for the responses of both the GET and PUT requests. JSON was used with the GET request because of the HTTP Accept header value, and it was used for the PUT request because the request itself used JSON.
Step 3: Setting the Response Format Explicitly
Automatic format selection is a powerful new feature, but it may not be the solution for all scenarios. For example, it won’t work when a service wants to support clients that aren’t able to set the HTTP Accept header when they send GET requests. Therefore WCF WebHttp Services also allows the response format to be set explicitly in code.
We’ll demonstrate how to explicitly set the response format by adding a “format” query string parameter to the GetTasks() operation of the TeamTask service. The value of this query string parameter will determine the response format.
Open the TeamTaskService.cs file in the code editor.
Add a “format” query string parameter to the UriTemplate of the GetTasks() operation along with a matching method parameter like so:
[WebGet(UriTemplate =
"Tasks?skip={skip}&top={top}&owner={userName}&format={format}")]
public List<Task> GetTasks(int skip, int top, string userName, string format)Within the body of the GetTasks() operation, add the following code:
// Set the format from the format query variable if it is available
if (string.Equals("json", format, StringComparison.OrdinalIgnoreCase))
{
WebOperationContext.Current.OutgoingResponse.Format =
WebMessageFormat.Json;
}Setting the response format explicitly is as simple as setting the Format property on the OutgoingResponse of the WebOperationContext. When the “format” query string is equal to “json”, the response format is set to JSON, otherwise the default value of XML is used.
Start without debugging (Ctrl+F5) and use the browser of your choice to navigate to https://localhost:8080/TeamTask/Tasks. In Internet Explorer, the list of tasks will be displayed as shown below:
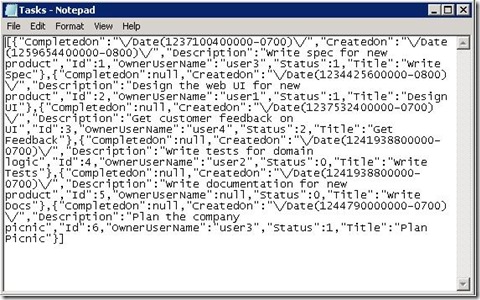
Now, send another request with the browser, but add the “format” query string parameter to the URI like so: https://localhost:8080/TeamTask/Tasks?format=json. In Internet Explorer, you’ll be presented with a dialog box asking if you want to download the response as a file. Save the file and open it in notepad and it will contain the tasks in the JSON format as shown below:
Helpful Tip: While WCF WebHttp Services offers first-class support for XML and JSON, it also provides a more advanced API for returning plain text, Atom feeds, or any other possible content-type. We’ll cover this feature in part eight of this blog post series. |
Next Steps: Error Handling with WebFaultException
So far in our implementation of the TeamTask service, we haven’t provided any real error handling. In part five of this blog post series we’ll rectify this and use the new WebFaultException class to communicate why a request has failed by providing an appropriate HTTP status code.
Randall Tombaugh
Developer, WCF WebHttp Services


