How to publish Citrix XenApp 5.x with UAG 2010
I recently was engaged by a customer who was having issues publishing Citrix's XenApp applications, using the web server, via UAG. While we do have some information in the release notes (see Publishing and Authentication), this might be confusing for some and may not work without additional configuration for all versions of Citrix XenApp.
The Basics
Let's start with the basics. UAG can publish many things via many methods. For XenApp, it may be best suited to not reinvent what Citrix has already produced in their web application. They have a lot of infrastructure that can dynamically determine who what and how things should be displayed on the web page.
To have the best "better together" story, UAG can:
1. Provide a front end consistent portal landing page for logging into XenApp and other applications.
2. Provide SSO access to XenApp
3. Protect XenApp web server from external attacks
4. Reformat XenApp web pages for consistency (example, remove logout buttons)
How it works
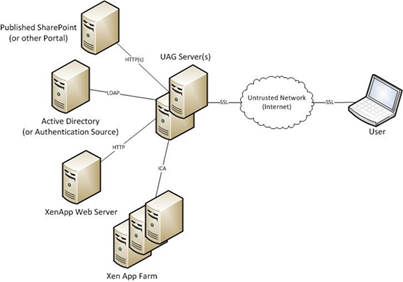
To really show the experience, consider the following flowchart: 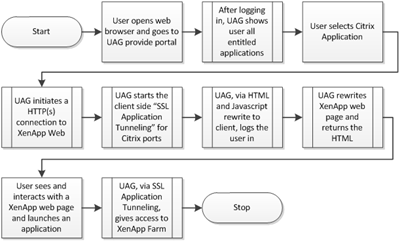
And the following architecture:
Seeing is believing
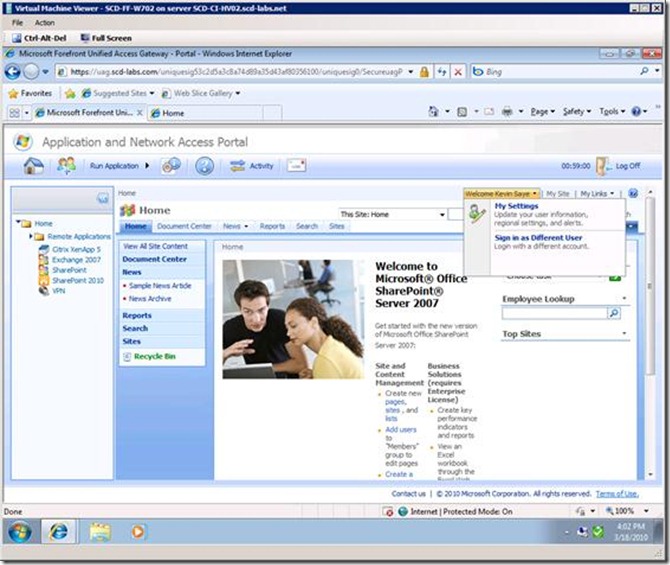
The following is a screens show a list of applications in the standard UAG portal, including XenApp.
After clicking the XenApp link the user automatically logs into the XenApp website. Notice the Application SSL VPN Tunneling Icon in the system tray  .
.
And of course I can launch the published application (notepad) and we also see the Citrix Connection Center Icon in the system tray .
.
How to set this up
The setup is straight forward, provided by the wizard. In some more complex environment, this can be confusing. For that reason, we will walk through the 10 step wizard plus enabling the SSL Application Tunneling for XenApp, which is discussed in the release notes (Publishing and Authentication).
Step 0: Log into an existing installation of UAG and access the Management Console.
Step 1: Select an existing trunk and click the Add button in the application list on the right. Select Brower-embedded --> Citrix XenApp (Web Interface 5.0) .
Step 2: Name the Application.
Step 3: Select any special Endpoint Policies (I just left mine as default and you can change them later).
Step 4: Select configure an application server.
Step 5: Type in the hostname of your Citrix XenApp Web Server. This can be a single server, a set of servers or a set of servers behind a load balancer.
Step 6: Select you Authentication Servers.
Step 7: Define all Citrix XenApp Servers in the Farm(s) that you publish or you can use regex (regular expression) to express servers with a similar naming standard. In my case, all Citrix servers start with "SCD-CI-XA", so I can use "SCD-CI-XA*". More info on RegEx used in UAG at: https://technet.microsoft.com/en-us/library/dd282903.aspx.
Step 8: Define how you want the portal link to appear. "Open in a new window" is the default. I personally prefer not to use a new window when possible. UAG can do both!
Step 9: Select any user or groups that you want to restrict this to
Step 10: Complete the wizard, save the changes and Active the configuration
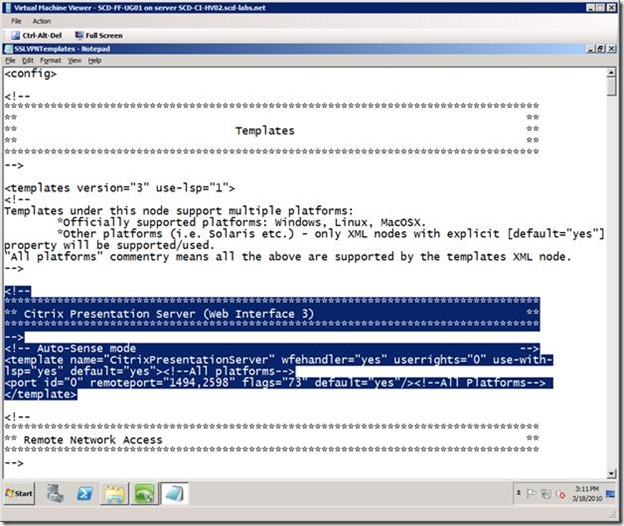
Step 11: Because UAG does not automatically enable SSL Application Tunneling for Citrix by default, you need to enable this via a configuration file. Per the release notes (Publishing and Authentication), add the following content to the "%Program Files%\Microsoft Forefront Unified Access Gateway\von\Conf\SSLVPNTemplates.xml" file.
<!--
*********************************************************************************
** Citrix Presentation Server (Web Interface 3) **
*********************************************************************************
-->
<!-- Auto-Sense mode -->
<template name="CitrixPresentationServer" wfehandler="yes" userrights="0" use-with-lsp="yes" default="yes"><!--All platforms-->
<port id="0" remoteport="1494,2598" flags="73" default="yes"/><!--All Platforms--> </template>
As shown below:
At this point, once UAG, TMG (Threat Management Gateway, a supporting technology in UAG) and IIS have updated their cache, users will be able to see the published application. In lab or test environments, I restart IIS to force the changes now.
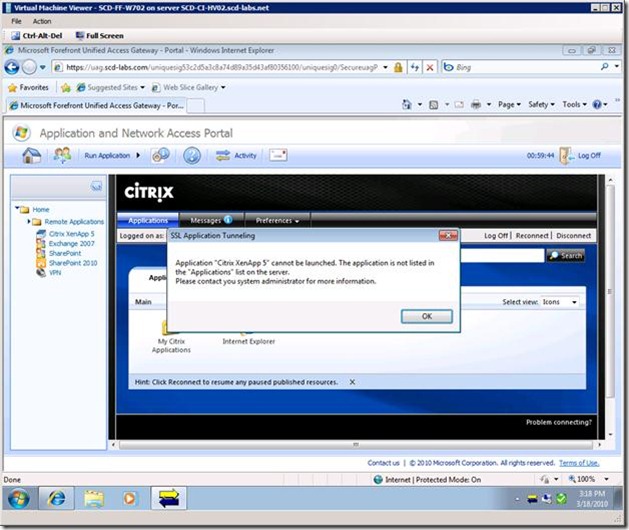
I am getting an "Application "xxx" cannot be launched." error
You will get this error if you have not completed step 11 above. Verify the syntax and placement of the file. Also perform an IIS reset after making the change.
Application " %Your Application Name Here% " cannot be launched. The application is not listed in the "Applications" list on the server.
Please contact you system administrator for more information.
Actual error message is shown below.
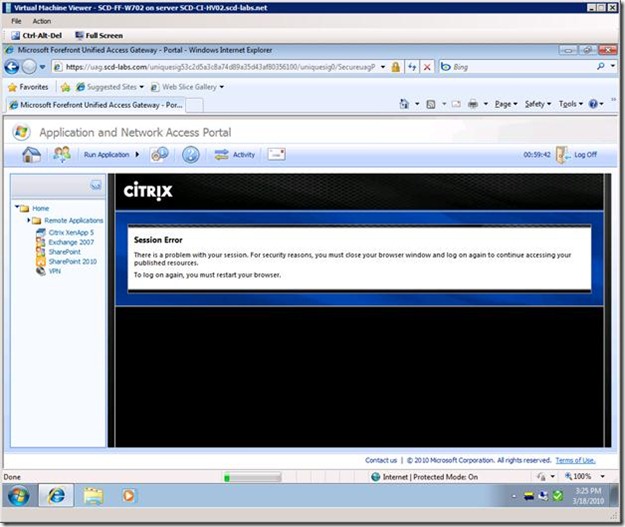
I am getting a "Session Error" with XenApp web server
Depending on your version of Citrix XenApp web server, you may get the following error:
Session Error
There is a problem with your session. For security reasons, you must close your browser window and log on again to continue accessing your published resources.
To logon again, you must restart your browser.
Actual error message is shown below.
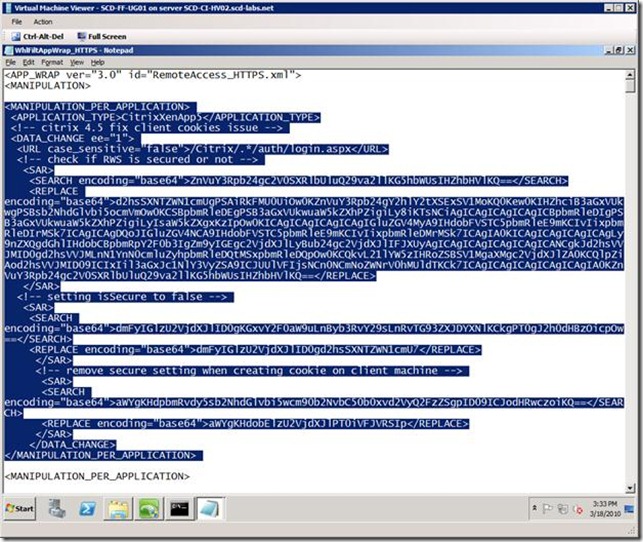
This error can be resolved by adding the following content to the file "C:\Program Files\Microsoft Forefront Unified Access Gateway\von\Conf\Websites\<your trunk name>\conf\CustomUpdate\WhlFiltAppWrap_HTTPS.xml" which will rewrite the XenApp HTML to avoid the error. More info about what the change is actually doing later.
<MANIPULATION_PER_APPLICATION>
<APPLICATION_TYPE>CitrixXenApp5</APPLICATION_TYPE>
<!-- citrix 4.5 fix client cookies issue -->
<DATA_CHANGE ee="1">
<URL case_sensitive="false">/Citrix/.*/auth/login.aspx</URL>
<!-- check if RWS is secured or not -->
<SAR>
<SEARCH encoding="base64">ZnVuY3Rpb24gc2V0SXRlbUluQ29va2llKG5hbWUsIHZhbHVlKQ==</SEARCH>
<REPLACE encoding="base64">d2hsSXNTZWN1cmUgPSAiRkFMU0UiOw0KZnVuY3Rpb24gY2hlY2tXSExSV1MoKQ0Kew0KIHZhciB3aGxVUkwgPSBsb2NhdGlvbi5ocmVmOw0KCSBpbmRleDEgPSB3aGxVUkwuaW5kZXhPZigiLy8iKTsNCiAgICAgICAgICAgICBpbmRleDIgPSB3aGxVUkwuaW5kZXhPZigiLyIsaW5kZXgxKzIpOw0KICAgICAgICAgICAgIGluZGV4MyA9IHdobFVSTC5pbmRleE9mKCIvIixpbmRleDIrMSk7ICAgICAgDQoJIGluZGV4NCA9IHdobFVSTC5pbmRleE9mKCIvIixpbmRleDMrMSk7ICAgIA0KICAgICAgICAgICAgLy9nZXQgdGhlIHdobCBpbmRpY2F0b3IgZm9yIGEgc2VjdXJlLyBub24gc2VjdXJlIFJXUyAgICAgICAgICAgICAgICANCgkJd2hsVVJMID0gd2hsVVJMLnN1YnN0cmluZyhpbmRleDQtMSxpbmRleDQpOw0KCQkvL21lYW5zIHRoZSBSV1MgaXMgc2VjdXJlZA0KCQlpZiAod2hsVVJMID09ICIxIil3aGxJc1NlY3VyZSA9ICJUUlVFIjsNCn0NCmNoZWNrV0hMUldTKCk7ICAgICAgICAgICAgICAgIA0KZnVuY3Rpb24gc2V0SXRlbUluQ29va2llKG5hbWUsIHZhbHVlKQ==</REPLACE>
</SAR>
<!-- setting isSecure to false -->
<SAR>
<SEARCH encoding="base64">dmFyIGlzU2VjdXJlID0gKGxvY2F0aW9uLnByb3RvY29sLnRvTG93ZXJDYXNlKCkgPT0gJ2h0dHBzOicpOw==</SEARCH>
<REPLACE encoding="base64">dmFyIGlzU2VjdXJlID0gd2hsSXNTZWN1cmU7</REPLACE>
</SAR>
<!-- remove secure setting when creating cookie on client machine -->
<SAR>
<SEARCH encoding="base64">aWYgKHdpbmRvdy5sb2NhdGlvbi5wcm90b2NvbC50b0xvd2VyQ2FzZSgpID09ICJodHRwczoiKQ==</SEARCH>
<REPLACE encoding="base64">aWYgKHdobElzU2VjdXJlPT0iVFJVRSIp</REPLACE>
</SAR>
</DATA_CHANGE>
</MANIPULATION_PER_APPLICATION>
Actual edited file shown below:
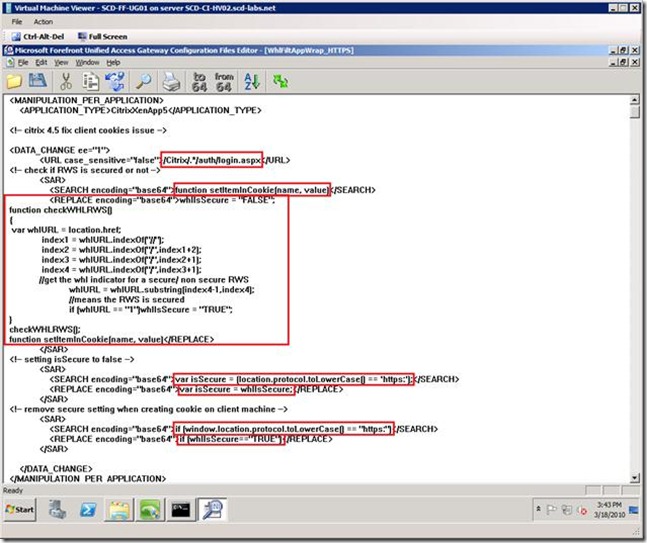
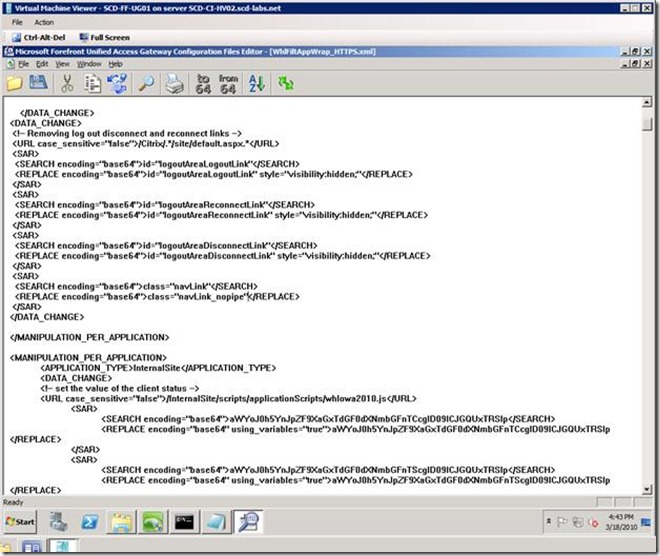
For those interested in what the above configuration is doing, UAG comes with a configuration file editor that allows you to convert base64 encoding to text. The conversion is shown and highlighted below:
How to remove the "Log Off, Reconnect and Disconnect" links
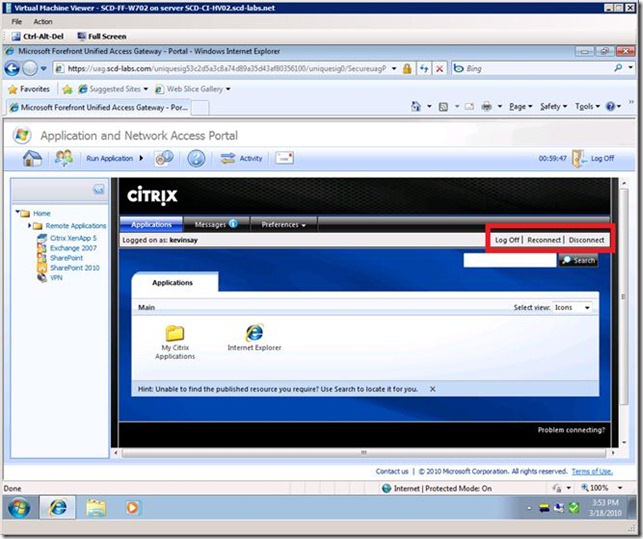
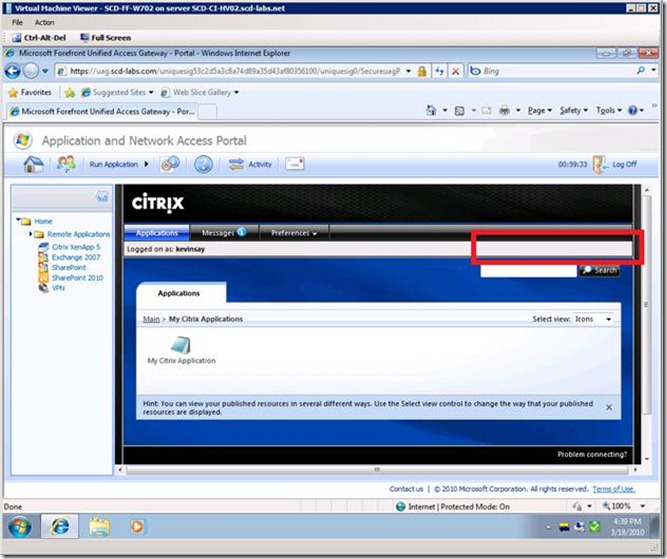
Now that XenApp is fully integrated from a protection, publishing and SSO experience with UAG, we move on to other less important topics. UAG provides a centralized authentication, logon, inactivity and logoff experience. XenApp also provides a "log off" option, one that can confuse users and break UAG's ability maintain log on / log off state. The screen below shows the "Log Off | Reconnect | Disconnect" links on the XenApp page. If a user clicks on the log off link, they will be back to the "Session Error" message listed above.
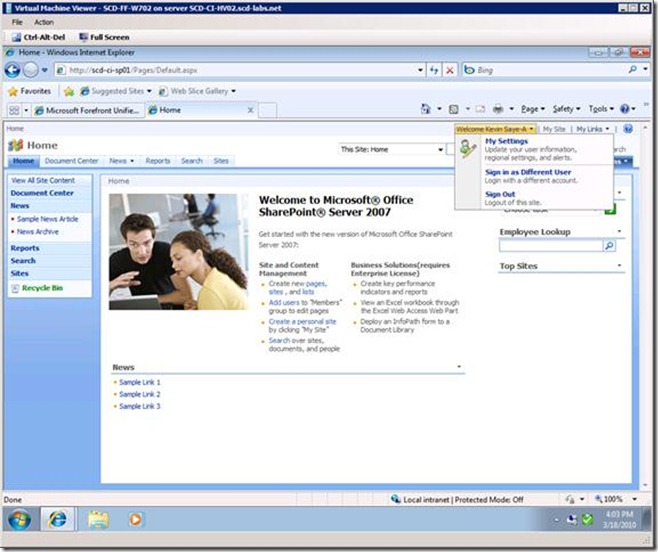
Our goal is to remove them, the exact same way that UAG removes the "Sign Out" link for SharePoint, see below (figure 1, SharePoint without UAG publishing, figure 2, SharePoint with UAG publishing):
Figure 1
Figure 2
To do this for XenApp, we need to set a few links to style="visibility:hidden;", which effectively hides the links. We also change the class from navLink to navLink_nopipe, so we also remove the "|" pipes that are associated with the links. The configuration for this, shown below, should be added to "C:\Program Files\Microsoft Forefront Unified Access Gateway\von\Conf\Websites\<your trunk name>\conf\CustomUpdate\WhlFiltAppWrap_HTTPS.xml":
<DATA_CHANGE>
<!-- Removing log out disconnect and reconnect links -->
<URL case_sensitive="false">/Citrix/.*/site/default.aspx.*</URL>
<SAR>
<SEARCH encoding="base64">aWQ9ImxvZ291dEFyZWFMb2dvdXRMaW5rIg==</SEARCH>
<REPLACE encoding="base64">aWQ9ImxvZ291dEFyZWFMb2dvdXRMaW5rIiBzdHlsZT0idmlzaWJpbGl0eTpoaWRkZW47Ig==</REPLACE>
</SAR>
<SAR>
<SEARCH encoding="base64">aWQ9ImxvZ291dEFyZWFSZWNvbm5lY3RMaW5rIg==</SEARCH>
<REPLACE encoding="base64">aWQ9ImxvZ291dEFyZWFSZWNvbm5lY3RMaW5rIiBzdHlsZT0idmlzaWJpbGl0eTpoaWRkZW47Ig==</REPLACE>
</SAR>
<SAR>
<SEARCH encoding="base64">aWQ9ImxvZ291dEFyZWFEaXNjb25uZWN0TGluayI=</SEARCH>
<REPLACE encoding="base64">aWQ9ImxvZ291dEFyZWFEaXNjb25uZWN0TGluayIgc3R5bGU9InZpc2liaWxpdHk6aGlkZGVuOyI=</REPLACE>
</SAR>
<SAR>
<SEARCH encoding="base64">Y2xhc3M9Im5hdkxpbmsi</SEARCH>
<REPLACE encoding="base64">Y2xhc3M9Im5hdkxpbmtfbm9waXBlIg==</REPLACE>
</SAR>
</DATA_CHANGE>
Which is placed in the <MANIPULATION_PER_APPLICATION> <APPLICATION_TYPE>CitrixXenApp5</APPLICATION_TYPE> section as discussed in "I am getting a "Session Error" with XenApp web server" above. Using the Configuration File Editor, we can see what the configuration is actually doing, shown below:
Once added and you restart IIS, the published XenApp page looks like:
For clarity sake, the final "C:\Program Files\Microsoft Forefront Unified Access Gateway\von\Conf\Websites\<your trunk name>\conf\CustomUpdate\WhlFiltAppWrap_HTTPS.xml" file looks like:
How was XenApp Setup
For this setup, XenApp version 5.0 was used. The configuration was as follows:
· Windows Server version: Windows Server 2008 x64
· Citrix Web Server Platform: IIS
· Citrix Web Interface Authentication: Explicit
· Citrix Web Interface Appearance: Full Graphics
Author:
Kevin Saye, Security Technical Specialist, Microsoft
Contributor:
Jason Jones, Forefront MVP, Silversands Limited
Comments
Anonymous
January 01, 2003
Steve: Great Point. I have not had to do too much testing with UAG + MAC + Citrix, so you are a bit out of my experience. If possible, I suggest opening a ticket as the support folks do address these type of issues. KevinAnonymous
January 01, 2003
The comment has been removedAnonymous
March 25, 2010
Would you be so kind as to let us know if UAG client could be run under 64bit Windows?Anonymous
April 05, 2010
UAG does support x64 Windows and MAC, but unfortunatly the "SSL Application Tunneling" is not supported on x64, as discussed here: http://technet.microsoft.com/en-us/library/dd903055.aspx. To make this work for x64, you can just publish a website (Citrix Web Interface) and make this website dependent on a "Remote Network Access" that goes above and beyond what a the "SSL Applicaiton Tunneling" feature does. The product team told me that "SSL Application Tunneling" for x64 did not make it in time for the product release. I suspect we will see this feature in the future. Kevin SayeAnonymous
April 28, 2010
The comment has been removedAnonymous
July 30, 2010
The comment has been removedAnonymous
September 07, 2010
I have recently set up UAG with Update 1 installed from the very beginning. I get the errors you have described when i set up XenApp, and i have applied your changes to SSLVPNTemplates.xml and WhlFiltAppWrap_HTTPS.xml. The changes in SSLVPNTemplates.xml seems to work (error message changes), but the changes in WhlFiltAppWrap_HTTPS.xml does not make the "Session Error" disapear. Now, WhlFiltAppWrap_HTTPS.xml is not where you claim it should be. In my system it is positioned here: "..vonConfWebsites<your trunk name>conf" and i have edited it in that position. Do i need to copy it elsewhere or can i trust that it is being read into configuration where it is regards, BoAnonymous
December 08, 2010
The comment has been removedAnonymous
December 24, 2010
The comment has been removedAnonymous
December 27, 2010
Hi Rewster, I'm checking to see if we have someone who might know the answer to this question. Thanks! TomAnonymous
January 04, 2011
Hi Kevin, Thanks for the help on this! TomAnonymous
January 17, 2011
The comment has been removedAnonymous
March 03, 2011
can it possible run citrix without active directory. What is UNC path and where password is store?Anonymous
March 08, 2011
The comment has been removedAnonymous
April 06, 2011
@Steve. I would assume it is an issue with the UAG client on your Mac. Citrix alone seems to work on everything with the proper receiver/client installed. According the Technet site the following versions are supported. Not sure how often they update. Macintosh OS X 10.4 and up (PowerPC and Intel) Safari 3.2.x; Safari 4.0.x Firefox 3.0.x; Firefox 3.5.xAnonymous
November 27, 2012
Des this still work with WI 5.4 and also with XenDesktop?
