Signing Windows 8 applications using an Internal PKI
So – your development cycles have been completed and now you are ready to deploy the much anticipated Windows 8 based application that you have developed to your clients. You will quickly realize that the deployment of your newly created Windows 8 application cannot happen until the appx assembly has been signed. All methods of deployment (Windows Store, PowerShell or System Center 2012 Configuration Manager) require the application to be signed using a certificate issued by a trusted source before you can deploy it.
If your application was developed with the intention of staying within the corporate landscape, then you may use a certificate issued by an internally hosted trusted CA. A lot of documentation is available about the requirements of the certificate issued, but a how-to guide was not available until now. This blog post will walk you through the steps required to install an internally developed application to production systems.
The screen captures in this blog post are performed using Windows Server 2012 Domain Controller, Windows Server 2012 Certificate Authority, Visual Studio 2012 and Windows 8 Enterprise. The procedures for Windows Server 2008 R2 vary slightly, but the same certificate requirements can been completed.
The diagram below identifies the workflow that this blog post will walk you through.
Get the Certificate
Visual Studio will validate the certificate used to sign the app in the following ways:
- Verifies the presence of the Basic Constraints extension and its value, which must be either Subject Type=End Entity or unspecified.
- Verifies the value of the Enhanced Key Usage property, which must contain Code Signing and may also contain Lifetime Signing. Any other EKUs are prohibited.
- Verifies the value of the KeyUsage (KU) property, which must be either Unset or DigitalSignature.
- Verifies the existence of a private key exists.
- Verifies whether the certificate is active, hasn’t expired, and hasn't been revoked.
Create the Template
The built-in Windows 2008 R2 or Windows 2012 templates will not allow the creation of a certificate which meets all of these requirements. A new template must be created which allows the issuance of a properly configured certificate.
Load an MMC and add the Certificate Authority and Certificate Templates |
|
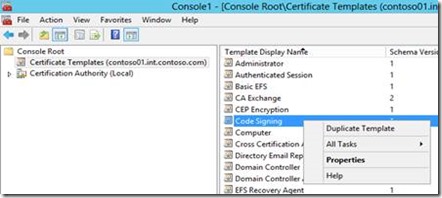
Select Certificate Templates > Right Click on Code Signing > Duplicate Template |
|
On the Compatibility tab · Change Certificate Authority to Windows Server 2008 R2 or Higher · Change the Certificate Recipient to Windows 7/Server 2008 R2 or Higher Note: These two changes allow the Basic Constraints Extension to be enabled. |
|
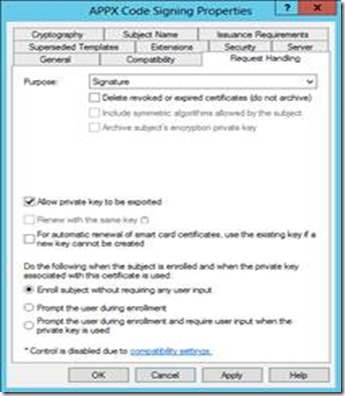
On the Request Handling tab · Check the box to allow private key to be exported |
|
On the General tab · Provide a useful name for this new template |
|
On the Extensions tab · Click on the Application Policies Extension and verify Code Signing Note: For additional security, you can also add the Lifetime Signing extension to this template to ensure the signing certificate is no longer valid after expiration. |
|
On the Extensions tab · Click on Basic Constraints and click Edit and check the box to Enable this extension. Note: If this checkbox is grayed out, make sure the certificate template is set properly on the Compatibility tab |
|
On the Subject Name tab · Select the Supply in the request radio button and Click OK on the warning |
|
On the Security tab · Add a user or group to allow them to enroll the certificate. The must have the Read and Enroll permissions. |
|
In the MMC, expand Certificate Authority > {CAName} > Right Click Certificate Templates > New > Certificate Template to Issue Select the Template Name just created > Click OK |
|
Notice the APPX Code Signing Template is now listed on the CA under Certificate Templates |
Request the Certificate
The certificate template has been created and now must be requested to generate a .cer file that will be placed in the local store on the computer the request is made from. It doesn’t matter which system makes the request because the .cer is immediately used to generate the .pfx file needed to sign the application.
Open an MMC and add the certificates snap-in and select My User account radio button. In the MMC > Expand Certificates – Current user > Personal > Right Click on Certificates > All Tasks > Request New Certificate Note: The computer store can be used as well, but the computer account would need permission to enroll the certificate. In this example, we only added permissions for the application developers group. |
|
Click Next on the Before You Begin screen |
|
On the Select Certificate Enrollment Policy screen · Ensure Active Directory Enrollment Policy is selected · Click Next |
|
On the Request Certificates screen · Click on the link below the APPX Code Signing template to configure additional settings Note: The Enroll button cannot be selected until the missing settings are configured |
|
On the Certificate Properties screen · Under Subject Name the type should be Common Name · Value must be the same as the Publisher value in the Visual Studio 2012 package.appxmanifest · Click Add Note: The CN= is automatically appended and is not required when typing the Publisher Name. In this example just ContosoAppDev was entered in the value textbox. |
|
On the Request Certificates screen · APPX Code Signing is selected · Click Enroll |
|
On the Certificate Installation Results screen · Check the status · Click finish |
|
On the Certificates – Current User MMC · The new certificate will be listed |
Export to PFX
Visual Studio requires the .pfx format to sign the application. In the previous step, we generated a .cer file which is located in the user store. We need to convert that .cer to a .pfx in preparation for signing.
On the Certificates – Current User MMC · Right Click the New Certificate > Click All Tasks > Click Export |
|
On the Welcome screen · Click Next |
|
On the Export Private key screen · Click ‘Yes, export the private key’ · Click Next |
|
On the Export File Format screen · Ensure Personal Information Exchange is selected · Ensure Include all certificates in the certification path if possible is checked · Check Export all extended properties · Click Next |
|
On the Security screen · Select the Password checkbox · Enter a password (this will be needed during import into Visual Studio 2012) · Click Next |
|
On the File to Export screen · Provide a path and filename · Click Next |
|
On the Completing the Certificate Export Wizard screen · Click Next |
|
On the Certificate Export Wizard message box · Click OK |
Sign the Application
Open Windows Explorer to the location where the pfx file was saved. Note: The pfx file should be moved to a computer with VS 2012 installed. |
|
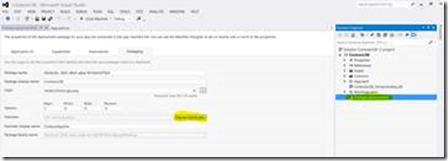
Open Visual Studio 2012 project to be signed · double click the package.appxmanifest · Click Choose Certificate… |
|
On the Choose Certificate screen · Click Configure Certificate > Select from File… |
|
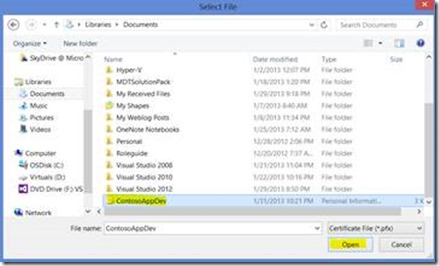
On the Select File screen · Navigate to and select the exported PFX file · Click Open |
|
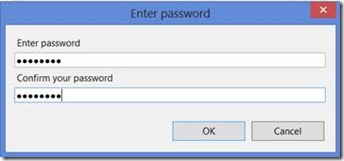
On the Enter Password screen · Enter Password · Click OK |
|
On the Choose Certificate screen · Click OK |
Package the signed APPX
We have created the .pfx file needed to sign the application in the previous steps, so now we can sign our application.
Open Visual Studio 2012 project to be packaged |
|
Inside the project · Right click the Project · Click Rebuild |
|
Inside Solution Explorer · Right click the solution to be packaged · Click Store · Click Create App Package |
|
On Create Your Package screen · Select No · Click Next |
|
On the Select and Configure Packages screen · Specify the path for the package to be placed · Click Create |
|
On the Package Creation Completed screen · Click OK Note: You may click on the link provided to navigate to the location the package was placed. |
Configure Group Policy
In order to deploy a Windows 8 application using Side loading, the computer receiving the package must either have a developer license (used for testing purposes only) or appropriate local/group policy settings to ensure the applications which are trusted can be installed.
Open Group Policy Management · Right click where you want to link the new Group Policy · Click Create a GPO in this domain and Link it here… Note: The Windows 8 systems must be located within the location where the new GPO is being linked |
|
On the new GPO screen · Name the GPO appropriately · Click OK |
|
On the GPMC · Right click the new policy · Click Edit… |
|
On the Group Policy Management Editor screen · Expand Computer Configuration > Policies > Administrative Templates > Windows Components > App Package Deployment · Right Click Allow all trusted apps to install > Click Edit |
|
On Allow trusted apps to install screen · Select Enabled · Click OK |
This post was contributed by John Taylor, a Senior Consultant with Microsoft National IT Operational Consulting – US.
Disclaimer: The information on this site is provided "AS IS" with no warranties, confers no rights, and is not supported by the authors or Microsoft Corporation. Use of included script samples are subject to the terms specified in the Terms of Use .
Signing Windows 8 apps using an Internal PKI.docx
Comments
Anonymous
January 01, 2003
thanksAnonymous
June 27, 2013
Good tutorial - but the screen shots are the worst I've ever seen in MS blogs...Anonymous
August 15, 2013
Great tutorial. Thumbs up.Anonymous
January 29, 2014
This is an extension of this blog: Signing Windows 8 applications using an Internal PKI which mentionsAnonymous
January 29, 2014
This is an extension of this blog: Signing Windows 8 applications using an Internal PKI which mentionsAnonymous
February 28, 2014
This is a guest post from Martin Booth, a Senior Technical Product Manager in the System Center ProductAnonymous
March 06, 2014
Autorem tohoto článků je Martin Booth, Senior Technical Product Manager v produktovém týmuAnonymous
May 13, 2014
Thanks a lot, you saved my week :-)Anonymous
May 15, 2014
Configuration Manager Intune Connector és Subscription beállítása Az Intune előfizetésünk beállításaAnonymous
August 29, 2014
Alkalmazás telepítés Elérkeztünk a legizgalmasabb fejezethez - telepítsünk sok-sok izgalmas alkalmazástAnonymous
September 16, 2014
Thanks a lot it is very goodAnonymous
October 24, 2014
The comment has been removedAnonymous
December 18, 2014
wow ! Enlightenment on a topic that seems not spoken about in online documentation.
PS: The Screenshots are really good in the attached Word Document !Anonymous
March 10, 2015
So we walked through this tutorial but wanted to use the same method for signing a Visual Studio Office Solution. We're running into errors and I'm presuming because this is geared or Windows 8 Apps. Am I correct? What do we need to change for applying to this to Office ClickOnce solutions?Anonymous
August 16, 2015
Awesome guide! Can you update for VS2015/WIndows 10 please? Only the part about sideloading is different AFAIK.

![clip_image002[6] clip_image002[6]](https://msdntnarchive.z22.web.core.windows.net/media/TNBlogsFS/prod.evol.blogs.technet.com/CommunityServer.Blogs.Components.WeblogFiles/00/00/00/61/27/metablogapi/7180.clip_image0026_thumb_7B9B37D7.jpg)



![clip_image002[8] clip_image002[8]](https://msdntnarchive.z22.web.core.windows.net/media/TNBlogsFS/prod.evol.blogs.technet.com/CommunityServer.Blogs.Components.WeblogFiles/00/00/00/61/27/metablogapi/4214.clip_image0028_thumb_73F4D008.jpg)
![clip_image004[6] clip_image004[6]](https://msdntnarchive.z22.web.core.windows.net/media/TNBlogsFS/prod.evol.blogs.technet.com/CommunityServer.Blogs.Components.WeblogFiles/00/00/00/61/27/metablogapi/7737.clip_image0046_thumb_00F140CB.jpg)
![clip_image006[7] clip_image006[7]](https://msdntnarchive.z22.web.core.windows.net/media/TNBlogsFS/prod.evol.blogs.technet.com/CommunityServer.Blogs.Components.WeblogFiles/00/00/00/61/27/metablogapi/1030.clip_image0067_thumb_2E08BE4A.jpg)
![clip_image008[5] clip_image008[5]](https://msdntnarchive.z22.web.core.windows.net/media/TNBlogsFS/prod.evol.blogs.technet.com/CommunityServer.Blogs.Components.WeblogFiles/00/00/00/61/27/metablogapi/3463.clip_image0085_thumb_0664D2D1.jpg)
![clip_image010[5] clip_image010[5]](https://msdntnarchive.z22.web.core.windows.net/media/TNBlogsFS/prod.evol.blogs.technet.com/CommunityServer.Blogs.Components.WeblogFiles/00/00/00/61/27/metablogapi/0601.clip_image0105_thumb_058EFD98.jpg)
![clip_image012[5] clip_image012[5]](https://msdntnarchive.z22.web.core.windows.net/media/TNBlogsFS/prod.evol.blogs.technet.com/CommunityServer.Blogs.Components.WeblogFiles/00/00/00/61/27/metablogapi/1072.clip_image0125_thumb_182379DF.jpg)
![clip_image014[5] clip_image014[5]](https://msdntnarchive.z22.web.core.windows.net/media/TNBlogsFS/prod.evol.blogs.technet.com/CommunityServer.Blogs.Components.WeblogFiles/00/00/00/61/27/metablogapi/3286.clip_image0145_thumb_02C85528.jpg)
![clip_image016[5] clip_image016[5]](https://msdntnarchive.z22.web.core.windows.net/media/TNBlogsFS/prod.evol.blogs.technet.com/CommunityServer.Blogs.Components.WeblogFiles/00/00/00/61/27/metablogapi/2475.clip_image0165_thumb_7015EC21.jpg)
![clip_image018[5] clip_image018[5]](https://msdntnarchive.z22.web.core.windows.net/media/TNBlogsFS/prod.evol.blogs.technet.com/CommunityServer.Blogs.Components.WeblogFiles/00/00/00/61/27/metablogapi/5483.clip_image0185_thumb_73B697AF.jpg)
![clip_image002[10] clip_image002[10]](https://msdntnarchive.z22.web.core.windows.net/media/TNBlogsFS/prod.evol.blogs.technet.com/CommunityServer.Blogs.Components.WeblogFiles/00/00/00/61/27/metablogapi/5481.clip_image00210_thumb_2E342835.jpg)
![clip_image004[9] clip_image004[9]](https://msdntnarchive.z22.web.core.windows.net/media/TNBlogsFS/prod.evol.blogs.technet.com/CommunityServer.Blogs.Components.WeblogFiles/00/00/00/61/27/metablogapi/7411.clip_image0049_thumb_32A67B17.jpg)
![clip_image006[10] clip_image006[10]](https://msdntnarchive.z22.web.core.windows.net/media/TNBlogsFS/prod.evol.blogs.technet.com/CommunityServer.Blogs.Components.WeblogFiles/00/00/00/61/27/metablogapi/2273.clip_image00610_thumb_7FD90553.jpg)
![clip_image008[8] clip_image008[8]](https://msdntnarchive.z22.web.core.windows.net/media/TNBlogsFS/prod.evol.blogs.technet.com/CommunityServer.Blogs.Components.WeblogFiles/00/00/00/61/27/metablogapi/0815.clip_image0088_thumb_0A2CBA65.jpg)
![clip_image010[8] clip_image010[8]](https://msdntnarchive.z22.web.core.windows.net/media/TNBlogsFS/prod.evol.blogs.technet.com/CommunityServer.Blogs.Components.WeblogFiles/00/00/00/61/27/metablogapi/2055.clip_image0108_thumb_04E06465.jpg)
![clip_image012[8] clip_image012[8]](https://msdntnarchive.z22.web.core.windows.net/media/TNBlogsFS/prod.evol.blogs.technet.com/CommunityServer.Blogs.Components.WeblogFiles/00/00/00/61/27/metablogapi/4073.clip_image0128_thumb_76384930.jpg)
![clip_image014[8] clip_image014[8]](https://msdntnarchive.z22.web.core.windows.net/media/TNBlogsFS/prod.evol.blogs.technet.com/CommunityServer.Blogs.Components.WeblogFiles/00/00/00/61/27/metablogapi/7506.clip_image0148_thumb_37D5162E.jpg)
![clip_image016[8] clip_image016[8]](https://msdntnarchive.z22.web.core.windows.net/media/TNBlogsFS/prod.evol.blogs.technet.com/CommunityServer.Blogs.Components.WeblogFiles/00/00/00/61/27/metablogapi/0574.clip_image0168_thumb_7DEF2288.jpg)



![clip_image002[12] clip_image002[12]](https://msdntnarchive.z22.web.core.windows.net/media/TNBlogsFS/prod.evol.blogs.technet.com/CommunityServer.Blogs.Components.WeblogFiles/00/00/00/61/27/metablogapi/2235.clip_image00212_thumb_37267CFB.jpg)
![clip_image004[11] clip_image004[11]](https://msdntnarchive.z22.web.core.windows.net/media/TNBlogsFS/prod.evol.blogs.technet.com/CommunityServer.Blogs.Components.WeblogFiles/00/00/00/61/27/metablogapi/4762.clip_image00411_thumb_6AF103FD.jpg)
![clip_image006[12] clip_image006[12]](https://msdntnarchive.z22.web.core.windows.net/media/TNBlogsFS/prod.evol.blogs.technet.com/CommunityServer.Blogs.Components.WeblogFiles/00/00/00/61/27/metablogapi/5228.clip_image00612_thumb_4589A140.jpg)
![clip_image008[10] clip_image008[10]](https://msdntnarchive.z22.web.core.windows.net/media/TNBlogsFS/prod.evol.blogs.technet.com/CommunityServer.Blogs.Components.WeblogFiles/00/00/00/61/27/metablogapi/0728.clip_image00810_thumb_290F4011.jpg)
![clip_image010[10] clip_image010[10]](https://msdntnarchive.z22.web.core.windows.net/media/TNBlogsFS/prod.evol.blogs.technet.com/CommunityServer.Blogs.Components.WeblogFiles/00/00/00/61/27/metablogapi/5141.clip_image01010_thumb_21866155.jpg)
![clip_image002[14] clip_image002[14]](https://msdntnarchive.z22.web.core.windows.net/media/TNBlogsFS/prod.evol.blogs.technet.com/CommunityServer.Blogs.Components.WeblogFiles/00/00/00/61/27/metablogapi/8662.clip_image00214_thumb_59C7691E.jpg)
![clip_image004[13] clip_image004[13]](https://msdntnarchive.z22.web.core.windows.net/media/TNBlogsFS/prod.evol.blogs.technet.com/CommunityServer.Blogs.Components.WeblogFiles/00/00/00/61/27/metablogapi/2330.clip_image00413_thumb_73821249.jpg)

![clip_image007[7] clip_image007[7]](https://msdntnarchive.z22.web.core.windows.net/media/TNBlogsFS/prod.evol.blogs.technet.com/CommunityServer.Blogs.Components.WeblogFiles/00/00/00/61/27/metablogapi/1031.clip_image0077_thumb_7EEC659D.jpg)
![clip_image009[5] clip_image009[5]](https://msdntnarchive.z22.web.core.windows.net/media/TNBlogsFS/prod.evol.blogs.technet.com/CommunityServer.Blogs.Components.WeblogFiles/00/00/00/61/27/metablogapi/4130.clip_image0095_thumb_17CEA8DF.jpg)