Tutorial Series: using WinJS & WinRT to build a fun HTML5 Camera Application for Windows 8 (2/4)
In this second tutorial, we’re going to add support for video recording. The first step will then to work on the UI to let the user choosing between photo & video mode. Then we will add the JavaScript code that will let you recording some videos. Finally, we will add a cool slide effect with CSS3 animations to provide a visual feedback to the user while taking some photos/videos. As a reminder, this tutorial is part of this series:
1 – Accessing to the Camera stream and writing it on disk
2 – Working on the layout, adding video recording support and providing feedback to the user with CSS3 animations
3 – Using the FlipView to navigate through the live preview and the recorded files
4 – Manipulating the image to add some effects via the canvas tag with EaselJS or WebWorkers and via GPU Shaders with a WinRT component
Once again, you’ll be able to download the Visual Studio solution matching the end of the second tutorial at the end of this article.
Step 1: creating a better layout to enable switching between photo & video mode
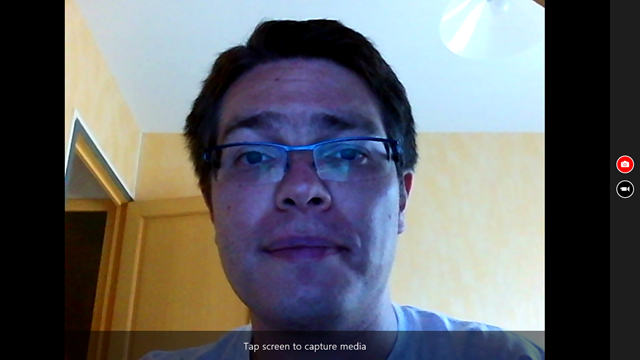
We’re going to create this exact layout :
We will still have of course the video live preview stretched and centered. But I’d like to have at the bottom of the screen an overlaid transparent bar with some textual indications (“Tap screen to capture media” for instance). I’d like also a vertical bar on the right with a nice styled radio button in the center allowing me to switch between the photo and the video mode.
Ok, to do that, we first need to work on the HTML containers. Open default.html or replace the previous <div id=”application”> by this one:
 <div id="application">
    <div id="control-bar">
        <div id="input-switch">
            <div class="top-switch">
                <input id="still" type="radio" name="inputSwitch" value="still" class="switch camera"
                    checked="checked" />
            </div>
            <div class="bottom-switch">
                <input id="vid" type="radio" name="inputSwitch" value="video" class="switch video" />
            </div>
        </div>
    </div>
    <div id="overlay">
        <div id="capture-status" class="win-contentTitle">
            Tap screen to capture media
        </div>
    </div>
    <video id="live-preview">
    </video>
</div>
As you can see, we have the 3 parts of the targeted layout. The control bar will have to be placed vertically on the right. The overlaid div will be displayed horizontally at the bottom of the screen. And last but not least, we have to support all possible resolutions using some fluid containers and best practices.
With today’s IE10 CSS3 support, and thus with Windows 8 HTML5 support, the 2 best specifications to help us doing that are the CSS3 Grid & Flexible box layouts. Again, if you need to discover those 2 great specifications, go play with our IE Test Drive site to test them in live: Hands On: CSS3 Grid Layout & Hands On: CSS3 Flexible Box Layout
We need also to style the default radio buttons using the red color when checked and more importantly using some vector symbols in their content to visually indicate their function. In Windows 8 applications using our Modern UI style, we’ve got a lot of available symbols in the Segoe UI Symbols font family for that. If you want to know more about that and find how to select the proper symbol in your code, you can read this article from Jonathan Antoine: Windows 8 Metro apps – a lot of icons are available out of the box !
In my case, I’m going to use the photo glyph which got the “ \E114” code and the video one with the “ \E116” code. Those 2 characters with be centered into a circle generated thanks to CSS3 border radius using a radius of 50%.
In conclusion, our new layout will be generated by this CSS code to insert into your default.css file:
 body {
    width: 100%;
    height: 100%;
}

#application
{
    width: 100%;
    height: 100%;
     display: -ms-grid;
    -ms-grid-columns: 1fr;
    -ms-grid-rows: 1fr;
}

#live-preview
{
    width: 100%;
    height: 100%;
}

#overlay
{
    display: -ms-grid;
    -ms-grid-columns: 1fr 182px;
    -ms-grid-rows: 1fr 120px;
    width: 100%;
    height: 100%;
    z-index: 4;
}

#control-bar
{
    -ms-grid-column: 2;
    -ms-grid-row: 1;
    -ms-grid-row-span: 2;
    width: 75px;
    height: 100%;
    display: -ms-flexbox;
    -ms-flex-direction: column;
    -ms-flex-align: center;
    -ms-flex-pack: center;
}

#capture-status
{
    -ms-grid-column: 1;
    -ms-grid-row: 2;
    -ms-grid-column-span: 2;
    -ms-grid-row-align: end;
    background-color: rgba(0, 0, 0, 0.5);
    width: calc(100% - 40px);
    padding: 20px;
    text-align: center;
    font-size: x-large;
}

input[type="radio"].switch,
input[type="radio"].switch::-ms-check,
input[type="radio"].switch:hover::-ms-check,
input[type="radio"].switch:active::-ms-check,
input[type="radio"].switch:hover:active::-ms-check,
input[type="radio"].switch:hover:active:disabled::-ms-check
{
    display: block;
    color: transparent;
    border: none;
    border-radius: 50%;
    background-color: transparent;
    padding: 0px;
    margin: 5px;
}

.top-switch::before
{
    display: block;
    content: "\E114";
    color: #fff;
    font-family: 'Segoe UI Symbol';
    font-size: 15pt;
    line-height: 15pt;
    margin-bottom: -37px;
    margin-left: 15px;
}

.bottom-switch::before
{
    margin-top: 30px;
    display: block;
    content: "\E116";
    color: #fff;
    font-family: 'Segoe UI Symbol';
    font-size: 15pt;
    line-height: 15pt;
    margin-bottom: -37px;
    margin-left: 15px;
}

input[type='radio'].switch.camera
{
    width: 40px;
    height: 40px;
    background-color: #000;
    border: 2px solid #fff;
}

input[type='radio'].switch.video
{
    width: 40px;
    height: 40px;
    background-color: #000;
    border: 2px solid #fff;
}

input[type='radio'].switch:checked
{
    background-color: red;
}
Press F5 to check you now have the same layout exposed in the first screenshot.
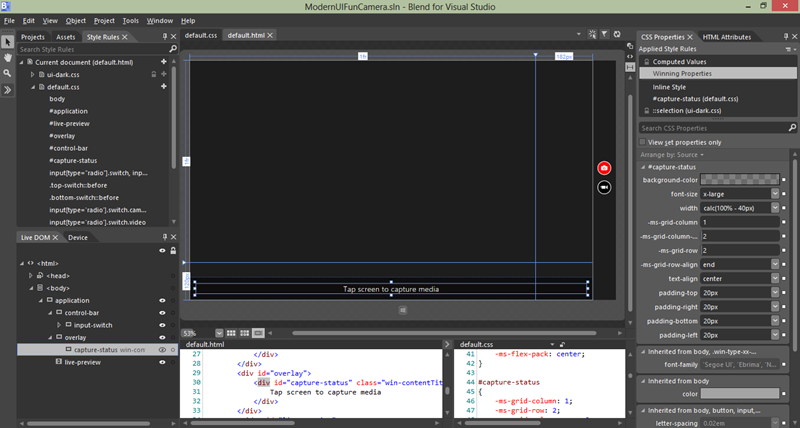
If you want to better understand the CSS you’ve just simply copy/paste into your Visual Studio solution, you should learn to how to use Blend 5. It’s really a powerful tool to work on the CSS part of your Windows 8 applications.
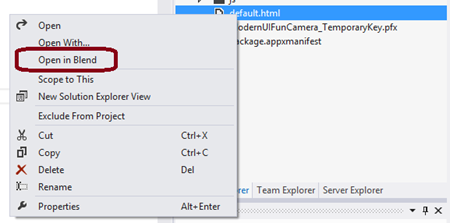
Right-click on default.html in the solution explorer of Visual Studio and choose “Open in Blend”:
You will then be able to better understand the layout we’ve just built:
Feel free to change some Flexbox values or Grid values to break the layout and learn those features.
Step 2: recording some videos on the disk
Now that we’ve got a nice layout, it’s time to add some JavaScript logic to use it.
The first thing we need to do is to create a folder in the Videos special folder of Windows 8 and/or retrieve an handler on it. The code is very similar to the one already used for the Pictures folder. Insert this code in the onactivated handler:
 var videosLib = Storage.KnownFolders.videosLibrary;
videosLib.createFolderAsync("ModernUI Fun Camera", Storage.CreationCollisionOption.openIfExists)
  .then(function (folder) {
    videos = folder;
});
Now, we need some simple logic to check the current radio button state to decide if we need to call the code that will create a photo or a video.
Here is the function to use for that:
 function capture() {
    if (document.getElementById("still").checked) {
        takePhoto();
    } else if (!recording) {
        recording = true;
        startRecording();
    } else {
        recording = false;
        stopRecording();
    }
}
Call this function instead of takePhoto() as the handler for the click event:
livePreview.addEventListener("click", capture);
And you will need the startRecording and stopRecording functions:
 function startRecording() {
    document.getElementById("capture-status").innerText = "Recording.  Tap screen to stop."
    videos.createFileAsync("video.mp4", Windows.Storage.CreationCollisionOption.generateUniqueName)
      .then(function (file) {
        var profile =
           Windows.Media.MediaProperties.MediaEncodingProfile
                  .createMp4(Windows.Media.MediaProperties.VideoEncodingQuality.auto);

        mediaCapture.startRecordToStorageFileAsync(profile, file).then(function () {
            recordedFile = file;
        });
    });
}

function stopRecording() {
    mediaCapture.stopRecordAsync().then(function () {
        document.getElementById("capture-status").innerText = "Tap screen to capture media";
        console.log("Video saved on disk");
    });
}
Again, the code is very similar to capturing a photo. Choose the type of video profile you’d like to use via Windows.Media.MediaProperties.MediaEncodingProfile (MP4 or WMV) and choose also the quality targeted with Windows.Media.MediaProperties.VideoEncodingQuality (Auto, 1080p, 720p, etc.).
Press F5 to test that your application works. Once launched, switch to the video mode by clicking/touching the radio button, tap or click the video to start recording and tap or click again the video to stop the recording.
You’'ll see in the JavaScript console: “Video saved on disk” and opening the file explorer in the Videos library, you will have a new video to watch inside the “ModernUI Fun Camera” folder:
Step 3: adding a cool preview slide effect with CSS3 animations
Well, our app starts to be fun but it’s missing an important part: some visual feedbacks. Indeed, when you’re taking a photo for instance, it’s far from being obvious that something really happened when you’ve tapped or click the screen.
To fix that, we’re going to code a simple slide effect that will take the photo or thumbnail of the video taken and slide it from right to left once the file will be written on disk. To better understand what I mean, have a look to this short video:
Download Video: MP4, WebM, HTML5 Video Player by VideoJS
I’ve taken 2 photos and each time you’ve seen the slide effect in action. Let’s now see how to code that.
We need a HTML container first. This container should have an image tag. The source of the image tag will be dynamically provided during the snapshots done while using the application. We could then use a WinJS control supporting the binding mechanism for that.
Copy/paste this piece of HTML at the end of default.html before the closing body tag:
 <div id="slide" data-win-control="WinJS.Binding.Template">
    <div class="slide">
        <img data-win-bind="src: url" src="" alt="" />
    </div>
</div>
We’re using the WinJS Binding Template control as we will be able to use its embedded binding feature. The source property of the HTML image control is indeed dynamically affected via the binding expression: “src: url”. We will then have to provide a binding object containing an url property.
This template will be filled by this function:
 function previewSlide(thumbnail) {
    document.getElementById("slide").winControl.render({ "url": thumbnail }).then(function (elements) {
        var slide = elements.children[0];
        var handler = slide.addEventListener("MSAnimationEnd", function _removeSlide(e) {
            slide.removeEventListener("MSAnimationEnd", handler);
            document.body.removeChild(slide);
        });
        document.body.appendChild(slide);
    });
}
It takes an URL to a thumbnail image as a parameter. Then, we’re rendering the template and we’re providing it an JS object created on the fly via {“url”: thumbnail}. Once done, we’re appending the HTML element to the document’s body. It will be removed from the DOM at the of a CSS3 animation we now need to work on. The animation job will be done by this piece of CSS:
 @keyframes slide {
    0%
    {
       transform: translate(0%, 0%);
    }

    100%
    {
        transform: translate(-100%, 0%);
    }
}

.slide
    {
        position: absolute;
        top: 0px;
        left: 0px;
        width: 100%;
        height: 100%;
        z-index: 2;
        animation-delay: 250ms;
        animation-name: slide;
        animation-duration: 1s;
        animation-iteration-count: 1;
        animation-timing-function: ease-out;
        background-color: #000;
    }
        .slide img
        {
            height: 100%;
            width: auto;
        }
If you don’t know yet how CSS3 animations works, please read an introduction I’ve written here: Introduction to CSS3 Animations
The animation is very simple. Only 2 keyframes are defined. It’s enough to achieve the slide effect which is just a complete translation from right to left, or from 0% on X to –100%. This animation is launched by the slide class affectation. It’s slightly delayed during 250ms to let the user tapping/clicking without stress and it lasts 1s.
Note: IE10 and thus Windows HTML5 apps now support the unprefixed versions of CSS3 animations & transform as well as a bunch of other features: Moving the Stable Web Forward in IE10 Release Preview
Ok, the final step is now to call this previewSlide function and to provide it an URL to an image. In the takePhoto() function, change the previous promise function by this new one:
 mediaCapture.capturePhotoToStorageFileAsync(photoProperties, file).then(function () {
    console.log("Image saved on disk.");
    var thumbnailUrl = URL.createObjectURL(file, { oneTimeOnly: true });
    previewSlide(thumbnailUrl);
});
It’s quite easy as we already have a picture we just generated with the capturePhotoToStorageFileAsync function. We just then need to build a temporary URL in memory that will be used by the previewSlide function for our WinJS template. That’s why, the oneTimeOnly boolean is set to true. We won’t reuse this URL allocation later. So, let say to the system it can garbage collect this memory as soon as possible.
We now need to handle the video recording case. For that, replace the current stopRecording function by this one:
 function stopRecording() {
    mediaCapture.stopRecordAsync().then(function () {
        document.getElementById("capture-status").innerText = "Tap screen to capture media";
        console.log("Video saved on disk");
        recordedFile.getThumbnailAsync(Windows.Storage.FileProperties.ThumbnailMode.singleItem).then(function (thumbnail) {
            var thumbnailUrl = URL.createObjectURL(thumbnail, { oneTimeOnly: true });
            previewSlide(thumbnailUrl);
        });
    });
}
To provide an image URL to the previewSlide function, we’re using the WinRT getThumbnailAsync function.
Press F5 to check that everything is working as expected.
You can download the Visual Studio solution here: download the ModernUIFunCamera Tutorial 2 solution
That’s the end of the second tutorial! In the next tutorial, we will see how to use the WinJS FlipView control to navigate between the recorded images/videos and the live preview layout we’ve just built in this tutorial. Our camera application will be even more fun to use. So continue the series here: Using the FlipView to navigate through the live preview and the recorded files
David
Comments
- Anonymous
January 20, 2013
The comment has been removed - Anonymous
July 28, 2013
The comment has been removed - Anonymous
July 28, 2013
Thanks for your feedback Rick!


