The Complete Synchronization Process - Part 1: New User Synchronization
Let’s take a deep-dive look at the actual synchronization process. For the purpose of this example, we will keep our environment very simple. For the time being, forget about the FIM portal or any other data sources. In this scenario, we will have a SQL data source (HR, for example) and an Active Directory. The goal will be to read in a new unique user from SQL and provision them to Active Directory.
Here is a basic representation of the above described environment. Before proceeding, let’s clear up the terminology:
SQL: Microsoft SQL Server (database)
AD: Active Directory
CS: Connector Space
MV: Metaverse
MA: Management Agent

The first step to occur is the import. While it is true that there are two types of import (delta and full), at this stage it is best to forget about that and assume there is on an “import”. The import is performed on the management agent containing the source data we wish to read from (in this case, SQL). When an import occurs, that source data (such as users and their associated attributes) are brought into that management agent’s connector space. The connector space is said to be a hologram of the connected data source. That is, whatever is visible (in scope) in the connected data source will be created also in the connector space.
In the below drawing, we can see a user and their attributes being brought in from SQL to the SQLMA connector space during an import job.

After a successful import, the next step to be performed is synchronization. Again, while there are two distinct types of synchronization (delta and full), for the purpose of this discussion, we will think only in terms of a single, generic “synchronization”.
To dig deeper, there are actually six individual steps that make up synchronization:
- Filter/Delete
- Join
- Project
- Import Attribute Flow
- Provision
- Export Attribute Flow
Filter/Delete: This is the first step in the synchronization process. Here, we perform a filter step between the connector space and the Metaverse (in accordance with the settings on the management agent). In the below example, you can see a declared user filter. While there is no good way to filter objects from coming into a connector space on import, we can stop them from getting to the Metaverse (and, by doing stop, prevent them from going anywhere else). In the below example, anyone with whose “displayName Equals administrator” will be filtered.

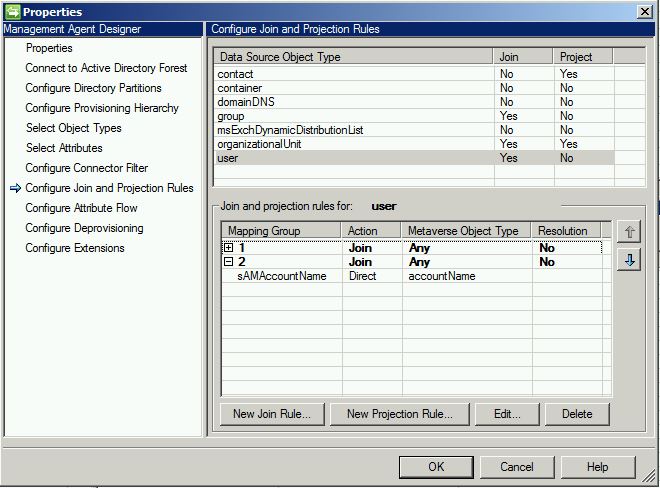
Join: A join is the first thing we attempt and what we want to occur if this is not a new object being synched. A join occurs in accordance with a defined join rule. For example, if a user object is pre-existing in two distinct data sources (HR database and Active Directory, for example), we do not want to create a duplicate account for them. After all, it’s the same identity being represented. Therefore, the goal is to join them based on a unique value. This is also configured directly on the management agent, as shown here:

Project: If an object has not been filtered, and this is not a pre-existing object (no join), the next step is to project. Projection occurs from a source connected data source into the Metaverse. Two important things to note: a project only occurs for a new object and it only creates the shell of the object (no attributes).

Import Attribute Flow: Above, I mentioned that it was important to note that only a “shell” object gets created on a project. That’s because attributes are brought in during an additional following step, import attribute flow. At this point, the object (with all attributes) is fully formed in the metaverse (as illustrated below).

Provision: In essence, a provision is basically a projection in reverse. By that I mean, in the context of a new object, a “shell” gets pushed from the Metaverse into the target connector space, sans attributes (much in the same way a project brings them from the connector space in). The real thing to remember here (especially in the context of troubleshooting sync errors) is: project in, provision out. We project into the Metaverse and provision back out.

Export Attribute Flow: Much in the same way that provision is the obverse of project, export attribute flow is the obverse of import attribute flow. When we provisioned the new object into the target connector space, it was as a “shell” only. It is on the export attribute flow step that we actually populate attributes for them in the connector space (as illustrated below). At this stage, the object is fully formed in the target connector space. This is the final step of the synchronization process.

The final step to occur is to export. It is this step that takes the fully formed new object (staged in the target connector space) and actually move it into our target data source (such as Active Directory). This step is performed on the management agent of the target connected data source.

To recap, based on the above illustrations, the complete cycle would consist of:
- Import the SQL management agent
- Synchronize the SQL management agent
- Export the Active Directory management agent
This would read in the data for a new user object in SQL and create them an associated account in Active Directory.
Questions? Comments? Love FIM so much you can’t even stand it?
EMAIL US>WE WANT TO HEAR FROM YOU!<
## https://blogs.msdn.com/connector_space # #
Comments
- Anonymous
April 19, 2016
Love this post. Thanks @ktackett! - Anonymous
July 19, 2016
Forward post link to part 2:https://blogs.msdn.microsoft.com/connector_space/2015/09/25/the-complete-synchronization-process-part-2-existing-user-synchronization/ - Anonymous
September 09, 2016
No listings - Anonymous
December 28, 2016
Very informative post!! - Anonymous
December 31, 2016
Awesome explanation, many thanks for this post. It was very useful for me and many others I referred. - Anonymous
June 14, 2017
Excellent Article! Thanks a ton!