New Drop Down window in Microsoft NAV 2009 using Fields Groups
I have now be asked many times how the new Drop Down window in Microsoft NAV 2009 is defined, so let me give you an example on how this works.
In this screen dump, I have just clicked the Drop Down arrow on the field ”Bill-to Customer No”, on the Customer Card, and our new Drop Down window appears displaying the columns No., Name, City, Post Code, Phone No. and Contact.
So how do I define that when I click “Bill-to Customer No.” it displays a Drop Down? And how are the columns defined which are displayed in the Drop Down?
Let us look at a field which actually shows a List page and change this field to show a Drop Down. This could be ex. “Post Code” also found on the Customer Card.
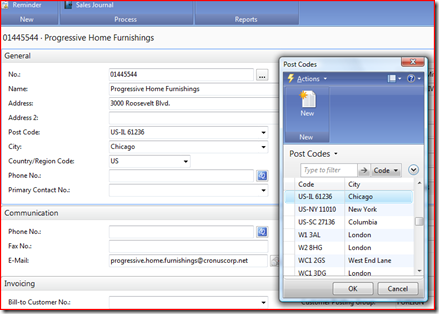
Let us see what happens when I click “Post Code”:
So in standard NAV 2009 we show a List page where the use can select from the available Code and Cities found in the demo database. I would like to change this into a Drop Down so let us go into the Object Designer and explorer why I shown a List page when clicking the Post Code field.
My first thought is to look at Page 21 in the Page Designer and look at the properties for “Post Code”:
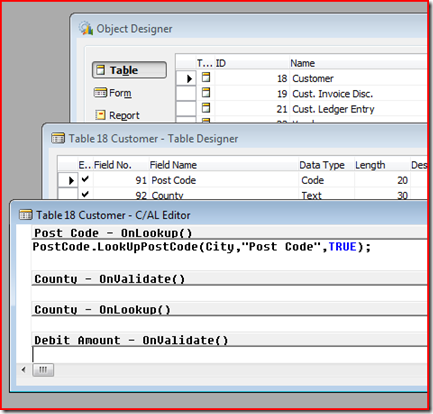
But since nothing is specified on the “Lookup” property this must be on table level. In table 18 you find the following code “PostCode.LookUpPostCode(City,"Post Code",TRUE); ”
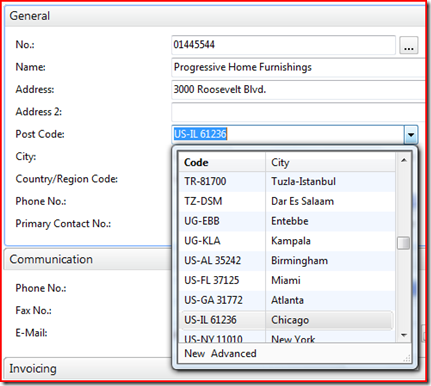
With this on the OnLookup trigger we will show a List page and not a Drop Down, so let us delete what is on the OnLokup trigger and see how the “Post Code” fields now behaves in the RoleTailered client:
So now I got my Drop Down on “Post Code” but I actually want to sort the columns different and add other columns to the Drop Down. To do this I used a new thing we call “Fields Groups”.
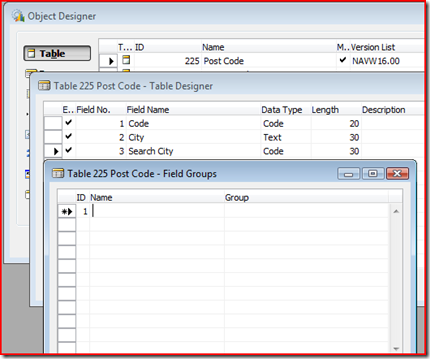
Since when I look at the “Post Code” on the customer card we actually lookup in Post Code table 225, so to change the columns displayed we need to look at this table, so back to Object Designer and design table 225.
In design mode click “View” and notice a new field called “Field Groups”. Notice that this is blank, so the “Code” and “City” which are displayed in Drop Down above are shown because these fields are Primary Keys specified on the Table.
Now let us define the columns shown in the Drop Down window of “Post Code”.
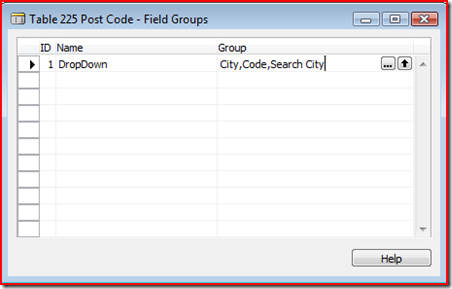
In the Name type “DropDown” and in group select the assist button and select City, Code and City Search:
Your Field Group should now look like this:
Now compile table 225 and go back to your Customer Card. If you had one open already you will need to reopen since we have changed the underlying data.
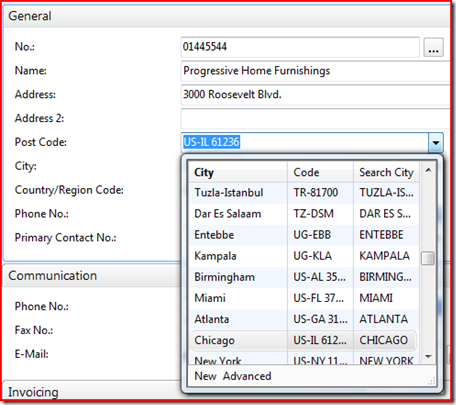
Your Drop Down now displays like this:
We have now completed created our new Drop Down window, but before I end this blog I would to like show you a bit more what you can do with this Drop Down.
I have been been in the NAV group for almost 10 years now so I’m a keyboard shortcut addict so let me show a small tip.
While standing on the “Post Code” field press “ALT+ARROW DOWN”, Drop Down will show up.
Now type “New”. The Drop Down will now be sorted on all cities starting with “New”:
You might have noticed that “City” is bold in the Drop Down. This signals that the Drop Down will be searched based on upon the field “City”. So in this case when we type “New” we will see the Cities which start with “New”
Now let us make “Code” the default.
Press “ARROWDOWN” to get down into to Drop Down.
Press “ARROWRIGHT” to get to the “Code” column. Notice that “Code” now becomes bold, and if you are still searching on “New” the list will become blank:
Now type “US“ and your Drop Down window will now be sorted on all codes which is starting with “US“:
Also notice that “Code” going forward will be column to sort on as this information is stored in the Personalization store.
So here you have it, my first blog ever.
Thanks,
Claus Lundstrøm, Program Manager, Microsoft Dynamics NAV
Comments
- Anonymous
September 21, 2008
Thanks Claus, great blog.Also the tips at the end - which I hope to see more in the future :-). I'm a keyboard-fan as well, and I'm a bit worried for the future for this ;°). - Anonymous
September 21, 2008
I wanted to get your attention to a new blogger: Claus Lundstrøm . OK, I hear you thinking "just - Anonymous
September 22, 2008
Hi Claus,Fantastic to see more on NAV 2009 in the blogosphere. Please keep up the good work - I can't wait to read more.It's also nice to see the product coming along so well with such useful features.Maybe you could do another post on the Report Layout transformation features? Do you know (of course you do, but are you willing to tell) if there is any way to refresh the dataset definition for the report layout without loosing any report layout changes you have already made?Cheers, Dave. - Anonymous
September 24, 2008
Hi Dave,Yes, this is possible. After you have done your Report Layout Transformation and compiled the report, all you need to do, is to add a new field in the Section Designer and open up the Layout by going to "View / Layout" and your new dataset value can be added to your report layout. So the trick here is not to do transformation again, since this will overwrite you layout.Regards,Claus - Anonymous
October 12, 2008
Just in case you haven't found the new blog Clausl already. It has two new good blogs about NAV 2009: - Anonymous
October 13, 2008
Just in case you haven't found the new blog Clausl already. It has two new good blogs about NAV 2009 - Anonymous
October 28, 2008
Just in case you haven't found the new blog Clausl already. It has two new good blogs about NAV 2009

