What’s New, R2? – BitLocker: New updates and Why would I use it on a Server?
You can play around with and test the features I will be discussing in this series by download the Windows Server 2012 R2 Preview here -
Have you ever lost a laptop or had a PC stolen? I have. About a year ago, I had a laptop stolen that contained about 50,000 files on it that I was responsible for safe-guarding. It may seem silly, but the files were karaoke tracks that I use for a karaoke hosting business I have. Again, it may seem silly, but karaoke music isn’t free and I have a very sizable investment in the music I use for the karaoke shows I run. Karaoke music files are actually high demand items on pirate distribution sites, particularly the high quality tracks I have invested in. I need to protect them from loss so they could not be uploaded elsewhere by pirates. I also need to protect myself because many of the files are digitally watermarked with information that identify me as the licensee for the tracks and I could be held accountable if they were distributed without authorization.
But I wasn’t worried at all about the files making their way to a pirate iRC channel or Torrent feed. Why? Because I BitLocked the laptop where the files were stored.
BitLocker is Microsoft’s built-in, full disk encryption technology that provides enhanced protection against data theft or exposure on computers and removable drives that are lost or stolen.
BitLocker was introduced in Windows Vista. It amazes me that in the years since, I still run across IT professionals that have never even tested BitLocker out much less implemented it for their organizations. The purpose of this article is to give you some information about BitLocker, why I think you should check it out, and a new feature for Windows Server 2012 R2 (and Windows 8.1 too!) that lets you more easily enable BitLocker as a part of the operating system deployment.
All of the versions of BitLocker that have been included with the operating system have obtained the Federal Information Processing Standard (FIPS) 140-2 certification, and have been Common Criteria certified EAL4+. These certifications are also in process for Windows 8, and Windows Server 2012.
Why would I use BitLocker on a Server?
Unlike my laptop experience above, “servers” aren’t usually being toted around on your shoulder, accidentally left in the backseat of a cab, or exposed to the public at your local Starbucks while having a latte and doing some work. Servers are generally in racks within your datacenter where you have physical security layers to prevent then from walking off. But how many physical servers do you have left these days? Most of them are probably virtualized which introduced a much greater level of portability than a physical server. 15 years ago, if you want to steal a server, you had to actually steal the server (or at least the hard drives the OS and data were stored on). Now, with virtualization, you can copy a server. In fact, given that there are replication technologies, you can make a copy of a replica without shutting down the production server and still have relatively current data. Since this can be performed over the wire, no physical access is strictly needed. Of course we all know that our administrators have secured all network access and configured roles and NTFS permissions such that no one but real admins can get access to the .VHD repository where our servers reside……right?
How about putting one more piece of protection in place that protects the servers in the event someone were to gain unauthorized access to the .VHD repository? BitLocker can protect virtual machine servers as well as physical servers. It is possible to enable BitLocker for a virtual machine, but you have to make some changes via Group Policy to enable BitLocker to be enabled without using a TPM chip since we do not emulate a TPM with a virtual machine.
What is a Trusted Platform Module (TPM)?
TPM is a combination of hardware and software controls designed to store cryptographic keys that are generally used to protect information. Microsoft uses TPM in combination with BitLocker to provide two primary benefits -
Help protect the integrity of the operating system – Information about operating system startup and file information can be stored on the TPM hardware to ensure that operating system startup stay s secure. For example, information about the Windows boot files are stored in the TPM. if the files are modified by an unauthorized process, the TPM can report this to Windows during boot and prevent the system from booting thus preventing access to data and or further infection by malware.
Store encryption key information for disk encryption – When BitLocker is activated, the TPM hardware can be used to store cryptographic key information for additional security. TPM is not explicitly required by BitLocker, but using a TPM offers the highest level of BitLocker encryption protection.
TPM hardware is typically embedded on the motherboard of the computer and works with the BIOS to present information to the operating system. Microsoft includes a TPM Management console in Windows to manage overall TPM functionality if TPM has been enabled in the BIOS.
We won’t have access to a TPM in a virtual machine so we will have to make some changes with Group Policy to enabled a virtual instance of Windows Server to use BitLocker.
Let’s walk through enabling BitLocker on a Windows Server 2012 R2 Preview instance running on Hyper-V.
BitLocker – The Basics
As noted above, BitLocker is a full disk/volume encryption technology that lets you protect your data with high level encryption. BitLocker can be used on laptops, desktops and even servers to ensure your data stays safe. BitLocker can be configured manually, via scripting and using Group Policy. This makes for a very flexible set of deployment methods to fit any size organization. There are also a variety of tools for admins to centrally manage BitLocker policies and provide recoverability in the event someone forgets a BitLocker PIN or you have a rogue employee that maliciously encrypts a disk and does not provide the information to unlock it. BitLocker can even protect removable media.
On a Windows Server 2012 platform, we have to add the BitLocker feature, then reboot the system before we can change the polices for BitLocker. Since we can’t emulate a TPM chip for a virtualized server, we have to make a change to Local Group Policy to enable the use of BitLocker. For Windows 8.1 and Windows Server 2012 R2 machines, this policy for this can be found at
Computer Configuration\Administrative Templates\Windows Components\BitLocker Drive Encryption\Operating System Drives\Require additional authentication at startup
There are a variety of options that can be selected if you have a TPM, but since I don’t, the option we are most concerned with is - Allow BitLocker without a compatible TPM
Once we have selected this option, we will need to update Local Group Policy on the virtual machine with a reboot or using gpupdate /force at a CMD prompt. Once Group Policy is updated, we can go back to the BitLocker Control panel to enable BitLocker on disks/volumes.
Using the BitLocker Control Panel
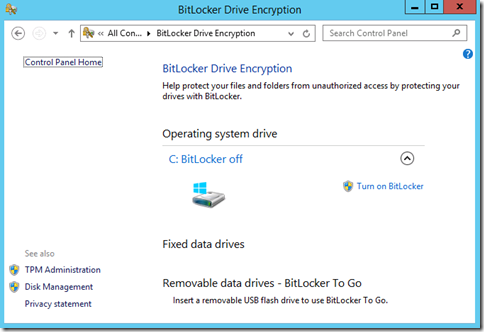
Anyone can use BitLocker to encrypt their own disks using the control panel.
On my machine you can see that I have two fixed disks as well as a thumb drive. All of these can be independently encrypted. You do not have to encrypt everything. However, using Group Policy, administrators can set policies that reqire everything to be encrypted for maximum protection or simply encrypt the Operating System drive to help protect against offline malware attacks or just a data volume to protect sensitive company data. The choice is yours.
To enable BitLocker, identify the drive to encrypt and “Turn on BitLocker”. I am going to use my C: drive in this scenario.
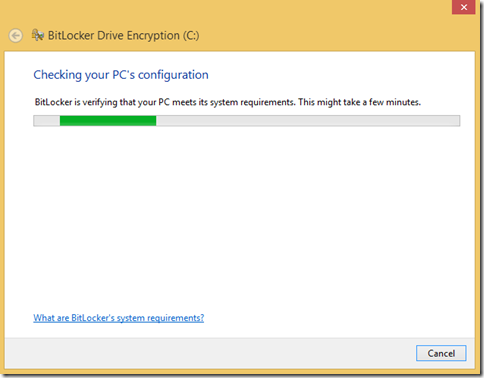
BitLocker initiates a system check to make sure there are no errors on disk or other problems that need to be resolved before attempting to encrypt the volume. This can take quite a while depending on the size of the drive and how much data is stored on it. My C: drive is 500 gigs with about 60 gigs used
Once the system check completes with no issues, we are asked to provide a USB Flash Drive or a Password. It would be impractical to require a USB flash drive on a Hyper-V server to be inserted to start VM’s (not to mention having to have that physical object exposed which could be stolen/manipulated/copied). So we are left with only a single option which is to provide a password. Password strength and length can also be controlled via Group Policy.
Here we will provide the password used to unlock the drive. Standard strong password rules apply.
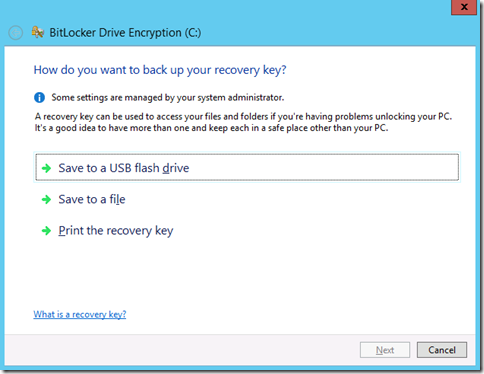
We are then prompted to backup the recovery key to a secure location. My personal recommendation for this scenario would be to backup to a secure folder that only the required administrators have access to. You can print it, but you have to beat everyone else to the printer ![]()
In my example below, I have saved the network to a secured network share on a domain controller -
Next, we will be prompted for how we wish to begin the encryption process. If you are initiating BitLocker on a new virtual machine with no significant data, you can choose to Encrypt used space only. As the option suggests, only the sued disk space will be encrypted which is usually faster. If you are initiating BitLocker on a machine which has been in use for an extended amount of time or you have added and perhaps deleted data, you should select the option to Encrypt entire drive. Why? Because if you have deleted data, it is possible the data actually still exists either in the Recycle Bin or in the sectors of the VHD. It could be possible to use file recovery utilities on an unencrypted VHD file to recover deleted data. Encrypting the entire drive will take longer but it also encrypts the unused space which prevents previously deleted files from being extracted by mounting the VHD.
Finally, we run a final BitLocker System Check to ensure there have been no disk issues introduced during the process -
Once the System Check completes without issue, we are prompted to restart the virtual machine -
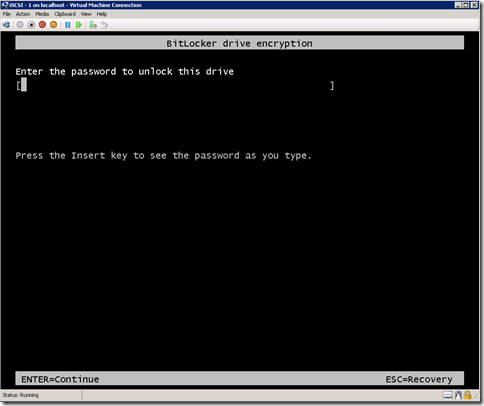
On restart, we will be prompted for out BitLocker password to unlock the drive and allow the boot process to start -
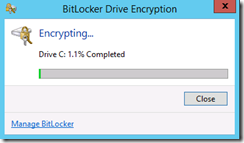
Enter the correct password and – Voila! – the virtual machine will boot! After we log in we will receive a pop-up message from the tray telling us that BitLocker is encrypting the disk -
We can check the status of encryption by double clicking the BitLocker icon in the tray -
We can also check the status in the BitLocker Control Panel -
We have now successfully encrypted a Windows Server 2012 R2 virtual machine!. The resulting VHD file can be mounted without an Hyper-V server or even a capable Windows Server or Windows Client OS and unlocked using the correct BitLocker password. now, even if someone gains unauthorized access to the .VHD repository, they will not be able to mount or boot the .VHD without having the BitLocker password.
What's New in BitLocker for Windows 8.1 and Windows Server 2012 R2
I mentioned above that I am continually surprised by how few IT Pros leverage BitLocker. So I have provide some additional information below on BitLocker features that were introduced in Windows 8.9 and Windows Server 2012 for reference.
For Windows Server 2012 and Windows 8.0 we introduced the following updates for BitLocker -
- BitLocker provisioning
BitLocker can be used to deploy drives to an encrypted state during installation prior to calling setup. - Used Disk Space Only encryption
BitLocker now offers two encryption methods, Used Disk Space Only and Full volume encryption. Used Disk Space Only allows for a much quicker encryption experience by only encrypting used blocks on the targeted volume. - Standard User PIN and password change
Allows a standard user to change the BitLocker PIN or password on operating system volumes and the BitLocker password on data volumes, reducing internal help desk call volume. - Network Unlock
Enables a BitLocker system on a wired network to automatically unlock the system volume during boot (on capable Windows Server 2012 networks), reducing internal help desk call volumes for lost PINs. - Support for Encrypted Hard Drives for Windows
BitLocker support for Encrypted Hard Drives provides users a familiar method for managing drive encryption along with the benefit of using hardware-based encryption.
We also introduced a feature that applied only to Windows RT devices. Since Windows RT devices are designed to go into a “connected stand-by” mode for quick startup from standby mode, we needed a way to still protect the devices with BitLocker when using this mode. This has now been extended to Windows 8.1 and Windows Server 2012 R2.
Support for device encryption
BitLocker is providing support for device encryption on x86 and x64-based computers with a TPM that supports connected stand-by.
Unlike a standard BitLocker implementation, device encryption is enabled automatically so that the device is always protected. The following list outlines the way this is accomplished:
- When a clean install of Windows 8.1 Preview is completed the computer is prepared for first use. As part of this preparation, device encryption is initialized on the operating system drive and fixed data drives on the computer with a clear key (this is the equivalent of standard BitLocker suspended state).
- If the device is not domain-joined a Microsoft Account that has been granted administrative privileges on the device is required. When the administrator uses a Microsoft account to sign in, the clear key is removed, a recovery key is uploaded to online Microsoft account and TPM protector is created. Should a device require the recovery key, the user will be guided to use an alternate device and navigate to a recovery key access URL to retrieve the recovery key using their Microsoft Account credentials.
- If the user signs in using a domain account, the clear key is not removed until the user joins the device to a domain (on x86/x64 platforms) and the recovery key is successfully backed up to Active Directory Domain Services. The Group Policy setting Computer Configuration\Administrative Templates\Windows Components\BitLocker Drive Encryption\Operating System Drives must be enabled and the option Do not enable BitLocker until recovery information is stored in AD DS for operating system drives should be selected. With this configuration the recovery password will be automatically created when the computer joins the domain, then the recovery key will be backed up to AD DS, the TPM protector is created, and the clear key is removed.
Device encryption is subject to BitLocker Group Policy settings; however, its default configuration will conflict with some Group Policy settings. The following list describes the policy settings that should be set to either “not configured” or, if configured, reviewed to ensure that they support device encryption.
- Computer Configuration\Administrative Templates\Windows Components\BitLocker Drive Encryption\Operating System Drives\Require additional authentication at startup settings:
- Any option that requires a startup authentication method other than the TPM.
Device encryption defaults only allow for the TPM key protector to be configured when the device is encrypted. On Windows x84 and x86 computers an additional protector can be added after the device is encrypted from the BitLocker Control Panel by using the Change how drive is unlocked at startup item.
- Any option that requires a startup authentication method other than the TPM.
- Computer Configuration\Administrative Templates\Windows Components\BitLocker Drive Encryption\Operating System Drives\Choose how BitLocker-protected operating system drives can be recovered and Computer Configuration\Administrative Templates\Windows Components\BitLocker Drive Encryption\Fixed Data Drives\Choose how BitLocker-protected fixed data drives can be recovered settings:
- Device encryption uses recovery passwords only. If you have configured this Group Policy setting with the option Do not allow 48-digit recovery password, device encryption will be prevented because its only recovery method is the recovery password.
- Device encryption requires that passwords be backed up to an online storage location. If you have configured this Group Policy setting with the option Save BitLocker recovery information to Active Directory Domain Services unchecked, device encryption will be prevented because device encryption requires that the recovery password be backed up to AD DS if the device is domain-joined.
Every Day Users – BitLocker is for you too!
Everyone I know stores pictures, email, and all kinds of personal information on their Windows laptops. I encourage EVERYONE that has a Windows Vista or later laptop to use BitLocker to encrypt ALL of their data. BitLocker doesn’t introduce any noticeable degradation in performance. The only two things anyone really has to deal with after a machine has been encrypted with BitLocker is having the unlock mechanism handy (be that a USB thumb drive or a password) and ensuring that you do not let anyone else have access to the unlock mechanism. Buy a small personal safe, print the BitLocker password and recovery keys out and store them in the safe. With the amount of personal information we create and store on our PC today, it just makes sense to protect it from prying eyes!
-Cheers!


