Layer Validation with the VSTS 2010 CTP
In my first post of this series, I broke down the VSTS 2010 Architecture product into "functional" areas, and I've been slowly describing the pieces. The areas highlighted ( Modeling Project here and here, Model Explorer, and Work Item Integration ) I've already discussed at some length. Today, I want to drill into the Layer Diagram a bit more. Specifically, I want to walk you through the steps of creating a simple Layer diagram, map your code onto it, and validate that code against the constraints authored in the diagram via a manual validation gesture. ( In a future post I'll show you how to automate validation in your build process. )
For this post, I'll be using the VSTS 2010 CTP.
In this example, I'm going to be using some very simplistic code, as it is not the details of the code that I'm trying to emphasize, but more the concept the code represents. Let's get started...
Start you VSTS 2010 CTP image
Launch VS 2010
Create a C# console app called "Client", and name the solution "Layer Validation". You're "New Project" dialog should look similar to this:
Now right click on the solution node, select "New Project...", select "Class Library" and name the Project "Implementation":
Do the exact same thing you just did in step 4, except name the project "Interfaces".
Again, do the exact same thing except name the project "Creators". You should have a solution explorer that looks similar to this:
Now expand the "Interfaces" project node. Right click on the "Class1.cs" file, select "Rename", rename the class to IDataRetriever.cs, and click the "Yes" button when prompted. You should now see something like this in your document well and Solution Explorer:
Change IDataRetriever into an interface by replacing the "class" keyword with "interface".
Now add a getter property that returns an object that implements the "IData" interface. You'll notice that VS is indicating to you that IData doesn't exist yet by putting the red squiggles underneath "IData":

Let's resolve this error by taking advantage of a new feature in VS 2010.Right click on the offending "IData", select "Generate", and select "Other...":
You'll now be presented with the "New Type" dialog. Change the "Type Kind:" drop-down to "interface" and the "Access:" drop-down to "public". Leave the rest as defaults:
VS will automatically create a new interface called "IData" in a new file called "IData.cs" placed in the Interfaces project. Nice, that's exactly what we wanted! Now let's go implement the IDataRetriever interface over in the "Implementation" project.
Expand the "Implementation" project node.
Right click on the "References" node, select "Add Reference...", click the "Projects" tab, and select "Interfaces":

Collapse the "References" node.
Right click on the "Class1.cs" file, select "Rename", change the file name to "DataRetriever.cs" , and select "Yes" in the dialog that pops up.
Double-click on the "DataRetriever.cs" file, and make the new class implement the "IDataRetriever" interface. You'll notice that as you attempt to type "IDataRetriever", you get no intellisense support. That's ok, finish typing in "IDataRetriever", and again notice the red squigglies below the term.
Hover over "IDataRetriever" and notice a small rectangle under the start of the word. Click on that and select "using interfaces;". This will automatically insert the using statement that is required.

Now that the "using Interfaces;" line has been automatically added, select the "smart tag" again, but this time select "Implement interface 'IDataRetriever'":

Your final "DataRetriever" file should look like this:

Now add a reference to the "Implementation" project as well as the "Interfaces" project, following the similar steps in step 13 above.
Expand the "Client" project node and double click on "Program.cs".
Type "DataRetriever", select the smart-tag and select "using Implementation;". That will automatically generate the using statement needed to use the DataRetriever type. Finish like so, adding the "using Interfaces;" statement as well:
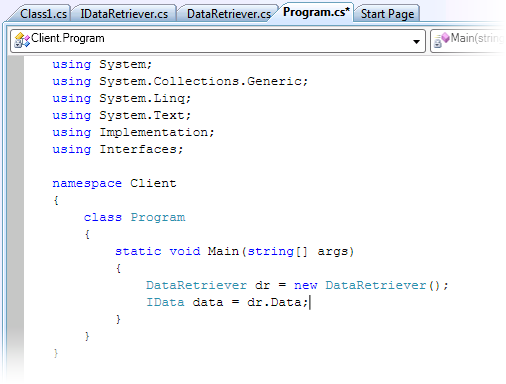
Rebuild the solution. If all went according to plan, no errors.
So what does this program do at this point? Well, actually nothing except instantiate a type, call a property on that type, throw a "NotImplementedException", then exit. Not that interesting, but also not the point. This is just setting the stage for a very common problem found in systems of all types.
This code is pretty typical of code that is early in its evolutionary path. We've got a client program accessing the specific implementation of an interface directly. This is fine for now, as all the program needs is the data that "DataRetriever" was designed to retrieve ( imagine DataRetriever pulling from a SQL database for instance ). But what about tomorrow when a requirement hits your desk, demanding data to be pulled from a different data source without changing the behavior of the rest of the application?
What we need is to *not* make any assumptions on *how* an interface is implemented, and depend *only* on the contract of the interface(s) itself. Again, a fairly common design pattern, but one that is pretty easy to violate in today's world, as it takes but one line of code to break this pattern and create dependencies that were not intended. This is what various IoC containers are out to help mitigate.
So how do we enforce this design in our code, protecting the intent of that design, and ensure our code is resilient to this type of breakage? Enter the Layer Diagram and Layer Validation.
Let's create a Layer Diagram where we will visually describe the constraints on our architecture that we want to maintain.
Create the Layer Diagram
Right click on the solution node and select Add->New Solution Folder. Name the folder "Diagrams"
Right click on the "Diagrams" solution folder and select Add->New Item..., select the "Layer Diagram" template, and name the diagram "FirstLayerDiagram.layer":
Since these are CTP bits, there are still a few things not quite right. One of these things is the fact that you'll see two Layer Diagram Explorers appear next to your Solution Explorer. Close the one that looks like this:
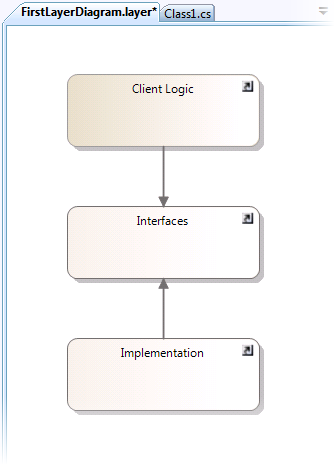
Now let's draw the layer diagram, make your diagram look like this one:
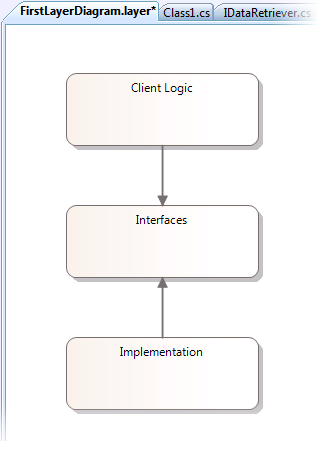
Please make sure that the links are going in the direction you see above, or things aren't going to work right in later steps!What we're saying through this diagram is that we have a "Client Logic" layer that is dependent on the "Interfaces" layer, and an "Implementation" layer also dependent on the "Interfaces" layer. What we are also saying is that the "Client Logic" layer is *not* dependent on the "Implementation" layer, nor should it be. The lack of a directed link in this last case is very important.
But now we need to map our source code onto this layer diagram, so that the system can verify that your code is complying or *not* complying with the constraints this seemingly simple diagram is describing.
Let's do that now.
Map Source Onto the Layers
In the Solution Explorer, click and drag the "Client" project out onto the layer diagram and release your mouse on the "Client Logic" layer shape:
Drag the "Interfaces" project from the Solution Explorer out onto the layer diagram and let go over the top of the "Interfaces" layer shape:
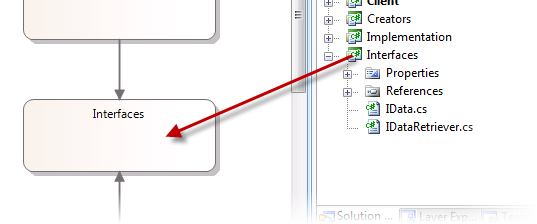
And finally, drag the "Implementation" project from the Solution Explorer out onto the "Implementation" layer shape:
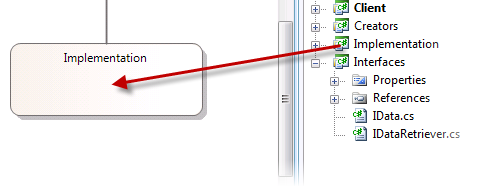
Your layer diagram should now look something like this. Notice the little icons in the upper right hand corner of the shapes. This indicates that source ( or some type of artifact(s) ) has been associated to the layer:
If you select the "Client Logic" shape, then click on the "Layer Explorer", that shows you the types of items associated with the layer. In this case, the "Client" csharp project:

Now we're ready to "Validate" our code against the diagram.
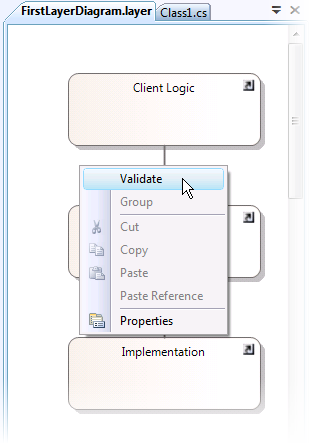
Right click anywhere in the layer diagram and select "Validate":
Notice an error is displayed in the Error Window:
This is expected at this point, 'cause the code in Program.cs found in the "Client" project is directly manipulating types from the "Implementation" project. We just finished creating a layer diagram that declares this type of dependency invalid!
So let's fix the problem in code so that this layer validation error goes away.
Fix Code
Back in Program.cs, we need to make sure that we are only using types out of the "Interfaces" project, or more importantly, *not* use types out of the "Implementation" project. That's all well and good, but we need a way to get an instance of an object that implements IDataRetriever without taking a direct dependency on that type.
Enter the Factory pattern.
In the Solution Explorer, expand the "Creators" project, right click on "Class1.cs", select "Rename...", and rename the file to "TypeCreator.cs".
Add the "Implementation" project and "Interfaces" as a references to the "Creators" project ( i.e., "Creators" now depends on the "Implementation" and "Interfaces" projects ).
Double click on the "TypeCreator.cs" file in Solution Explorer, which will make that file fill the document well.
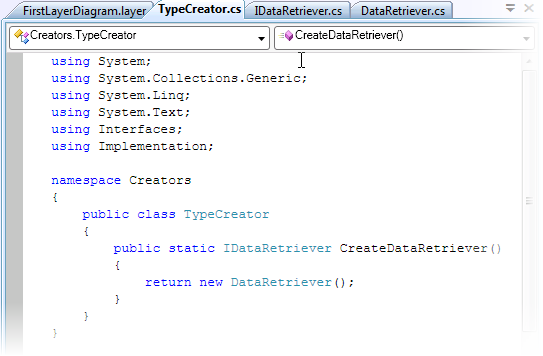
Add a static method that creates a "DataRetriever" object but returns an IDataRetriever interface. TypeCreator.cs should look similar to this:
In the "Client" project, remove the "Implementation" project reference, and add a reference to the "Creators" project.
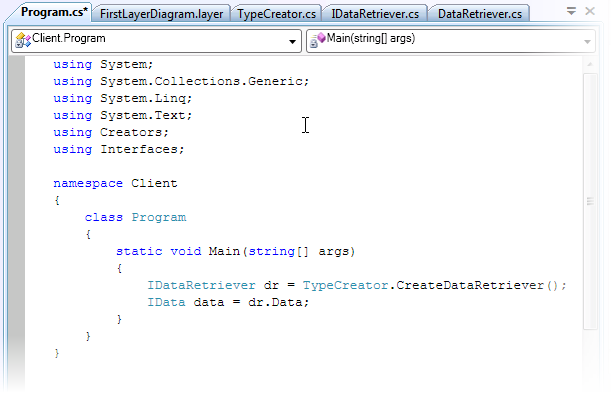
Change Program.cs to take advantage of the new method we just created. Program.cs should look something like this:
Rebuild the solution. No errors.
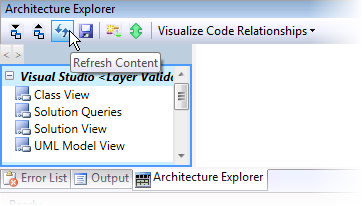
Now we need to bring up the Architecture Explorer and click the refresh button to work around a current limitation in the CTP bits.
From the main menu bar, select "View->Architecture Explorer".
Select the "Refresh Content" button on that explorer:
Now bring the FirstLayerDiagram back into view, right click on "Validate", and take a look at the error tool window. No errors! WooHoo! :)
Summary
I've shown you, through an admittedly trivial example, how to validate your solution through a simple Layer diagram. I've shown you how to map source onto the layers and how to tell the system what dependencies are valid and which are not via a manual gesture and that diagram.
There is much more to show on this diagram and how you can interact with it. A very important next step is to show you how to make the Validation action an automatic step in your build process. I'll do that in a future post.
Stay tuned! :)
Cameron
Comments
- Anonymous
December 08, 2008
This is very interesting stuff. I do wonder how easy it will be to maintain such a diagram when there are hundreds of classes involved. If you do blog about bringing Validation into the continuous build, can you please also mention how we can get it to break the build?TIA,John - Anonymous
December 09, 2008
Hey John,Check out this post ( http://blogs.msdn.com/camerons/archive/2008/09/30/architectural-validation-and-synchronization.aspx ) and let me know if that helps answer your question.And yeah, I plan on showing how to get the validation pass as part of your build, and ultimately how to get part of Team Build.Regards,Cameron - Anonymous
December 10, 2008
As I promised in my last post , I want to show you how you can make Layer Validation part of your build - Anonymous
December 11, 2008
Shai Raiten on Testing Improvement - The Problem and How To: Set Work Item CreationEdit Permission Using... - Anonymous
December 11, 2008
Layer Validation with the VSTS 2010 CTP - Anonymous
February 04, 2009
The comment has been removed


