.Net RIA Services Part 3: DataForm and Validation
.Net RIA Services Part 3: DataForm and Validation
 This is the forth part in a series of posts about building applications with Microsoft .Net RIA Services and Silverlight 3. In part 1 of this series I created a new application, created a simple data model and used the Domain Service and Domain Context to retrieve data and bind it to a DataGrid. In part 2 we replaced the manual work needed to get the data from the server with the DomainDataSource that provided some more advanced scenarios such as filtering and sorting. In this post we’ll introduce the DataForm control and talk more about data validation.
Using the DataForm control
Add A DataForm Control and bind it to the current item of the DataGrid. Open Views\HomePage.xaml, and add a DataForm Control right after the DataPager.
<Grid x:Name="LayoutRoot" Background="White">
...
<dataControls:DataPager PageSize="3"
Source="{Binding Data, ElementName=customersDataSource}" />
<dataControls:DataForm x:Name="customerDataForm"
Header="Customer Data"
CurrentItem="{Binding ElementName=dataGrid, Path=SelectedItem}">
</dataControls:DataForm>
...
</Grid>
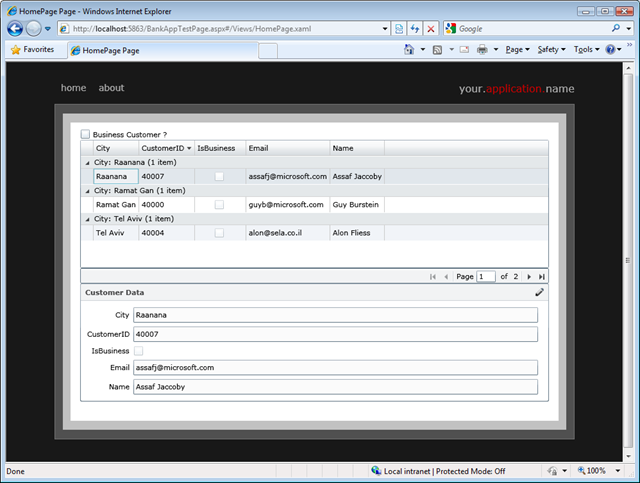
If you run the application, you should see the DataForm below the DataGrid. Move between the items, and see how the displayed customer’s data is changing as you do that.

To edit an item, click the pencil icon on the DataForm.

When you do that, the controls will be replaced with input controls, and Save and Cancel buttons will show up.

If you change a value of a property in a customer’s data, you’ll get a notification that this data was changed and the customer is not “dirty”.

Notice that changes that are made here are tracked only in memory. This means, that by pressing the Save button, you’ll switch over to Display more, but the data is not saved to the server. To enable submitting changes back to the server, we need to add a submit button below the DataForm.
<Button x:Name="btnSubmit"
Width="120"
Click="btnSubmit_Click"
Content="Submit" />
As the implementation of the submit button, you’ll need to commit the changes of the current item that is being edited (similar to EndCurrentEdit() in Windows Forms), and only then pushing the changes back the server.
private void btnSubmit_Click(object sender, RoutedEventArgs e)
{
this.customerDataForm.CommitItemEdit();
this.customersDataSource.SubmitChanges();
}
Adding Validation Logic using Data Annotations
One of the great things in .Net RIA Services is that code that we wrote in the server side can be resued in the client side. This means that we can reuse the validation annotations that we have for our domain entities.
To annotate entities with validation semantics, open the metadata file for the domain service (BankDomainService.metadata.cs in the sample). In this file, you’ll find partial classes that match your domain classes (class Customer in this sample), decorated with MetadataTypeAttribute pointing to a metadata type the is also generated here as an inner class. The metadata class has fields / properties that match the properties that the original class has, that you can annotate with validation requirements.
[MetadataTypeAttribute(typeof(Customer.CustomerMetadata))]
public partial class Customer
{
internal sealed class CustomerMetadata
{
public int CustomerID;
public bool IsBusiness;
public string Name;
public string City;
public string Email;
public EntitySet<Account> Accounts;
}
}
In this examples we’ll use the Regular Expression attribute, the String Length Attribute and the Required Attribute to validate the customer entity, but I encourage you to explore the System.ComponentModel.DataAnnotations namespace more deeply.
internal sealed class CustomerMetadata
{
public int CustomerID;
public bool IsBusiness;
[Required(ErrorMessage="Please provide a name for the customer")]
[StringLength(30,
ErrorMessage="Customer's name cannot be more than 30 characters")]
public string Name;
[StringLength(30,
ErrorMessage = "Customer's city cannot be more than 15 characters")]
public string City;
[RegularExpression(@"^[A-Z0-9._%+-]+@[A-Z0-9.-]+\.[A-Z]{2,4}$",
ErrorMessage="Please provide a valid email address")]
public string Email;
public EntitySet<Account> Accounts;
}
Build the project and Visual Studio will regenerate the client side code for the domain context, that will now also contain the metadata.
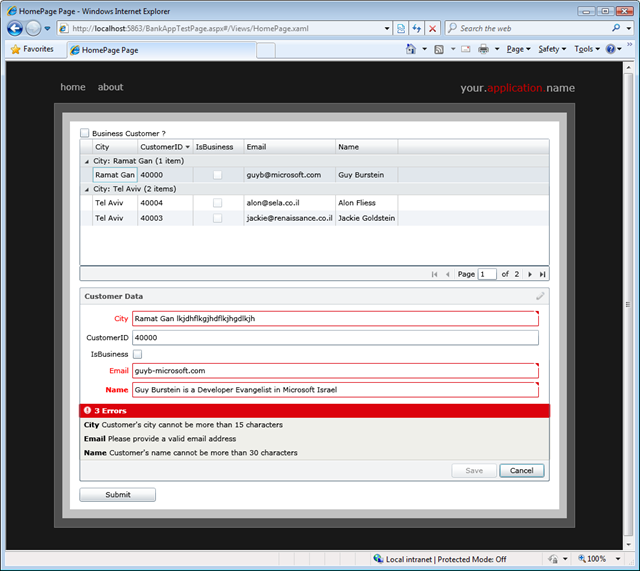
If you now run the application, and try to update a customer’s entity with values that do not match the validations, you will get a visual notification and the data will not be updated to the server.

In this post I talked about the new DataForm control in .Net RIA Services, showed how to add it to our application and how it works. Then we talked a little bit about annotating the entities with validation requirements and saw how the DataForm enforces them.
Enjoy!
Comments
- Anonymous
April 14, 2009
PingBack from http://asp-net-hosting.simplynetdev.com/net-ria-services-part-3-dataform-and-validation/ - Anonymous
April 14, 2009
As I can see, the validation works well on a single property. How about validation across more than one property?Consider the following scenario. Supposed, there is a Customer (with Name and CustomerType properties) places an Order (with Customer, DiscountAmount, and TotalAmount properties). A business rule suggests that a Customer with specific CustomerType can have a discount, while others can't. What is the suggested way of doing validation regards to this one?Thanks!