Intel® SCS Add-on 2.1 and SC2012 R2 ConfigMgr Integration (RCS Database mode) - Part 4
ConfigMgr 2012 R2 configuration
This section covers the procedure to configure the Configuration Manager server in order to use Out of Band management. This procedure is covering steps 4 to 6 from the following TechNet link but also integrates the Intel SCS integration, which is not described on the TechNet.
How to Provision and Configure AMT-Based Computers in Configuration Manager https://technet.microsoft.com/en-us/library/gg712319.aspx
Adding Hardware inventory classes
1. From [Administration]-[Overview]-[Client Settings]-[Default Client Settings], righ-click and select [Properties].

2. In the [Hardware Inventory] tab, click on [Set Classes].
3. Click on [Import]
4. From the Intel SCS Add-on source folder, select “sms_def_AMT.mof” and click [Open].
5. Select [Import both hardware inventory classes and hardware inventory class settings] and click [Import].
6. Click on [Import].
7. From the Intel SCS Add-on source folder, select “sms_def_SCSDiscovery.mof” and click [Open].
8. Select [Import both hardware inventory classes and hardware inventory class settings] and click [Import].
9. Click on [OK].
10. Click [OK]
Site system role addition
1. From ConfigMgr console [Administration]-[Overview]-[Site Configuration]-[Servers and Site Server Roles], right-click on the site server and click on [Add Site System Roles].
2. Click [Next].
3. Click [Next].
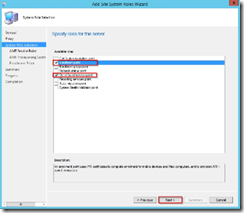
4. Select [Enrollment point] and [Out of band service point] and click [Next].

5. Click [Next].
6. Click [Browse].
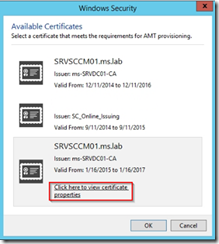
7. Click on [Click here to view certificate properties]

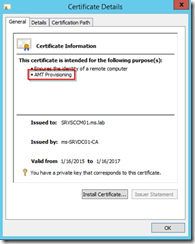
8. Verify that it is the correct certificate for AMT Provisioning

9. Select the appropriate certificate and click [OK]
10. Check [Enable CRL checking for the AMT provisioning certificate] and click [Next]
11. Click [Next].
※Warning:The enrollment point will be configured to use HTTPS by default. Please verify on IIS Management Console that the appropriate certificate is binded. In this lab environment, we used the same certificate as AMT Provisioning.
12. Click [Next].
13. Click [Close].
Configuration of Out-of-band management component
1. From [Administration]-[Overview]-[Site Configuration]-[Sites], click on the Primary site. From the ribbon, click on [Out of Band Management].
2. For [Enrollment point], select the site server from the drop down list.
3. For [OU for AMT-based computer accounts], click on [Browse]
4. Select the OU (AMT Computers), which has been created previously and click [OK]
5. For [Universal security group for AMT-based compute accounts], click on [Browse].
6. Type the group (SC2012CM R2 AMT Computers) and click on [OK].
7. For [AMT web server certificate template], click on [Browse]
8. Select [ConfigMgr 2012 R2 AMT Provisioning] as certificate template and click [OK].
9. Click on [Set] to setup MBEx account.
10. Here, type ”admin” as a name and type the password twice. In this lab, the password is <“P@ssw0rd>”. Click [OK]
11. Configuration must be like in the below screen. Click [OK]

12. Reopen [Out of Band Management Component Properties], go to [AMT Settings] tab and click on the yellow star button.
13. Type [SC2012CM R2 AMT Administrators] and click [OK]
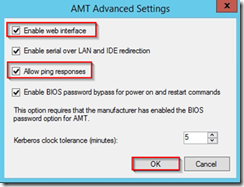
14. Click on [Advanced settings]
15. Check [Enable web interface] and [Allow ping responses] and click [OK]
Enabling Out-of-band management Discovery
1. From [Administration]-[Overview]-[Site Configuration]-[Sites], click on the Primary site. From the ribbon, click on [Out of Band Management].
2. Go to [AMT Settings] tab and hit the yellow star button.
3. Here, type ”admin” as a name and type the password twice. In this lab, the password is “P@ssw0rd”.
Click [OK]
4. Click [OK]
Adding permissions for discovery
1. From [Administration]-[Overview]-[Security], right-click on [Administrative Users] and click on [Add User or Group]
2. Hit the [Browse] button to set a user or group name.
3. Type [Domain Computers] and click [OK]
4. Click [Add]
5. Add [Operations Administrator] as a security role and click [OK]
Enabling Wake-on-LAN for the related site
1. From [Administration]-[Overview]-[Site Configuration]-[Sites], select the primary site, right-click on it and click on [Properties]
2. From the [Wake On LAN] tab, check [Enable Wake on LAN for this site] and select [Use AMT power on commands only]. Click [OK]


