Lab Ops - Part 14 Putting Applications into the VDI Template with MDT
In my last post I created a process to quickly create what MDT refers to as a Reference Computer and directly boot this from the LiteTouchPE_x64.iso in the deployment share. This was then shutdown and sysprepped so that I could use it to deploy VDI collections in Remote Desktop Services. Now I want to add in a simple example of an application deployment along with the OS. Simple because I am only interested in the mechanics of the process in MDT rather than getting into any specifics about what is needed to install a particular application e.g. command line switches, dependencies and licensing. If you are going to do this for real create I wouod recommend creating a new VM and test the installation process from the command line and tune the switches etc. for that application accordingly before doing any work in MDT. There is already lots of help out there on the form for the application you are interested in.
I am going to use Foxit Enterprise Reader for this example , as it’s not a Microsoft application and it’s a traditional application in that it’s not what MDT calls a packaged application designed for the modern interface in Windows 8.1. It’s also free (although you’ll have to register to get the Enterprise Reader as an msi) and I actually use it anyway to read PDF documents. All this is is actually pretty easy to do but I got caught out a few times and wading through the huge amount of MDT documentation can be time consuming so I hope you’ll find this useful. My steps will be:
- Import the Foxit application into the Deployment Share in the MDT Deployment Workbench
- Modify the Task Sequence to deploy Foxit
- amend the Rules (aka ControlSettings.ini) of the Deployment Share properties to install Foxit without any intervention on my part.
Import the Application.
To import an application in MDT all you need to do is navigate to the Applications folder in the Deployment share right click and select Import Application. However I thought it would be good to create folders for each software publisher so I created a Foxit folder underneath Applications and then I did right click -> Imported Application from there. This looked OK in the Deployment Workbench but actually there’s no actual folder created on the Deployment Share. This is by design and if you want to create your own physical folder structure then you should store them on a share you control and point MDT to the applications ton that share than importing them which is the Application without source files or elsewhere on the network option in the Import Application Wizard.
Next I found that I couldn’t import a file only a folder which I guess is typical for many applications so I stored the Foxit msi in its own folder before importing it.
The next thing that caught me out was the Command details. It’s pretty easy to install an msi for Foxit this would be msiexec /i EnterpriseFoxitReader612.1224_enu.msi /quiet. However the Working directory entry confused me because MDT has the application now so surely I could just leave this empty? Well no and this not a problem with MDT rather it’s because of the way I am using it. Anyway I set the Working Directory to the UNC path of Foxit Reader folder (\\RDS-OPS\DeploymentShare$\Applications\Foxit Enterprise Reader in my case) and that worked.
Modify the Task Sequence
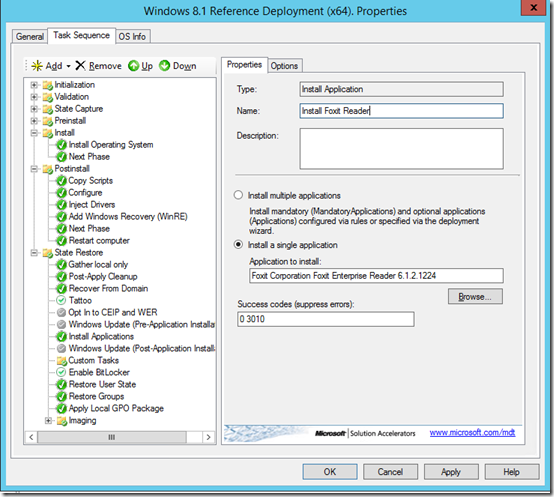
I just used a standard Task Sequence template in my last post which already has a step in it to install an application, but where is it? The answer turns out to be that it’s inside the State Restore folder ..
Anyway I changed the settings here to reference Foxit and all is well.
Configure the Rules
I didn’t think I need to make any changes to the rules (in my last post) as my deployment was already fully automated so I was surprised to be presented with a popup asking me to confirm which application I wanted install when I first tested this. So I needed to add in two more settings one to skip which application to install and another to actually select it. However the Rules identify applications by GUID not by name, so I had to get the GUID from the general tab of the Application properties and enter it like this..
SkipApplications=Yes
Applications001 ={ec8fcd8e-ec1e-45d8-a3d5-613be5770b14}
Your GUID will be different and if you want more than one application then you would add more afterwards (Application002 = , Application003 etc).
I also set SkipFinallSummary=No at this point as I wanted to see if everything was working before the VM switched off.
Summary
MDT also has the ability to deploy bundles of applications and before you ask me you’ll need to do something completely different for Office 365 and Office 213 Pro Plus and my recommendation for a simple life would be to use Application Virtualization aka App-V. This is included in MDOP (Microsoft Desktop Optimization Pack) and is one of the benefits of having Software Assurance. That’s a topic for another day based on feedback and my doing a bot more research. Next up the exciting world of patching VDI
Comments
- Anonymous
January 10, 2014
If we are going to deploy VDI to our users we are going to still have some of the same challenges as - Anonymous
January 10, 2014
If we are going to deploy VDI to our users we are going to still have some of the same challenges as
