Securely load data using Synapse SQL
This article highlights and provides examples on the secure authentication mechanisms for the COPY statement. The COPY statement is the most flexible and secure way of bulk loading data in Synapse SQL.
Supported authentication mechanisms
The following matrix describes the supported authentication methods for each file type and storage account. This applies to the source storage location and the error file location.
| CSV | Parquet | ORC | |
|---|---|---|---|
| Azure blob storage | SAS/MSI/SERVICE PRINCIPAL/KEY/AAD | SAS/KEY | SAS/KEY |
| Azure Data Lake Gen2 | SAS/MSI/SERVICE PRINCIPAL/KEY/AAD | SAS (blob1)/MSI (dfs2)/SERVICE PRINCIPAL/KEY/AAD | SAS (blob1)/MSI (dfs2)/SERVICE PRINCIPAL/KEY/AAD |
1: The .blob endpoint (.blob.core.windows.net) in your external location path is required for this authentication method.
2: The .dfs endpoint (.dfs.core.windows.net) in your external location path is required for this authentication method.
A. Storage account key with LF as the row terminator (Unix-style new line)
--Note when specifying the column list, input field numbers start from 1
COPY INTO target_table (Col_one default 'myStringDefault' 1, Col_two default 1 3)
FROM 'https://adlsgen2account.dfs.core.windows.net/myblobcontainer/folder1/'
WITH (
    FILE_TYPE = 'CSV'
    ,CREDENTIAL=(IDENTITY= 'Storage Account Key', SECRET='<Your_Account_Key>')
    --CREDENTIAL should look something like this:
    --CREDENTIAL=(IDENTITY= 'Storage Account Key', SECRET='<secret>'),
    ,ROWTERMINATOR='0x0A' --0x0A specifies to use the Line Feed character (Unix based systems)
)
Important
- Use the hexadecimal value (0x0A) to specify the Line Feed/Newline character. Note the COPY statement will interpret the
\nstring as\r\n(carriage return newline).
B. Shared Access Signatures (SAS) with CRLF as the row terminator (Windows style new line)
COPY INTO target_table
FROM 'https://adlsgen2account.dfs.core.windows.net/myblobcontainer/folder1/'
WITH (
    FILE_TYPE = 'CSV'
    ,CREDENTIAL=(IDENTITY= 'Shared Access Signature', SECRET='<Your_SAS_Token>')
    --CREDENTIAL should look something like this:
    --CREDENTIAL=(IDENTITY= 'Shared Access Signature', SECRET='?sv=2018-03-28&ss=bfqt&srt=sco&sp=rl&st=2016-10-17T20%3A14%3A55Z&se=2021-10-18T20%3A19%3A00Z&sig=IEoOdmeYnE9%2FKiJDSFSYsz4AkN'),
    ,ROWTERMINATOR='\n'-- COPY command automatically prefixes the \r character when \n (newline) is specified. This results in carriage return newline (\r\n) for Windows based systems.
)
Important
Do not specify the ROWTERMINATOR as '\r\n' which will be interpreted as '\r\r\n' and can result in parsing issues. The COPY command automatically prefixes the \r character when \n (newline) is specified. This results in carriage return newline (\r\n) for Windows based systems.
C. Managed Identity
Managed Identity authentication is required when your storage account is attached to a VNet.
Prerequisites
- Install Azure PowerShell. Refer to Install PowerShell.
- If you have a general-purpose v1 or blob storage account, you must first upgrade to general-purpose v2. Refer to Upgrade to a general-purpose v2 storage account.
- You must have Allow trusted Microsoft services to access this storage account turned on under Azure Storage account Firewalls and Virtual networks settings menu. Refer to Configure Azure Storage firewalls and virtual networks.
Steps
If you have a standalone dedicated SQL pool, register your SQL server with Microsoft Entra ID using PowerShell:
Connect-AzAccount
Select-AzSubscription -SubscriptionId <subscriptionId>
Set-AzSqlServer -ResourceGroupName your-database-server-resourceGroup -ServerName your-SQL-servername -AssignIdentity
This step is not required for dedicated SQL pools within a Synapse workspace. The system assigned managed identity (SA-MI) of the workspace is a member of the Synapse Administrator role and thus has elevated privileges on the dedicated SQL pools of the workspace.
Create a general-purpose v2 Storage Account. For more information, see Create a storage account.
Note
- If you have a general-purpose v1 or blob storage account, you must first upgrade to v2. For more information, see Upgrade to a general-purpose v2 storage account.
- For known issues with Azure Data Lake Storage Gen2, refer to Known issues with Azure Data Lake Storage Gen2.
Under your storage account, select Access control (IAM).
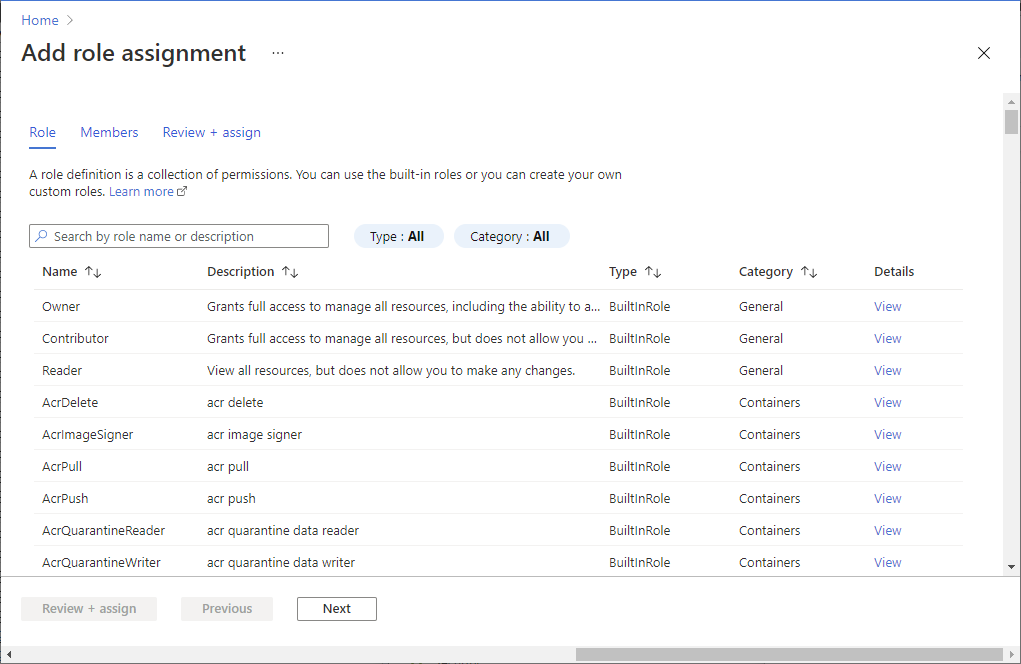
Select Add > Add role assignment to open the Add role assignment page.
Assign the following role. For detailed steps, see Assign Azure roles using the Azure portal.
Setting Value Role Storage Blob Data Contributor Assign access to SERVICEPRINCIPAL Members server or workspace hosting your dedicated SQL pool that you've registered with Microsoft Entra ID 
Note
Only members with Owner privilege can perform this step. For various Azure built-in roles, refer to Azure built-in roles.
Important
Specify the Storage Blob Data Owner, Contributor, or Reader Azure role. These roles are different than the Azure built-in roles of Owner, Contributor, and Reader.

You can now run the COPY statement specifying "Managed Identity":
COPY INTO dbo.target_table
FROM 'https://myaccount.blob.core.windows.net/myblobcontainer/folder1/*.txt'
WITH (
    FILE_TYPE = 'CSV',
    CREDENTIAL = (IDENTITY = 'Managed Identity'),
)
D. Microsoft Entra authentication
Steps
Under your storage account, select Access control (IAM).
Select Add > Add role assignment to open the Add role assignment page.
Assign the following role. For detailed steps, see Assign Azure roles using the Azure portal.
Setting Value Role Storage Blob Data Owner, Contributor, or Reader Assign access to USER Members Microsoft Entra user 
Important
Specify the Storage Blob Data Owner, Contributor, or Reader Azure role. These roles are different than the Azure built-in roles of Owner, Contributor, and Reader.

Configure Microsoft Entra authentication. Refer to Configure and manage Microsoft Entra authentication with Azure SQL.
Connect to your SQL pool using Active Directory where you can now run the COPY statement without specifying any credentials:
COPY INTO dbo.target_table
FROM 'https://myaccount.blob.core.windows.net/myblobcontainer/folder1/*.txt'
WITH (
    FILE_TYPE = 'CSV'
)
E. Service Principal Authentication
Steps
Assign read, write, and execution permissions to your Microsoft Entra application on your storage account.
You can now run the COPY statement:
COPY INTO dbo.target_table
FROM 'https://myaccount.blob.core.windows.net/myblobcontainer/folder0/*.txt'
WITH (
    FILE_TYPE = 'CSV'
    ,CREDENTIAL=(IDENTITY= '<application_ID>@<OAuth_2.0_Token_EndPoint>' , SECRET= '<authentication_key>')
    --CREDENTIAL should look something like this:
    --,CREDENTIAL=(IDENTITY= '92761aac-12a9-4ec3-89b8-7149aef4c35b@https://login.microsoftonline.com/72f714bf-86f1-41af-91ab-2d7cd011db47/oauth2/token', SECRET='juXi12sZ6gse]woKQNgqwSywYv]7A.M')
)
Important
Use the V1 version of the OAuth 2.0 token endpoint
Next steps
- Check the COPY statement article article for the detailed syntax
- Check the data loading overview article for loading best practices