Quickstart: Create and run a load test with Azure Load Testing
In this quickstart, you'll load test a web application by creating a URL-based test with Azure Load Testing in the Azure portal. With a URL-based test, you can create a load test without prior knowledge about load testing tools or scripting. Use the Azure portal experience to configure a load test by specifying HTTP requests.
To create a URL-based load test, you perform the following steps:
- Create an Azure Load Testing resource
- Specify the web application endpoint and basic load configuration parameters.
- Optionally, add more HTTP endpoints.
After you complete this quickstart, you'll have a resource and load test that you can use for other tutorials.
Prerequisites
- An Azure account with an active subscription. Create an account for free.
- An Azure account with permission to create and manage resources in the subscription, such as the Contributor or Owner role.
What problem will we solve?
Before you deploy an application, you want to make sure that the application can support the expected load. You can use load testing to simulate user traffic to your application and ensure that your application meets your requirements. Simulating load might require a complex infrastructure setup. Also, as a developer, you might not be familiar with load testing tools and test script syntax.
In this quickstart, you create a load test for your application endpoint by using Azure Load Testing. You configure the load test by adding HTTP requests for your application entirely in the Azure portal, without knowledge of load testing tools and scripting.
Create an Azure Load Testing resource
First, you create the top-level resource for Azure Load Testing. It provides a centralized place to view and manage test plans, test results, and related artifacts.
If you already have a load testing resource, skip this section and continue to Create a load test.
To create a load testing resource:
Sign in to the Azure portal by using the credentials for your Azure subscription.
From the Azure portal menu or the Home page, select Create a resource.
On the Marketplace page, search for and select Azure Load Testing.
On the Azure Load Testing pane, select Create.
On the Create a load testing resource page, enter the following information:
Field Description Subscription Select the Azure subscription that you want to use for this Azure Load Testing resource. Resource group Select an existing resource group. Or select Create new, and then enter a unique name for the new resource group. Name Enter a unique name to identify your Azure Load Testing resource.
The name can't contain special characters, such as \/""[]:|<>+=;,?*@&, or whitespace. The name can't begin with an underscore (_), and it can't end with a period (.) or a dash (-). The length must be 1 to 64 characters.Location Select a geographic location to host your Azure Load Testing resource.
This location also determines where the test engines are hosted and where the test framework requests originate from.Note
Optionally, you can configure more details on the Tags tab. Tags are name/value pairs that enable you to categorize resources and view consolidated billing by applying the same tag to multiple resources and resource groups.
After you're finished configuring the resource, select Review + Create.
Review the settings you provide, and then select Create. It takes a few minutes to create the account. Wait for the portal page to display Your deployment is complete before moving on.
To view the new resource, select Go to resource.
Optionally, manage access to your Azure Load Testing resource.
Azure Load Testing uses role-based access control (RBAC) to manage permissions for your resource. If you encounter this message, your account doesn't have the necessary permissions to manage tests.
Create a load test
Azure Load Testing enables you to quickly create a load test from the Azure portal by specifying the target web application URL and the basic load testing parameters. The service abstracts the complexity of creating the load test script and provisioning the compute infrastructure.
To create a load test for a web endpoint:
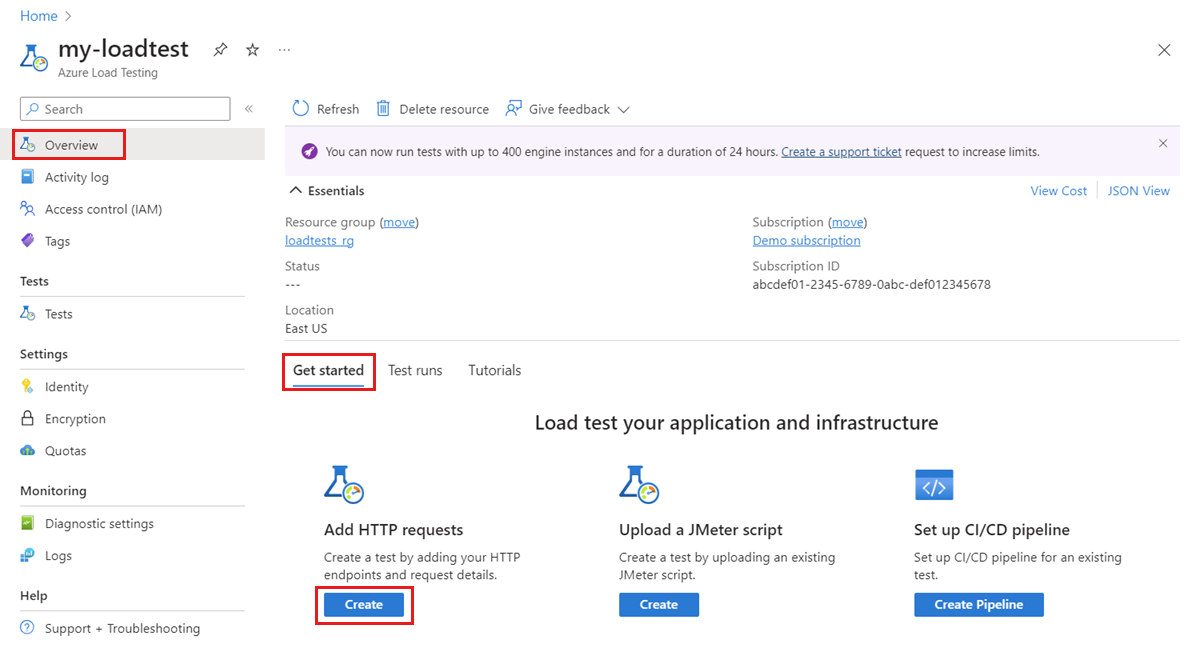
Go to the Overview page of your Azure Load Testing resource.
On the Get started tab, select Add HTTP requests > Create.
On the Basics tab, enter the load test details:
Field Description Test name Enter a unique test name. Test description (Optional) Enter a load test description. Run test after creation Selected. After you save the load test, the test starts automatically. Enable advanced settings Leave unchecked. With advanced settings, you can add multiple HTTP requests and configure more advanced load test settings. Next, configure the application endpoint and load test parameters:
Field Description Test URL Enter the complete URL that you would like to run the test for. For example, https://www.example.com/products.Specify load Select Virtual users to specify the simulated load based on a target number of virtual users. Number of virtual users Enter the total number of virtual users to simulate.
Azure Load Testing distributes the simulated load evenly across parallel test engine instances, with each engine handling up to 250 virtual users. For example, entering 400 virtual users results in two instances with 200 virtual users each.Test duration (minutes) Enter the duration of the load test in minutes. Ramp-up time (minutes) Enter the ramp-up time of the load test in minutes. The ramp-up time is the time to reach the target number of virtual users. Alternately, select the Requests per seconds (RPS) to configure the simulated load based on the target number of requests per second.
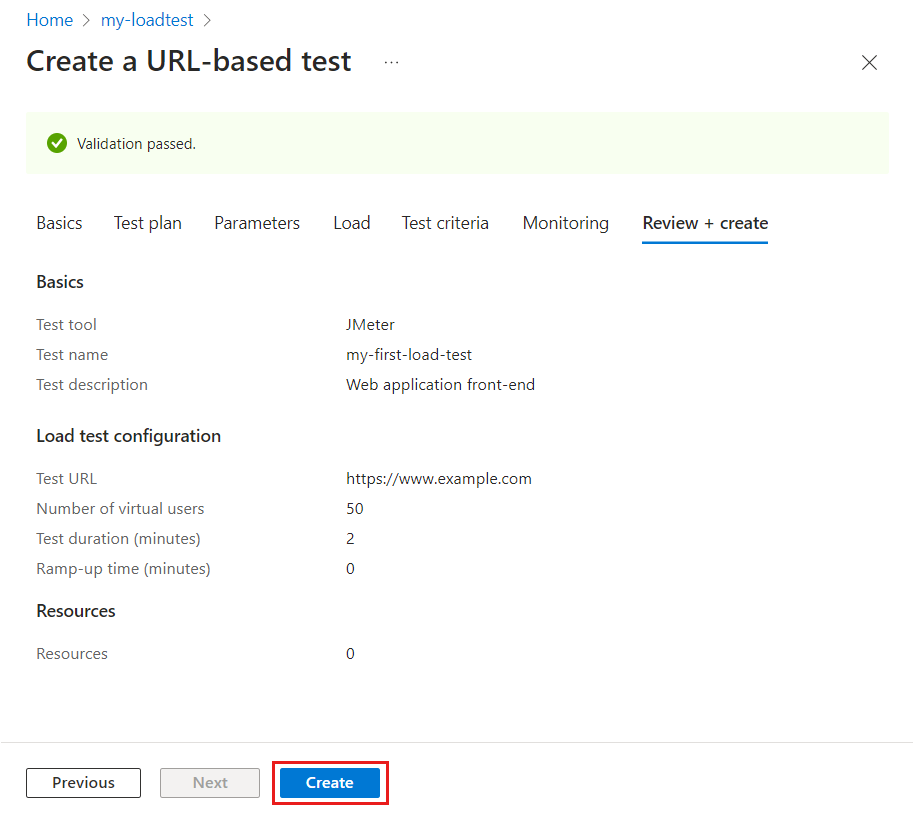
Select Review + create to review the load test configuration, and then select Create to start the load test.
After the load test is saved, Azure Load Testing generates a load test script to simulate traffic to your application endpoint. Then, the service provisions the infrastructure for simulating the target load.
View the test results
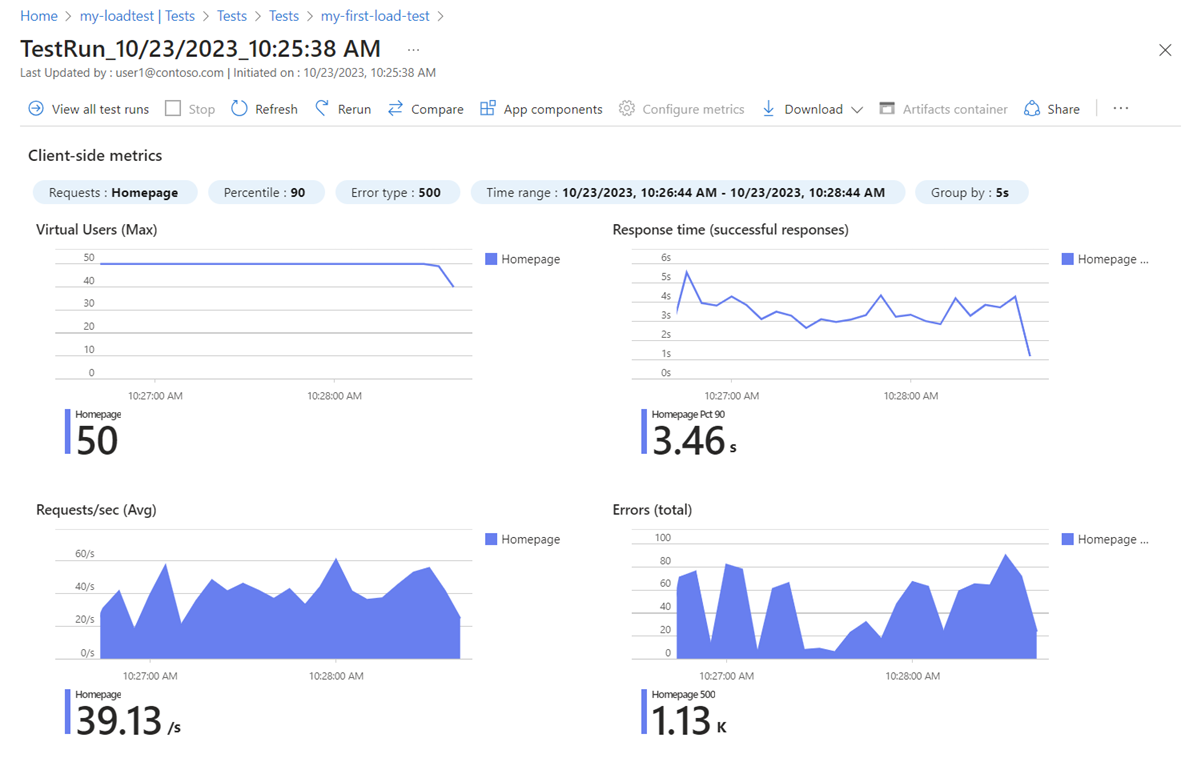
Once the load test starts, you're redirected to the test run dashboard. While the load test is running, Azure Load Testing captures both client-side metrics and server-side metrics. In this section, you use the dashboard to monitor the client-side metrics.
On the test run dashboard, you can see the streaming client-side metrics while the test is running. By default, the data refreshes every five seconds.
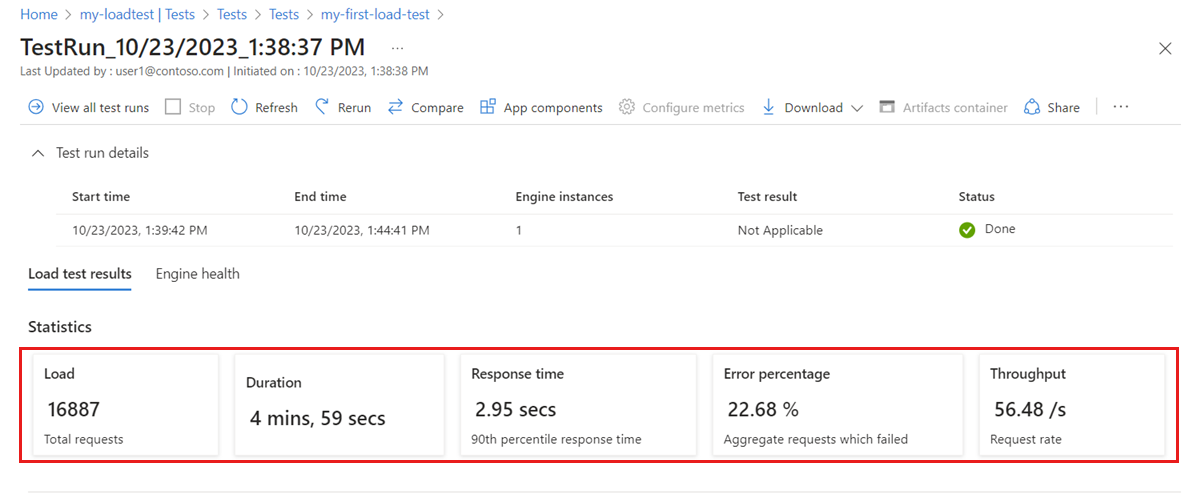
After the load test finishes, you can view the load test summary statistics, such as total requests, duration, average response time, error percentage, and throughput.
Optionally, change the display filters to view a specific time range, result percentile, or error type.
Add requests to a load test
With Azure Load Testing, you can create a URL-based load test that contains multiple requests. You can add up to five HTTP requests to a load test and use any of the HTTP methods, such as GET, POST, and more.
To add an HTTP request to the load test you created previously:
In the Azure portal, go to your Azure Load Testing resource.
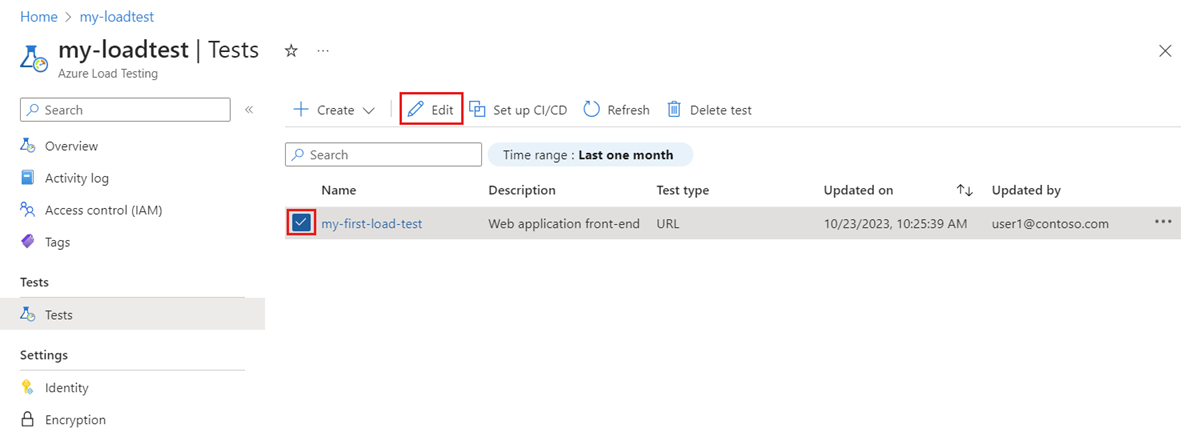
In the left navigation, select Tests to view all tests.
Select your test from the list by selecting the corresponding checkbox, and then select Edit.
On the Basics tab, select Enable advanced settings.
With advanced settings, you can define multiple HTTP requests for a load test. In addition, you can also configure test criteria and advanced load parameters.
When you switch to advanced settings, the test URL isn't automatically added to the test. You need to re-add the test URL to the load test.
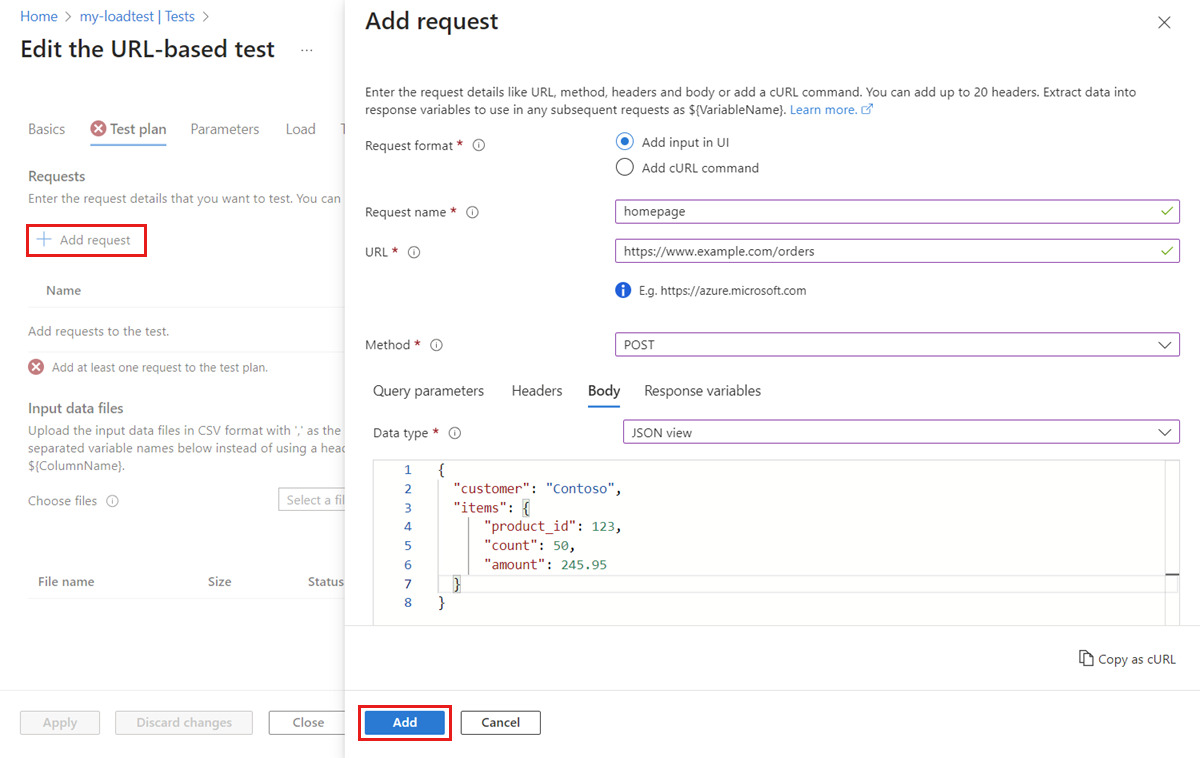
Go to the Test plan tab, and select Add request to add a request to the load test.
On the Add request page, enter the request details, and then select Add.
Field Description Request format Select Add input in UI to configure the request details through fields in the Azure portal. Request name Enter a unique name for the request. You can refer to this request name when you define test fail criteria. URL The URL of the application endpoint. Method Select an HTTP method from the list. Azure Load Testing supports GET, POST, PUT, DELETE, PATCH, HEAD, and OPTIONS. Query parameters (Optional) Enter query string parameters to append to the URL. Headers (Optional) Enter HTTP headers to include in the HTTP request. Body (Optional) Depending on the HTTP method, you can specify the HTTP body content. Azure Load Testing supports the following formats: raw data, JSON view, JavaScript, HTML, and XML. (Optional) Add more requests to your load test.
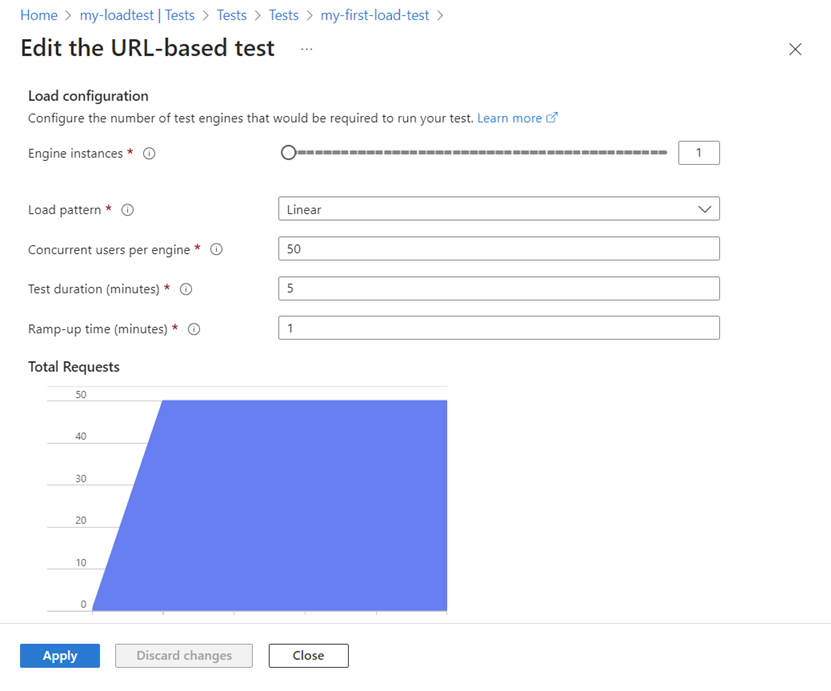
(Optional) On to the Load tab, configure the load parameters.
Notice that the advanced settings enable you to configure the number of test engine instances and choose from different load patterns.
Select Apply to update the load test configuration.
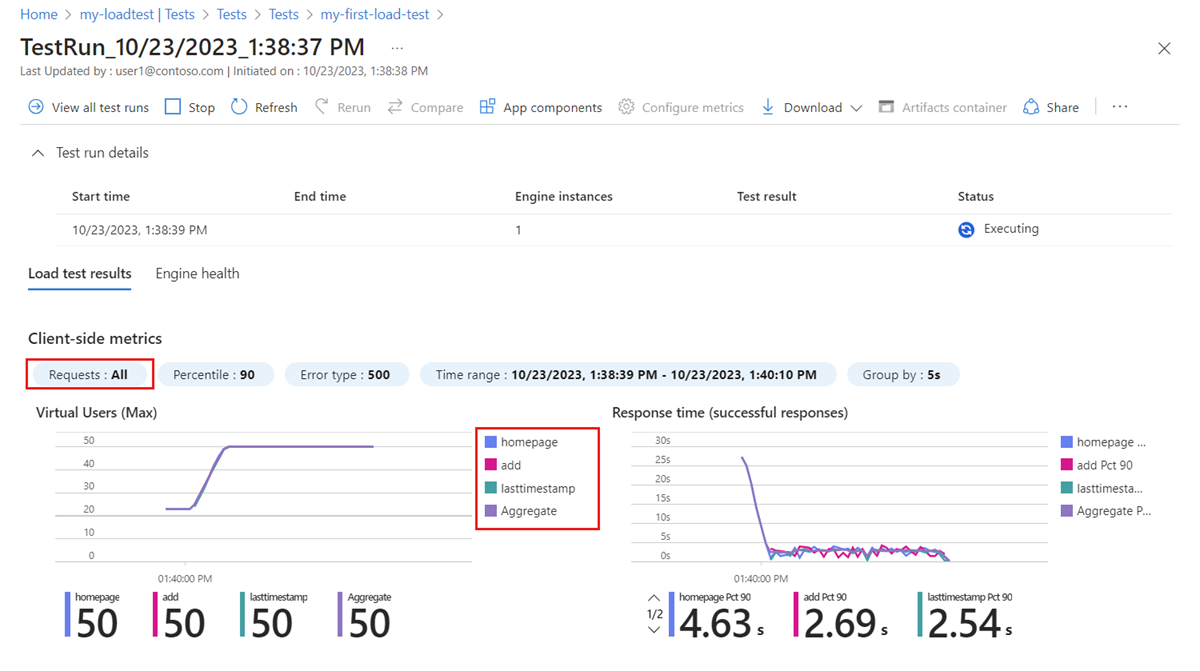
On the Tests page, select the test, and then select Run to run the load test with the updated configuration.
Notice that the test run dashboard displays metrics for the different HTTP requests in the load test. You can use the Requests filter to only view metrics for specific requests.
How did we solve the problem?
In this quickstart, you created a URL-based load test entirely in the Azure portal, without scripting or load testing tools. You configured the load test by adding HTTP requests and then used the load test dashboard to analyze the load test client-side metrics and assess the performance of the application under test. Azure Load Testing abstracts the complexity of setting up the infrastructure for simulating high-scale user load for your application.
You can further expand the load test to also monitor server-side metrics of the application under load, and to specify test fail metrics to get alerted when the application doesn't meet your requirements. To ensure that the application continues to perform well, you can also integrate load testing as part of your continuous integration and continuous deployment (CI/CD) workflow.
Clean up resources
Important
You can reuse the Azure Load Testing resource that you created for other Azure Load Testing tutorials and how-to articles.
If you don't plan to use any of the resources that you created, delete them so you don't incur any further charges. If you've deployed the sample application in a different resource group, you might want to repeat the following steps.
To delete resources by using the Azure portal:
Select the menu button in the upper-left corner, and then select Resource groups.
From the list, select the resource group that you created.
Select Delete resource group.
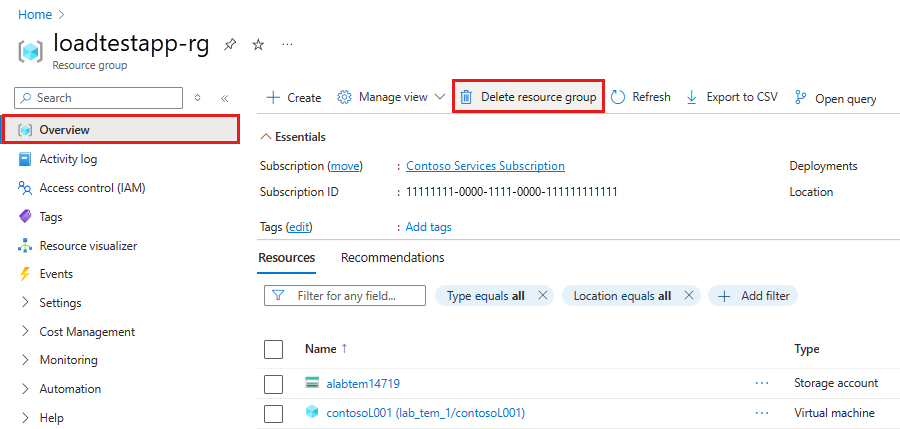
Enter the resource group name. Then select Delete.
To delete resources by using the Azure CLI, enter the following command:
az group delete --name <yourresourcegroup>
Remember, deleting the resource group deletes all of the resources within it.

