Copy data and send email notifications on success and failure
APPLIES TO:  Azure Data Factory
  Azure Synapse Analytics
Tip
Try out Data Factory in Microsoft Fabric, an all-in-one analytics solution for enterprises. Microsoft Fabric covers everything from data movement to data science, real-time analytics, business intelligence, and reporting. Learn how to start a new trial for free!
In this tutorial, you create a Data Factory pipeline that showcases some of the control flow features. This pipeline does a simple copy from a container in Azure Blob Storage to another container in the same storage account. If the copy activity succeeds, the pipeline sends details of the successful copy operation (such as the amount of data written) in a success email. If the copy activity fails, the pipeline sends details of copy failure (such as the error message) in a failure email. Throughout the tutorial, you see how to pass parameters.
A high-level overview of the scenario:

You perform the following steps in this tutorial:
- Create a data factory.
- Create an Azure Storage linked service.
- Create an Azure Blob dataset
- Create a pipeline that contains a Copy activity and a Web activity
- Send outputs of activities to subsequent activities
- Utilize parameter passing and system variables
- Start a pipeline run
- Monitor the pipeline and activity runs
This tutorial uses Azure portal. You can use other mechanisms to interact with Azure Data Factory, refer to "Quickstarts" in the table of contents.
Prerequisites
- Azure subscription. If you don't have an Azure subscription, create a free account before you begin.
- Azure Storage account. You use the blob storage as source data store. If you don't have an Azure storage account, see the Create a storage account article for steps to create one.
- Azure SQL Database. You use the database as sink data store. If you don't have a database in Azure SQL Database, see the Create a database in Azure SQL Database article for steps to create one.
Create blob table
Launch Notepad. Copy the following text and save it as input.txt file on your disk.
John,Doe
Jane,Doe
Use tools such as Azure Storage Explorer do the following steps:
- Create the adfv2branch container.
- Create input folder in the adfv2branch container.
- Upload input.txt file to the container.
Create email workflow endpoints
To trigger sending an email from the pipeline, you use Azure Logic Apps to define the workflow. For more information about creating a logic app workflow, see Create an example Consumption logic app workflow.
Success email workflow
Create a Consumption logic app workflow named CopySuccessEmail. Add the Request trigger named When an HTTP request is received, and add the Office 365 Outlook action named Send an email. If prompted, sign in to your Office 365 Outlook account.
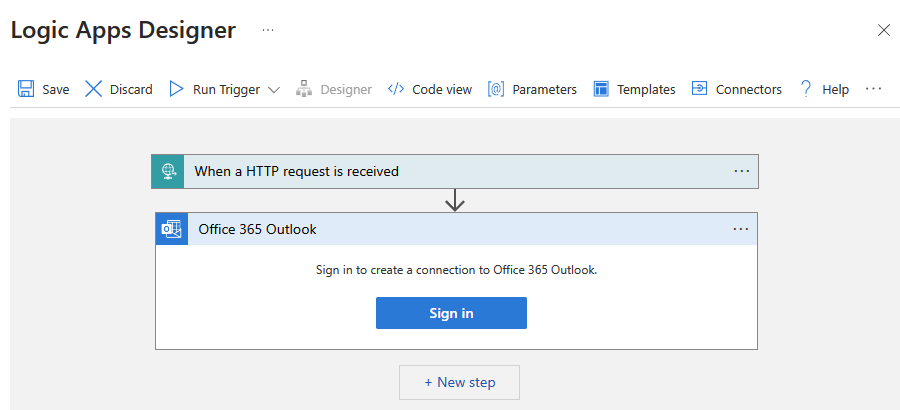
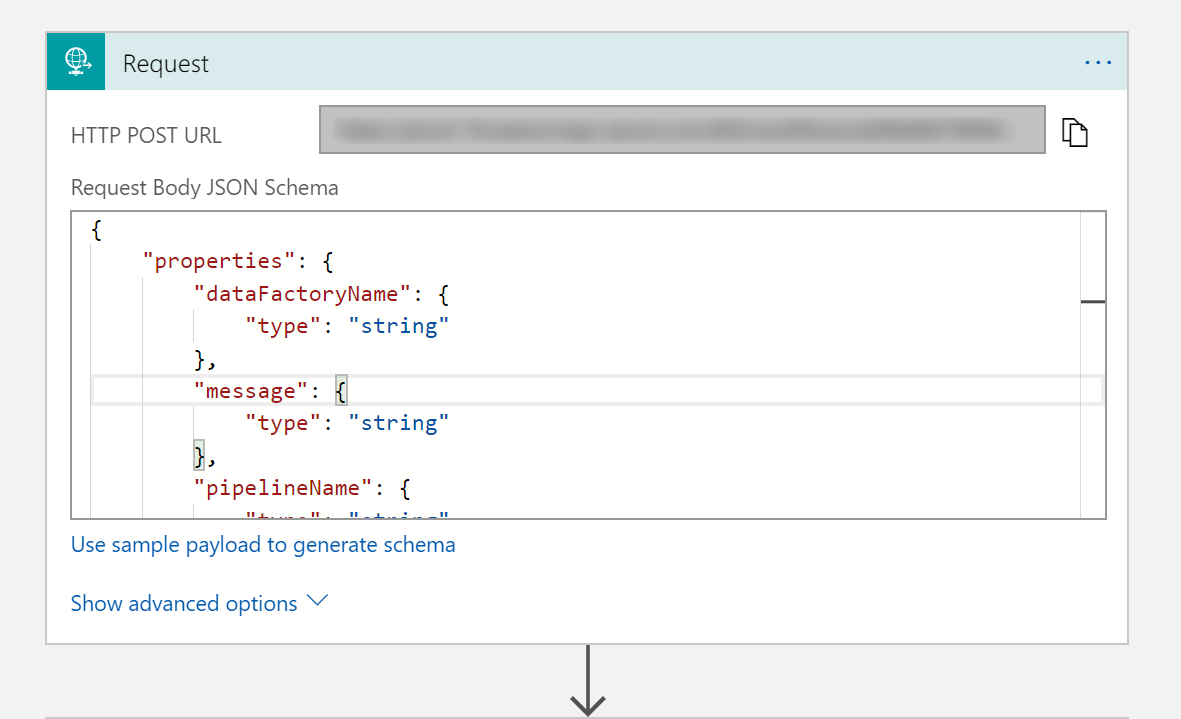
For the Request trigger, fill in the Request Body JSON Schema box with the following JSON:
{
    "properties": {
        "dataFactoryName": {
            "type": "string"
        },
        "message": {
            "type": "string"
        },
        "pipelineName": {
            "type": "string"
        },
        "receiver": {
            "type": "string"
        }
    },
    "type": "object"
}
The Request trigger in the workflow designer should look like the following image:
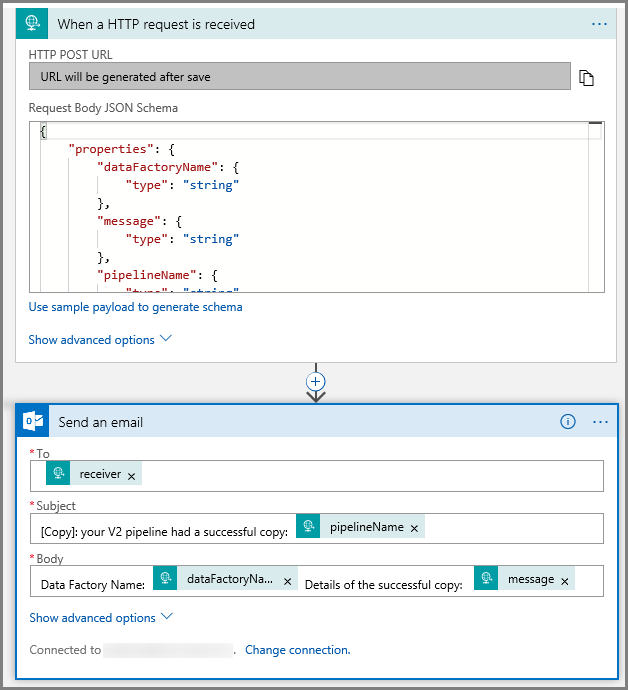
For the Send an email action, customize how you wish to format the email, utilizing the properties passed in the request Body JSON schema. Here is an example:
Save the workflow. Make a note of your HTTP Post request URL for your success email workflow:
//Success Request Url
https://prodxxx.eastus.logic.azure.com:443/workflows/000000/triggers/manual/paths/invoke?api-version=2016-10-01&sp=%2Ftriggers%2Fmanual%2Frun&sv=1.0&sig=000000
Fail email workflow
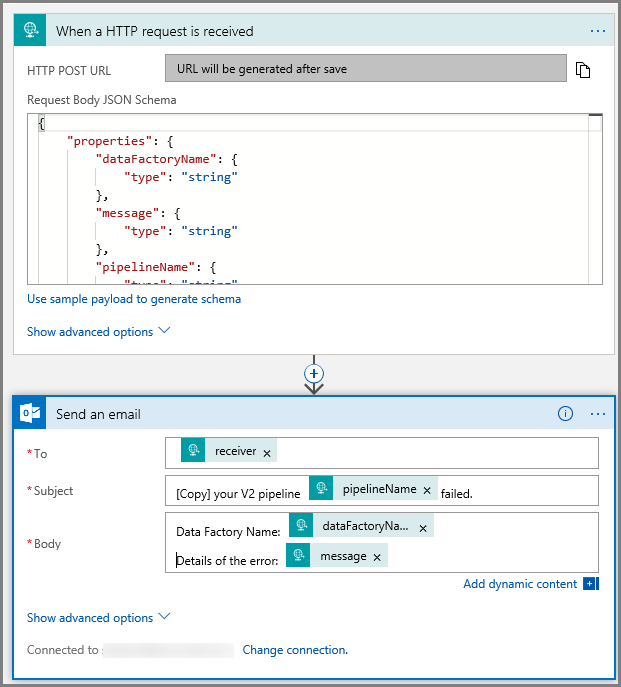
Follow the same steps to create another logic app workflow named CopyFailEmail. In the Request trigger, the Request Body JSON schema value is the same. Change the format of your email like the Subject to tailor toward a failure email. Here is an example:
Save the workflow. Make a note of your HTTP Post request URL for your failure email workflow:
//Fail Request Url
https://prodxxx.eastus.logic.azure.com:443/workflows/000000/triggers/manual/paths/invoke?api-version=2016-10-01&sp=%2Ftriggers%2Fmanual%2Frun&sv=1.0&sig=000000
You should now have two workflow URLs:
//Success Request Url
https://prodxxx.eastus.logic.azure.com:443/workflows/000000/triggers/manual/paths/invoke?api-version=2016-10-01&sp=%2Ftriggers%2Fmanual%2Frun&sv=1.0&sig=000000

//Fail Request Url
https://prodxxx.eastus.logic.azure.com:443/workflows/000000/triggers/manual/paths/invoke?api-version=2016-10-01&sp=%2Ftriggers%2Fmanual%2Frun&sv=1.0&sig=000000
Create a data factory
Launch Microsoft Edge or Google Chrome web browser. Currently, Data Factory UI is supported only in Microsoft Edge and Google Chrome web browsers.
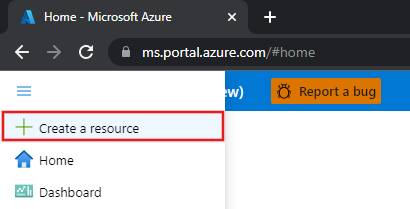
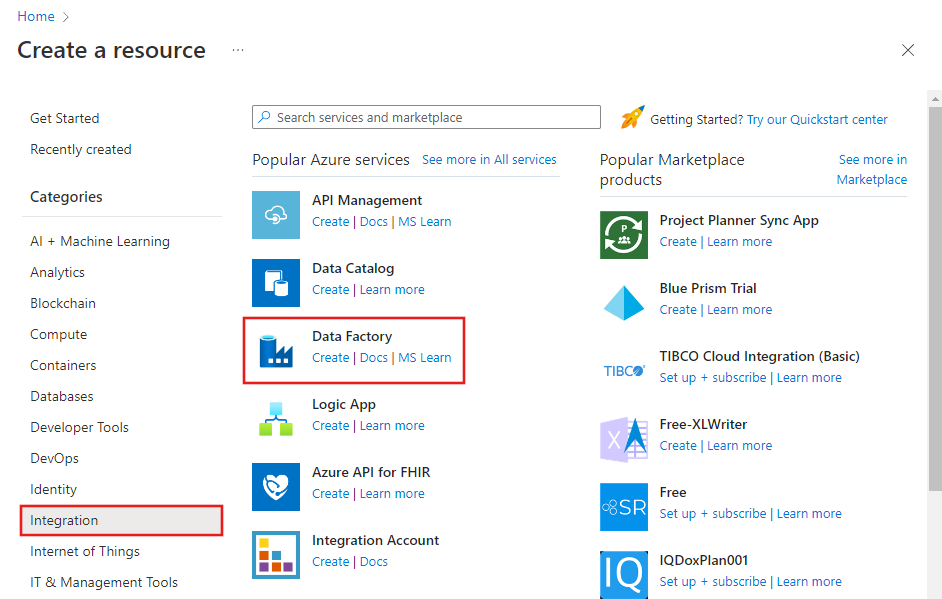
Expand the menu at the top left and select Create a resource. Then select > Integration > Data Factory:
In the New data factory page, enter ADFTutorialDataFactory for the name.
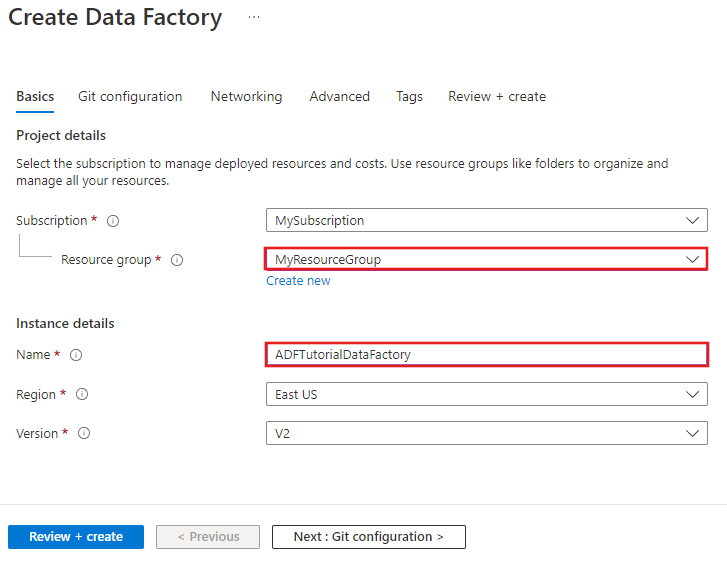
The name of the Azure data factory must be globally unique. If you receive the following error, change the name of the data factory (for example, yournameADFTutorialDataFactory) and try creating again. See Data Factory - Naming Rules article for naming rules for Data Factory artifacts.
Data factory name “ADFTutorialDataFactory” is not available.
Select your Azure subscription in which you want to create the data factory.
For the Resource Group, do one of the following steps:
Select Use existing, and select an existing resource group from the drop-down list.
Select Create new, and enter the name of a resource group.
To learn about resource groups, see Using resource groups to manage your Azure resources.
Select V2 for the version.
Select the location for the data factory. Only locations that are supported are displayed in the drop-down list. The data stores (Azure Storage, Azure SQL Database, etc.) and computes (HDInsight, etc.) used by data factory can be in other regions.
Select Pin to dashboard.
Click Create.
After the creation is complete, you see the Data Factory page as shown in the image.
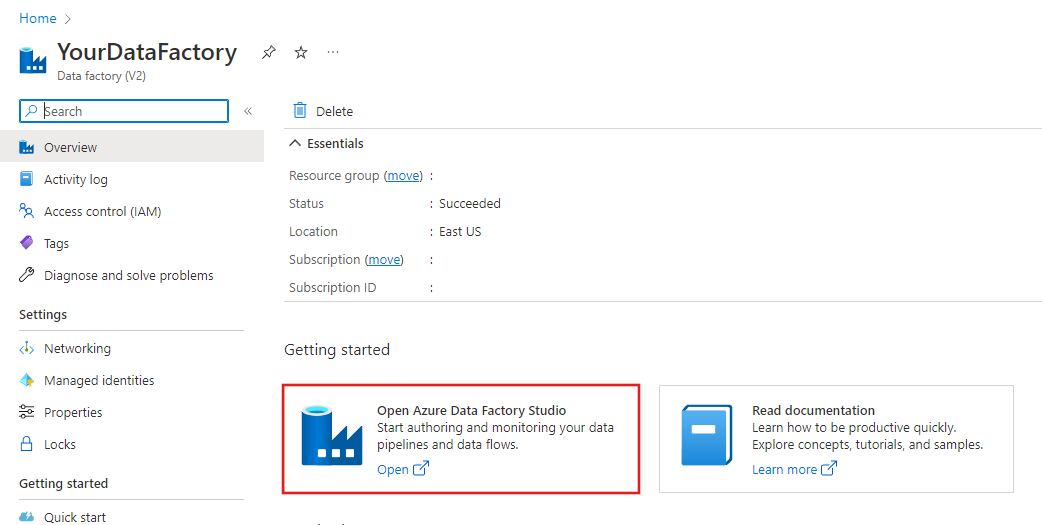
Click Open Azure Data Factory Studio tile to launch the Azure Data Factory user interface (UI) in a separate tab.
Create a pipeline
In this step, you create a pipeline with one Copy activity and two Web activities. You use the following features to create the pipeline:
- Parameters for the pipeline that are access by datasets.
- Web activity to invoke logic apps workflows to send success/failure emails.
- Connecting one activity with another activity (on success and failure)
- Using output from an activity as an input to the subsequent activity
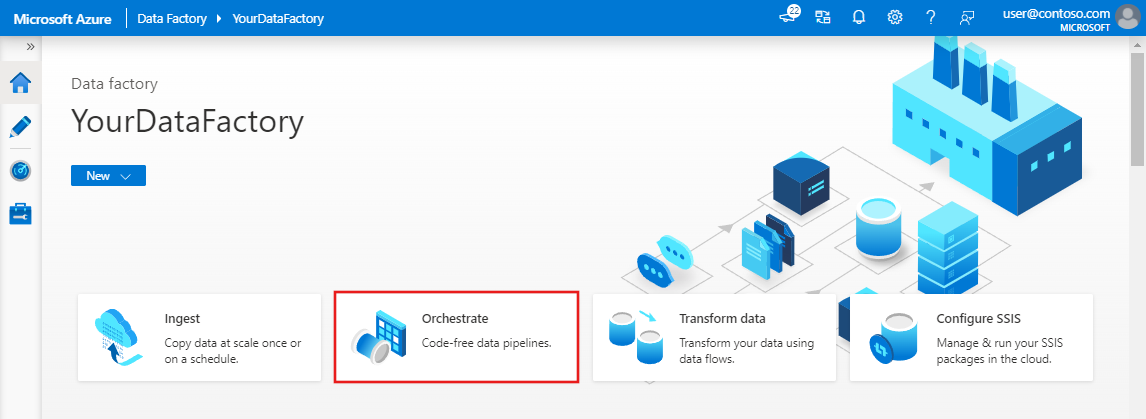
In the home page of Data Factory UI, click the Orchestrate tile.
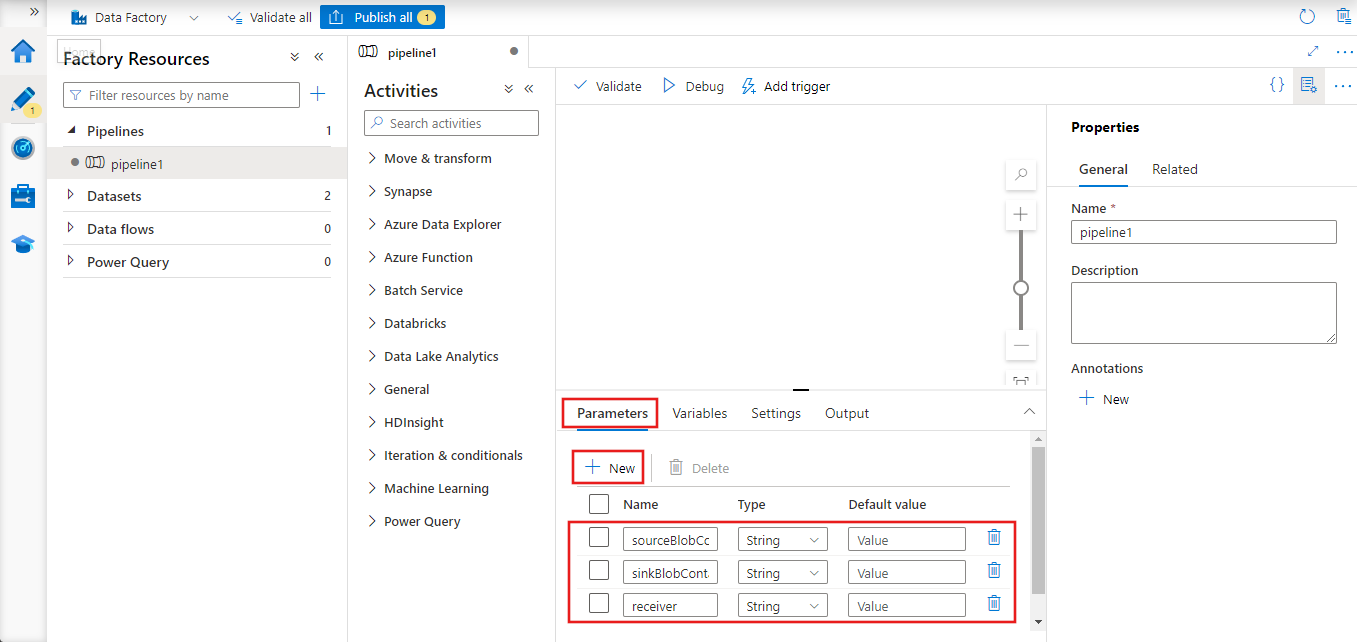
In the properties window for the pipeline, switch to the Parameters tab, and use the New button to add the following three parameters of type String: sourceBlobContainer, sinkBlobContainer, and receiver.
- sourceBlobContainer - parameter in the pipeline consumed by the source blob dataset.
- sinkBlobContainer - parameter in the pipeline consumed by the sink blob dataset
- receiver - this parameter is used by the two Web activities in the pipeline that send success or failure emails to the receiver whose email address is specified by this parameter.
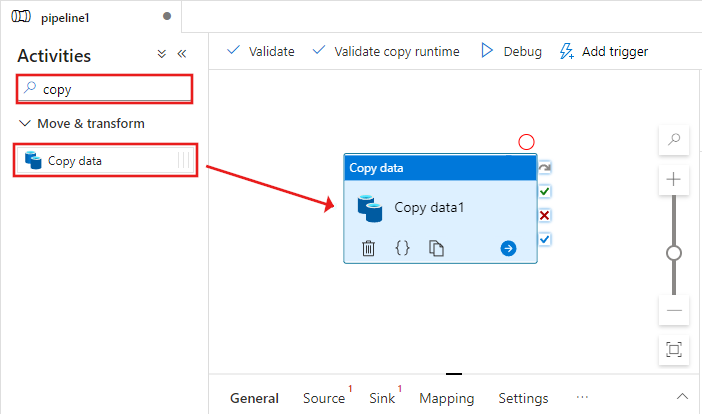
In the Activities toolbox, search for Copy and drag-drop the Copy activity to the pipeline designer surface.
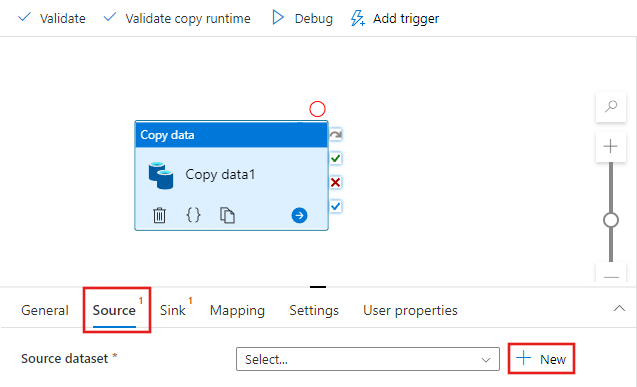
Select the Copy activity you dragged onto the pipeline designer surface. In the Properties window for the Copy activity at the bottom, switch to the Source tab, and click + New. You create a source dataset for the copy activity in this step.
In the New Dataset window, select the Azure tab at the top, and then choose Azure Blob Storage, and select Continue.
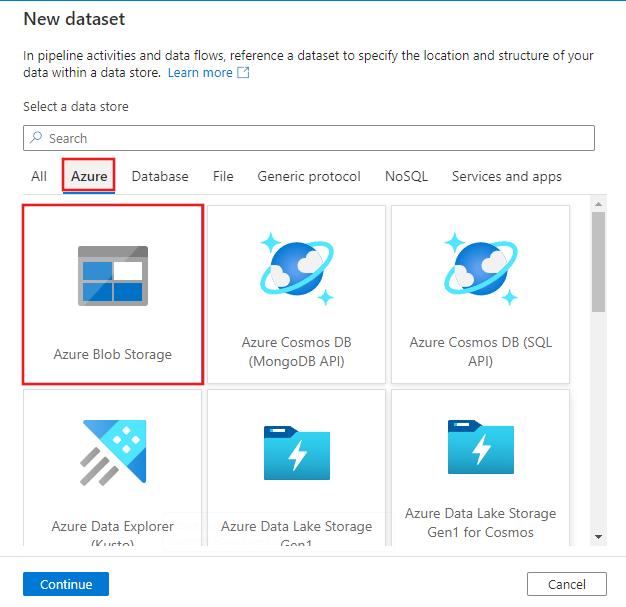
In the Select format window, choose DelimitedText and select Continue.
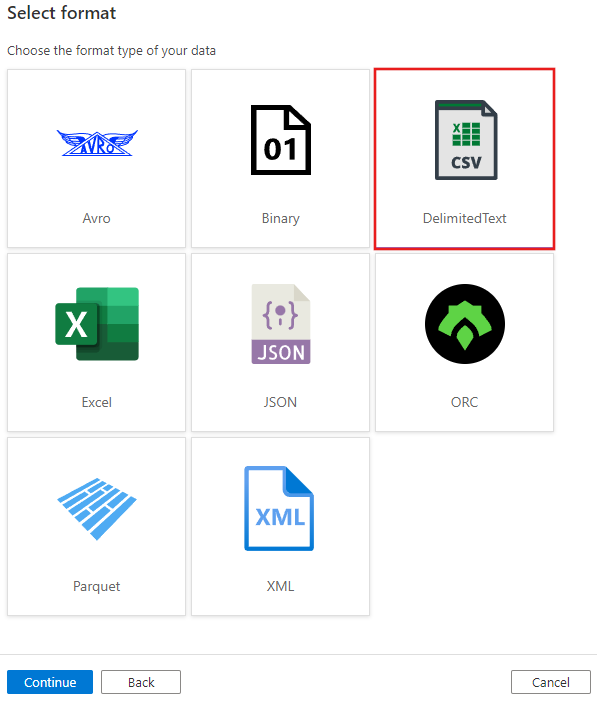
You see a new tab titled Set properties. Change the name of the dataset to SourceBlobDataset. Select the Linked Service dropdown, and choose +New to create a new linked service to your source dataset.
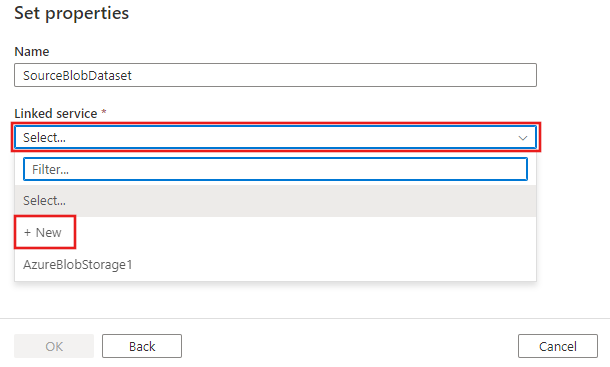
You will see the New linked service window where you can fill out the required properties for the linked service.
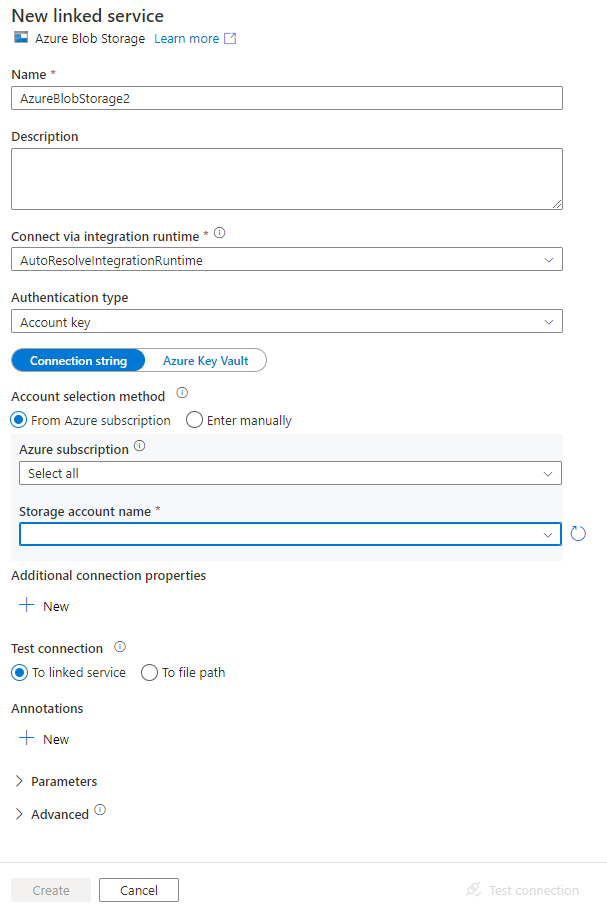
In the New Linked Service window, complete the following steps:
- Enter AzureStorageLinkedService for Name.
- Select your Azure storage account for the Storage account name.
- Click Create.
On the Set properties window that appears next, select Open this dataset to enter a parameterized value for the file name.
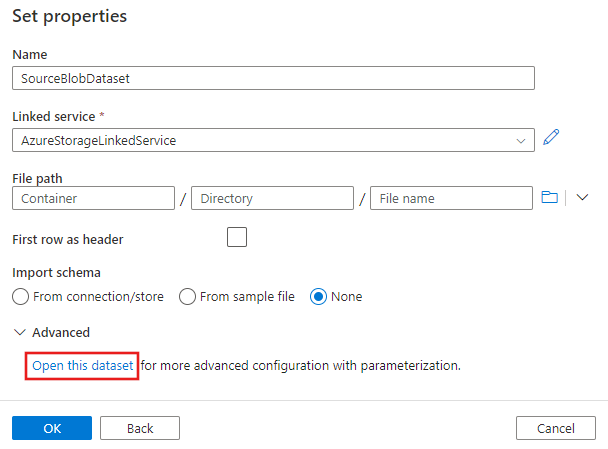
Enter
@pipeline().parameters.sourceBlobContainerfor the folder andemp.txtfor the file name.
Switch back to the pipeline tab (or click the pipeline in the treeview on the left), and select the Copy activity on the designer. Confirm that your new dataset is selected for Source Dataset.
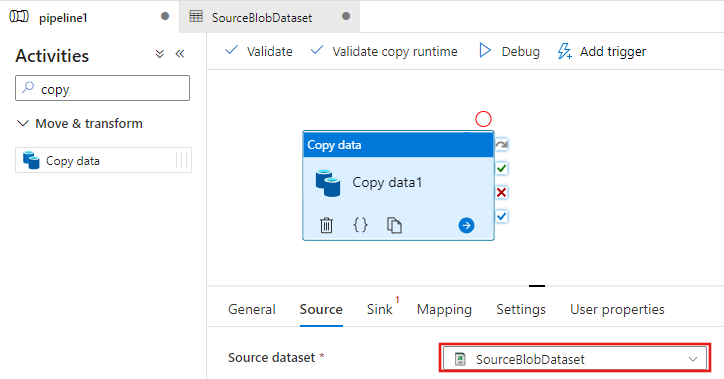
In the properties window, switch to the Sink tab, and click + New for Sink Dataset. You create a sink dataset for the copy activity in this step similar to the way you created the source dataset.

In the New Dataset window, select Azure Blob Storage, and click Continue, and then select DelimitedText again on the Select format window and click Continue again.
In the Set properties page for the dataset, enter SinkBlobDataset for Name, and select AzureStorageLinkedService for LinkedService.
Expand the Advanced section of the properties page and select Open this dataset.
On the dataset Connection tab, edit the File path. Enter
@pipeline().parameters.sinkBlobContainerfor the folder, and@concat(pipeline().RunId, '.txt')for the file name. The expression uses the ID of the current pipeline run for the file name. For the supported list of system variables and expressions, see System variables and Expression language.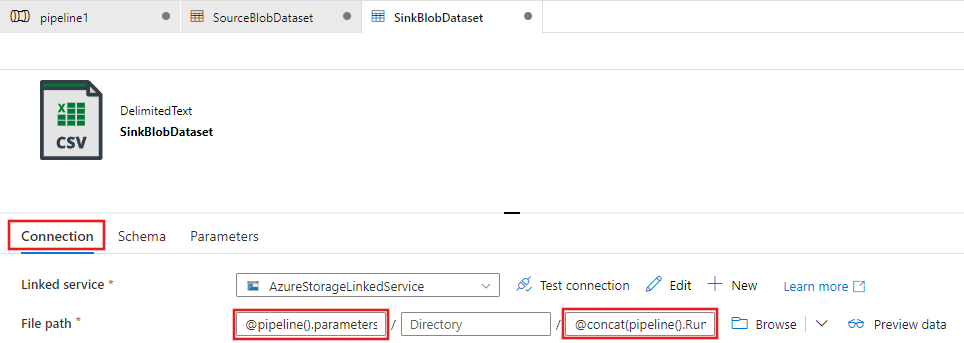
Switch back to the pipeline tab at the top. Search for Web in the search box, and drag-drop a Web activity to the pipeline designer surface. Set the name of the activity to SendSuccessEmailActivity. The Web Activity allows a call to any REST endpoint. For more information about the activity, see Web Activity. This pipeline uses a Web Activity to call the Logic Apps email workflow.
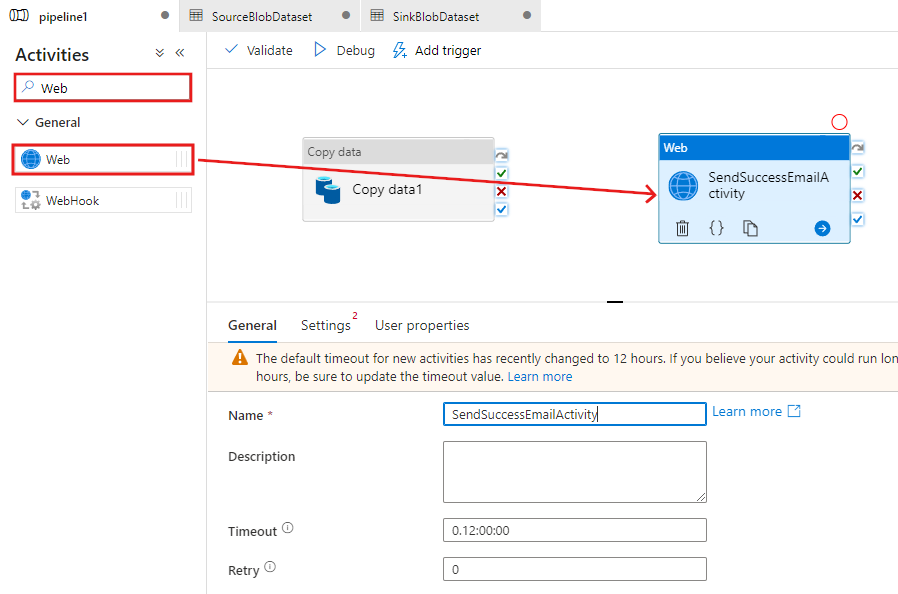
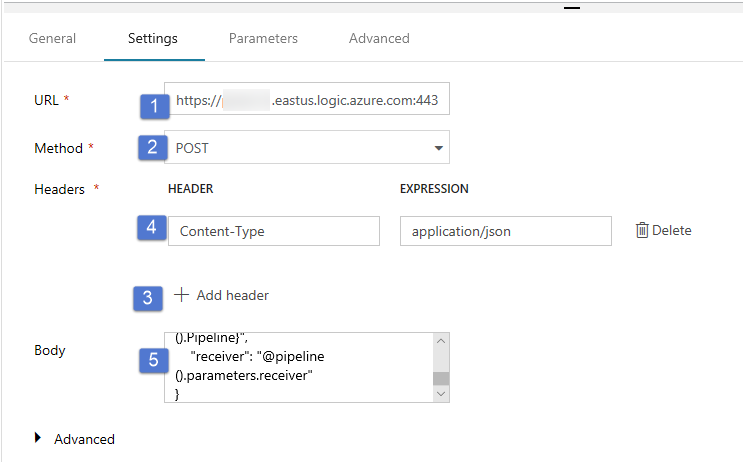
Switch to the Settings tab from the General tab, and do the following steps:
For URL, specify URL for the logic apps workflow that sends the success email.
Select POST for Method.
Click + Add header link in the Headers section.
Add a header Content-Type and set it to application/json.
Specify the following JSON for Body.
{
    "message": "@{activity('Copy1').output.dataWritten}",
    "dataFactoryName": "@{pipeline().DataFactory}",
    "pipelineName": "@{pipeline().Pipeline}",
    "receiver": "@pipeline().parameters.receiver"
}
The message body contains the following properties:
Message - Passing value of
@{activity('Copy1').output.dataWritten. Accesses a property of the previous copy activity and passes the value of dataWritten. For the failure case, pass the error output instead of@{activity('CopyBlobtoBlob').error.message.Data Factory Name - Passing value of
@{pipeline().DataFactory}This is a system variable, allowing you to access the corresponding data factory name. For a list of system variables, see System Variables article.Pipeline Name - Passing value of
@{pipeline().Pipeline}. This is also a system variable, allowing you to access the corresponding pipeline name.Receiver - Passing value of "@pipeline().parameters.receiver"). Accessing the pipeline parameters.
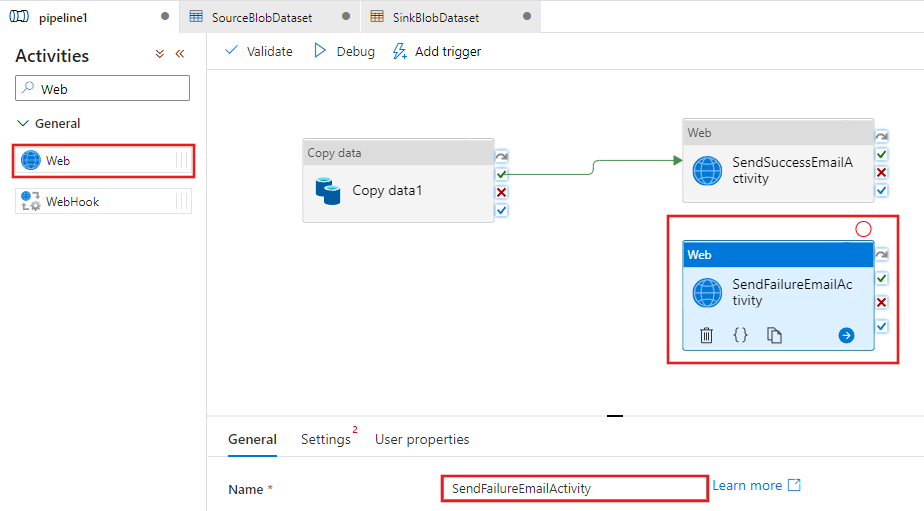
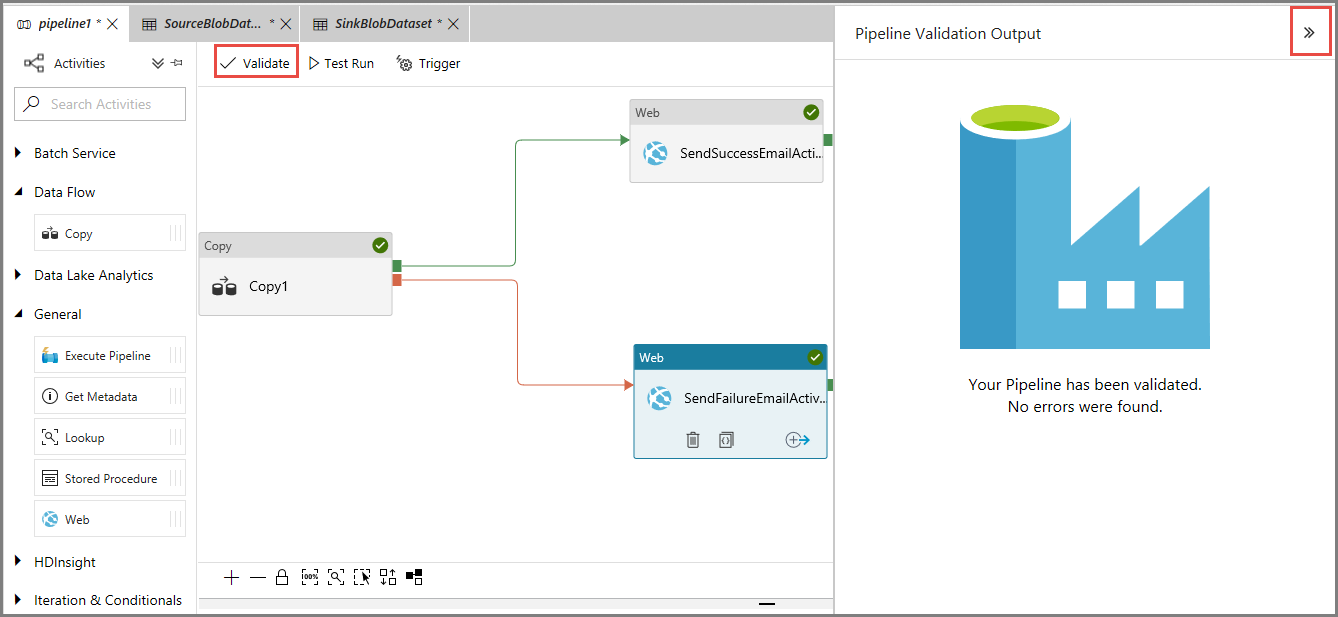
Connect the Copy activity to the Web activity by dragging the green checkbox button next to the Copy activity and dropping on the Web activity.

Drag-drop another Web activity from the Activities toolbox to the pipeline designer surface, and set the name to SendFailureEmailActivity.
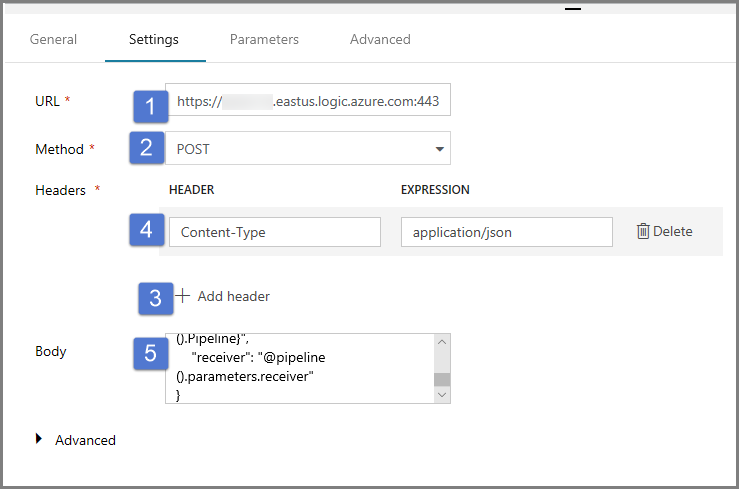
Switch to the Settings tab, and do the following steps:
For URL, specify URL for the logic apps workflow that sends the failure email.
Select POST for Method.
Click + Add header link in the Headers section.
Add a header Content-Type and set it to application/json.
Specify the following JSON for Body.
{
    "message": "@{activity('Copy1').error.message}",
    "dataFactoryName": "@{pipeline().DataFactory}",
    "pipelineName": "@{pipeline().Pipeline}",
    "receiver": "@pipeline().parameters.receiver"
}
Select the red X button on the right side of the Copy activity in the pipeline designer and drag and drop it onto the SendFailureEmailActivity you just created.
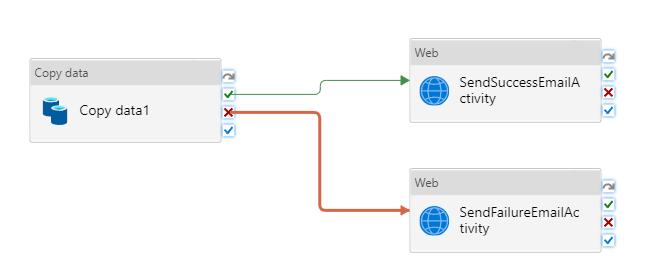
To validate the pipeline, click Validate button on the toolbar. Close the Pipeline Validation Output window by clicking the >> button.
To publish the entities (datasets, pipelines, etc.) to Data Factory service, select Publish All. Wait until you see the Successfully published message.

Trigger a pipeline run that succeeds
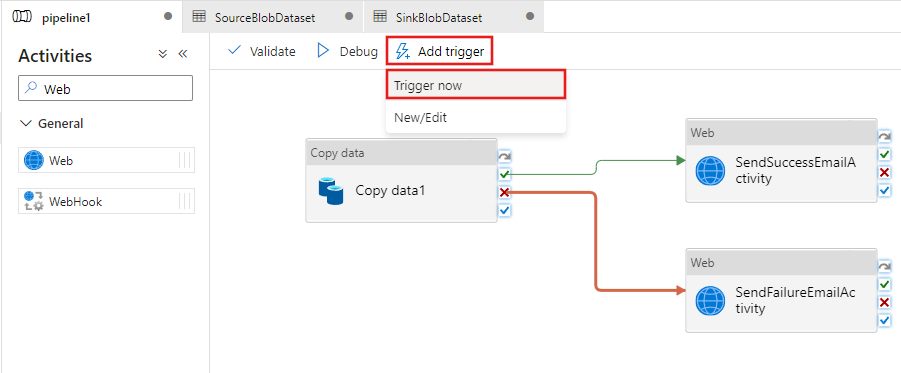
To trigger a pipeline run, click Trigger on the toolbar, and click Trigger Now.
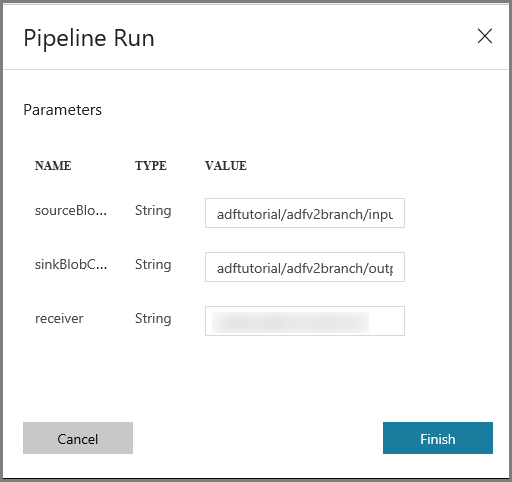
In the Pipeline Run window, do the following steps:
Enter adftutorial/adfv2branch/input for the sourceBlobContainer parameter.
Enter adftutorial/adfv2branch/output for the sinkBlobContainer parameter.
Enter an email address of the receiver.
Click Finish
Monitor the successful pipeline run
To monitor the pipeline run, switch to the Monitor tab on the left. You see the pipeline run that was triggered manually by you. Use the Refresh button to refresh the list.

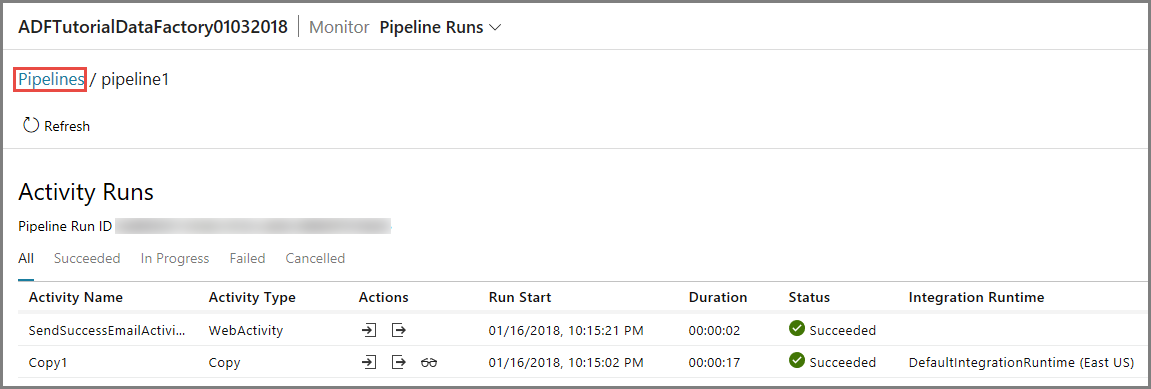
To view activity runs associated with this pipeline run, click the first link in the Actions column. You can switch back to the previous view by clicking Pipelines at the top. Use the Refresh button to refresh the list.
Trigger a pipeline run that fails
Switch to the Edit tab on the left.
To trigger a pipeline run, click Trigger on the toolbar, and click Trigger Now.
In the Pipeline Run window, do the following steps:
- Enter adftutorial/dummy/input for the sourceBlobContainer parameter. Ensure that the dummy folder does not exist in the adftutorial container.
- Enter adftutorial/dummy/output for the sinkBlobContainer parameter.
- Enter an email address of the receiver.
- Click Finish.
Monitor the failed pipeline run
To monitor the pipeline run, switch to the Monitor tab on the left. You see the pipeline run that was triggered manually by you. Use the Refresh button to refresh the list.

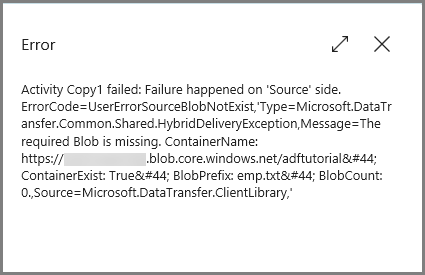
Click Error link for the pipeline run to see details about the error.
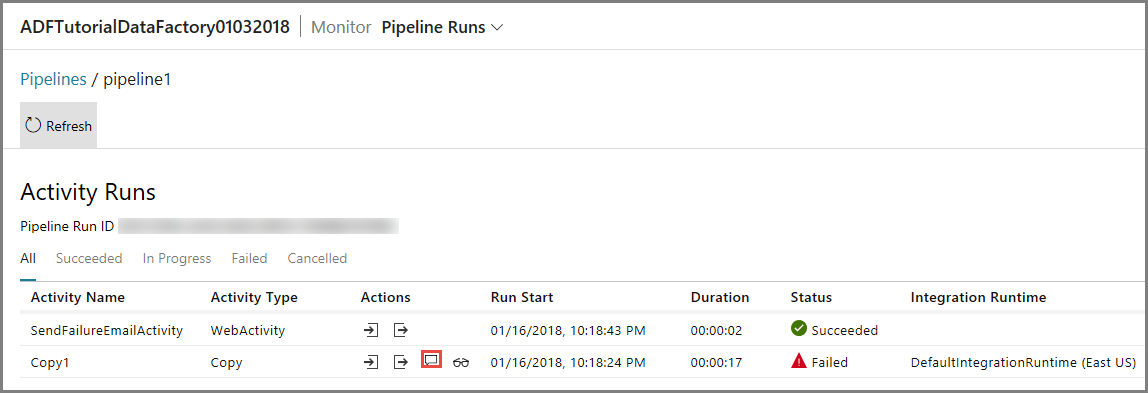
To view activity runs associated with this pipeline run, click the first link in the Actions column. Use the Refresh button to refresh the list. Notice that the Copy activity in the pipeline failed. The Web activity succeeded to send the failure email to the specified receiver.
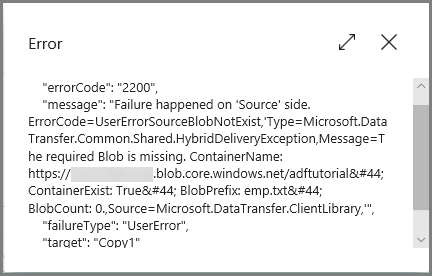
Click Error link in the Actions column to see details about the error.
Related content
You performed the following steps in this tutorial:
- Create a data factory.
- Create an Azure Storage linked service.
- Create an Azure Blob dataset
- Create a pipeline that contains a copy activity and a web activity
- Send outputs of activities to subsequent activities
- Utilize parameter passing and system variables
- Start a pipeline run
- Monitor the pipeline and activity runs
You can now proceed to the Concepts section for more information about Azure Data Factory.