Deploy applications to compute nodes with Batch application packages
Application packages can simplify the code in your Azure Batch solution and make it easier to manage the applications that your tasks run. With application packages, you can upload and manage multiple versions of the applications your tasks run, including their supporting files. You can then automatically deploy one or more of these applications to the compute nodes in your pool.
The APIs for creating and managing application packages are part of the Batch Management .NET library. The APIs for installing application packages on a compute node are part of the Batch .NET library. Comparable features are in the available Batch APIs for other programming languages.
This article explains how to upload and manage application packages in the Azure portal. It also shows how to install them on a pool's compute nodes with the Batch .NET library.
Application package requirements
To use application packages, you need to link an Azure Storage account to your Batch account.
There are restrictions on the number of applications and application packages within a Batch account and on the maximum application package size. For more information, see Batch service quotas and limits.
Note
Batch pools created prior to July 5, 2017 do not support application packages (unless they were created after March 10, 2016 by using Cloud Services Configuration). The application packages feature described here supersedes the Batch Apps feature available in previous versions of the service.
Understand applications and application packages
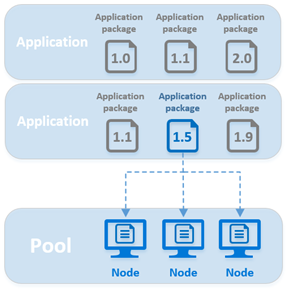
Within Azure Batch, an application refers to a set of versioned binaries that can be automatically downloaded to the compute nodes in your pool. An application contains one or more application packages, which represent different versions of the application.
Each application package is a .zip file that contains the application binaries and any supporting files. Only the .zip format is supported.

You can specify application packages at the pool or task level.
Pool application packages are deployed to every node in the pool. Applications are deployed when a node joins a pool and when it's rebooted or reimaged.
Pool application packages are appropriate when all nodes in a pool run a job's tasks. You can specify one or more application packages to deploy when you create a pool. You can also add or update an existing pool's packages. To install a new package to an existing pool, you must restart its nodes.
Task application packages are deployed only to a compute node scheduled to run a task, just before running the task's command line. If the specified application package and version is already on the node, it isn't redeployed and the existing package is used.
Task application packages are useful in shared-pool environments, where different jobs run on one pool, and the pool isn't deleted when a job completes. If your job has fewer tasks than nodes in the pool, task application packages can minimize data transfer, since your application is deployed only to the nodes that run tasks.
Other scenarios that can benefit from task application packages are jobs that run a large application but for only a few tasks. For example, task applications might be useful for a heavyweight preprocessing stage or a merge task.
With application packages, your pool's start task doesn't have to specify a long list of individual resource files to install on the nodes. You don't have to manually manage multiple versions of your application files in Azure Storage or on your nodes. And you don't need to worry about generating SAS URLs to provide access to the files in your Azure Storage account. Batch works in the background with Azure Storage to store application packages and deploy them to compute nodes.
Note
The total size of a start task must be less than or equal to 32,768 characters, including resource files and environment variables. If your start task exceeds this limit, using application packages is another option. You can also create a .zip file containing your resource files, upload the file as a blob to Azure Storage, and then unzip it from the command line of your start task.
Upload and manage applications
You can use the Azure portal or the Batch Management APIs to manage the application packages in your Batch account. The following sections explain how to link a storage account, you learn how to add and manage applications and application packages in the Azure portal.
Note
While you can define application values in the Microsoft.Batch/batchAccounts resource of an ARM template, it's not currently possible to use an ARM template to upload application packages to use in your Batch account. You must upload them to your linked storage account as described in Add a new application.
Link a storage account
To use application packages, you must link an Azure Storage account to your Batch account. The Batch service uses the associated storage account to store your application packages. Ideally, you should create a storage account specifically for use with your Batch account.
If you haven't yet configured a storage account, the Azure portal displays a warning the first time you select Applications from the left navigation menu in your Batch account. To need to link a storage account to your Batch account:
- Select the Warning window that states, "No Storage account configured for this batch account."
- Then choose Storage Account set... on the next page.
- Choose the Select a storage account link in the Storage Account Information section.
- Select the storage account you want to use with this batch account in the list on the Choose storage account pane.
- Then select Save on the top left corner of the page.
After you link the two accounts, Batch can automatically deploy the packages stored in the linked Storage account to your compute nodes.
Important
You can't use application packages with Azure Storage accounts configured with firewall rules or with Hierarchical namespace set to Enabled.
The Batch service uses Azure Storage to store your application packages as block blobs. You're charged as normal for the block blob data, and the size of each package can't exceed the maximum block blob size. For more information, see Scalability and performance targets for Blob storage. To minimize costs, be sure to consider the size and number of your application packages, and periodically remove deprecated packages.
Add a new application
To create a new application, you add an application package and specify a unique application ID.
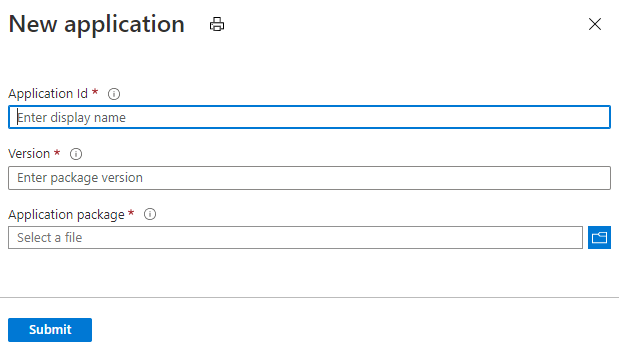
In your Batch account, select Applications from the left navigation menu, and then select Add.

Enter the following information:
- Application ID: The ID of your new application.
- Version": The version for the application package you're uploading.
- Application package: The .zip file containing the application binaries and supporting files that are required to run the application.
The Application ID and Version you enter must follow these requirements:
- On Windows nodes, the ID can contain any combination of alphanumeric characters, hyphens, and underscores. On Linux nodes, only alphanumeric characters and underscores are permitted.
- Can't contain more than 64 characters.
- Must be unique within the Batch account.
- IDs are case-preserving and case-insensitive.
When you're ready, select Submit. After the .zip file has been uploaded to your Azure Storage account, the portal displays a notification. Depending on the size of the file that you're uploading and the speed of your network connection, this process might take some time.
View current applications
To view the applications in your Batch account, select Applications in the left navigation menu.

Selecting this menu option opens the Applications window. This window displays the ID of each application in your account and the following properties:
- Packages: The number of versions associated with this application.
- Default version: If applicable, the application version that is installed if no version is specified when deploying the application.
- Allow updates: Specifies whether package updates and deletions are allowed.
To see the file structure of the application package on a compute node, navigate to your Batch account in the Azure portal. Select Pools. Then select the pool that contains the compute node. Select the compute node on which the application package is installed and open the applications folder.
View application details
To see the details for an application, select it in the Applications window. You can configure your application by selecting Settings in the left navigation menu.
- Allow updates: Indicates whether application packages can be updated or deleted. The default is Yes. If set to No, existing application packages can't be updated or deleted, but new application package versions can still be added.
- Default version: The default application package to use when the application is deployed if no version is specified.
- Display name: A friendly name that your Batch solution can use when it displays information about the application. For example, this name can be used in the UI of a service that you provide to your customers through Batch.
Add a new application package
To add an application package version for an existing application, select the application on the Applications page of your Batch account. Then select Add.
As you did for the new application, specify the Version for your new package, upload your .zip file in the Application package field, and then select Submit.
Update or delete an application package
To update or delete an existing application package, select the application on the Applications page of your Batch account. Select the ellipsis in the row of the application package that you want to modify. Then select the action that you want to perform.

If you select Update, you can upload a new .zip file. This file replaces the previous .zip file that you uploaded for that version.
If you select Delete, you're prompted to confirm the deletion of that version. After you select OK, Batch deletes the .zip file from your Azure Storage account. If you delete the default version of an application, the Default version setting is removed for that application.
Install applications on compute nodes
You've learned how to manage application packages in the Azure portal. Now you can learn how to deploy them to compute nodes and run them with Batch tasks.
Install pool application packages
To install an application package on all compute nodes in a pool, specify one or more application package references for the pool. The application packages that you specify for a pool are installed on each compute node that joins the pool and on any node that is rebooted or reimaged.
In Batch .NET, specify one or more CloudPool.ApplicationPackageReferences when you create a new pool or when you use an existing pool. The ApplicationPackageReference class specifies an application ID and version to install on a pool's compute nodes.
// Create the unbound CloudPool
CloudPool myCloudPool =
    batchClient.PoolOperations.CreatePool(
        poolId: "myPool",
        targetDedicatedComputeNodes: 1,
        virtualMachineSize: "standard_d1_v2",
        VirtualMachineConfiguration: new VirtualMachineConfiguration(
            imageReference: new ImageReference(
                                publisher: "MicrosoftWindowsServer",
                                offer: "WindowsServer",
                                sku: "2019-datacenter-core",
                                version: "latest"),
            nodeAgentSkuId: "batch.node.windows amd64");

// Specify the application and version to install on the compute nodes
myCloudPool.ApplicationPackageReferences = new List<ApplicationPackageReference>
{
    new ApplicationPackageReference {
        ApplicationId = "litware",
        Version = "1.1001.2b" }
};

// Commit the pool so that it's created in the Batch service. As the nodes join
// the pool, the specified application package is installed on each.
await myCloudPool.CommitAsync();
Important
If an application package deployment fails, the Batch service marks the node unusable and no tasks are scheduled for execution on that node. If this happens, restart the node to reinitiate the package deployment. Restarting the node also enables task scheduling again on the node.
Install task application packages
Similar to a pool, you specify application package references for a task. When a task is scheduled to run on a node, the package is downloaded and extracted just before the task's command line runs. If a specified package and version is already installed on the node, the package isn't downloaded and the existing package is used.
To install a task application package, configure the task's CloudTask.ApplicationPackageReferences property:
CloudTask task =
    new CloudTask(
        "litwaretask001",
        "cmd /c %AZ_BATCH_APP_PACKAGE_LITWARE%\\litware.exe -args -here");

task.ApplicationPackageReferences = new List<ApplicationPackageReference>
{
    new ApplicationPackageReference
    {
        ApplicationId = "litware",
        Version = "1.1001.2b"
    }
};
Execute the installed applications
The packages that you specify for a pool or task are downloaded and extracted to a named directory within the AZ_BATCH_ROOT_DIR of the node. Batch also creates an environment variable that contains the path to the named directory. Your task command lines use this environment variable when referencing the application on the node.
On Windows nodes, the variable is in the following format:
Windows:
AZ_BATCH_APP_PACKAGE_APPLICATIONID#version
On Linux nodes, the format is slightly different. Periods (.), hyphens (-) and number signs (#) are flattened to underscores in the environment variable. Also, the case of the application ID is preserved. For example:
Linux:
AZ_BATCH_APP_PACKAGE_applicationid_version
APPLICATIONID and version are values that correspond to the application and package version you've specified for deployment. For example, if you specify that version 2.7 of application blender should be installed on Windows nodes, your task command lines would use this environment variable to access its files:
Windows:
AZ_BATCH_APP_PACKAGE_BLENDER#2.7
On Linux nodes, specify the environment variable in this format. Flatten the periods (.), hyphens (-) and number signs (#) to underscores, and preserve the case of the application ID:
Linux:
AZ_BATCH_APP_PACKAGE_blender_2_7
When you upload an application package, you can specify a default version to deploy to your compute nodes. If you've specified a default version for an application, you can omit the version suffix when you reference the application. You can specify the default application version in the Azure portal, in the Applications window, as shown in Upload and manage applications.
For example, if you set "2.7" as the default version for application blender, and your tasks reference the following environment variable, then your Windows nodes use version 2.7:
AZ_BATCH_APP_PACKAGE_BLENDER
The following code snippet shows an example task command line that launches the default version of the blender application:
string taskId = "blendertask01";
string commandLine =
    @"cmd /c %AZ_BATCH_APP_PACKAGE_BLENDER%\blender.exe -args -here";
CloudTask blenderTask = new CloudTask(taskId, commandLine);
Tip
For more information about compute node environment settings, see Environment settings for tasks.
Update a pool's application packages
If an existing pool has already been configured with an application package, you can specify a new package for the pool. This means:
- The Batch service installs the newly specified package on all new nodes that join the pool and on any existing node that is rebooted or reimaged.
- Compute nodes that are already in the pool when you update the package references don't automatically install the new application package. These compute nodes must be rebooted or reimaged to receive the new package.
- When a new package is deployed, the created environment variables reflect the new application package references.
In this example, the existing pool has version 2.7 of the blender application configured as one of its CloudPool.ApplicationPackageReferences. To update the pool's nodes with version 2.76b, specify a new ApplicationPackageReference with the new version, and commit the change.
string newVersion = "2.76b";
CloudPool boundPool = await batchClient.PoolOperations.GetPoolAsync("myPool");
boundPool.ApplicationPackageReferences = new List<ApplicationPackageReference>
{
    new ApplicationPackageReference {
        ApplicationId = "blender",
        Version = newVersion }
};
await boundPool.CommitAsync();
Now that the new version has been configured, the Batch service installs version 2.76b to any new node that joins the pool. To install 2.76b on the nodes that are already in the pool, reboot or reimage them. Rebooted nodes retain files from previous package deployments.
List the applications in a Batch account
You can list the applications and their packages in a Batch account by using the ApplicationOperations.ListApplicationSummaries method.
// List the applications and their application packages in the Batch account.
List<ApplicationSummary> applications = await batchClient.ApplicationOperations.ListApplicationSummaries().ToListAsync();
foreach (ApplicationSummary app in applications)
{
    Console.WriteLine("ID: {0} | Display Name: {1}", app.Id, app.DisplayName);

    foreach (string version in app.Versions)
    {
        Console.WriteLine("  {0}", version);
    }
}
Next steps
- The Batch REST API also provides support to work with application packages. For example, see the applicationPackageReferences element for how to specify packages to install, and Applications for how to obtain application information.
- Learn how to programmatically manage Azure Batch accounts and quotas with Batch Management .NET. The Batch Management .NET library can enable account creation and deletion features for your Batch application or service.