Tutorial: Import SQL BACPAC files with ARM templates
Learn how to use Azure SQL Database extensions to import a BACPAC file with Azure Resource Manager templates (ARM templates). Deployment artifacts are any files, in addition to the main template files, that are needed to complete a deployment. The BACPAC file is an artifact.
In this tutorial, you create a template to deploy a logical SQL server and a single database and import a BACPAC file. For information about how to deploy Azure virtual machine extensions by using ARM templates, see Tutorial: Deploy virtual machine extensions with ARM templates.
This tutorial covers the following tasks:
- Prepare a BACPAC file.
- Open a quickstart template.
- Edit the template.
- Deploy the template.
- Verify the deployment.
If you don't have an Azure subscription, create a free account before you begin.
Prerequisites
To complete this article, you need:
Visual Studio Code with the Resource Manager Tools extension. See Quickstart: Create ARM templates with Visual Studio Code.
To increase security, use a generated password for the server administrator account. You can use Azure Cloud Shell to run the following command in PowerShell or Bash:
openssl rand -base64 32To learn more, run
man openssl randto open the manual page.Azure Key Vault is designed to safeguard cryptographic keys and other secrets. For more information, see Tutorial: Integrate Azure Key Vault in ARM template deployment. We also recommend you to update your password every three months.
Prepare a BACPAC file
A BACPAC file is shared in GitHub. To create your own, see Export a database from Azure SQL Database to a BACPAC file. If you choose to publish the file to your own location, you must update the template later in the tutorial.
The BACPAC file must be stored in an Azure Storage account before it can be imported with an ARM template. The following PowerShell script prepares the BACPAC file with these steps:
- Download the BACPAC file.
- Create an Azure Storage account.
- Create a storage account blob container.
- Upload the BACPAC file to the container.
- Display the storage account key, blob URL, resource group name, and location.
Select Try It to open Cloud Shell. Then copy and paste the following PowerShell script into the shell window.
$projectName = Read-Host -Prompt "Enter a project name that is used to generate Azure resource names"
$location = Read-Host -Prompt "Enter the location (i.e. centralus)"

$resourceGroupName = "${projectName}rg"
$storageAccountName = "${projectName}store"
$containerName = "bacpacfiles"
$bacpacFileName = "SQLDatabaseExtension.bacpac"
$bacpacUrl = "https://github.com/Azure/azure-docs-json-samples/raw/master/tutorial-sql-extension/SQLDatabaseExtension.bacpac"

# Download the bacpac file
Invoke-WebRequest -Uri $bacpacUrl -OutFile "$HOME/$bacpacFileName"

# Create a resource group
New-AzResourceGroup -Name $resourceGroupName -Location $location

# Create a storage account
$storageAccount = New-AzStorageAccount -ResourceGroupName $resourceGroupName `
                                       -Name $storageAccountName `
                                       -SkuName Standard_LRS `
                                       -Location $location
$storageAccountKey = (Get-AzStorageAccountKey -ResourceGroupName $resourceGroupName `
                                              -Name $storageAccountName).Value[0]

# Create a container
New-AzStorageContainer -Name $containerName -Context $storageAccount.Context

# Upload the BACPAC file to the container
Set-AzStorageBlobContent -File $HOME/$bacpacFileName `
                         -Container $containerName `
                         -Blob $bacpacFileName `
                         -Context $storageAccount.Context

Write-Host "The project name:        $projectName `
  The location:            $location `
  The storage account key: $storageAccountKey `
  The BACPAC file URL:     https://$storageAccountName.blob.core.windows.net/$containerName/$bacpacFileName `
  "

Write-Host "Press [ENTER] to continue ..."
Save the storage account key, BACPAC file URL, project name, and location. You'll use those values when you deploy the template later in this tutorial.
Open a quickstart template
The template used in this tutorial is stored in GitHub.
From Visual Studio Code, select File > Open File.
In File name, paste the following URL:
https://raw.githubusercontent.com/Azure/azure-docs-json-samples/master/tutorial-sql-extension/azuredeploy.jsonSelect Open to open the file.
There are two resources defined in the template:
Microsoft.Sql/servers. See the template reference.Microsoft.SQL.servers/databases. See the template reference.It's helpful to get some basic understanding of the template before you customize it.
Select File > Save As to save a copy of the file to your local computer with the name azuredeploy.json.
Edit the template
Add two parameters at the end of the
parameterssection to set the storage account key and the BACPAC URL."storageAccountKey": { "type":"string", "metadata":{ "description": "Specifies the key of the storage account where the BACPAC file is stored." } }, "bacpacUrl": { "type":"string", "metadata":{ "description": "Specifies the URL of the BACPAC file." } }Add a comma after the
adminPasswordproperty's closing curly brace (}). To format the JSON file from Visual Studio Code, select Shift+Alt+F.Add two resources to the template.
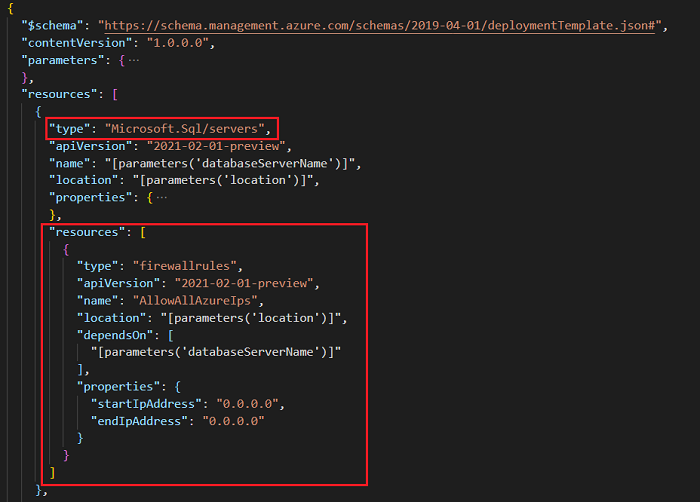
To allow the SQL Database extension to import BACPAC files, you must allow traffic from Azure services. When the SQL server is deployed, the firewall rule turns on the setting for Allow Azure services and resources to access this server.
Add the following firewall rule under the server definition:
"resources": [
  {
    "type": "firewallrules",
    "apiVersion": "2021-02-01-preview",
    "name": "AllowAllAzureIps",
    "location": "[parameters('location')]",
    "dependsOn": [
      "[parameters('databaseServerName')]"
    ],
    "properties": {
      "startIpAddress": "0.0.0.0",
      "endIpAddress": "0.0.0.0"
    }
  }
]
The following example shows the updated template:

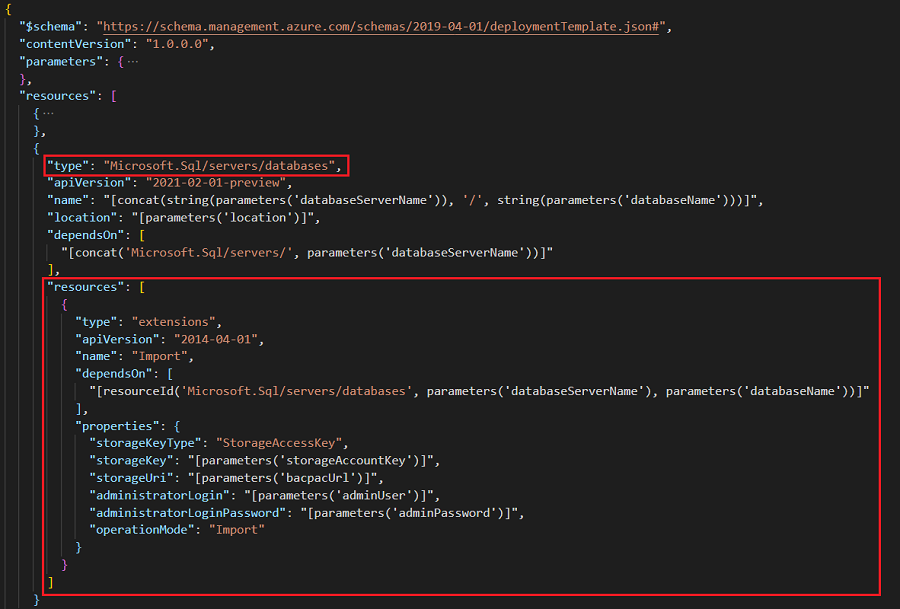
Add a SQL Database extension resource to the database definition with the following JSON:
"resources": [
  {
    "type": "extensions",
    "apiVersion": "2014-04-01",
    "name": "Import",
    "dependsOn": [
      "[resourceId('Microsoft.Sql/servers/databases', parameters('databaseServerName'), parameters('databaseName'))]"
    ],
    "properties": {
      "storageKeyType": "StorageAccessKey",
      "storageKey": "[parameters('storageAccountKey')]",
      "storageUri": "[parameters('bacpacUrl')]",
      "administratorLogin": "[parameters('adminUser')]",
      "administratorLoginPassword": "[parameters('adminPassword')]",
      "operationMode": "Import"
    }
  }
]
The following example shows the updated template:

To understand the resource definition, see the API version's SQL Database extension reference. The following are some important elements:
dependsOn: The extension resource must be created after the database has been created.storageKeyType: Specify the type of the storage key to use. The value can be eitherStorageAccessKeyorSharedAccessKey. UseStorageAccessKeyin this tutorial.storageKey: Specify the key for the storage account where the BACPAC file is stored. If the storage key type isSharedAccessKey, it must be preceded with a "?".storageUri: Specify the URL of the BACPAC file stored in a storage account.administratorLogin: The SQL administrator's account name.administratorLoginPassword: The SQL administrator's password. To use a generated password, see Prerequisites.
The following example shows the completed template:
{
  "$schema": "https://schema.management.azure.com/schemas/2019-04-01/deploymentTemplate.json#",
  "contentVersion": "1.0.0.0",
  "parameters": {
    "databaseServerName": {
      "type": "string",
      "defaultValue": "[concat('server-', uniqueString(resourceGroup().id, deployment().name))]",
      "metadata": {
        "description": "Specifies the name for the SQL server"
      }
    },
    "databaseName": {
      "type": "string",
      "defaultValue": "[concat('db-', uniqueString(resourceGroup().id, deployment().name), '-1')]",
      "metadata": {
        "description": "Specifies the name for the SQL database under the SQL server"
      }
    },
    "location": {
      "type": "string",
      "defaultValue": "[resourceGroup().location]",
      "metadata": {
        "description": "Specifies the location for server and database"
      }
    },
    "adminUser": {
      "type": "string",
      "metadata": {
        "description": "Specifies the username for admin"
      }
    },
    "adminPassword": {
      "type": "securestring",
      "metadata": {
        "description": "Specifies the password for admin"
      }
    },
    "storageAccountKey": {
      "type": "string",
      "metadata": {
        "description": "Specifies the key of the storage account where the BACPAC file is stored."
      }
    },
    "bacpacUrl": {
      "type": "string",
      "metadata": {
        "description": "Specifies the URL of the BACPAC file."
      }
    }
  },
  "resources": [
    {
      "type": "Microsoft.Sql/servers",
      "apiVersion": "2021-02-01-preview",
      "name": "[parameters('databaseServerName')]",
      "location": "[parameters('location')]",
      "properties": {
        "administratorLogin": "[parameters('adminUser')]",
        "administratorLoginPassword": "[parameters('adminPassword')]",
        "version": "12.0"
      },
      "resources": [
        {
          "type": "firewallrules",
          "apiVersion": "2021-02-01-preview",
          "name": "AllowAllAzureIps",
          "location": "[parameters('location')]",
          "dependsOn": [
            "[parameters('databaseServerName')]"
          ],
          "properties": {
            "startIpAddress": "0.0.0.0",
            "endIpAddress": "0.0.0.0"
          }
        }
      ]
    },
    {
      "type": "Microsoft.Sql/servers/databases",
      "apiVersion": "2021-02-01-preview",
      "name": "[concat(string(parameters('databaseServerName')), '/', string(parameters('databaseName')))]",
      "location": "[parameters('location')]",
      "dependsOn": [
        "[concat('Microsoft.Sql/servers/', parameters('databaseServerName'))]"
      ],
      "resources": [
        {
          "type": "extensions",
          "apiVersion": "2014-04-01",
          "name": "Import",
          "dependsOn": [
            "[resourceId('Microsoft.Sql/servers/databases', parameters('databaseServerName'), parameters('databaseName'))]"
          ],
          "properties": {
            "storageKeyType": "StorageAccessKey",
            "storageKey": "[parameters('storageAccountKey')]",
            "storageUri": "[parameters('bacpacUrl')]",
            "administratorLogin": "[parameters('adminUser')]",
            "administratorLoginPassword": "[parameters('adminPassword')]",
            "operationMode": "Import"
          }
        }
      ]
    }
  ]
}
Deploy the template
Use the project name and location that were used when you prepared the BACPAC file. That puts all resources in the same resource group, which is helpful when you delete resources.
Sign in to Cloud Shell.
Select PowerShell from the upper left corner.

Select Upload/Download files and upload your azuredeploy.json file.
To deploy the template, copy and paste the following script into the shell window.
$projectName = Read-Host -Prompt "Enter the same project name that is used earlier"
$adminUsername = Read-Host -Prompt "Enter the SQL admin username"
$adminPassword = Read-Host -Prompt "Enter the admin password" -AsSecureString
$storageAccountKey = Read-Host -Prompt "Enter the storage account key"
$bacpacUrl = Read-Host -Prompt "Enter the URL of the BACPAC file"
$resourceGroupName = "${projectName}rg"

New-AzResourceGroupDeployment `
    -ResourceGroupName $resourceGroupName `
    -adminUser $adminUsername `
    -adminPassword $adminPassword `
    -TemplateFile "$HOME/azuredeploy.json" `
    -storageAccountKey $storageAccountKey `
    -bacpacUrl $bacpacUrl

Write-Host "Press [ENTER] to continue ..."
Verify the deployment
To access the server from your client computer, you need to add a firewall rule. Your client's IP address and the IP address that's used to connect to the server might be different because of network address translation (NAT). For more information, see Create and manage IP firewall rules.
For example, when you sign in to Query editor a message is displayed that the IP address isn't allowed. The address is different from your client's IP address because of NAT. Select the message's link to add a firewall rule for the IP address. When you're finished, you can delete the IP address from the server's Firewalls and virtual networks settings.
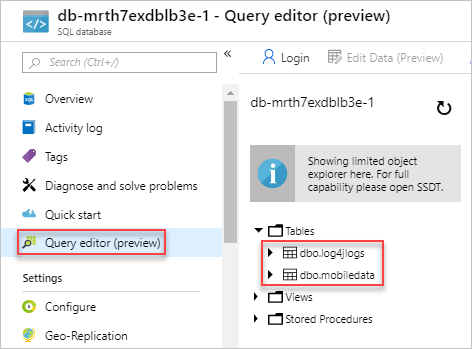
In the Azure portal, from the resource group select the database. Select Query editor (preview), and enter the administrator credentials. You'll see two tables were imported into the database.

Clean up resources
When the Azure resources you deployed are no longer needed, delete the resource group. The resource group, storage account, SQL server, and SQL databases are deleted.
- In the Azure portal, enter Resource groups in the search box.
- In the Filter by name field, enter the resource group name.
- Select the resource group name.
- Select Delete resource group.
- To confirm the deletion, enter the resource group name and select Delete.
Next steps
In this tutorial, you deployed a server and a database and imported a BACPAC file. To learn how to troubleshoot template deployment, see: