Start a runbook from a webhook
A webhook allows an external service to start a particular runbook in Azure Automation through a single HTTP request. External services include Azure DevOps Services, GitHub, Azure Monitor logs, and custom applications. Such a service can use a webhook to start a runbook without implementing the full Azure Automation API. You can compare webhooks to other methods of starting a runbook in Starting a runbook in Azure Automation.
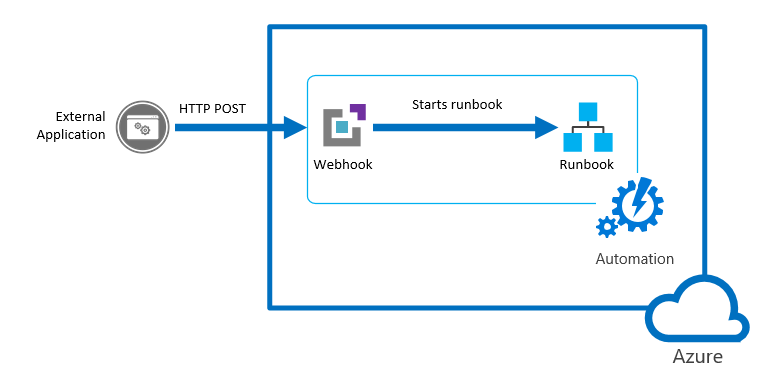
To understand client requirements for TLS 1.2 or higher with webhooks, see TLS for Azure Automation.
Webhook properties
The following table describes the properties that you must configure for a webhook.
| Property | Description |
|---|---|
| Name | Name of the webhook. You can provide any name you want, since it isn't exposed to the client. It's only used for you to identify the runbook in Azure Automation. As a best practice, you should give the webhook a name related to the client that uses it. |
| URL | URL of the webhook. This is the unique address that a client calls with an HTTP POST to start the runbook linked to the webhook. It's automatically generated when you create the webhook. You can't specify a custom URL. The URL contains a security token that allows a third-party system to invoke the runbook with no further authentication. For this reason, you should treat the URL like a password. For security reasons, you can only view the URL in the Azure portal when creating the webhook. Note the URL in a secure location for future use. |
| Expiration date | Expiration date of the webhook, after which it can no longer be used. You can modify the expiration date after the webhook is created, as long as the webhook hasn't expired. |
| Enabled | Setting indicating if the webhook is enabled by default when it's created. If you set this property to Disabled, no client can use the webhook. You can set this property when you create the webhook or any other time after its creation. |
Parameters used when the webhook starts a runbook
A webhook can define values for runbook parameters that are used when the runbook starts. The webhook must include values for any mandatory runbook parameters and can include values for optional parameters. A parameter value configured to a webhook can be modified even after webhook creation. Multiple webhooks linked to a single runbook can each use different runbook parameter values. When a client starts a runbook using a webhook, it can't override the parameter values defined in the webhook.
To receive data from the client, the runbook supports a single parameter called WebhookData. This parameter defines an object containing data that the client includes in a POST request.
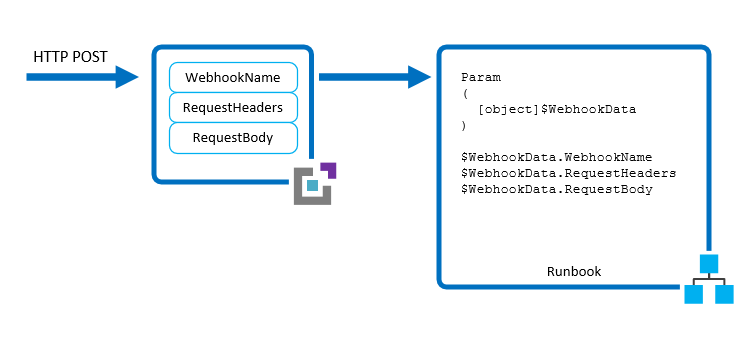
The WebhookData parameter has the following properties:
| Property | Description |
|---|---|
| WebhookName | Name of the webhook. |
| RequestHeader | PSCustomObject containing the headers of the incoming POST request. |
| RequestBody | Body of the incoming POST request. This body keeps any data formatting, such as string, JSON, XML, or form-encoded. The runbook must be written to work with the data format that is expected. |
There's no configuration of the webhook required to support the WebhookData parameter, and the runbook isn't required to accept it. If the runbook doesn't define the parameter, any details of the request sent from the client are ignored.
Note
When calling a webhook, the client should always store any parameter values in case the call fails. If there is a network outage or connection issue, the application can't retrieve failed webhook calls.
If you specify a value for WebhookData at webhook creation, it's overridden when the webhook starts the runbook with the data from the client POST request. This happens even if the application doesn't include any data in the request body.
If you start a runbook that defines WebhookData using a mechanism other than a webhook, you can provide a value for WebhookData that the runbook recognizes. This value should be an object with the same properties as the WebhookData parameter so that the runbook can work with it just as it works with actual WebhookData objects passed by a webhook.
For example, if you're starting the following runbook from the Azure portal and want to pass some sample webhook data for testing, you must pass the data in JSON in the user interface.
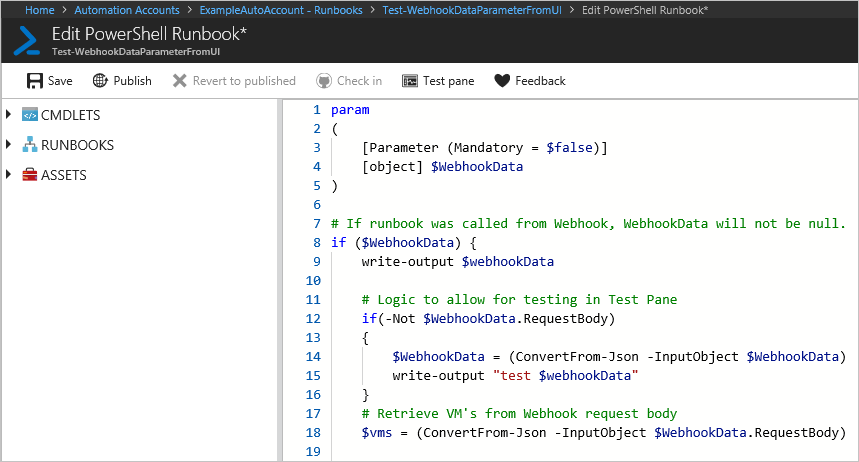
For the next runbook example, let's define the following properties for WebhookData:
- WebhookName: MyWebhook
- RequestBody:
*[{'ResourceGroup': 'myResourceGroup','Name': 'vm01'},{'ResourceGroup': 'myResourceGroup','Name': 'vm02'}]*
Now we pass the following JSON object in the UI for the WebhookData parameter. This example, with carriage returns and newline characters, matches the format that is passed in from a webhook.
{"WebhookName":"mywebhook","RequestBody":"[\r\n {\r\n \"ResourceGroup\": \"vm01\",\r\n \"Name\": \"vm01\"\r\n },\r\n {\r\n \"ResourceGroup\": \"vm02\",\r\n \"Name\": \"vm02\"\r\n }\r\n]"}
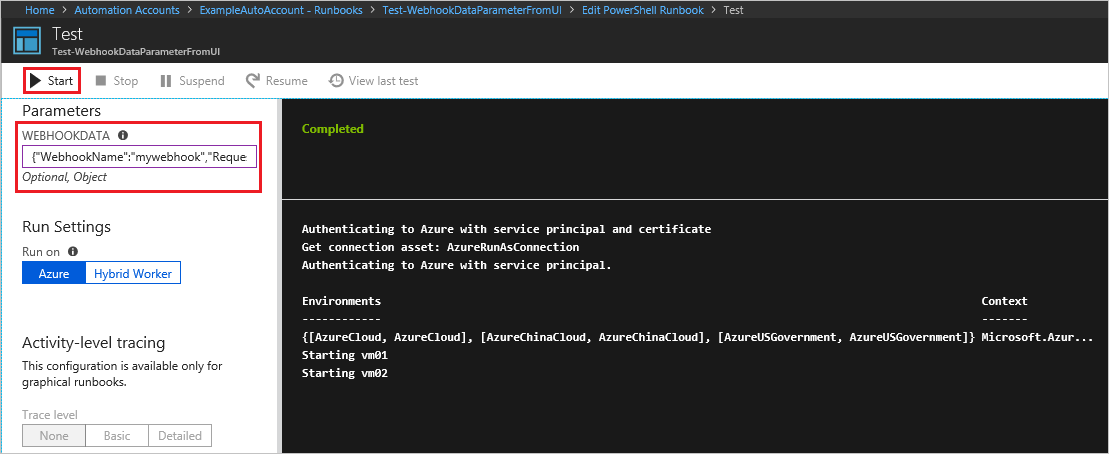
Note
Azure Automation logs the values of all input parameters with the runbook job. Thus any input provided by the client in the webhook request is logged and available to anyone with access to the automation job. For this reason, you should be cautious about including sensitive information in webhook calls.
Webhook security
The security of a webhook relies on the privacy of its URL, which contains a security token that allows the webhook to be invoked. Azure Automation doesn't perform any authentication on a request as long as it's made to the correct URL. For this reason, your clients shouldn't use webhooks for runbooks that perform highly sensitive operations without using an alternate means of validating the request.
Consider the following strategies:
You can include logic within a runbook to determine if it's called by a webhook. Have the runbook check the
WebhookNameproperty of theWebhookDataparameter. The runbook can perform further validation by looking for particular information in theRequestHeaderandRequestBodyproperties.Have the runbook perform some validation of an external condition when it receives a webhook request. For example, consider a runbook that is called by GitHub any time there's a new commit to a GitHub repository. The runbook might connect to GitHub to validate that a new commit has occurred before continuing.
Azure Automation supports Azure virtual network service tags, specifically GuestAndHybridManagement. You can use service tags to define network access controls on network security groups or Azure Firewall and trigger webhooks from within your virtual network. Service tags can be used in place of specific IP addresses when you create security rules. By specifying the service tag name GuestAndHybridManagement in the appropriate source or destination field of a rule, you can allow or deny the traffic for the Automation service. This service tag doesn't support allowing more granular control by restricting IP ranges to a specific region.
Create a webhook
Note
When you use the webhook with PowerShell 7 runbook, it auto-converts the webhook input parameter to an invalid JSON. For more information, see Known issues - PowerShell 7.1 (preview). We recommend that you use the webhook with PowerShell 5 runbook.
Create PowerShell runbook with the following code:
param
(
    [Parameter(Mandatory=$false)]
    [object] $WebhookData
)

write-output "start"
write-output ("object type: {0}" -f $WebhookData.gettype())
write-output $WebhookData
write-output "`n`n"
write-output $WebhookData.WebhookName
write-output $WebhookData.RequestBody
write-output $WebhookData.RequestHeader
write-output "end"

if ($WebhookData.RequestBody) {
    $names = (ConvertFrom-Json -InputObject $WebhookData.RequestBody)

        foreach ($x in $names)
        {
            $name = $x.Name
            Write-Output "Hello $name"
        }
}
else {
    Write-Output "Hello World!"
}
Create a webhook using the Azure portal, or PowerShell or REST API. A webhook requires a published runbook. This walk through uses a modified version of the runbook created from Create an Azure Automation runbook.
Sign in to the Azure portal.
In the Azure portal, navigate to your Automation account.
Under Process Automation, select Runbooks to open the Runbooks page.
Select your runbook from the list to open the Runbook Overview page.
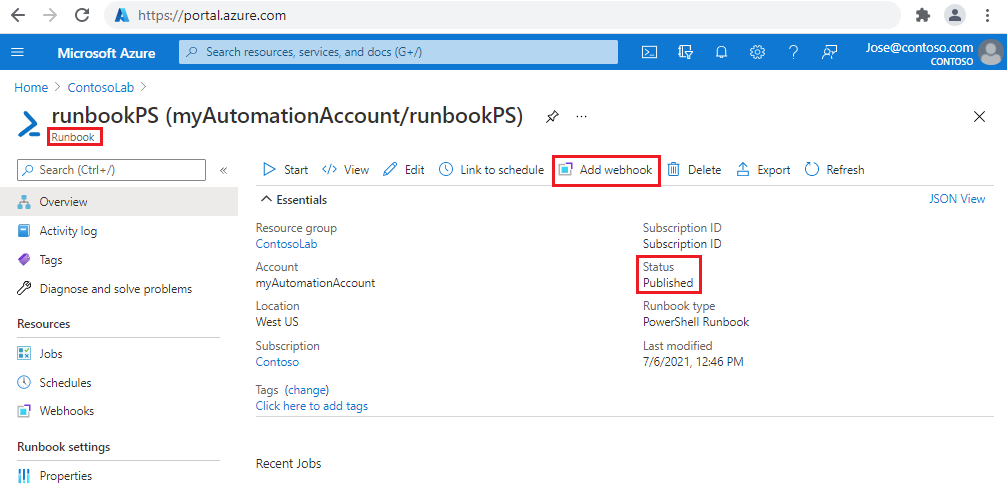
Select Add webhook to open the Add Webhook page.
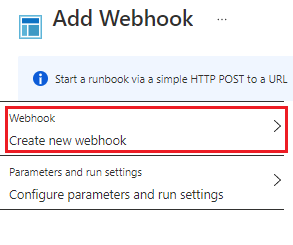
On the Add Webhook page, select Create new webhook.
Enter in the Name for the webhook. The expiration date for the field Expires defaults to one year from the current date.
Click the copy icon or press Ctrl + C copy the URL of the webhook. Then save the URL to a secure location.
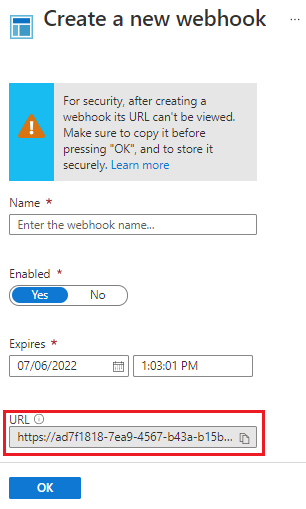
Important
Once you create the webhook, you cannot retrieve the URL again. Make sure you copy and record it as above.
Select OK to return to the Add Webhook page.
From the Add Webhook page, select Configure parameters and run settings to open the Parameters page.
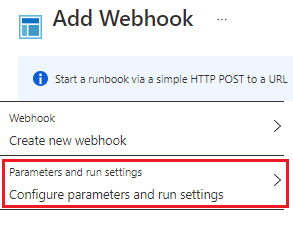
Review the Parameters page. For the example runbook used in this article, no changes are needed. Select OK to return to the Add Webhook page.
From the Add Webhook page, select Create. The webhook is created and you're returned to the Runbook Overview page.
Use a webhook
This example uses the PowerShell cmdlet Invoke-WebRequest to send the POST request to your new webhook.
Prepare values to pass to the runbook as the body for the webhook call. For relatively simple values, you could script the values as follows:
$Names  = @(
            @{ Name="Hawaii"},
            @{ Name="Seattle"},
            @{ Name="Florida"}
        )

$body = ConvertTo-Json -InputObject $Names
For larger sets, you may wish to use a file. Create a file named
names.jsonand then paste the following code:[ { "Name": "Hawaii" }, { "Name": "Florida" }, { "Name": "Seattle" } ]Change the value for the variable
$filewith the actual path to the json file before running the following PowerShell commands.# Revise file path with actual path $file = "path\names.json" $bodyFile = Get-Content -Path $fileRun the following PowerShell commands to call the webhook using the REST API.
$response = Invoke-WebRequest -Method Post -Uri $webhookURI -Body $body -UseBasicParsing
$response

$responseFile = Invoke-WebRequest -Method Post -Uri $webhookURI -Body $bodyFile -UseBasicParsing
$responseFile
For illustrative purposes, two calls were made for the two different methods of producing the body. For production, use only one method. The output should look similar as follows (only one output is shown):

The client receives one of the following return codes from the
POSTrequest.Code Text Description 202 Accepted The request was accepted, and the runbook was successfully queued. 400 Bad Request The request wasn't accepted for one of the following reasons: - The webhook has expired.
- The webhook is disabled.
- The token in the URL is invalid.
404 Not Found The request wasn't accepted for one of the following reasons: - The webhook wasn't found.
- The runbook wasn't found.
- The account wasn't found.
500 Internal Server Error The URL was valid, but an error occurred. Resubmit the request. Assuming the request is successful, the webhook response contains the job ID in JSON format as shown below. It contains a single job ID, but the JSON format allows for potential future enhancements.
{"JobIds":["<JobId>"]}The PowerShell cmdlet Get-AzAutomationJobOutput will be used to get the output. The Azure Automation API could also be used.
#isolate job ID
$jobid = (ConvertFrom-Json ($response.Content)).jobids[0]

# Get output
Get-AzAutomationJobOutput `
    -AutomationAccountName $automationAccount `
    -Id $jobid `
    -ResourceGroupName $resourceGroup `
    -Stream Output
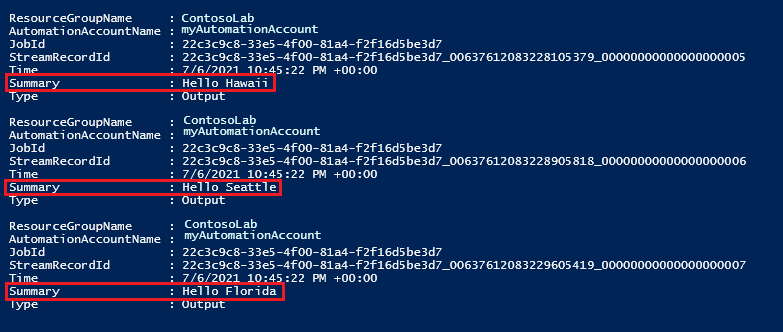
When you trigger a runbook created in the previous step, it will create a job and the output should look similar to the following:
Update a webhook
When a webhook is created, it has a validity time period of 10 years, after which it automatically expires. Once a webhook has expired, you can't reactivate it. You can only remove and then recreate it. You can extend a webhook that hasn't reached its expiration time. To extend a webhook, perform the following steps.
- Navigate to the runbook that contains the webhook.
- Under Resources, select Webhooks, and then the webhook that you want to extend.
- From the Webhook page, choose a new expiration date and time and then select Save.
Review the API call Webhook - Update and PowerShell cmdlet Set-AzAutomationWebhook for other possible modifications.
Clean up resources
Here are examples of removing a webhook from an Automation runbook.
Using PowerShell, the Remove-AzAutomationWebhook cmdlet can be used as shown below. No output is returned.
Remove-AzAutomationWebhook `
    -ResourceGroup $resourceGroup `
    -AutomationAccountName $automationAccount `
    -Name $psWebhook
Using REST, the REST Webhook - Delete API can be used as shown below.
Invoke-WebRequest -Method Delete -Uri $restURI -Headers $authHeaderAn output of
StatusCode : 200means a successful deletion.
Create runbook and webhook with ARM template
Automation webhooks can also be created using Azure Resource Manager templates. This sample template creates an Automation account, four runbooks, and a webhook for the named runbook.
Create a file named
webhook_deploy.jsonand then paste the following code:{ "$schema": "https://schema.management.azure.com/schemas/2019-04-01/deploymentTemplate.json#", "contentVersion": "1.0.0.0", "parameters": { "automationAccountName": { "type": "String", "metadata": { "description": "Automation account name" } }, "webhookName": { "type": "String", "metadata": { "description": "Webhook Name" } }, "runbookName": { "type": "String", "metadata": { "description": "Runbook Name for which webhook will be created" } }, "WebhookExpiryTime": { "type": "String", "metadata": { "description": "Webhook Expiry time" } }, "_artifactsLocation": { "defaultValue": "https://raw.githubusercontent.com/Azure/azure-quickstart-templates/master/quickstarts/microsoft.automation/101-automation/", "type": "String", "metadata": { "description": "URI to artifacts location" } } }, "resources": [ { "type": "Microsoft.Automation/automationAccounts", "apiVersion": "2020-01-13-preview", "name": "[parameters('automationAccountName')]", "location": "[resourceGroup().location]", "properties": { "sku": { "name": "Free" } }, "resources": [ { "type": "runbooks", "apiVersion": "2018-06-30", "name": "[parameters('runbookName')]", "location": "[resourceGroup().location]", "dependsOn": [ "[parameters('automationAccountName')]" ], "properties": { "runbookType": "Python2", "logProgress": "false", "logVerbose": "false", "description": "Sample Runbook", "publishContentLink": { "uri": "[uri(parameters('_artifactsLocation'), 'scripts/AzureAutomationTutorialPython2.py')]", "version": "1.0.0.0" } } }, { "type": "webhooks", "apiVersion": "2018-06-30", "name": "[parameters('webhookName')]", "dependsOn": [ "[parameters('automationAccountName')]", "[parameters('runbookName')]" ], "properties": { "isEnabled": true, "expiryTime": "[parameters('WebhookExpiryTime')]", "runbook": { "name": "[parameters('runbookName')]" } } } ] } ], "outputs": { "webhookUri": { "type": "String", "value": "[reference(parameters('webhookName')).uri]" } } }The following PowerShell code sample deploys the template from your machine. Provide an appropriate value for the variables and then execute the script.
$resourceGroup = "resourceGroup"
$templateFile = "path\webhook_deploy.json"
$armAutomationAccount = "automationAccount"
$armRunbook = "ARMrunbookName"
$armWebhook = "webhookName"
$webhookExpiryTime = "12-31-2022"

New-AzResourceGroupDeployment `
    -Name "testDeployment" `
    -ResourceGroupName $resourceGroup `
    -TemplateFile $templateFile `
    -automationAccountName $armAutomationAccount `
    -runbookName $armRunbook `
    -webhookName $armWebhook `
    -WebhookExpiryTime $webhookExpiryTime
Note
For security reasons, the URI is only returned the first time a template is deployed.
Next steps
- To trigger a runbook from an alert, see Use an alert to trigger an Azure Automation runbook.