Classic release pipelines
TFS 2018
Classic release pipelines provide developers with a framework for deploying applications to multiple environments efficiently and securely. Using classic release pipelines, you can automate testing and deployment processes, set up flexible deployment strategies, incorporate approval workflows, and ensure smooth application transitions across various stages.
How do release pipelines work
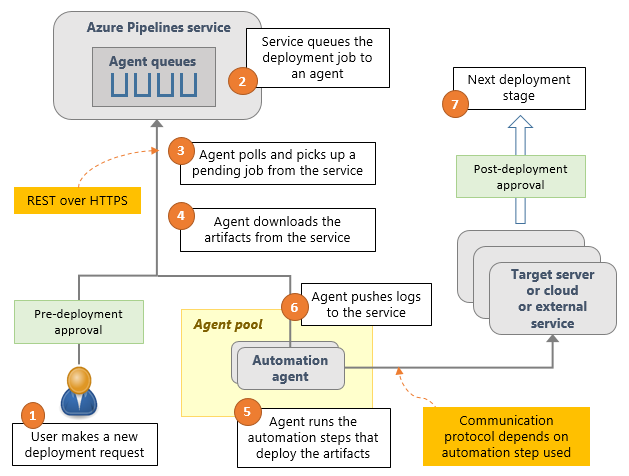
As part of every deployment, Azure Pipelines executes the following steps:
Pre-deployment approval:
When a new deployment request is triggered, Azure Pipelines verifies if a predeployment approval is necessary before deploying a release to a stage. If approval is required, it sends email notifications to the relevant approvers.
Queue deployment job:
Azure Pipelines schedules the deployment job on an available Agent.
Agent selection:
An available agent picks up the deployment job. A release pipeline can be configured to dynamically select a suitable agent during runtime.
Download artifacts:
The agent retrieves and downloads all the artifacts specified in the release.
Run the deployment tasks:
The agent executes all the tasks in the deployment job.
Generate progress logs:
The agent generates comprehensive logs for each deployment step and sends them back to Azure Pipelines.
Post-deployment approval:
After the deployment to a stage is finished, Azure Pipelines verifies if a post-deployment approval is necessary for that particular stage. If no approval is needed, or once a required approval is obtained, it proceeds to initiate the deployment to the next stage.
Deployment model
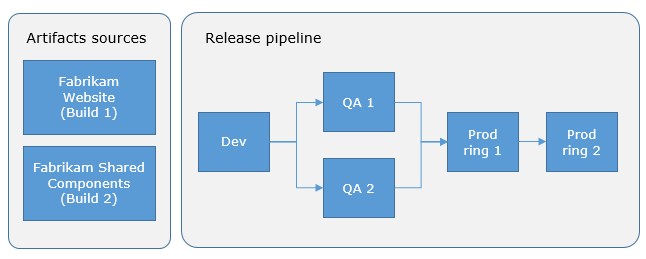
Azure release pipelines support a wide range of artifact sources including Jenkins, Azure Artifacts, and Team City. The following example illustrates a deployment model using Azure release pipelines:
In the following example, the pipeline consists of two build artifacts originating from separate build pipelines. The application is initially deployed to the Dev stage and then to two separate QA stages. If the deployment is successful in both QA stages, the application will be deployed to Prod ring 1 and then to Prod ring 2. Each production ring represents multiple instances of the same web app, deployed to different locations across the world.
FAQ
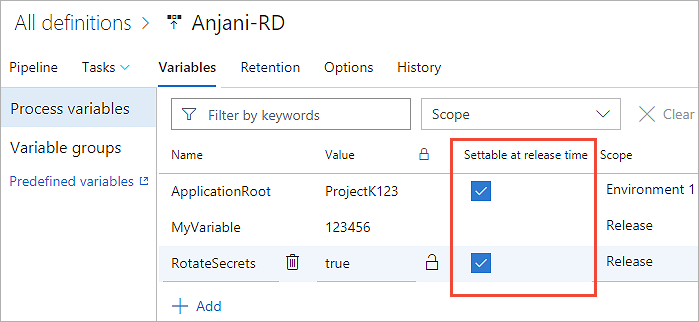
Q: How can I edit variables at release time?
A: In the Variables tab of your release pipeline, Select the Settable at release time checkbox for the variables that you wish to modify when a release is queued.
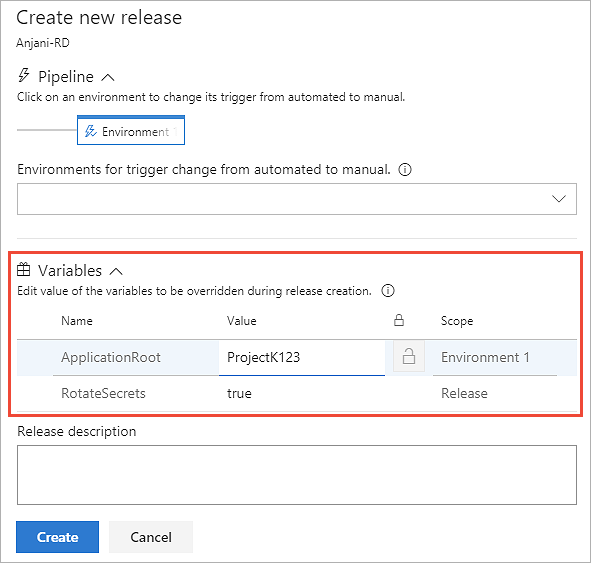
Subsequently, when generating a new release, you have the ability to modify the values of those variables.
Q: When would it be more appropriate to modify a release instead of the pipeline that defines it?
A: You can edit the approvals, tasks, and variables of a release instance. However, these edits will only apply to that instance. If you want your changes to apply to all future releases, edit the release pipeline instead.
Q: What are the scenarios where the "abandon a release" feature is useful?
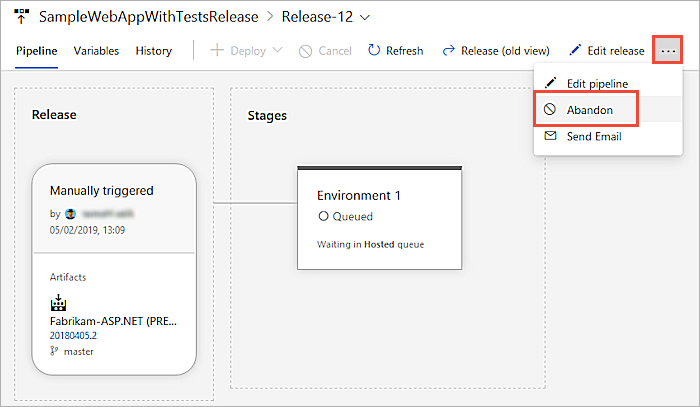
A: If you don't plan to reuse the release, or want to prevent it from being used, you can abandon the release as follows Pipelines > (...) > Abandon. You can't abandon a release when a deployment is in progress, you must cancel the deployment first.
Q: How do I manage the naming of new releases?
A: The default naming convention for release pipelines is sequential numbering, where the releases are named Release-1, Release-2, and so on. However, you have the flexibility to customize the naming scheme by modifying the release name format mask. In the Options tab of your release pipeline, navigate to the General page and adjust the Release name format property to suit your preferences.
When specifying the format mask, you can use the following predefined variables. Example: The following release name format: Release $(Rev:rrr) for build $(Build.BuildNumber) $(Build.DefinitionName) will create the following release: Release 002 for build 20170213.2 MySampleAppBuild.
| Variable | Description |
|---|---|
| Rev: rr | An autoincremented number with at least the specified number of digits. |
| Date / Date: MMddyy | The current date, with the default format MMddyy. Any combinations of M/MM/MMM/MMMM, d/dd/ddd/dddd, y/yy/yyyy/yyyy, h/hh/H/HH, m/mm, s/ss are supported. |
| System.TeamProject | The name of the project to which this build belongs. |
| Release.ReleaseId | The ID of the release, which is unique across all releases in the project. |
| Release.DefinitionName | The name of the release pipeline to which the current release belongs. |
| Build.BuildNumber | The number of the build contained in the release. If a release has multiple builds, it's the number of the primary build. |
| Build.DefinitionName | The pipeline name of the build contained in the release. If a release has multiple builds, it's the pipeline name of the primary build. |
| Artifact.ArtifactType | The type of the artifact source linked with the release. For example, this can be Azure Pipelines or Jenkins. |
| Build.SourceBranch | The branch of the primary artifact source. For Git, this is of the form main if the branch is refs/heads/main. For Team Foundation Version Control, this is of the form branch if the root server path for the workspace is $/teamproject/branch. This variable is not set for Jenkins or other artifact sources. |
| Custom variable | The value of a global configuration property defined in the release pipeline. You can update the release name with custom variables using the Release logging commands |
Q: How can I define the retention period for my releases?
A: See retention policies to learn how to set up retention policies for your release pipelines.