Tutorial: Agregar inicio y cierre de sesión a una aplicación de página única de Angular para un inquilino externo
Este tutorial es la última parte de una serie que muestra cómo compilar una aplicación de página única (SPA) de Angular y prepararla para la autenticación mediante el Centro de administración de Microsoft Entra. En laParte 3 de esta serie, ha agregado flujos de autenticación a la aplicación de página única de Angular y configuró los flujos para que funcionen con el inquilino externo. En este artículo, obtendrá información sobre cómo agregar la funcionalidad de inicio de sesión y cierre de sesión a la aplicación. Por último, probará la aplicación.
En este tutorial,
- Agregue la funcionalidad de inicio de sesión y cierre de sesión a la aplicación.
- Prueba de la aplicación
Requisitos previos
Inicio y cierre de sesión de los usuarios
Abra src/app/app.component.ts y reemplace el código por lo siguiente para iniciar sesión en un usuario mediante un punto de presencia (POP). Este código usa la biblioteca MSAL de Angular para iniciar sesión en un usuario.
  import { Component, OnInit, Inject, OnDestroy } from '@angular/core';
  import {
    MsalService,
    MsalBroadcastService,
    MSAL_GUARD_CONFIG,
    MsalGuardConfiguration,
  } from '@azure/msal-angular';
  import {
    AuthenticationResult,
    InteractionStatus,
    InteractionType,
    PopupRequest,
    RedirectRequest,
    EventMessage,
    EventType
  } from '@azure/msal-browser';
  import { Subject } from 'rxjs';
  import { filter, takeUntil } from 'rxjs/operators';

  @Component({
    selector: 'app-root',
    templateUrl: './app.component.html',
    styleUrls: ['./app.component.css'],
  })
  export class AppComponent implements OnInit, OnDestroy {
    title = 'Microsoft identity platform';
    loginDisplay = false;
    isIframe = false;

    private readonly _destroying$ = new Subject<void>();

    constructor(
      @Inject(MSAL_GUARD_CONFIG) private msalGuardConfig: MsalGuardConfiguration,
      private authService: MsalService,
      private msalBroadcastService: MsalBroadcastService,
    ) { }

    ngOnInit(): void {
      this.isIframe = window !== window.parent && !window.opener;
      this.setLoginDisplay();
      this.authService.instance.enableAccountStorageEvents(); // Optional - This will enable ACCOUNT_ADDED and ACCOUNT_REMOVED events emitted when a user logs in or out of another tab or window

      /**
       * You can subscribe to MSAL events as shown below. For more info,
       * visit: https://github.com/AzureAD/microsoft-authentication-library-for-js/blob/dev/lib/msal-angular/docs/v2-docs/events.md
       */
      this.msalBroadcastService.inProgress$
        .pipe(
          filter(
            (status: InteractionStatus) => status === InteractionStatus.None
          ),
          takeUntil(this._destroying$)
        )
        .subscribe(() => {
          this.setLoginDisplay();
          this.checkAndSetActiveAccount();
        });

      this.msalBroadcastService.msalSubject$
        .pipe(
          filter(
            (msg: EventMessage) => msg.eventType === EventType.LOGOUT_SUCCESS
          ),
          takeUntil(this._destroying$)
        )
        .subscribe((result: EventMessage) => {
          this.setLoginDisplay();
          this.checkAndSetActiveAccount();
        });

      this.msalBroadcastService.msalSubject$
        .pipe(
          filter(
            (msg: EventMessage) => msg.eventType === EventType.LOGIN_SUCCESS
          ),
          takeUntil(this._destroying$)
        )
        .subscribe((result: EventMessage) => {
          const payload = result.payload as AuthenticationResult;
          this.authService.instance.setActiveAccount(payload.account);
        });
    }

    setLoginDisplay() {
      this.loginDisplay = this.authService.instance.getAllAccounts().length > 0;
    }

    checkAndSetActiveAccount() {
      /**
       * If no active account set but there are accounts signed in, sets first account to active account
       * To use active account set here, subscribe to inProgress$ first in your component
       * Note: Basic usage demonstrated. Your app may require more complicated account selection logic
       */
      let activeAccount = this.authService.instance.getActiveAccount();

      if (!activeAccount && this.authService.instance.getAllAccounts().length > 0) {
        let accounts = this.authService.instance.getAllAccounts();
        // add your code for handling multiple accounts here
        this.authService.instance.setActiveAccount(accounts[0]);
      }
    }

    login() {
      if (this.msalGuardConfig.interactionType === InteractionType.Popup) {
        if (this.msalGuardConfig.authRequest) {
          this.authService.loginPopup({
            ...this.msalGuardConfig.authRequest,
          } as PopupRequest)
            .subscribe((response: AuthenticationResult) => {
              this.authService.instance.setActiveAccount(response.account);
            });
        } else {
          this.authService.loginPopup()
            .subscribe((response: AuthenticationResult) => {
              this.authService.instance.setActiveAccount(response.account);
            });
        }
      } else {
        if (this.msalGuardConfig.authRequest) {
          this.authService.loginRedirect({
            ...this.msalGuardConfig.authRequest,
          } as RedirectRequest);
        } else {
          this.authService.loginRedirect();
        }
      }
    }

    logout() {

      if (this.msalGuardConfig.interactionType === InteractionType.Popup) {
        this.authService.logoutPopup({
          account: this.authService.instance.getActiveAccount(),
        });
      } else {
        this.authService.logoutRedirect({
          account: this.authService.instance.getActiveAccount(),
        });
      }
    }

    // unsubscribe to events when component is destroyed
    ngOnDestroy(): void {
      this._destroying$.next(undefined);
      this._destroying$.complete();
    }
  }
Prueba de la aplicación
Inicie el servidor web ejecutando los siguientes comandos en el símbolo del sistema de la línea de comandos desde la carpeta de la aplicación:
npm install
npm start
En el explorador, escriba
http://localhost:4200para abrir la aplicación.
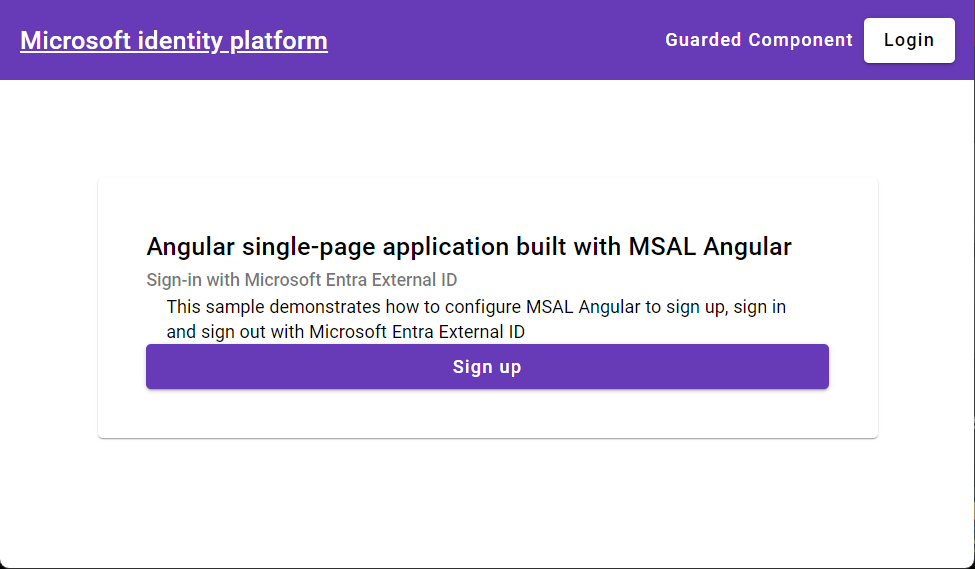
Seleccione el botón Iniciar sesión en la esquina superior derecha de la pantalla.
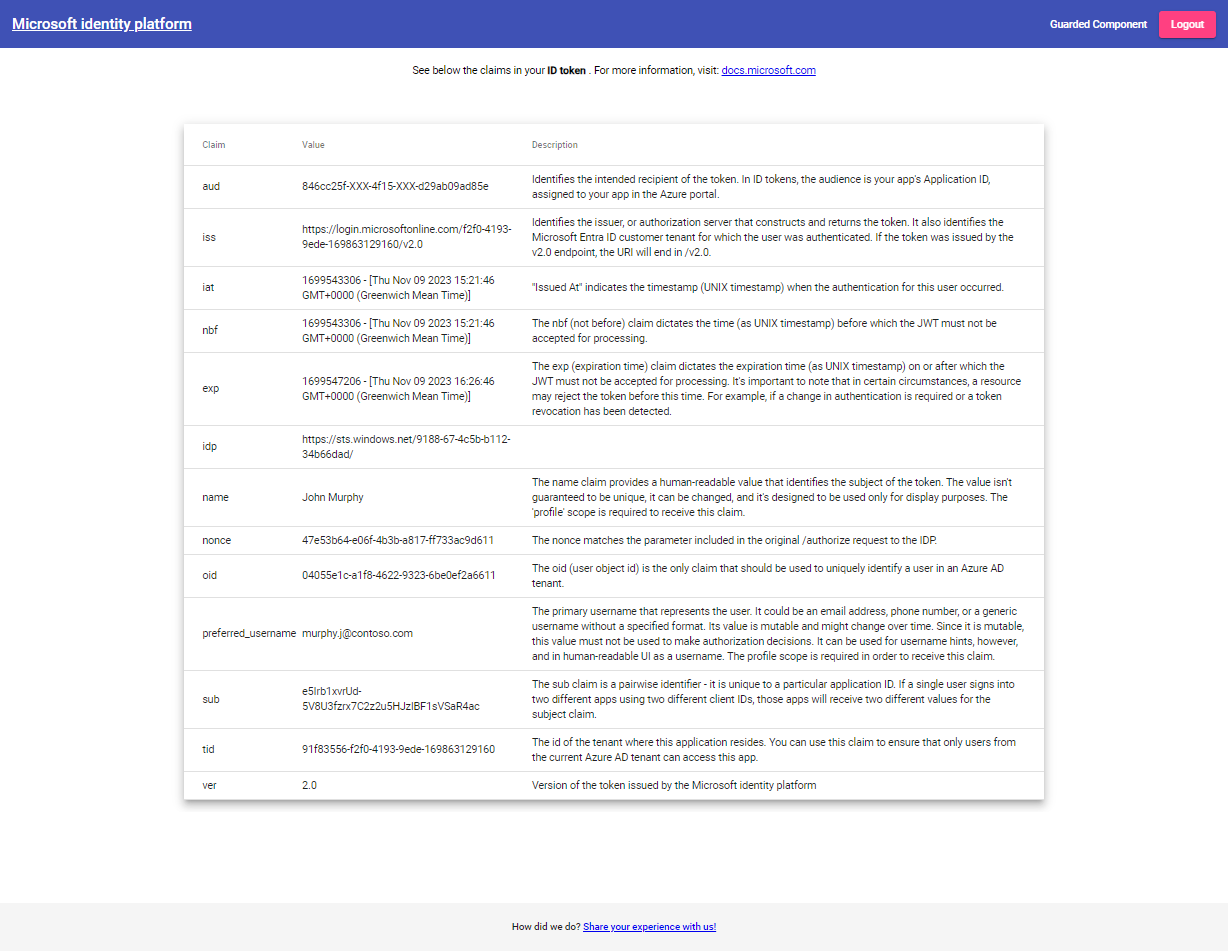
Después de iniciar sesión, verá la información del perfil en la página.

Seleccione el botón Cerrar sesión en la esquina superior derecha de la pantalla para cerrar la sesión.
Consulte también
Después de completar este tutorial, es posible que quiera obtener más información sobre cómo: