Compartir puntos de restauración de pc en la nube en una cuenta de Azure Storage
Los puntos de restauración del equipo en la nube se pueden compartir en una cuenta de almacenamiento tanto para equipos en la nube únicos como de forma masiva.
Es posible que quiera compartir (mover o copiar) un equipo en la nube y su contenido para:
- Cree una copia distribuida geográficamente de un equipo en la nube.
- Realice una copia de un equipo en la nube durante el proceso de desembarque.
- Obtenga una vista histórica de un equipo en la nube (frente al actual) para eDiscovery.
- Cree un VHD que se pueda montar en un dispositivo físico.
Compartir un único punto de restauración
- Inicie sesión en el centro > de administración de Microsoft IntuneDispositivos>Windows 365>Todos los equipos> en la nube seleccionen un punto de restauración de puntos> de restauración de dispositivo > Para el punto de restauración, seleccione los puntos suspensivos (...) >Compartir.
- En el área Punto de restauración de recursos compartidos , seleccione una suscripción, una cuenta de almacenamiento y un nivel de acceso.
- Seleccione Compartir.
Se crea una carpeta en la cuenta de almacenamiento. El nombre de la carpeta es idéntico al nombre del equipo en la nube. La carpeta contiene una copia de VHD del disco del dispositivo pc en la nube.
Para evitar problemas de tiempo de espera, comparta solo hasta 3000 puntos de restauración en una cuenta de almacenamiento de Azure al mismo tiempo.
Compartir varios puntos de restauración de forma masiva
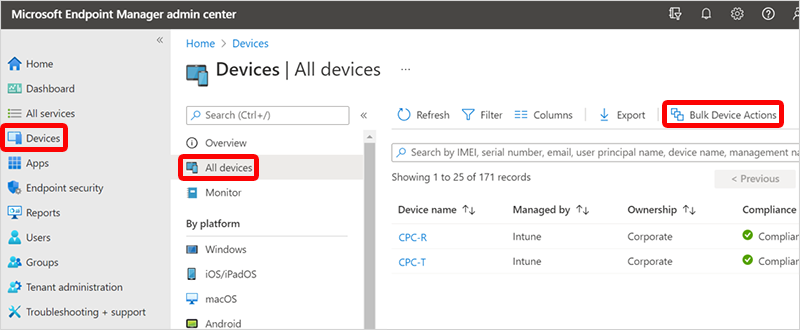
- Inicie sesión en el centro > de administración de Microsoft IntuneDispositivos> Todas lasacciones de dispositivo masivode dispositivos>.

- En la páginaAspectos básicos, seleccione las siguientes opciones:
- OS: Windows
- Acción del dispositivo: Compartir punto de restauración de PC en la nube con almacenamiento
- Especificar fecha y hora: elija una fecha y hora. Esta configuración define el momento de la restauración del equipo en la nube que le gustaría compartir. Las siguientes opciones ayudan a determinar exactamente qué punto de restauración se usa para cada uno de los equipos en la nube que seleccione.
-
Seleccionar intervalo de tiempo de punto de restauración: elija una de las siguientes opciones:
- Antes de la fecha y hora especificadas: comparta el punto de restauración del equipo en la nube más cercano antes de la fecha y hora especificadas.
- Después de la fecha y hora especificadas: comparta el punto de restauración de CLOUD PC más cercano después de la fecha y hora especificadas.
- Lo que sea más cercano (antes o después de la fecha y hora especificadas): comparta el punto de restauración del equipo en la nube más cercano a la fecha y hora especificadas.
- Seleccione una suscripción, una cuenta de almacenamiento y un nivel> de accesosiguiente.
- En la página Dispositivos , elija Seleccionar dispositivos que desea incluir.
- En Seleccionar dispositivos, elija los equipos en la nube que desea compartir para >Seleccionar>siguiente.
- En la página Revisar y crear , confirme las opciones >Crear.
Para cada punto de restauración del equipo en la nube compartido, se crea una carpeta en la cuenta de almacenamiento. El nombre de la carpeta es idéntico al nombre del equipo en la nube. La carpeta contiene una copia de VHD del disco del dispositivo pc en la nube.