Step 5: Install packages in your Python environment
Applies to: ![]() Visual Studio
Visual Studio ![]() Visual Studio for Mac
Visual Studio for Mac
Note
This article applies to Visual Studio 2017. If you're looking for the latest Visual Studio documentation, see Visual Studio documentation. We recommend upgrading to the latest version of Visual Studio. Download it here
Previous step: Run code in the debugger
The Python developer community has produced thousands of useful packages that you can incorporate into your own projects. Visual Studio provides a UI to manage packages in your Python environments.
View environments
Select the View > Other Windows > Python Environments menu command. The Python Environments window opens as a peer to Solution Explorer and shows the different environments available to you. The list shows both environments that you installed using the Visual Studio installer and environments you installed separately. That includes global, virtual, and conda environments. The environment in bold is the default environment that's used for new projects. For more information about working with environments, see How to create and manage Python environments in Visual Studio environments.
Note
You can also use the Ctrl+K, Ctrl+` keyboard shortcut to open the Python Environments window from the Solution Explorer window. If the shortcut doesn't work and you can't find the Python Environments window in the menu, it's possible that you haven't installed the Python workload. See How to install Python support in Visual Studio on Windows for guidance about how to install Python.
With a Python project open, you can open the Python Environments window from Solution Explorer. Right-click Python Environments and select View All Python Environments.
Now, create a new project with File > New > Project, selecting the Python Application template.
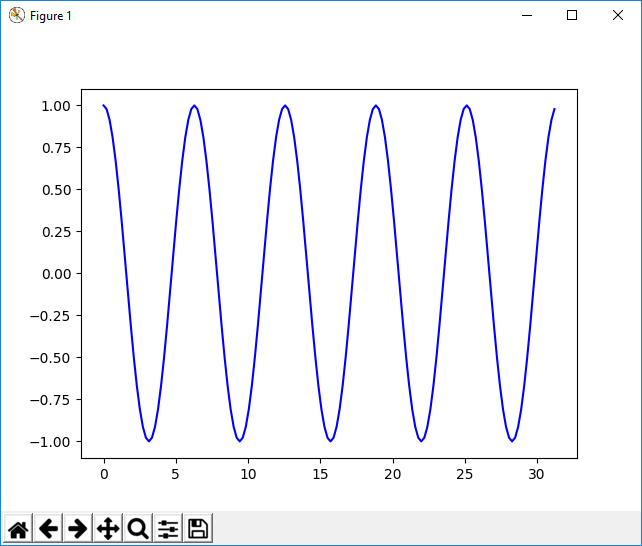
In the code file that appears, paste the following code, which creates a cosine wave like the previous tutorial steps, only this time plotted graphically. You can also use the project you previously created and replace the code.
from math import radians
import numpy as np # installed with matplotlib
import matplotlib.pyplot as plt

def main():
    x = np.arange(0, radians(1800), radians(12))
    plt.plot(x, np.cos(x), 'b')
    plt.show()

main()
In the editor window, hover over the
numpyandmatplotlibimport statements. You'll notice that they aren't resolved. To resolve the import statements, install the packages to the default global environment.When you look at the editor window, notice that when you hover over the
numpyandmatplotlibimport statements that they aren't resolved. The reason is the packages haven't been installed to the default global environment.For example, select Open interactive window and an Interactive window for that specific environment appears in Visual Studio.
The Packages tab in the Python Environments window lists all packages that are currently installed in the environment.
Install packages using the Python Environments window
From the Python Environments window, select the default environment for new Python projects and choose the Packages tab. You'll then see a list of packages that are currently installed in the environment.
Install
matplotlibby entering its name into the search field and then selecting the Run command: pip install matplotlib option. Running the command will installmatplotlib, and any packages it depends on (in this case that includesnumpy).Choose the Packages tab.
Consent to elevation if prompted to do so.
After the package is installed, it appears in the Python Environments window. The X to the right of the package uninstalls it.
Enter
matplotlibinto the search field to installmatplotlib.Select the Run command: pip install matplotlib option. This option installs
matplotlib, and any packages it depends on (in this case, that includesnumpy).Consent to elevation if prompted to do so.
After the package installs, it appears in the Python Environments window. The X to the right of the package uninstalls it.
Note
A small progress bar might appear underneath the environment to indicate that Visual Studio is building its IntelliSense database for the newly-installed package. The IntelliSense tab also shows more detailed information. Be aware that until that database is complete, IntelliSense features like auto-completion and syntax checking won't be active in the editor for that package.
Visual Studio 2017 version 15.6 and later uses a different and faster method for working with IntelliSense, and displays a message to that effect on the IntelliSense tab.
Run the program
Now that matplotlib is installed, run the program with (F5) or without the debugger (Ctrl+F5) to see the output:
