Link Python tools and IDEs to the Python interpreter installed with Machine Learning Server
Important
This content is being retired and may not be updated in the future. The support for Machine Learning Server will end on July 1, 2022. For more information, see What's happening to Machine Learning Server?
Applies to: Machine Learning Server 9.x
Machine Learning Server installs a local, folder-only install of Anaconda to avoid interfering with other Python distributions on your system. As such, packages providing the Python modules in Machine Learning Server (revoscalepy, microsoftml, azureml-model-management-sdk) are not available system-wide. In this article, learn how to load the Python interpreter installed with Machine Learning Server in your Python IDE of choice.
Prerequisites
Before you begin, have the following ready:
- An instance of Machine Learning Server installed with the Python option.
- A Python IDE, such as Visual Studio 2017 Community Edition with Python.
Tip
Need help learning Python? Here's a video tutorial.
Python.exe (built-in)
To use the Python modules interactively, start the Python executable from the installation path.
On Windows, go to \Program Files\Microsoft\ML Server\PYTHON_SERVER and run Python.exe to open an interactive command-line window.
As a validation step, load the revoscalepy module and run the example code for rx_summary to print out summary statistics using an embedded sample data set:
import os
from revoscalepy import rx_summary, RxOptions, RxXdfData
sample_data_path = RxOptions.get_option("sampleDataDir")
ds = RxXdfData(os.path.join(sample_data_path, "AirlineDemoSmall.xdf"))
summary = rx_summary("ArrDelay+DayOfWeek", ds)
print(summary)
Visual Studio 2017 with Python
The setup program for Machine Learning Server 9.4 adds Python distribution information to the registry, which makes loading Python modules more straightforward than in previous releases.
However, when using an earlier release or to confirm settings, follow these steps to add Machine Learning Server's Python distribution information to an environment. For more information, see Python environments (Visual Studio docs).
In Tools > Python > Python environments, click + Custom to create a new environment.
In Description, give the environment name, and then fill in the following fields.
In Prefix path, enter
C:\Program Files\Microsoft\ML Server\PYTHON_SERVER.Click Auto Detect in the top right to auto-fill the remaining fields:
- Interpreter path should be
C:\Program Files\Microsoft\ML Server\PYTHON_SERVER\python.exe. - Windowed interpreter should be
C:\Program Files\Microsoft\ML Server\PYTHON_SERVER\pythonw.exe. - Language version should be
3.5for Python 3.5. - Path should be read-only.
- Interpreter path should be
Click Apply in the top right to save the environment.
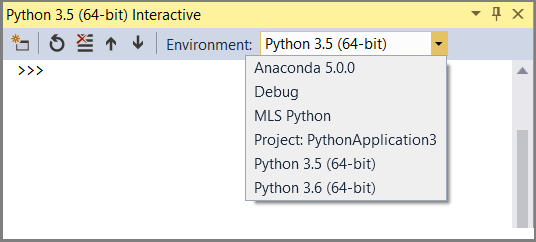
You can use the environment you just created by selecting it in an interactive window. As a verification step, run the example from the rx_summary function in revoscalepy.

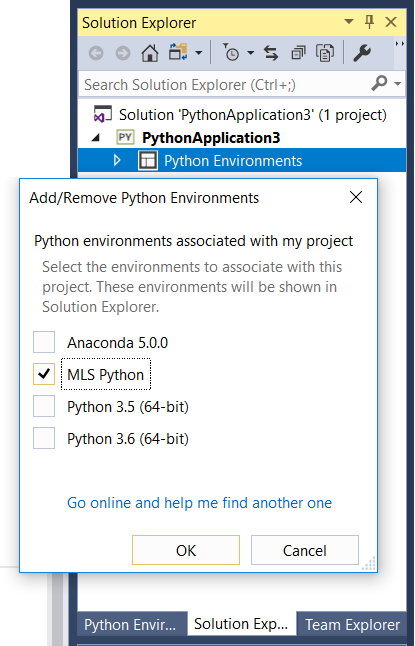
For new projects, you can also add an environment to your project in Solution Explorer > Python Environments > Add/Remove Environments.

Jupyter Notebooks (local)
Jupyter Notebooks is distributed with Anaconda, which is the Python distribution used by Machine Learning Server. A local executable is installed with Machine Learning Server.
On Windows, go to \Program Files\Microsoft\ML Server\PYTHON_SERVER\Scripts\ and double-click jupyter-notebook.exe to start a Jupyter Notebook session in the default browser window.
On Linux, go to /opt/microsoft/mlserver/9.4.7/runtime/python/bin/ and type
./jupyter notebook. You should get a series of messages that includes the server endpoint and a URL that you can copy into a browser, assuming one is available on your computer.
For additional instructions on configuring a multi-user server, see How to add Machine Learning Server modules to single and multi-user Jupyter Notebook instances.
Note
Jupyter Notebooks are a presentation concept, integrating script and text on the same page. Script is interactive on the page, often Python or R, but could be any one of the 40 languages supported by Jupyter. The text is user-provided content that describes the script. Notebooks are executed on a server, accessed over http, and rendered as HTML in a browser to the person requesting the notebook. For more information, see Jupyter documentation.
How to load Python samples on Windows
Download just the .ipynb files from the GitHub repo https://github.com/Microsoft/ML-Server-Python-Samples:
- Go to the source page: ML-Server-Python-Samples/microsoftml/quickstarts/binary-classification/Binary+Classification+Quickstart.ipynb
- In the GitHub page for this notebook, click Raw to show the Python script.
- Use the browser save-as command to save a local copy of the file. Apply an .ipynb file extension.
Note
Some browsers append a .txt file extension automatically. Remove the extraneous .txt extension if you see it in the file name.
Upload the .ipynb to your local server:
- Navigate to the Jupyter-notebook executable on your computer:
C:\Program Files\Microsoft\ML Server\PYTHON_SERVER\Scripts - Right-click Run as administrator on
jupyter-notebook.exe - The Notebook Dashboard opens in your default browser at
https://localhost:8888/tree. - Click Upload on the top right corner.
- Navigate to the folder where you saved the .ipynb file. Most likely, it's in the Downloads folder:
\Downloads\ML-Server-Python-Samples-master\microsoftml\quickstarts\binary-classification\Binary+Classification+Quickstart.ipynb - Select the file and click Open to add the notebook to your server.
- Navigate to the Jupyter-notebook executable on your computer:
Click the notebook to load it, then click Run to step through the content and script. For this particular notebook, no additional configuration is required. For the web service notebook, read the readme for configuration requirements.
PyCharm
In PyCharm, set the interpreter to the Python executable installed by Machine Learning Server.
In a new project, in Settings, click Add Local.
Enter
C:\Program Files\Microsoft\ML Server\PYTHON_SERVER.
You can now import revoscalepy, microsoftml, or azureml-model-management-sdk modules.
You can also choose Tools > Python Console to open an interactive window.
Next steps
Now that you know how to load the Python libraries, you might want to explore them in-depth:
- revoscalepy Python package functions
- microsoftml Python package functions
- azureml-model-management-sdk
See also
For more about Machine Learning Server in general, see Overview of Machine Learning Server