Crear aplicaciones nativas de iOS con REST de Microsoft Graph
Este tutorial te enseña a crear una aplicación React Native que usa la API de Microsoft Graph para recuperar información de calendario para un usuario.
Sugerencia
Si prefiere descargar el tutorial completado, puede descargar o clonar el repositorio GitHub archivo.
Requisitos previos
Antes de iniciar este tutorial, debe tener lo siguiente instalado en el equipo de desarrollo.
- Al menos una de las siguientes opciones:
- Android Studio y Java Development Kit (necesario para ejecutar el ejemplo en Android)
- Xcode (necesario para ejecutar el ejemplo en iOS)
- Node.js
También debe tener una cuenta personal de Microsoft con un buzón en Outlook.com, o una cuenta de Trabajo o escuela de Microsoft. Si no tienes una cuenta de Microsoft, hay un par de opciones para obtener una cuenta gratuita:
- Puedes suscribirte a una nueva cuenta personal de Microsoft.
- Puedes suscribirte al programa Microsoft 365 desarrolladores para obtener una suscripción Microsoft 365 gratuita.
Nota
Este tutorial se escribió con la CLI React Native, que tiene requisitos previos específicos según el sistema operativo y las plataformas de destino. Consulte React Native Introducción para obtener instrucciones sobre cómo configurar el equipo de desarrollo. Las versiones usadas para este tutorial se enumeran a continuación. Los pasos de esta guía pueden funcionar con otras versiones, pero eso no se ha probado.
- Android Studio versión 4.1 con el SDK de Android 9.0
- Java Development Kit versión 12.0.2
- Xcode versión 12.5.1
- Node.js versión 14.15.0
Comentarios
Proporcione cualquier comentario sobre este tutorial en el repositorio GitHub usuario.
Crear una aplicación nativa de ReAct
Empiece por crear un nuevo React Native proyecto.
Abra la interfaz de línea de comandos (CLI) en un directorio donde desee crear el proyecto. Ejecute el siguiente comando para ejecutar la herramienta react-native-cli y crear un nuevo React Native proyecto.
npx react-native init GraphTutorial --template react-native-template-typescriptOpcional: Compruebe que el entorno de desarrollo está configurado correctamente ejecutando el proyecto. En la CLI, cambie el directorio al directorio GraphTutorial que acaba de crear y ejecute uno de los siguientes comandos.
- Para iOS:
npx react-native run-ios - Para Android: iniciar una instancia del emulador de Android y ejecutarla
npx react-native run-android
- Para iOS:
Instalar dependencias
Antes de seguir adelante, instale algunas dependencias adicionales que usará más adelante.
- react-navigation para controlar la navegación entre vistas de la aplicación.
- react-native-gesture-handler, react-native-safe-area-context, react-native-screens, react-native-reanimate y masked-view requeridos por react-navigation.
- react-native-elements y react-native-vector-icons para proporcionar iconos para la interfaz de usuario.
- react-native-app-auth para administrar la autenticación y la administración de tokens.
- async-storage para proporcionar almacenamiento para tokens.
- datetimepicker para agregar selectores de fecha y hora a la interfaz de usuario.
- momento para controlar el análisis y la comparación de fechas y horas.
- windows-iana para traducir Windows zonas horarias al formato IANA.
- microsoft-graph-client para realizar llamadas a microsoft Graph.
Abra la CLI en el directorio raíz del React Native proyecto.
Ejecuta el siguiente comando.
npm install @react-navigation/native@5.9.6 @react-navigation/drawer@5.12.7 @react-navigation/stack@5.14.7
npm install @react-native-community/masked-view@0.1.11 react-native-safe-area-context@3.3.0 windows-iana
npm install react-native-reanimated@2.2.0 react-native-screens@3.5.0 @react-native-async-storage/async-storage@1.15.5
npm install react-native-elements@3.4.2 react-native-vector-icons@8.1.0 react-native-gesture-handler@1.10.3
npm install react-native-app-auth@6.4.0 moment@2.29.1 moment-timezone @microsoft/microsoft-graph-client@3.0.0
npm install @react-native-community/datetimepicker@3.5.2
npm install @microsoft/microsoft-graph-types --save-dev
Vincular y configurar dependencias para iOS
Nota
Si no estás destinado a iOS, puedes omitir esta sección.
Abra la CLI en el directorio GraphTutorial/ios .
Ejecuta el siguiente comando.
pod installAbra el archivo GraphTutorial/ios/GraphTutorial/Info.plist en un editor de texto. Agregue lo siguiente justo antes de la última
</dict>línea del archivo.<key>UIAppFonts</key> <array> <string>AntDesign.ttf</string> <string>Entypo.ttf</string> <string>EvilIcons.ttf</string> <string>Feather.ttf</string> <string>FontAwesome.ttf</string> <string>FontAwesome5_Brands.ttf</string> <string>FontAwesome5_Regular.ttf</string> <string>FontAwesome5_Solid.ttf</string> <string>Foundation.ttf</string> <string>Ionicons.ttf</string> <string>MaterialIcons.ttf</string> <string>MaterialCommunityIcons.ttf</string> <string>SimpleLineIcons.ttf</string> <string>Octicons.ttf</string> <string>Zocial.ttf</string> </array>Abra el archivo GraphTutorial/ios/GraphTutorial/AppDelegate.h en un editor de texto. Reemplace su contenido por lo siguiente.
#import <React/RCTBridgeDelegate.h>
#import <UIKit/UIKit.h>
#import "RNAppAuthAuthorizationFlowManager.h"

@interface AppDelegate : UIResponder <UIApplicationDelegate, RCTBridgeDelegate, RNAppAuthAuthorizationFlowManager>

@property (nonatomic, strong) UIWindow *window;
@property (nonatomic, weak) id<RNAppAuthAuthorizationFlowManagerDelegate> authorizationFlowManagerDelegate;

@end
Configurar dependencias para Android
Nota
Si no estás destinado a Android, puedes omitir esta sección.
Abra el archivo GraphTutorial/android/app/build.gradle en un editor.
Busque la
defaultConfigentrada y agregue la siguiente propiedad dentro dedefaultConfig.manifestPlaceholders = [ appAuthRedirectScheme: 'graph-tutorial' ]La
defaultConfigentrada debe ser similar a la siguiente.defaultConfig { applicationId "com.graphtutorial" minSdkVersion rootProject.ext.minSdkVersion targetSdkVersion rootProject.ext.targetSdkVersion versionCode 1 versionName "1.0" manifestPlaceholders = [ appAuthRedirectScheme: 'graph-tutorial' ] }Agregue la siguiente línea al final del archivo.
apply from: "../../node_modules/react-native-vector-icons/fonts.gradle"Guarde el archivo.
Diseñar la aplicación
La aplicación usará un cajón de navegación para navegar entre diferentes vistas. En este paso, crearás las vistas básicas que usa la aplicación e implementará el cajón de navegación.
Crear vistas
En esta sección, crearás las vistas para que la aplicación admita un flujo de autenticación.
Abra GraphTutorial/index.js y agregue lo siguiente a la parte superior del archivo, antes de cualquier otra
importinstrucción.import 'react-native-gesture-handler';Cree un nuevo archivo en el directorio GraphTutorial denominado AuthContext.tsx y agregue el siguiente código.
import * as React from 'react';

type AuthContextType = {
  signIn: () => Promise<void>;
  signOut: () => void;
}

export const AuthContext = React.createContext<AuthContextType>({
  signIn: async () => {},
  signOut: () => {}
});
Cree un nuevo archivo en el directorio GraphTutorial denominado UserContext.tsx y agregue el siguiente código.
import * as React from 'react';
import { ImageSourcePropType } from 'react-native';

type UserContextType = {
  userLoading: boolean;
  userFirstName: string;
  userFullName: string;
  userEmail: string;
  userTimeZone: string;
  userPhoto: ImageSourcePropType;
}

export const UserContext = React.createContext<UserContextType>({
  userLoading: true,
  userFirstName: '',
  userFullName: '',
  userEmail: '',
  userTimeZone: '',
  userPhoto: require('./images/no-profile-pic.png')
});
Cree un nuevo directorio en el directorio GraphTutorial denominado screens.
Cree un nuevo archivo en el directorio GraphTutorial/screens denominado HomeScreen.tsx. Agregue el siguiente código al archivo.
import React from 'react';
import {
  ActivityIndicator,
  Platform,
  StyleSheet,
  Text,
  View,
} from 'react-native';
import { createStackNavigator } from '@react-navigation/stack';

import { UserContext } from '../UserContext';

const Stack = createStackNavigator();

const HomeComponent = () => {
  const userContext = React.useContext(UserContext);

  return (
    <View style={styles.container}>
      <ActivityIndicator
        color={Platform.OS === 'android' ? '#276b80' : undefined}
        animating={userContext.userLoading}
        size='large' />
      {userContext.userLoading ? null: <Text>Hello {userContext.userFirstName}!</Text>}
    </View>
  );
}

export default class HomeScreen extends React.Component {
  render() {
    return (
      <Stack.Navigator>
        <Stack.Screen name='Home'
          component={HomeComponent}
          options={{
            headerShown: false
          }} />
      </Stack.Navigator>
    );
  }
}

const styles = StyleSheet.create({
  container: {
    flex: 1,
    alignItems: 'center',
    justifyContent: 'center'
  }
});
Cree un nuevo archivo en el directorio GraphTutorial/screens denominado CalendarScreen.tsx. Agregue el siguiente código al archivo.
import React from 'react';
import {StyleSheet, Text, View} from 'react-native';
import {createStackNavigator} from '@react-navigation/stack';

const Stack = createStackNavigator();

// Temporary placeholder view
const CalendarComponent = () => (
  <View style={styles.container}>
    <Text>Calendar</Text>
  </View>
);

export default class CalendarScreen extends React.Component {
  render() {
    return (
      <Stack.Navigator>
        <Stack.Screen
          name='Calendar'
          component={CalendarComponent}
          options={{
            headerShown: false,
          }}
        />
      </Stack.Navigator>
    );
  }
}

const styles = StyleSheet.create({
  container: {
    flex: 1,
    alignItems: 'center',
    justifyContent: 'center',
  },
});
Cree un nuevo archivo en el directorio GraphTutorial/screens denominado SignInScreen.tsx. Agregue el siguiente código al archivo.
// Adapted from https://reactnavigation.org/docs/auth-flow
import React from 'react';
import {Alert, Button, StyleSheet, View} from 'react-native';
import {ParamListBase} from '@react-navigation/native';
import {StackNavigationProp} from '@react-navigation/stack';

import {AuthContext} from '../AuthContext';

type SignInProps = {
  navigation: StackNavigationProp<ParamListBase>;
};

export default class SignInScreen extends React.Component<SignInProps> {
  static contextType = AuthContext;

  _signInAsync = async () => {
    await this.context.signIn();
  };

  componentDidMount() {
    this.props.navigation.setOptions({
      title: 'Please sign in',
      headerShown: true,
    });
  }

  render() {
    return (
      <View style={styles.container}>
        <Button title='Sign In' onPress={this._signInAsync} />
      </View>
    );
  }
}

const styles = StyleSheet.create({
  container: {
    flex: 1,
    alignItems: 'center',
    justifyContent: 'center',
  },
});
Cree un nuevo archivo en el directorio GraphTutorial/screens denominado AuthLoadingScreen.tsx. Agregue el siguiente código al archivo.
// Adapted from https://reactnavigation.org/docs/auth-flow
import React from 'react';
import {
  ActivityIndicator,
  Platform,
  Text,
  StyleSheet,
  View,
} from 'react-native';

export default class AuthLoadingScreen extends React.Component {
  render() {
    return (
      <View style={styles.container}>
        <ActivityIndicator
          color={Platform.OS === 'android' ? '#276b80' : undefined}
          size='large' />
        <Text style={styles.statusText}>Logging in...</Text>
      </View>
    );
  }
}

const styles = StyleSheet.create({
  container: {
    flex: 1,
    alignItems: 'center',
    justifyContent: 'center'
  },
  statusText: {
    marginTop: 10
  }
});
Crear un cajón de navegación
En esta sección, creará un menú para la aplicación y actualizará la aplicación para que use la navegación de reacción para moverse entre pantallas.
Cree un nuevo directorio en el directorio GraphTutorial denominado menús.
Cree un nuevo archivo en el directorio GraphTutorial/menus denominado DrawerMenu.tsx. Agregue el siguiente código al archivo.
import React, {FC} from 'react';
import {
  Alert,
  Image,
  StyleSheet,
  Text,
  View,
  ImageSourcePropType,
} from 'react-native';
import {
  createDrawerNavigator,
  DrawerContentScrollView,
  DrawerItem,
  DrawerItemList,
  DrawerContentComponentProps,
} from '@react-navigation/drawer';
import {ParamListBase} from '@react-navigation/native';
import {StackNavigationProp} from '@react-navigation/stack';

import {AuthContext} from '../AuthContext';
import {UserContext} from '../UserContext';
import HomeScreen from '../screens/HomeScreen';
import CalendarScreen from '../screens/CalendarScreen';

const Drawer = createDrawerNavigator();

type CustomDrawerContentProps = DrawerContentComponentProps & {
  userName: string;
  userEmail: string;
  userPhoto: ImageSourcePropType;
  signOut: () => void;
};

type DrawerMenuProps = {
  navigation: StackNavigationProp<ParamListBase>;
};

const CustomDrawerContent: FC<CustomDrawerContentProps> = props => (
  <DrawerContentScrollView {...props}>
    <View style={styles.profileView}>
      <Image
        source={props.userPhoto}
        resizeMode='contain'
        style={styles.profilePhoto}
      />
      <Text style={styles.profileUserName}>{props.userName}</Text>
      <Text style={styles.profileEmail}>{props.userEmail}</Text>
    </View>
    <DrawerItemList {...props} />
    <DrawerItem label='Sign Out' onPress={props.signOut} />
  </DrawerContentScrollView>
);

export default class DrawerMenuContent extends React.Component<DrawerMenuProps> {
  static contextType = AuthContext;

  state = {
    // TEMPORARY
    userLoading: true,
    userFirstName: 'Adele',
    userFullName: 'Adele Vance',
    userEmail: 'adelev@contoso.com',
    userTimeZone: 'UTC',
    userPhoto: require('../images/no-profile-pic.png'),
  };

  _signOut = async () => {
    this.context.signOut();
  };

  async componentDidMount() {
    this.props.navigation.setOptions({
      headerShown: false,
    });
  }

  render() {
    const userLoaded = !this.state.userLoading;

    return (
      <UserContext.Provider value={this.state}>
        <Drawer.Navigator
          drawerType='front'
          screenOptions={{
            headerShown: true,
            headerStyle: {
              backgroundColor: '#276b80',
            },
            headerTintColor: 'white',
          }}
          drawerContent={props => (
            <CustomDrawerContent
              {...props}
              userName={this.state.userFullName}
              userEmail={this.state.userEmail}
              userPhoto={this.state.userPhoto}
              signOut={this._signOut}
            />
          )}>
          <Drawer.Screen
            name='Home'
            component={HomeScreen}
            options={{drawerLabel: 'Home', headerTitle: 'Welcome'}}
          />
          {userLoaded && (
            <Drawer.Screen
              name='Calendar'
              component={CalendarScreen}
              options={{drawerLabel: 'Calendar'}}
            />
          )}
        </Drawer.Navigator>
      </UserContext.Provider>
    );
  }
}

const styles = StyleSheet.create({
  container: {
    flex: 1,
  },
  profileView: {
    alignItems: 'center',
    padding: 10,
  },
  profilePhoto: {
    width: 80,
    height: 80,
    borderRadius: 40,
  },
  profileUserName: {
    fontWeight: '700',
  },
  profileEmail: {
    fontWeight: '200',
    fontSize: 10,
  },
});
Cree un nuevo directorio en el directorio GraphTutorial denominado imágenes.
Agregue una imagen de perfil predeterminada denominada no-profile-pic.png en este directorio. Puedes usar cualquier imagen que quieras o usar la de este ejemplo.
Abra el archivo GraphTutorial/App.tsx y reemplace todo el contenido por lo siguiente.
// Adapted from https://reactnavigation.org/docs/auth-flow
import * as React from 'react';
import {NavigationContainer, ParamListBase} from '@react-navigation/native';
import {
  createStackNavigator,
  StackNavigationProp,
} from '@react-navigation/stack';

import {AuthContext} from './AuthContext';
import SignInScreen from './screens/SignInScreen';
import DrawerMenuContent from './menus/DrawerMenu';
import AuthLoadingScreen from './screens/AuthLoadingScreen';

const Stack = createStackNavigator();

type Props = {
  navigation: StackNavigationProp<ParamListBase>;
};

export default function App({navigation}: Props) {
  const [state, dispatch] = React.useReducer(
    (prevState: any, action: any) => {
      switch (action.type) {
        case 'RESTORE_TOKEN':
          return {
            ...prevState,
            userToken: action.token,
            isLoading: false,
          };
        case 'SIGN_IN':
          return {
            ...prevState,
            isSignOut: false,
            userToken: action.token,
          };
        case 'SIGN_OUT':
          return {
            ...prevState,
            isSignOut: true,
            userToken: null,
          };
      }
    },
    {
      isLoading: true,
      isSignOut: false,
      userToken: null,
    },
  );

  React.useEffect(() => {
    const bootstrapAsync = async () => {
      let userToken = null;
      // TEMPORARY
      dispatch({type: 'RESTORE_TOKEN', token: userToken});
    };

    bootstrapAsync();
  }, []);

  const authContext = React.useMemo(
    () => ({
      signIn: async () => {
        dispatch({type: 'SIGN_IN', token: 'placeholder-token'});
      },
      signOut: async () => {
        dispatch({type: 'SIGN_OUT'});
      },
    }),
    [],
  );

  return (
    <AuthContext.Provider value={authContext}>
      <NavigationContainer>
        <Stack.Navigator>
          {state.isLoading ? (
            <Stack.Screen name='Loading' component={AuthLoadingScreen} />
          ) : state.userToken == null ? (
            <Stack.Screen name='SignIn' component={SignInScreen} />
          ) : (
            <Stack.Screen name='Main' component={DrawerMenuContent} />
          )}
        </Stack.Navigator>
      </NavigationContainer>
    </AuthContext.Provider>
  );
}
Guarde todos los cambios.
Vuelva a cargar la aplicación en el emulador.
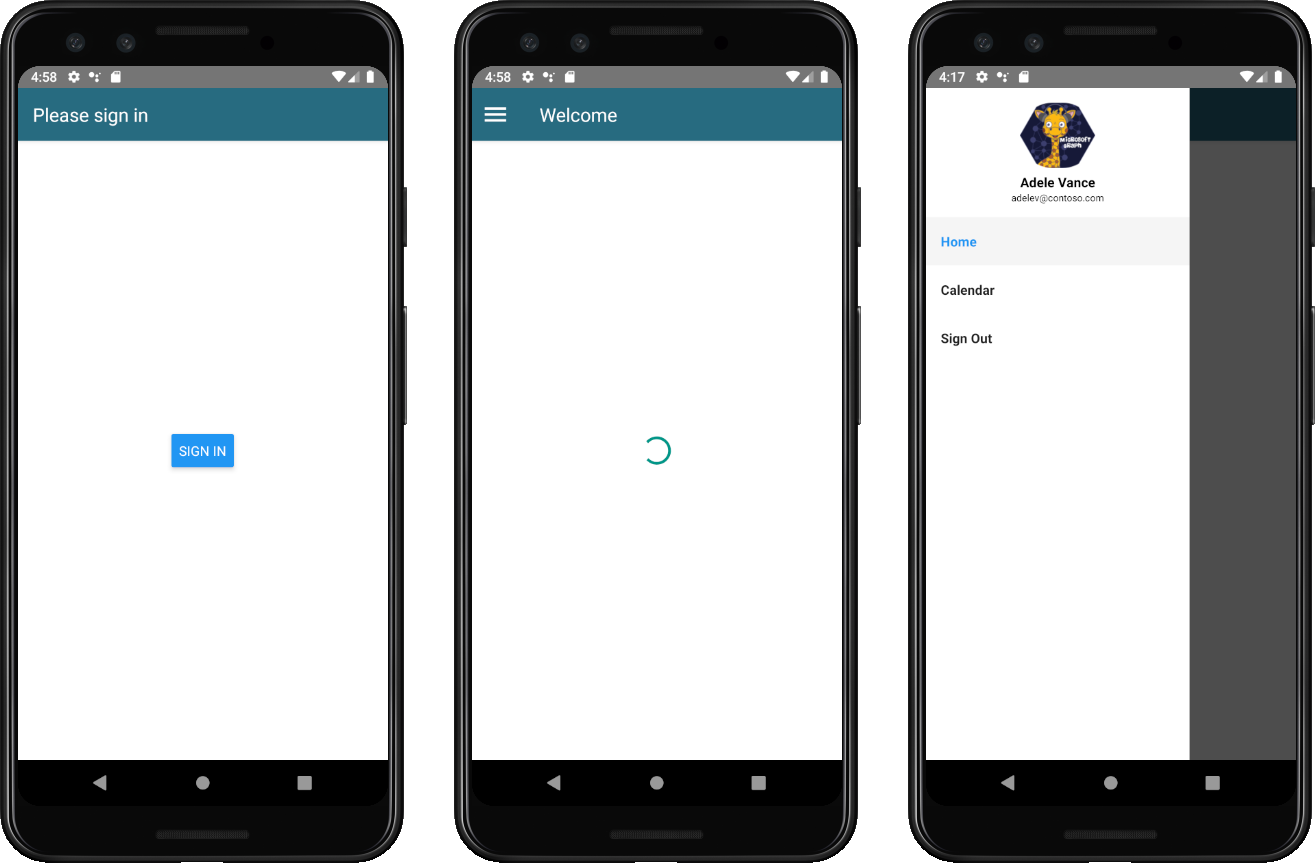
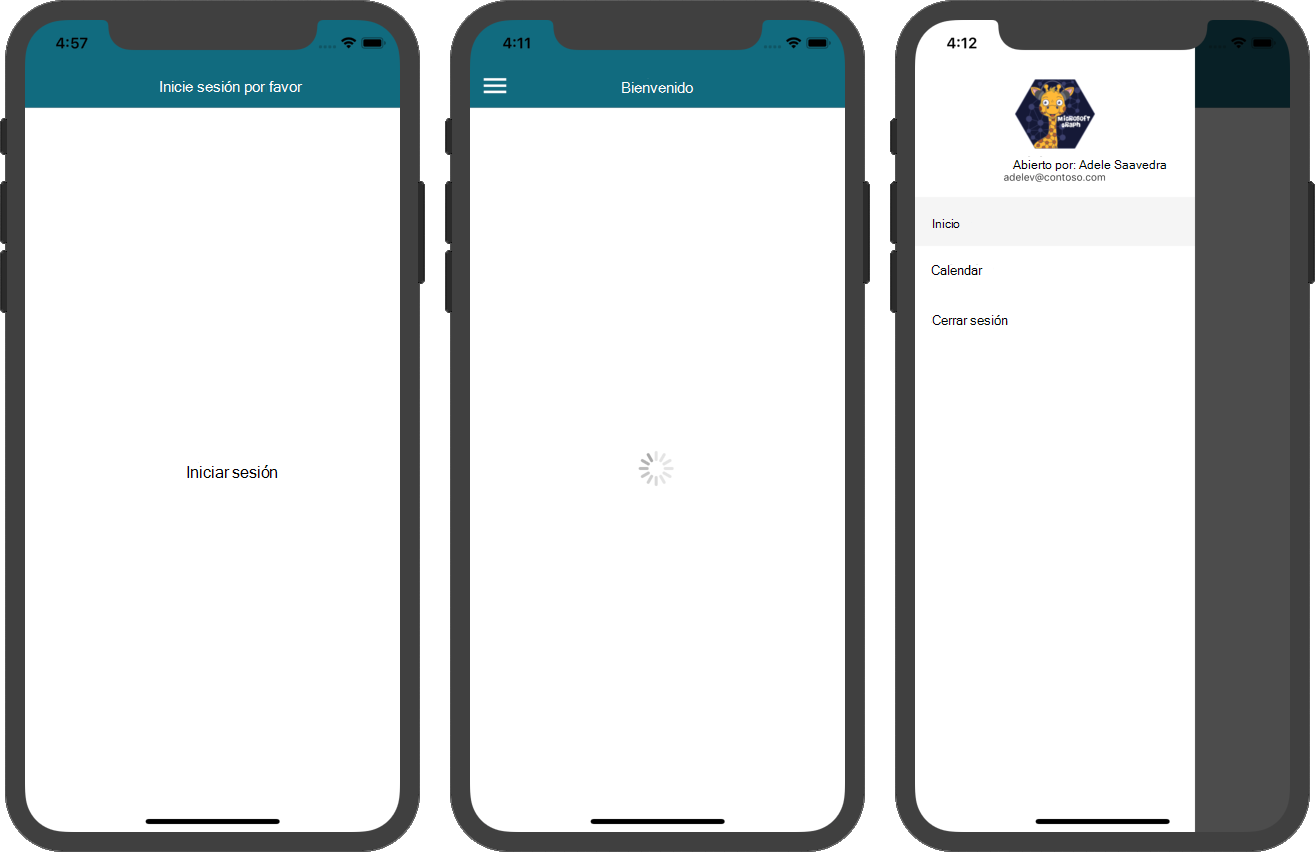
El menú de la aplicación debe funcionar para navegar entre los dos fragmentos y cambiar al pulsar los botones Iniciar sesión o Cerrar sesión .
Registrar la aplicación en el portal
En este ejercicio, creará una nueva aplicación nativa de Azure AD con el centro Azure Active Directory administración.
Abra un explorador y vaya al centro de administración de Azure Active Directory e inicie sesión con una cuenta personal (también conocida como: cuenta Microsoft) o una cuenta profesional o educativa.
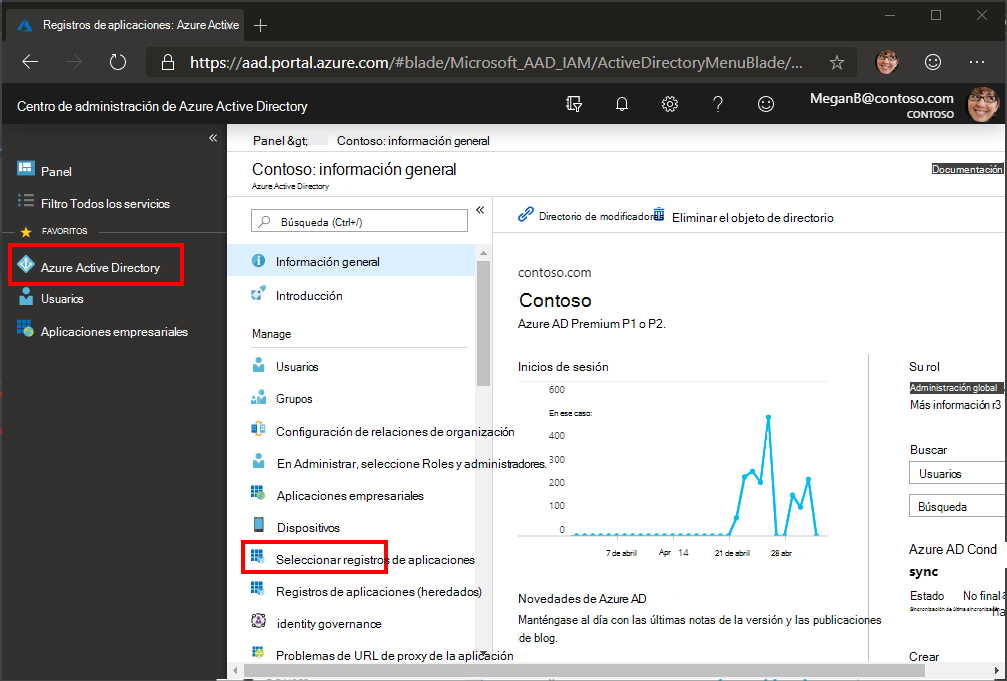
Seleccione Azure Active Directory en el panel de navegación izquierdo y, a continuación, seleccione Registros de aplicaciones en Administrar.
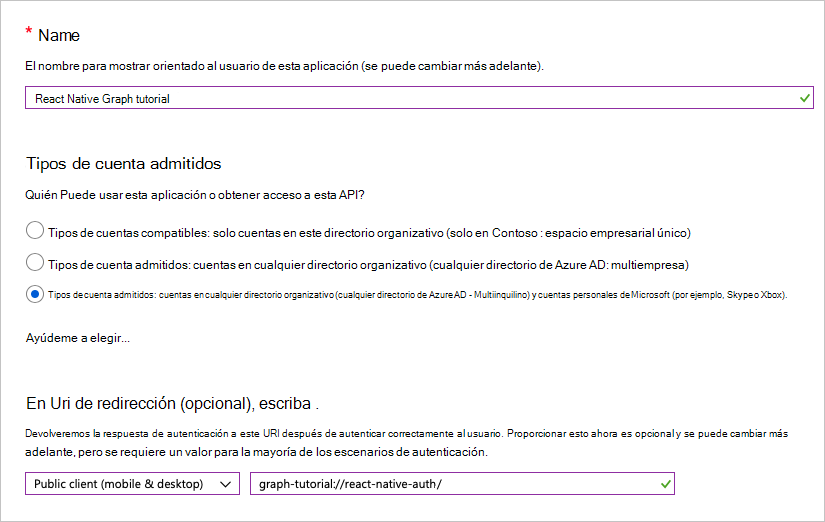
Seleccione Nuevo registro. En la página Registrar una aplicación, establezca los valores siguientes.
- Establezca Nombre como
React Native Graph Tutorial. - Establezca Tipos de cuenta admitidos en Cuentas en cualquier directorio de organización y cuentas personales de Microsoft.
- En URI de redireccionamiento, cambie el desplegable a Cliente público (escritorio & móvil) y establezca el valor en
graph-tutorial://react-native-auth/.
- Establezca Nombre como
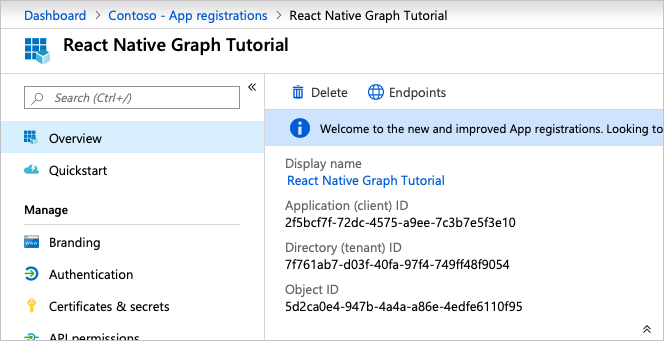
Seleccione Registrar. En la React Native Graph tutorial, copie el valor del identificador de aplicación (cliente) y guárdelo, lo necesitará en el paso siguiente.
Agregar autenticación de Azure AD
En este ejercicio, extenderá la aplicación desde el ejercicio anterior para admitir la autenticación con Azure AD. Esto es necesario para obtener el token de acceso OAuth necesario para llamar a Microsoft Graph. Para ello, integrará la biblioteca react-native-app-auth en la aplicación.
Cree un nuevo directorio en el directorio GraphTutorial denominado auth.
Cree un nuevo archivo en el directorio GraphTutorial/auth denominado AuthConfig.ts. Agregue el siguiente código al archivo.
export const AuthConfig = {
  appId: 'YOUR_APP_ID_HERE',
  appScopes: [
    'openid',
    'offline_access',
    'profile',
    'User.Read',
    'MailboxSettings.Read',
    'Calendars.ReadWrite'
  ]
};
Reemplace
YOUR_APP_ID_HEREpor el identificador de la aplicación desde el registro de la aplicación.
Importante
Si usas el control de código fuente como git, ahora sería un buen momento para excluir el archivo AuthConfig.ts del control de código fuente para evitar la pérdida involuntaria del identificador de la aplicación.
Implementar el inicio de sesión
En esta sección, crearás una clase auxiliar de autenticación y actualizará la aplicación para iniciar sesión y cerrar sesión.
Cree un nuevo archivo en el directorio GraphTutorial/auth denominado AuthManager.ts. Agregue el siguiente código al archivo.
import AsyncStorage from '@react-native-async-storage/async-storage';
import { authorize, refresh, AuthConfiguration } from 'react-native-app-auth';
import { Platform } from 'react-native';
import moment from 'moment';

import { AuthConfig } from './AuthConfig';

const config: AuthConfiguration = {
  clientId: AuthConfig.appId,
  redirectUrl: 'graph-tutorial://react-native-auth/',
  scopes: AuthConfig.appScopes,
  additionalParameters: { prompt: 'select_account' },
  serviceConfiguration: {
    authorizationEndpoint: 'https://login.microsoftonline.com/common/oauth2/v2.0/authorize',
    tokenEndpoint: 'https://login.microsoftonline.com/common/oauth2/v2.0/token',
  }
};

export class AuthManager {

  static signInAsync = async () => {
    const result = await authorize(config);

    console.log(result.accessToken);

    // Store the access token, refresh token, and expiration time in storage
    await AsyncStorage.setItem('userToken', result.accessToken);
    await AsyncStorage.setItem('refreshToken', result.refreshToken);
    await AsyncStorage.setItem('expireTime', result.accessTokenExpirationDate);
  }

  static signOutAsync = async () => {
    // Clear storage
    await AsyncStorage.removeItem('userToken');
    await AsyncStorage.removeItem('refreshToken');
    await AsyncStorage.removeItem('expireTime');
  }

  static getAccessTokenAsync = async() => {
    const expireTime = await AsyncStorage.getItem('expireTime');

    if (expireTime !== null) {
      // Get expiration time - 5 minutes
      // If it's <= 5 minutes before expiration, then refresh
      const expire = moment(expireTime).subtract(5, 'minutes');
      const now = moment();

      if (now.isSameOrAfter(expire)) {
        // Expired, refresh
        console.log('Refreshing token');
        const refreshToken = await AsyncStorage.getItem('refreshToken');
        console.log(`Refresh token: ${refreshToken}`);
        const result = await refresh(config, { refreshToken: refreshToken || '' });

        // Store the new access token, refresh token, and expiration time in storage
        await AsyncStorage.setItem('userToken', result.accessToken);
        await AsyncStorage.setItem('refreshToken', result.refreshToken || '');
        await AsyncStorage.setItem('expireTime', result.accessTokenExpirationDate);

        return result.accessToken;
      }

      // Not expired, just return saved access token
      const accessToken = await AsyncStorage.getItem('userToken');
      return accessToken;
    }

    return null;
  }
}
Abra el archivo GraphTutorial/App.tsx y agregue la siguiente
importinstrucción a la parte superior del archivo.import {AuthManager} from './auth/AuthManager';Reemplace la declaración
authContextexistente por la siguiente.const authContext = React.useMemo( () => ({ signIn: async () => { await AuthManager.signInAsync(); const token = await AuthManager.getAccessTokenAsync(); dispatch({ type: 'SIGN_IN', token: token }); }, signOut: async () => { await AuthManager.signOutAsync(); dispatch({ type: 'SIGN_OUT' }); } }), [] );Abra el archivo GraphTutorial/menus/DrawerMenu.tsx y agregue la siguiente
importinstrucción a la parte superior del archivo.import {AuthManager} from '../auth/AuthManager';Agregue el siguiente código a la
componentDidMountfunción.try { const accessToken = await AuthManager.getAccessTokenAsync(); // TEMPORARY this.setState({userFirstName: accessToken, userLoading: false}); } catch (error) { Alert.alert( 'Error getting token', JSON.stringify(error), [ { text: 'OK' } ], { cancelable: false } ); }Guarde los cambios y vuelva a cargar la aplicación en el emulador.
Si inicias sesión en la aplicación, deberías ver un token de acceso que se muestra en la pantalla de bienvenida.
Obtener detalles del usuario
En esta sección, creará un proveedor de autenticación personalizado para la biblioteca cliente de Graph, creará una clase auxiliar para contener todas las llamadas a Microsoft Graph DrawerMenuContent y actualizará la clase para usar esta nueva clase para obtener al usuario que ha iniciado sesión.
Cree un nuevo directorio en el directorio GraphTutorial denominado graph.
Cree un nuevo archivo en el directorio GraphTutorial/graph denominado GraphAuthProvider.ts. Agregue el siguiente código al archivo.
import { AuthManager } from '../auth/AuthManager';

// Used by Graph client to get access tokens
// See https://github.com/microsoftgraph/msgraph-sdk-javascript/blob/dev/docs/CustomAuthenticationProvider.md
export class GraphAuthProvider {
  getAccessToken = async() => {
    const token = await AuthManager.getAccessTokenAsync();
    return token || '';
  }
}
Cree un nuevo archivo en el directorio GraphTutorial/graph denominado GraphManager.ts. Agregue el siguiente código al archivo.
import {Client} from '@microsoft/microsoft-graph-client';
import {GraphAuthProvider} from './GraphAuthProvider';

// Set the authProvider to an instance
// of GraphAuthProvider
const clientOptions = {
  authProvider: new GraphAuthProvider(),
};

// Initialize the client
const graphClient = Client.initWithMiddleware(clientOptions);

export class GraphManager {
  static getUserAsync = async () => {
    // GET /me
    return await graphClient
      .api('/me')
      .select('displayName,givenName,mail,mailboxSettings,userPrincipalName')
      .get();
  };
}
Abra el archivo GraphTutorial/views/DrawerMenu.tsx y agregue
importlas siguientes instrucciones a la parte superior del archivo.import {GraphManager} from '../graph/GraphManager'; import * as MicrosoftGraph from '@microsoft/microsoft-graph-types';Reemplace el
componentDidMountmétodo por lo siguiente.async componentDidMount() { this.props.navigation.setOptions({ headerShown: false, }); try { // Get the signed-in user from Graph const user: MicrosoftGraph.User = await GraphManager.getUserAsync(); // Update UI with display name and email this.setState({ userLoading: false, userFirstName: user.givenName!, userFullName: user.displayName!, // Work/School accounts have email address in mail attribute // Personal accounts have it in userPrincipalName userEmail: user.mail! || user.userPrincipalName!, userTimeZone: user.mailboxSettings?.timeZone! }); } catch(error) { Alert.alert( 'Error getting user', JSON.stringify(error), [ { text: 'OK' } ], { cancelable: false } ); } }
Si guardas los cambios y vuelves a cargar la aplicación ahora, después de iniciar sesión, la interfaz de usuario se actualiza con el nombre para mostrar y la dirección de correo electrónico del usuario.
Obtener una vista de calendario
En este ejercicio, incorporará el Graph Microsoft en la aplicación. Para esta aplicación, usará la Biblioteca de cliente de JavaScript de Microsoft Graph para realizar llamadas a Microsoft Graph.
Obtener eventos del calendario desde Outlook
En esta sección, extenderá GraphManager CalendarScreen la clase para agregar una función para obtener los eventos del usuario de la semana actual y actualizar para usar estas nuevas funciones.
Abra el archivo GraphTutorial/graph/GraphManager.tsx y agregue el siguiente método a la
GraphManagerclase.static getCalendarView = async(start: string, end: string, timezone: string) => { // GET /me/calendarview return await graphClient.api('/me/calendarview') .header('Prefer', `outlook.timezone="${timezone}"`) .query({ startDateTime: start, endDateTime: end}) // $select='subject,organizer,start,end' // Only return these fields in results .select('subject,organizer,start,end') // $orderby=createdDateTime DESC // Sort results by when they were created, newest first .orderby('start/dateTime') .top(50) .get(); }Nota
Tenga en cuenta lo que está haciendo
getCalendarViewel código.- La dirección URL a la que se llamará es
/v1.0/me/calendarView. - La
headerfunción agrega el encabezadoPrefer: outlook.timezonea la solicitud, lo que hace que las horas de la respuesta se den en la zona horaria preferida del usuario. - La
queryfunción agrega los parámetrosstartDateTimeyendDateTime, definiendo la ventana de tiempo para la vista de calendario. - La
selectfunción limita los campos devueltos para cada evento a solo aquellos que la aplicación usará realmente. - La
orderbyfunción ordena los resultados por hora de inicio. - La
topfunción limita los resultados a los primeros 50 eventos.
- La dirección URL a la que se llamará es
Abra GraphTutorial/views/CalendarScreen.tsx y reemplace todo su contenido por el código siguiente.
import React from 'react';
import {
  ActivityIndicator,
  Alert,
  FlatList,
  Modal,
  Platform,
  ScrollView,
  StyleSheet,
  Text,
  View,
} from 'react-native';
import {createStackNavigator} from '@react-navigation/stack';
import * as MicrosoftGraph from '@microsoft/microsoft-graph-types';
import moment from 'moment-timezone';
import {findIana} from 'windows-iana';

import {UserContext} from '../UserContext';
import {GraphManager} from '../graph/GraphManager';

const Stack = createStackNavigator();
const CalendarState = React.createContext<CalendarScreenState>({
  loadingEvents: true,
  events: [],
});

type CalendarScreenState = {
  loadingEvents: boolean;
  events: MicrosoftGraph.Event[];
};

// Temporary JSON view
const CalendarComponent = () => {
  const calendarState = React.useContext(CalendarState);

  return (
    <View style={styles.container}>
      <Modal visible={calendarState.loadingEvents}>
        <View style={styles.loading}>
          <ActivityIndicator
            color={Platform.OS === 'android' ? '#276b80' : undefined}
            animating={calendarState.loadingEvents}
            size='large'
          />
        </View>
      </Modal>
      <ScrollView>
        <Text>{JSON.stringify(calendarState.events, null, 2)}</Text>
      </ScrollView>
    </View>
  );
};

export default class CalendarScreen extends React.Component {
  static contextType = UserContext;

  state: CalendarScreenState = {
    loadingEvents: true,
    events: [],
  };

  async componentDidMount() {
    try {
      const tz = this.context.userTimeZone || 'UTC';
      // Convert user's Windows time zone ("Pacific Standard Time")
      // to IANA format ("America/Los_Angeles")
      // Moment.js needs IANA format
      const ianaTimeZone = findIana(tz)[0];

      // Get midnight on the start of the current week in the user's
      // time zone, but in UTC. For example, for PST, the time value
      // would be 07:00:00Z
      const startOfWeek = moment
        .tz(ianaTimeZone!.valueOf())
        .startOf('week')
        .utc();

      const endOfWeek = moment(startOfWeek).add(7, 'day');

      const events = await GraphManager.getCalendarView(
        startOfWeek.format(),
        endOfWeek.format(),
        tz,
      );

      this.setState({
        loadingEvents: false,
        events: events.value,
      });
    } catch (error) {
      Alert.alert(
        'Error getting events',
        JSON.stringify(error),
        [
          {
            text: 'OK',
          },
        ],
        {cancelable: false},
      );
    }
  }

  render() {
    return (
      <CalendarState.Provider value={this.state}>
        <Stack.Navigator>
          <Stack.Screen
            name='Calendar'
            component={CalendarComponent}
            options={{
              headerShown: false,
            }}
          />
        </Stack.Navigator>
      </CalendarState.Provider>
    );
  }
}

const styles = StyleSheet.create({
  container: {
    flex: 1,
  },
  loading: {
    flex: 1,
    justifyContent: 'center',
    alignItems: 'center',
  },
  eventItem: {
    padding: 10,
  },
  eventSubject: {
    fontWeight: '700',
    fontSize: 18,
  },
  eventOrganizer: {
    fontWeight: '200',
  },
  eventDuration: {
    fontWeight: '200',
  },
});
Ahora puedes ejecutar la aplicación, iniciar sesión y pulsar el elemento de navegación Calendario en el menú. Debería ver un volcado JSON de los eventos en la aplicación.
Mostrar los resultados
Ahora puede reemplazar el volcado JSON por algo para mostrar los resultados de una manera fácil de usar. En esta sección, agregará una a a la FlatList pantalla del calendario para representar los eventos.
Agregue el siguiente método encima de la declaración
CalendarScreende clase.const convertDateTime = (dateTime: string): string => { return moment(dateTime).format('MMM Do H:mm a'); };Reemplace el
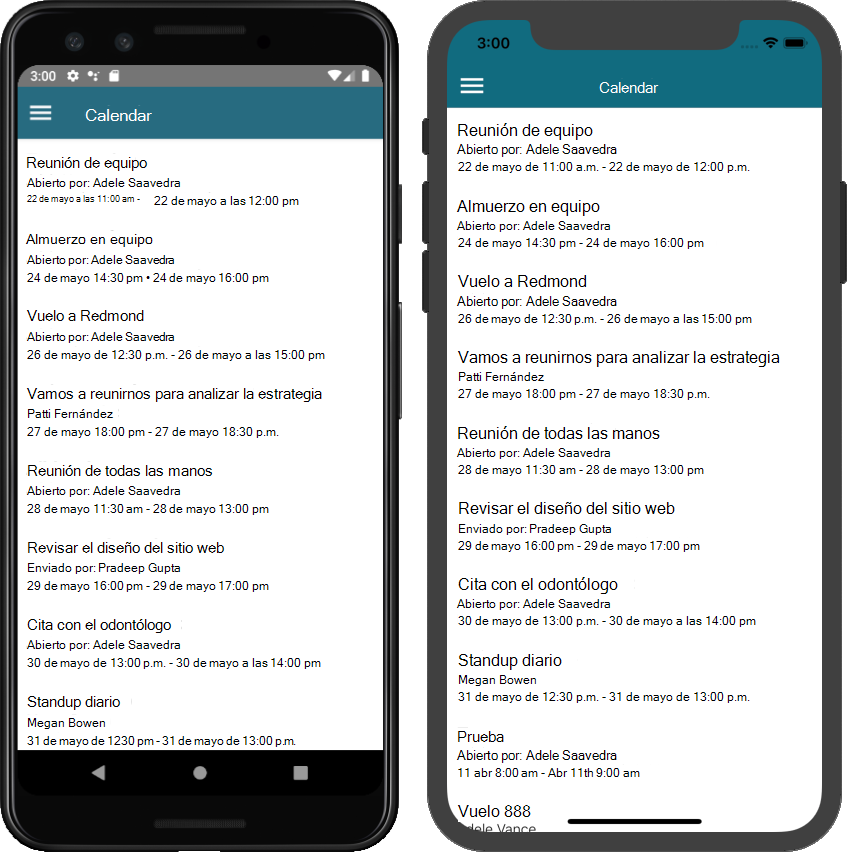
ScrollViewin en elCalendarComponentmétodo por lo siguiente.<FlatList data={calendarState.events} renderItem={({item}) => ( <View style={styles.eventItem}> <Text style={styles.eventSubject}>{item.subject}</Text> <Text style={styles.eventOrganizer}> {item.organizer!.emailAddress!.name} </Text> <Text style={styles.eventDuration}> {convertDateTime(item.start!.dateTime!)} -{' '} {convertDateTime(item.end!.dateTime!)} </Text> </View> )} />Ejecuta la aplicación, inicia sesión y pulsa el elemento de navegación Calendario. Debería ver la lista de eventos.
Crear un nuevo evento
En esta sección, agregará la capacidad de crear eventos en el calendario del usuario.
Crear la nueva pantalla de eventos
Abra ./graph/GraphManager.ts y agregue la siguiente función a la
GraphManagerclase.static createEvent = async(newEvent: any) => { // POST /me/events await graphClient.api('/me/events') .post(newEvent); }Esta función usa el SDK Graph para crear un nuevo evento.
Cree un nuevo archivo en el ./screens denominado NewEventScreen.tsx y agregue el siguiente código.
import React from 'react';
import {
  ActivityIndicator,
  Alert,
  Button,
  Modal,
  Platform,
  ScrollView,
  StyleSheet,
  Text,
  View,
} from 'react-native';
import DateTimePicker from '@react-native-community/datetimepicker';
import { createStackNavigator } from '@react-navigation/stack';
import * as MicrosoftGraph from '@microsoft/microsoft-graph-types';
import moment from 'moment-timezone';

import { UserContext } from '../UserContext';
import { GraphManager } from '../graph/GraphManager';
import { TextInput } from 'react-native-gesture-handler';

const Stack = createStackNavigator();
const NewEventState = React.createContext<NewEventState>({
  isCreating: false,
  subject: '',
  attendees: '',
  body: '',
  timeZone: '',
  startDate: new Date(),
  endDate: new Date(),
  disableCreate: () => { return true },
  updateValue: () => {}
});

type NewEventState = {
  isCreating: boolean;
  subject: string;
  attendees: string;
  body: string;
  timeZone: string;
  startDate: Date;
  endDate: Date;
  disableCreate: () => boolean;
  updateValue: (newValue: string | Date | boolean, fieldName: string) => void;
}

type DateTimeInputProps = {
  value: Date;
  onChange: (event: Event, newValue: Date | undefined) => void;
}

// The picker acts very differently on Android and iOS
// iOS can use a single picker for both date and time,
// where Android requires two. Also the iOS version can
// be displayed all the time, while the Android version is a
// modal pop-up. Encapsulating this into a reusable component
const DateTimeInput = (props: DateTimeInputProps) => {
  const [showDatePicker, setShowDatePicker] = React.useState(false);
  const [showTimePicker, setShowTimePicker] = React.useState(Platform.OS === 'ios');

  return (
    <View style={Platform.OS === 'android' ? styles.dateTime : null}>
      { Platform.OS === 'android' &&
        <Text
          style={styles.time}
          onPress={()=>{setShowTimePicker(true)}}>
          {formatTime(props.value)}
        </Text>
      }
      { showTimePicker &&
        <DateTimePicker
          mode={Platform.OS === 'ios' ? 'datetime' : 'time'}
          value={props.value}
          onChange={(e, d) => {
            setShowTimePicker(Platform.OS === 'ios');
            if (d)
              props.onChange(e,d);
          }}
          />
      }
      { Platform.OS === 'android' &&
        <Text
          style={styles.date}
          onPress={()=>{setShowDatePicker(true)}}>
          {formatDate(props.value)}
        </Text>
      }
      { showDatePicker &&
        Platform.OS === 'android' &&
        <DateTimePicker
          mode='date'
          value={props.value}
          onChange={(e, d) => {
            setShowDatePicker(Platform.OS === 'ios');
            if (d)
              props.onChange(e,d);
          }}
          />
      }
    </View>
  )
}

const NewEventComponent = () => {
  const newEventState = React.useContext(NewEventState);

  const createEvent = async () => {
    newEventState.updateValue(true, 'isCreating');

    // Create a new Event object with the
    // required fields
    const newEvent: MicrosoftGraph.Event = {
      subject: newEventState.subject,
      start: {
        dateTime: moment(newEventState.startDate).format('YYYY-MM-DDTHH:mm:ss'),
        timeZone: newEventState.timeZone
      },
      end: {
        dateTime: moment(newEventState.endDate).format('YYYY-MM-DDTHH:mm:ss'),
        timeZone: newEventState.timeZone
      }
    };

    // Only add attendees if the user specified them
    if (newEventState.attendees.length > 0) {
      newEvent.attendees = [];

      // Value should be a ;-delimited list of email addresses
      // NOTE: The app does no validation of this
      const emails = newEventState.attendees.split(';')

      emails.forEach((email) => {
        newEvent.attendees!.push({
          emailAddress: { address: email }
        });
      });
    }

    // Only add body if the user specified one
    if (newEventState.body.length > 0) {
      newEvent.body = {
        content: newEventState.body,
        // For simplicity, add it as a plain-text body
        contentType: 'text'
      };
    }

    await GraphManager.createEvent(newEvent);

    Alert.alert('Success',
      'Event created',
      [
        {
          text: 'OK',
          onPress: () => {
            newEventState.updateValue(false, 'isCreating');
          }
        }
      ]
    );
  }

  return (
    <ScrollView style={styles.container}>
      <Modal visible={newEventState.isCreating}>
        <View style={styles.loading}>
          <ActivityIndicator
            color={Platform.OS === 'android' ? '#276b80' : undefined}
            animating={newEventState.isCreating}
            size='large' />
        </View>
      </Modal>
        <View style={styles.formField}>
          <Text style={styles.fieldLabel}>Subject</Text>
          <TextInput style={styles.textInput}
            value={newEventState.subject}
            onChangeText={(text) => newEventState.updateValue(text, 'subject')} />
        </View>
        <View style={styles.formField}>
          <Text style={styles.fieldLabel}>Attendees</Text>
          <TextInput style={styles.textInput}
            placeholder="Email (separate multiple with ';')"
            value={newEventState.attendees}
            onChangeText={(text) => newEventState.updateValue(text, 'attendees')} />
        </View>
        <View style={styles.formField}>
          <Text style={styles.fieldLabel}>Start</Text>
          <DateTimeInput
            value={newEventState.startDate}
            onChange={(e, date) => newEventState.updateValue(date!, 'startDate')} />
        </View>
        <View style={styles.formField}>
          <Text style={styles.fieldLabel}>End</Text>
          <DateTimeInput
            value={newEventState.endDate}
            onChange={(e, date) => newEventState.updateValue(date!, 'endDate')} />
        </View>
        <View style={styles.formField}>
          <TextInput style={styles.multiLineTextInput}
            multiline={true}
            textAlignVertical='top'
            placeholder='Body'
            value={newEventState.body}
            onChangeText={(text) => newEventState.updateValue(text, 'body')} />
        </View>
        <View style={styles.formField}>
          <Button title="Create"
            disabled={newEventState.disableCreate()}
            onPress={createEvent}/>
        </View>
    </ScrollView>
  );
}

const formatTime = (dateTime: Date): string => {
  return moment(dateTime).format('h:mm A');
}

const formatDate = (dateTime: Date): string => {
  return moment(dateTime).format('MMM D, YYYY');
}

// When first loading the form, set the start time
// to the nearest hour or half-hour
const getDefaultStart = (): Date => {
  const now = moment().startOf('minute');
  const offset = 30 - (now.minute() % 30);

  return now.add(offset, 'minutes').toDate();
}

// When first loading the form, set the end time
// to start + 30 min
const getDefaultEnd = (): Date => {
  return moment(getDefaultStart()).add(30, 'minutes').toDate();
}

export default class NewEventScreen extends React.Component {
  static contextType = UserContext;

  // Disable the create button if:
  // - App is waiting for the result of create request
  // - Subject is empty
  // - Start time is after end time
  disableCreate = () => {
    return this.state.isCreating ||
      this.state.subject.length <= 0 ||
      moment(this.state.startDate).isAfter(this.state.endDate);
  }

  onStateValueChange = (newValue: string | Date | boolean, fieldName: string) => {
    this.setState({ [fieldName]: newValue });
  }

  state: NewEventState = {
    isCreating: false,
    subject: '',
    attendees: '',
    body: '',
    timeZone: this.context.userTimeZone,
    startDate: getDefaultStart(),
    endDate: getDefaultEnd(),
    disableCreate: this.disableCreate,
    updateValue: this.onStateValueChange
  };

  render() {
    return (
      <NewEventState.Provider value={this.state}>
        <Stack.Navigator>
          <Stack.Screen name='NewEvent'
            component={ NewEventComponent }
            options={{
              headerShown: false
            }} />
        </Stack.Navigator>
      </NewEventState.Provider>
    );
  }
}

const styles = StyleSheet.create({
  container: {
    flex: 1
  },
  loading: {
    flex: 1,
    justifyContent: 'center',
    alignItems: 'center'
  },
  formField: {
    paddingHorizontal: 10,
    paddingVertical: 5
  },
  fieldLabel: {
    fontWeight: '700',
    marginBottom: 10
  },
  textInput: {
    borderColor: 'gray',
    borderWidth: 1,
    height: 40,
    padding: 10
  },
  multiLineTextInput: {
    borderColor: 'gray',
    borderWidth: 1,
    height: 200,
    padding: 10
  },
  time: {
    padding: 10,
    backgroundColor: '#e6e6e6',
    color: '#147efb',
    marginRight: 10
  },
  date: {
    padding: 10,
    backgroundColor: '#e6e6e6',
    color: '#147efb'
  },
  dateTime: {
    flexDirection: 'row'
  }
});
Tenga en cuenta lo que
createEventhace la función. Crea un objetoMicrosoftGraph.Eventcon los valores del formulario y, a continuación, pasa ese objeto a laGraphManager.createEventfunción.Abra ./menus/DrawerMenu.tsx y agregue la siguiente
importinstrucción en la parte superior del archivo.import NewEventScreen from '../screens/NewEventScreen';Agregue el siguiente código dentro del
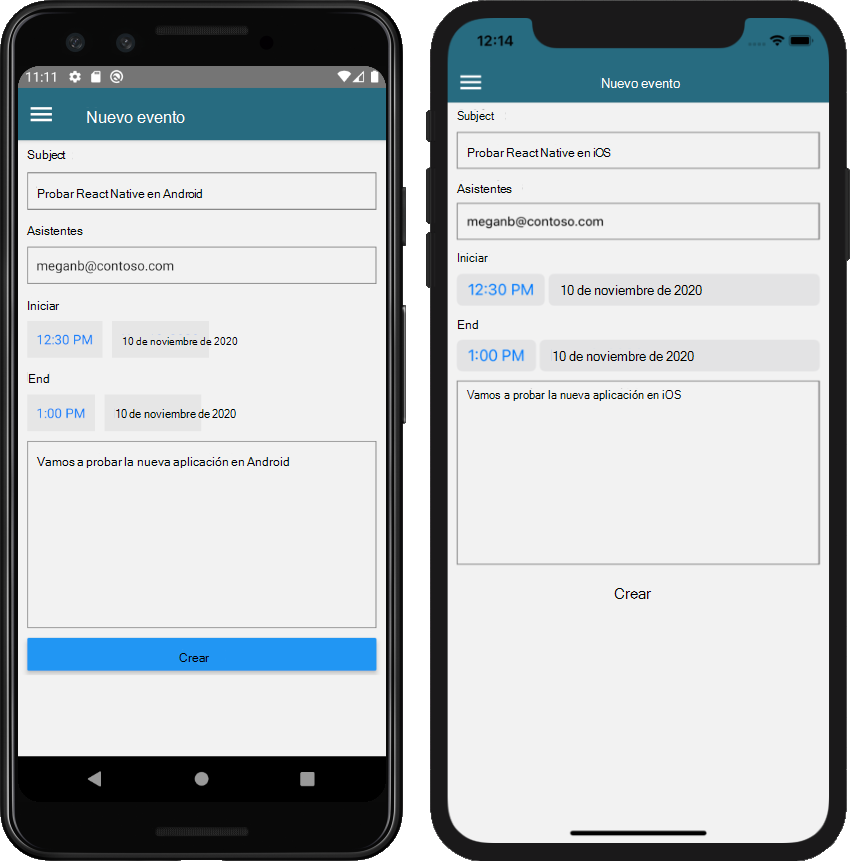
<Drawer.Navigator>elemento, justo encima de la</Drawer.Navigator>línea.{userLoaded && ( <Drawer.Screen name='NewEvent' component={NewEventScreen} options={{drawerLabel: 'New event'}} /> )}Guarda los cambios y reinicia o actualiza la aplicación. Seleccione la opción Nuevo evento en el menú para llegar al nuevo formulario de evento.
Rellene el formulario y seleccione Crear.
¡Enhorabuena!
Has completado el tutorial React Native microsoft Graph usuario. Ahora que tienes una aplicación de trabajo que llama a Microsoft Graph, puedes experimentar y agregar nuevas características. Visite la información general de Microsoft Graph para ver todos los datos a los que puede acceder con Microsoft Graph.
Comentarios
Proporcione cualquier comentario sobre este tutorial en el repositorio GitHub archivo.
¿Tiene algún problema con esta sección? Si es así, envíenos sus comentarios para que podamos mejorarla.