Manage approvals using the Approvals Management mobile app
This article explains how to use the Approvals Management mobile app to approve, reject, or delegate approval requests.
User requirements
To manage purchasing requests from the Approvals Management mobile app, you must meet the following requirements:
- You must sign in to Microsoft Power Apps by using a domain account, and that domain account must match a user account in Dynamics 365 Supply Chain Management that has the same Microsoft Entra ID user name.
- Your user account in Supply Chain Management must be assigned the required security roles for the types of approvals that you must manage. Learn more in Set up user accounts to manage approvals in Supply Chain Management.
Home page
When you open the Approvals Management mobile app and sign in, the home page appears. This page provides an overview of requests that are awaiting your approval.
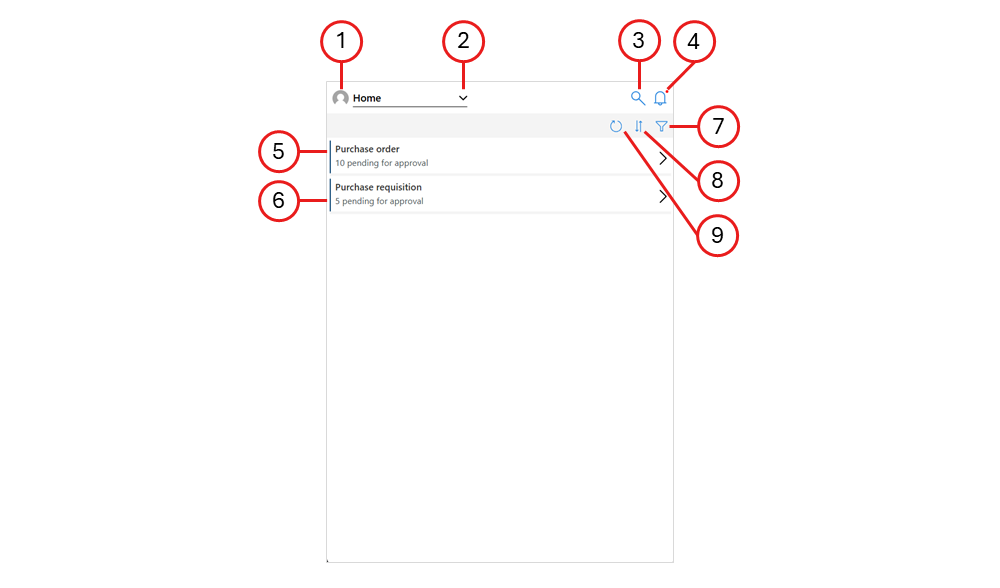
The following illustration highlights the user interface (UI) elements on the home page. Many of these elements are common to all pages in the app.
Legend:
- About button – View information about the app, such as terms and conditions, and the current version.
- Navigator – Move between the main pages of the app (such as Home, Purchase orders, and Purchase requisitions).
- Search – Search for specific documents to approve. For example, you can search for a specific order number, vendor account, vendor name, legal entity, or item number.
- Alerts – Read your notifications. A red dot indicates that you have new notifications.
- Purchase orders – If you can manage purchase orders, this item shows the number of purchase orders that are awaiting your approval. Select it to view the list of purchase orders.
- Purchase requisitions – If you can manage purchase requisitions, this item shows the number of purchase requisitions that are awaiting your approval. Select it to view the list of purchase requisitions.
- Filter – Filter the list by defining specific values to look for. This capability is useful on pages that show longer lists.
- Sort – Select how items are sorted in the list.
- Refresh – Manually refresh the list. (The list is automatically refreshed every 30 seconds.)
List pages
List pages show a list of orders, requisitions, or line items that are awaiting your approval. The type of item that is shown depends on how you opened the list page. From a list page, you can select any item in the list to view more details about it. If you turn on multiselect, you can select one or more items, and then approve, reject, delegate, or request changes for all of them directly from the list page.
List pages without multiselect
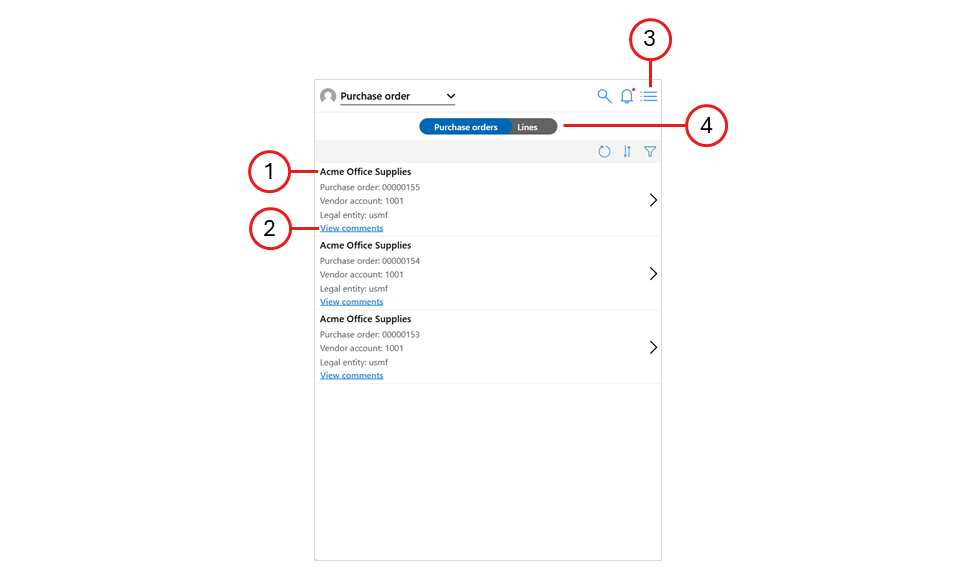
List pages where multiselect is turned off show a list of items that you can navigate and select to view more details. The following illustration highlights the UI elements on a list page where multiselect is turned off.
Legend:
- List item – Each item in the list represents an individual document header or line. A summary of the item is shown. Select the item to view details about it.
- View comments – View comments about the related item. These comments are usually comments that the requester wrote for the reviewer.
- Multiselect – Turn multiselect on or off. (In this illustration, multiselect is turned off.)
- Header/Lines selector – Select whether to view a list of document headers or individual lines.
List pages with multiselect
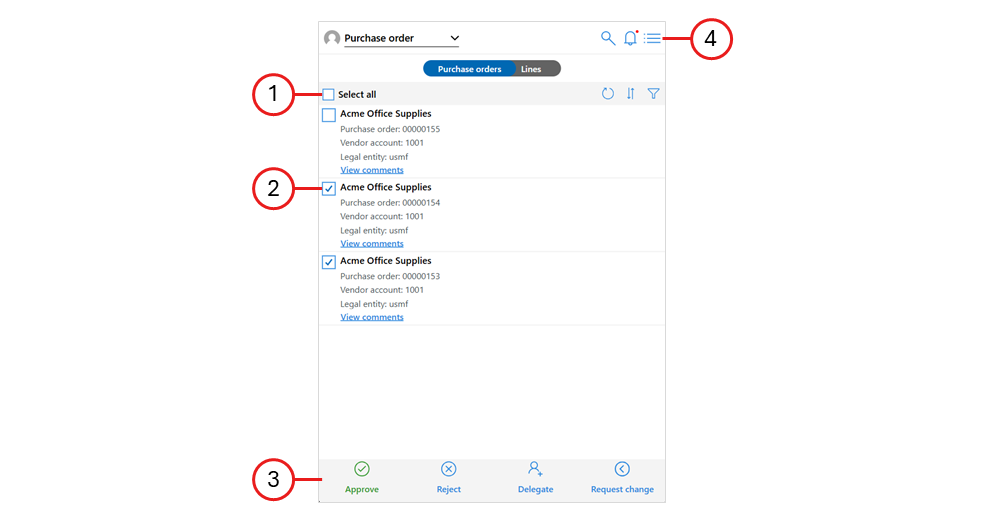
On list pages where multiselect is turned on, you can select one or more items in the list at the same time. You can then approve, reject, delegate, or request changes for all of those items directly from the list page. The following illustration highlights the UI elements on a list page where multiselect is turned on.
Legend:
- Select all – Select or clear the selection of all items in the list.
- Checkbox – Select or clear the selection of the related item.
- Action buttons – Approve, reject, delegate, or request changes for all the selected items.
- Multiselect – Turn multiselect on or off. (In this illustration, multiselect is turned on.)
Detail pages
Detail pages show detailed information about a specific document header or line item. The details that are provided vary slightly, depending on whether you view header details or line details.
Header details
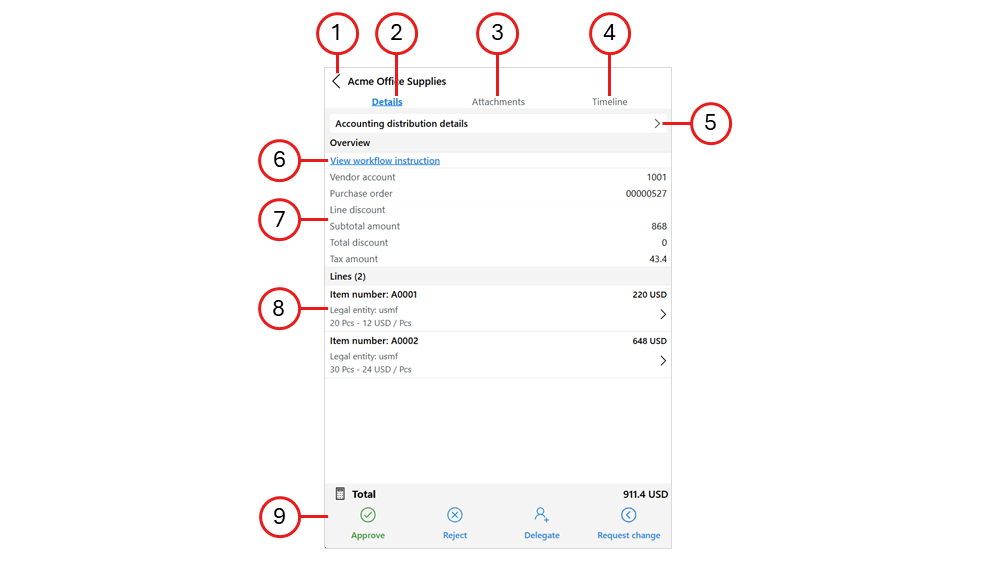
Header details pages show information about the selected document as a whole. The following illustration highlights the UI elements on a header details page.
Legend:
- Back – Return to the page that you came from.
- Details tab – View general information about the document. (In this illustration, this tab is selected.)
- Attachments tab – View and open any attachments that are associated with the document.
- Timeline tab – View a timeline of events that are related to the document.
- Accounting distribution details – View accounting distribution details that are linked to the document.
- View workflow instructions – View instructions for the workflow.
- Header details – Shows detailed information about the document.
- Lines – Lines are listed under the header details. Each line shows a summary of the line item. Select a line to view more details about it.
- Action buttons – Approve, reject, delegate, or request changes for the document.
Line details
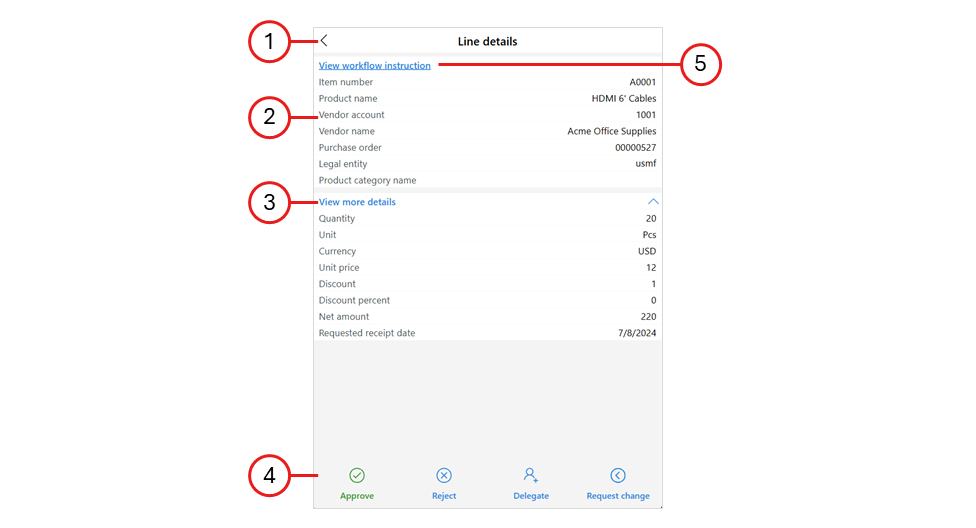
Line details pages show information about a specific document line. The following illustration highlights the UI elements on a line detail page.
Legend:
Back – Return to the page that you came from.
Standard details – View general information about the line item.
Extra details – Expand or collapse additional information about the line item.
Action buttons – Approve, reject, delegate, or request changes for the line.
Note
Not all line details pages include these buttons.
View workflow instructions – View instructions for the workflow.
