Set up test automation with Playwright
Applies to: Dynamics 365 Customer Service
Automated end-to-end testing is an important part of Dynamics 365 implementation projects. Automation helps you test code quickly by replicating the business process flows so that you can deploy it faster with high confidence. Historically, however, it's been complex to set up automated tests. Now, Playwright makes it much easier to set up end-to-end automated testing with Dynamics 365 Customer Service.
Playwright is an open-source library from Microsoft that's built to help developers and testers write end-to-end tests that run in all modern web browsers. It supports JavaScript, TypeScript, C#, and Python.
Playwright has two components. The Playwright Library provides unified APIs for launching and interacting with browsers. Playwright Test adds a fully managed end-to-end test runner experience.
Prerequisites
Playwright
- Native installation
- Playwright Test for Visual Studio Code - Visual Studio Marketplace
- Version 1.19+ or newer
Playwright NPM Package: Playwright supports testing on Windows, Linux, and macOS, locally or on CI, headless or headed, with native mobile emulation of Google Chrome for Android and Mobile Safari.
Azure subscription (optional): We recommend you use an active Microsoft Azure subscription. It's a requirement if you plan to run automated tests in Azure or if you integrate load testing into your CI/CD pipelines.
Installation
You can install Playwright natively using npm or yarn. We recommend you install the Playwright extension in Visual Studio Code (VS Code).
Install the Playwright VS Code extension from the marketplace or from the Extensions tab in VS Code.
Open the command panel, and then enter the following command:
Install PlaywrightSelect Test: Install Playwright, and then select the browsers you want to run your tests in. You can change the setting later in the
playwright.configfile.
Get a test environment
Next, you need a Dynamics 365 Customer Service environment that you can run tests in. If you're finalizing an implementation project, you probably have a test environment already. If you don't, you can get a free 30-day trial of Dynamics 365 Customer Service.
Configure the test environment
Turn off security defaults for automated testing.
In the Microsoft 365 admin center, create the user accounts you need and assign security roles. At a minimum, create a test automation account to use for testing, such as
test.automation@yourdomain.com.
Set up the test automation project
The Microsoft FastTrack for Dynamics 365 team provides a sample automation project to help you get started with test automation in Dynamics 365 implementation projects. The sample project is based on the Playwright test library.
Set up test automation
- Download or clone the sample automation project from the repository at https://github.com/microsoft/Dynamics-365-FastTrack-Implementation-Assets/Customer%20Service/Testing.
The project is in the /Automation/Samples/automation subfolder.
Extract the project folder, and then open the project in VS Code.
Open the
.envfile and edit the content to include your environment details, as in the following example with sample values:
 DYN365\_ORGURL='https://org123456.crm.dynamics.com/'
 DYN365\_USERNAME='test user account name'
 DYN365\_PASSWORD='test user account password'
 CSH\_APPID='ID for the Customer Service Hub app'
 CASE\_NUMBER='Existing case number'
The test sample project has end-to-end tests for the case to resolution business process. It covers the following process areas:
These cases are based on the out-of-the-box forms. We recommend you run the tests in a trial environment first. Once you're comfortable with running the tests, you can switch the configuration to the implementation project's environments.
Run the tests
For end-to-end tests, testDir must be ./tests-e2e. For unit tests, testDir must be ./tests.
By default, the sample project points to the end-to-end tests folder ./tests-e2e. The following instructions are for executing the end-to-end tests from the UI using VS Code. To run unit tests, change the setting testDir in the playwright.config.ts file to ./tests.
Run end-to-end tests from VS Code
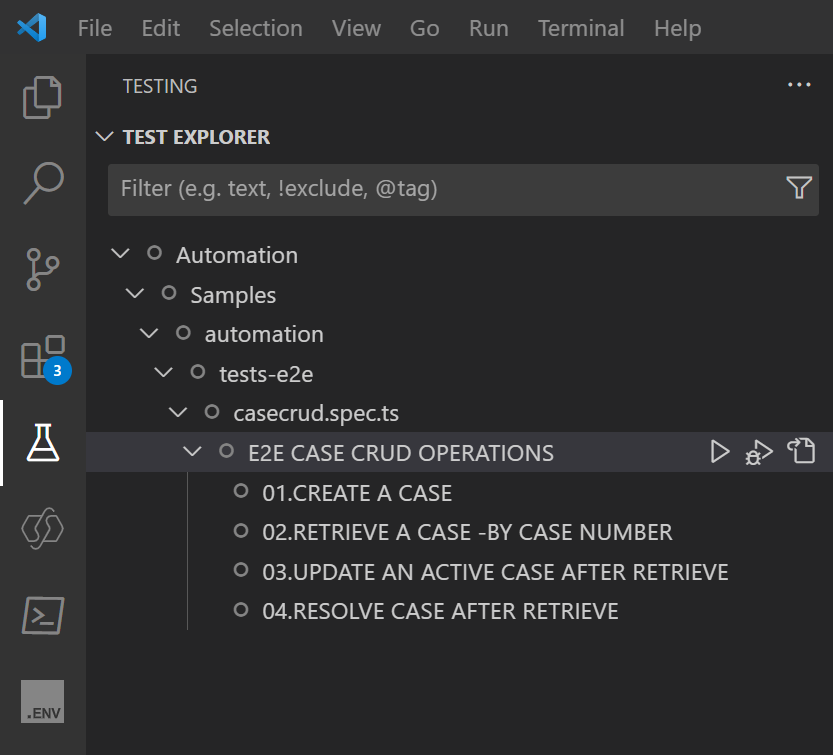
In the VS Code activity bar, select the Testing icon. Open the test project in Test Explorer.
The following screenshot shows the Test Explorer panel, which lists end-to-end test cases in a folder structure:
Select a test file, and then select the Run Test icon.
In the previous example, to run the
Case CRUDend-to-end test scenario, selectcasecrud.spec.ts.
By default, the VS Code test runner runs your tests in Chromium-based browsers. To test in other browsers, select the Play icon, and then select a browser type.
A checkmark next to a file in the Test Explorer indicates the test ran successfully.
