Get started with Electronic invoicing for Italy
Important
Electronic invoicing for Italy might not currently support all the functions that are available for electronic invoices in Microsoft Dynamics 365 Finance and Dynamics 365 Supply Chain Management.
This article provides information to help you get started with Electronic invoicing for Italy in Finance and Supply Chain Management. It guides you through the configuration steps that you must complete to enable the generation of electronic invoices in the Italy-specific format, FatturaPA, and to exchange electronic invoices with the Italian Revenue Agency's e-invoicing exchange system, SDI (Sistema di Interscambio).
Note
The solution for direct integration with SDI supports digital signing of documents only through separately stored certificate files that can be uploaded to the key vault. The solution doesn't support the use of qualified digital signatures, which require additional hardware involvement or an online connection to certification service providers.
Prerequisites
Before you complete the steps in this article, the following prerequisites must be met:
- Obtain SDICoop service channel accreditation in the Exchange system (SDI) government portal.
- Complete the steps in Electronic invoicing configuration.
- Import the Italian FatturaPA (IT) Electronic invoicing feature (version 5 or later) from the repository. Learn more in Import features from the repository.
- Configure Azure resources to store required certificates, including the Certificate authority (CA) certificate and Clients certificate. Learn more in Create a Key Vault reference.
- Optional: You can use the Digital signature certificate only for non-qualified signatures.
Country/region-specific configuration for the Italian FatturaPA (IT) Electronic invoicing feature
Complete the following procedures before you deploy the feature to Finance.
This section complements the common part of Electronic Invoicing service configuration that is described in Electronic invoicing configuration.
Create a new number sequence for ProgressivoInvio
To create a new number sequence for ProgressivoInvio, follow these steps.
- Go to Organization administration > Setup > Electronic document parameters.
- On the Electronic invoicing tab, on the Number sequences FastTab, select New to add a record.
- Enter a name for the new sequence (for example, ProgressivoInvio), and then select Save.
Create a new chain of certificates
To create a new chain of certificates, follow these steps.
Go to Organization administration > Setup > Electronic document parameters.
On the Electronic invoicing tab, on the Key Vault settings FastTab, select Key Vault parameters.
In the Certificates section, select Add to add the following certificates:
CAentrate.cer (and CAEntratetest.cer in the case of a test environment)
CAActalisOV.cer (in the case of a production environment)
Client identity certificate
Note
- Usually, the client identity certificate is generated while the user registers the SDICoop service channel. It's named SDI-<VatNumber>, where <VatNumber> is a company's 11-digit value-added tax (VAT) number.
- The client identity certificate has an expiration date. Review this date, and arrange to obtain a new certificate when the current one is about to expire. Learn how to establish proper rotation of the certificates that are used for this integration in the Rotate certificates section of this article.
Certificate for digital signature (optional)
On the Action Pane, select Chain of certificates.
Select New, and enter a name (for example, SDIChainProd or SDIChainTest).
In the Certificates section, add the following certificates in the order that they are listed in here:
- CAentrate.cer (and CAEntratetest.cer in the case of a test environment)
- CAActalisOV.cer (in the case of a production environment)
- Client identity certificate
Save your changes, and close the page.
Create a new feature
To create a new feature, follow these steps.
- In the Globalization Studio workspace, select the Electronic reporting tile.
- In the Configuration providers section, mark your company's configuration provider as active.
- In the Globalization Studio workspace, select the Electronic invoicing tile.
- On the Electronic invoicing features page, select Add > Based on existing feature.
- Under the Microsoft configuration provider, select Italian FatturaPA (IT) as a base feature, enter a name, and then select Create feature.
Align Electronic reporting configurations
The following procedures must be completed for both Electronic reporting (ER) format configurations that are used in the feature: Sales invoice (IT) and Project invoice (IT).
Set up payment method substitution
To set up payment method substitution, follow these steps.
- In the Globalization Studio workspace, select the Electronic reporting tile, and then select the Reporting configurations tile.
- On the Configurations page, select the Sales invoice (IT) format configuration.
- In the Versions section, verify that the Draft version is selected.
- On the Action Pane, select Designer.
- On the Mapping tab, select $PaymentMethodSubstitution, and then select Edit > Edit formula.
- Align the formula with the payment methods that are configured in Finance.
- Save your changes, close the formula designer, and then select OK.
- Save the whole Sales invoice (IT) format configuration, and then close the Designer page.
- In the Versions section, select Change status > Complete to complete the Sales invoice (IT) format configuration.
- Repeat steps 2 through 9 for the Project invoice (IT) format configuration, as required.
Set up application-specific parameters
To set up application-specific parameters, follow these steps.
In the Globalization Studio workspace, select the Electronic reporting tile, and then select the Reporting configurations tile.
On the Configurations page, select the Sales invoice (IT) format configuration.
On the menu, select Configurations > Application specific parameters > Setup.
In the Lookups section, make sure that the List of Natura reverse charge subcategories lookup is selected.
In the Conditions section, select Add.
Add specific conditions for each subcategory that is defined in the system.
Note
In the Name column, you can select the *Blank* or *Not blank* placeholder value instead of a specific value.
Change the State value to Completed, save your changes, and then close the page.
Repeat steps 2 through 7 for the Project invoice (IT) format configuration, as required.
Configure a processing pipeline for export
To configure a processing pipeline for export, follow these steps.
In the Globalization Studio workspace, select the Electronic invoicing tile.
On the Electronic invoicing features page, select the feature that you created based on the Italian FatturaPA (IT) feature.
On the Setups tab, select Sales invoice, and then select Edit.
In the Processing pipeline section, go through the actions, and set the required fields:
- Get next number sequence value – In the Parameters section, select the Number sequence parameter. Then, in the Value field, select the number sequence that you previously defined for ProgressivoInvio.
- Submit – In the Parameters section, in the URL address field, enter or select a value. In the Certificates field, enter or select a chain of certificates that you added earlier in this article (SDIChainProd or SDIChainTest).
- Sign document – In the Certificate name field, specify the Digital signature certificate (optional).
In the Applicability rules section, go through the clauses, and review or set the required fields. As part of this step, review the LegalEntityID clause, and update it with the correct value from your legal entity.
Select Validate to ensure that all required fields are set.
Save your changes, and close the page.
On the Setups tab, select Project invoices, and then select Edit.
Repeat steps 3 through 7 for Project invoice, Sales invoice PA, and Project invoice PA setups, if required.
Configure a processing pipeline for import
To configure a processing pipeline for import, follow these steps.
In the Globalization Studio workspace, select the Electronic invoicing tile.
On the Electronic invoicing features page, select the feature that you created based on the Italian FatturaPA (IT) feature.
On the Setups tab, select Import invoices, and then select Edit.
On the Import channel tab, in the Data channel section, on the Parameters tab, in the Data channel field, enter a string value.
On the Applicability rules tab, set the fields for the setup. To use the default Channel clause, pass the value that you set for the Data channel field in the previous step to the Value field.
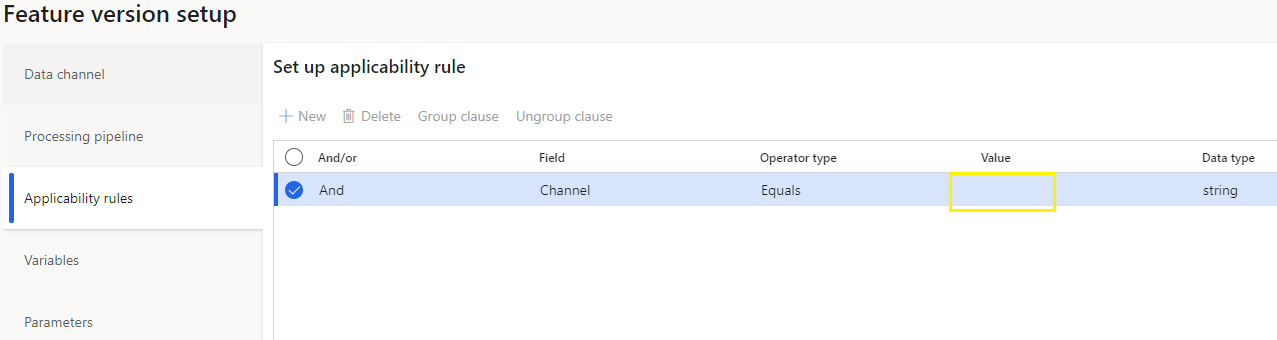
Select Validate to ensure that all required fields are set.
Save your changes, and close the page.
Deploy the feature
Complete and deploy the feature as described in Complete and deploy a Globalization feature.
Configure Electronic document parameters
To configure Electronic document parameters, follow these steps.
Import the Customer invoice context model (version 54 or later) and Vendor invoice import (IT) ER configurations from the repository. Learn more in Import Electronic reporting (ER) configurations from Dataverse.
Go to Organization administration > Setup > Electronic document parameters.
On the Features tab, find and select the Italian electronic invoice feature, and then select Enable.
On the Electronic document tab, make sure that the fields for Customer invoice journal and Project invoice are set according to the information in Set up Electronic document parameters.

Set up vendor invoice import
To set up vendor invoice import, follow these steps.
In the Globalization Studio workspace, select the Electronic reporting tile, and then select the Reporting configurations tile.
Select Customer invoice context model, and then select Create configuration.
Select Derive from Name: Customer invoice context, Microsoft to create a derived configuration.
Select the derived configuration, and then select Designer to open it for editing.
Select Map model to datasource.
In the Definitions tree, select DataChannel, and then select Designer.
In the Data sources tree, expand the $Context_Channel container.
In the Value field, select Edit.
Enter the name of the data channel. The name should have a maximum of 10 characters. It should match the value of the Data channel parameter of the data channel for the Electronic invoicing feature.
Save your changes, and close the form.
In the Versions section, select Change status > Complete to complete the derived context configuration.
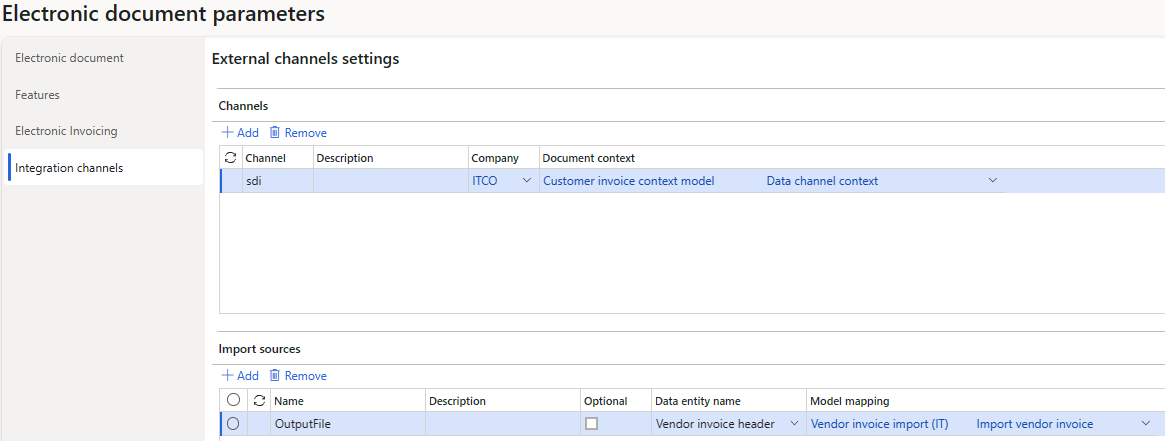
Go to Organization administration > Setup > Electronic document parameters.
On the Integration channels tab, in the Channels section, select Add.
In the Channel field, enter the $Context Channel value.
Enter values in the Description and Company fields.
In the Document context field, select the new configuration that you derived from Customer invoice context model. The mapping name should be Data channel context.
On the Import sources tab, select Add, and set the following values:
- Name: OutputFile
- Data entity name: Vendor invoice header (Data entity: VendorInvoiceHeaderEntity)
- Model mapping: Vendor invoice import (IT)
Note
If you have import vendor invoices from different sources, you can create several channels and several derived configurations that have different $Context Channel values. For example, you might want to import vendor invoices for different legal entities.
Finance business data configuration
Follow the configuration steps in Customer electronic invoices. Start from the Electronic invoice currency section.
Proxy server setup
This section provides information to help you set up and configure the proxy service for communication between the Exchange system (SDI) and the Electronic Invoicing service.
Note
This section is provided solely for illustrative purposes. It offers a high-level overview of the steps involved in the process of Proxy server configuration. It isn't a comprehensive guide for design, configuration, implementation, maintenance, or ongoing support of the Proxy server. All responsibilities related to this area, including but not limited to detailed technical execution, troubleshooting, and system upkeep, lie with the customer's team. Users are advised to consult appropriate technical resources or engage qualified professionals for full implementation and support needs.
Create an app registration
To create an app registration, follow these steps.
Use the following Windows PowerShell script to create a self-signed certificate for service-to-service (S2S) authentication.
Note
The certificate is set to expire in 12 months. You can extend this period by modifying the value of the NotAfter parameter. Learn how to establish proper rotation of the certificates that are used for this integration in the Rotate certificates section of this article.
$certOutputLocation = "C:\certs\proxytest"
$certName = "sdiProxyClientS2SCert"
$certPassword = "123"

$certCerFile = Join-Path $certOutputLocation "$certName.cer"
$certPfxFile = Join-Path $certOutputLocation "$certName.pfx"

$securePassword = ConvertTo-SecureString $certPassword -AsPlainText -Force

$cert = New-SelfSignedCertificate -KeyLength 2048 -KeyExportPolicy Exportable -FriendlyName "CN=$certName" -CertStoreLocation Cert:\CurrentUser\My -Subject $certName
-Provider "Microsoft Enhanced RSA and AES Cryptographic Provider" -NotAfter (Get-Date).AddMonths(12)

Export-Certificate -Cert $cert -FilePath $certCerFile -type CERT | Out-Null
Export-PfxCertificate -Cert $cert -FilePath $certPfxFile -Password $securePassword | Out-Null
Save the .pfx certificate file to the key vault. This certificate is referred to later as the App Registration Certificate.
Sign in to the Azure portal as an administrator.
Create an app registration for the SDI Proxy service:
Go to App registrations, create a registration, and set the following values for it:
- Name: SDI Proxy Client
- Supported account types: Accounts in this organizational directory only (Single tenant)
Select Register, and then select the app registration that you just created.
Go to API permissions, and select Grant admin consent.
Go to Certificates & secrets, select Upload certificate, and upload the App Registration Certificate .cer file for S2S authentication.
Go to Enterprise applications, and select the app that you created.
Save the Application ID (client ID) and Object ID values for the app.
The Invoicing Service team must grant the app access to the service. Open a support ticket that has the theme Electronic invoicing service integration with SDI. Application allow-listing. Provide the following information:
- Microsoft Entra tenant ID
- Microsoft Dynamics Lifecycle Services environment ID
- Application ID
- Object ID
Note
The object ID for an application differs on the App registrations and Enterprise applications pages. Use the Object ID value from the Enterprise applications page.
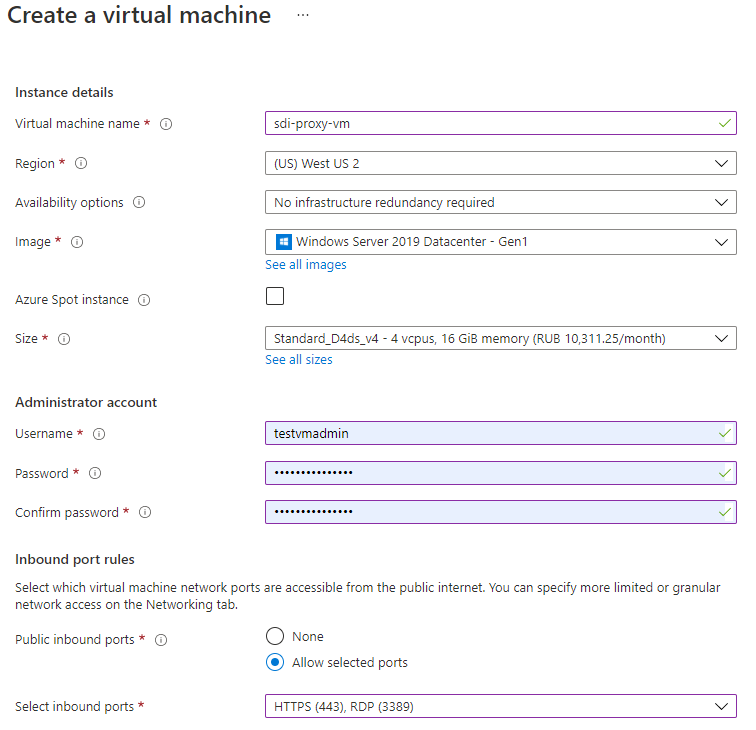
Create an Azure virtual machine
To create an Azure virtual machine (VM), follow these steps.
In the Azure portal, go to Virtual machines, and select Create new.
On the Basics tab, select the subscription and resource group. The values should be the subscription and resource group where your key vault and Blob storage are located.
Select the region. The value should be the region where your Finance environment is deployed.
Add the administrator's user name and password, and save them to the key vault.
In the Select inbound ports field, select HTTPS (443) and RPD (3389).
Note
We recommend that you disable the RDP (3389) port when the system goes to production. You can reenable it if you must connect to the VM for troubleshooting purposes.
We also recommend that you use the Windows Server 2019 Datacenter operating system (OS). The proxy application sample might have issues if it runs on another type of OS.
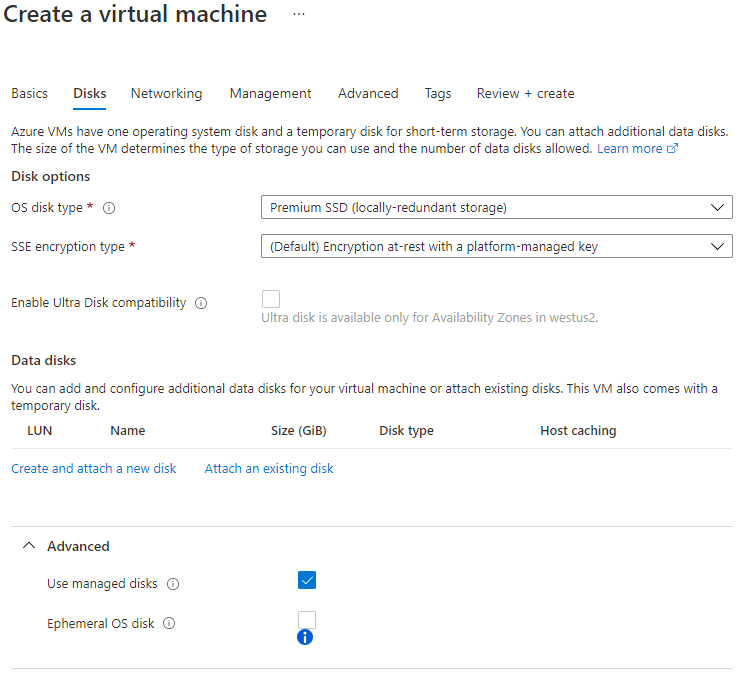
On the Disks tab, on the Advanced FastTab, select the Use managed disks checkbox. Leave the Ephemeral OS disk checkbox cleared.
On the Networking tab, under the Public IP field, select Create new.
In the Create public IP address dialog box, in the SKU field group, select the Standard option. In the Assignment field group, select the Static option.
On the Management tab, clear the Auto-shutdown checkbox to disable automatic shutdown.
Set the Guest OS updates field to Manual, and set any other policies.
Review and create the VM.
In the new VM, go to Identity > System assigned, and set the Status option to On.
Grant the VM access to the key vault:
In the key vault, go to Access control (IAM) > Role assignments.
Select Add role assignment, and follow these steps:
- In the Role field, specify Key Vault Secrets User.
- In the Assign access to field, specify Virtual machine.
- In the Subscription field, specify your subscription.
- In the Select field, specify your VM.
Go to Access policies.
Select Add Access Policy, and follow these steps:
- In the Selected principal field, select your VM.
- In the Certificate section, select List and Get permissions.
- In the Secret section, select List and Get permissions.
In the Azure portal, go to Public IP addresses, and select the IP address that was created in the VM.
Go to Configuration, and set the Domain Name System (DNS) name.
Prepare the proxy service environment
To prepare the proxy service environment, follow these steps on the machine where the proxy service is hosted.
Connect to the VM by using Remote Desktop Connection.
Open the Local Machine Certificate snap-in. Learn more in How to: View certificates with the MMC snap-in.
Import the caentrate.cer certificate into the Trusted Root Certification Authorities store.
Import the CAEntratetest.cer certificate into the Trusted Root Certification Authorities store (only for a test environment).
Import the SistemaInterscambioFatturaPA.cer certificate for production and the SistemaInterscambioFatturaPATest.cer certificate for testing into the Trusted People store.
In Control Panel, open Turn Windows features on or off, or go to Server Manager > Add Roles and Features for the server OS, and turn on the following Internet Information Services (IIS) features:
Web Management Tools
- IIS Management Console
World Wide Web Services
Application Development Features
- .NET Extensibility 4.7 (or 4.8)
- ASP
- ASP.NET 4.7 (or 4.8)
- CGI
- ISAPI Extensions
- ISAPI Filters
Common HTTP Features
- Default Document
- Directory Browsing
- HTTP Errors
- Static Content
Health and Diagnostics
- HTTP Logging
- Tracing
Performance Features
- Static Content Compression
Security
- Request Filtering
.NET Framework 4.7 Features
WCF Services
- HTTP Activation
Set up the SDI Proxy service in IIS
To set up the SDI Proxy service in IIS, follow these steps.
In Lifecycle Services, go to the Shared asset library, and select Data package as the asset type.
Find Electronic Invoicing Service Sdi Proxy v1.1, and download it to the VM.
Configure the service:
Unzip the Electronic Invoicing Service Sdi Proxy archive folder that you downloaded.
In the src\FattureService folder, open the appsettings.json file, and set the following parameters:
- KeyVaultUri – Specify the address of the key vault that stores the client certificate for the invoicing service.
- TenantId – Specify the globally unique identifier (GUID) of the customer's tenant.
- EnvironmentId – Specify the ID of the Lifecycle Services environment.
- ClientId – Specify the app ID of the intermediate services app registration in the customer's tenant.
- ClientCertificateName – Specify the name of the App Registration Certificate in the key vault.
- SecurityServiceClientOptions.Endpoint – Specify the URL of the security service.
- SecurityServiceClientOptions.Resource – Specify the scope to obtain the token for.
- InvoicingServiceClientOptions.Endpoint – Specify the endpoint of the invoicing service. (You can obtain this value from the Endpoint URL field in the Service parameters section on the Electronic Invoicing tab of the Electronic document parameters page in Finance.), after copying remove / at the end.
- InvoicingServiceClientOptions.ServiceEnvironmentId – You can leave the default value, ServiceEnvironment, because Microsoft plans to deprecate this field in future releases.
- NotificationsFolder – Specify the folder to save incoming notification files in (for example, C:\\Files\\).
Tip
You can copy the InvoicingServiceClientOptions.Endpoint and InvoicingServiceClientOptions.ServiceEnvironmentId values from the Electronic Invoicing tab of the Electronic document parameters page in finance and operations apps (Organization Administration > Setup > Electronic document parameters).
In the src\Clients folder, open the Constants.cs file, and set the following parameters:
- ApiVersion – Update the value to 2.0.
- InvoicingServiceResumePath – Update the value to /businessdocumentsubmission/resume.
- InvoicingServiceCreateIncomingPath – Update the value to /incomingdocuments/{0}.
In the web.config file, find the following line, and add the thumbprint of the proxy server certificate.
<serviceCertificate findValue="[certificate thumbprint]" storeLocation="LocalMachine" storeName="My" x509FindType="FindByThumbprint">Tip
When the system goes to production, you can change some values in the web.config file to help reduce the amount of log information that is collected and help save disk space. In the <system.diagnostics><source> node, change the value of switchValue to Critical,Error. Learn more in Service Trace Viewer Tool (SvcTraceViewer.exe).
Build the solution.
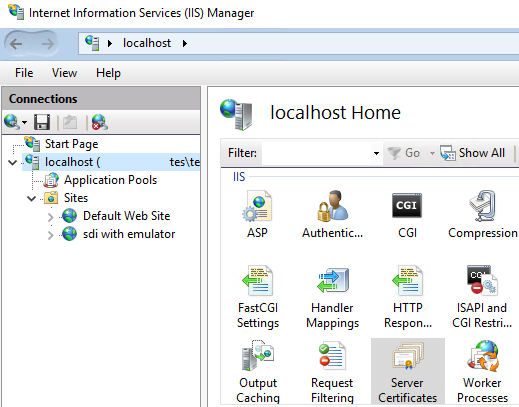
Open IIS Manager. In the tree on the left, remain in the root node. On the right, select Server Certificates.
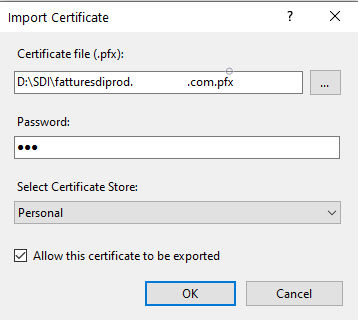
Open the menu, and select Import.
In the Import Certificate dialog box, in the Certificate file (.pfx) field, specify the path of the .pfx file for the proxy server certificate. Usually, this file is generated while you register the SDICoop service channel. It's named sdiproxy.com.pfx, where sdiproxy.com is a DNS that is assigned to the proxy VM.
Note
The server certificate has an expiration date. Review this date, and arrange to obtain a new certificate when the current one is about to expire. Learn how to establish proper rotation of the certificates that are used for this integration in the Rotate certificates section of this article.
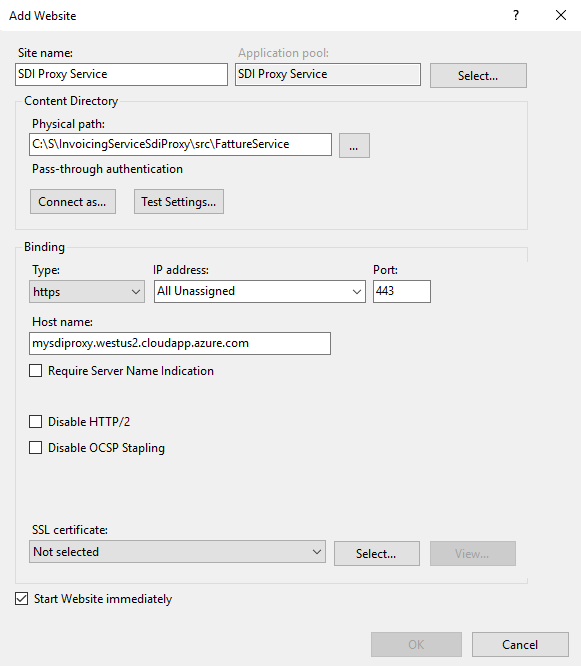
Select and hold (or right-click) Sites, and then select Add website.
In the Add Website dialog box, in the Site name field, enter a name for the site.
In the Physical path field, point to the src\FattureService folder.
In the Binding section, in the Type field, select https.
In the Host name field, specify the host name.
Leave the IP address and Port fields set to the default values.
Make sure that the Require Server Name Indication checkbox is cleared, because SDI doesn't support that technology.
In the SSL certificate field, select the proxy server certificate that you imported.
In the Application pool field, specify a pool for the site, and make a note of its name (for example, SdiAppPool).
After you finish creating the website, open the menu for SSL Settings.
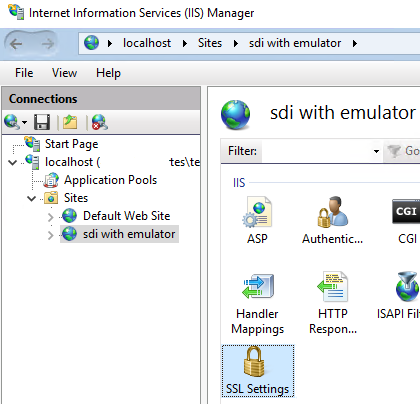
Select the Require SSL checkbox.
In the Client certificates field group, select the Require option.
Open Directory Browsing, and select Enable.
Open the Configuration Editor, and select system.webServer > serverRuntime.
Modify the uploadReadAheadSize and maxRequestEntityAllowed values to at least 10 megabits.
In any web browser, go to serverDNS/TrasmissioneFatture.svc. A standard page about the service must appear, or you might receive a server error, such as "403 - Forbidden." This step is required to ensure that serverDNS is accessible, and that it isn't hidden by a firewall or something else.
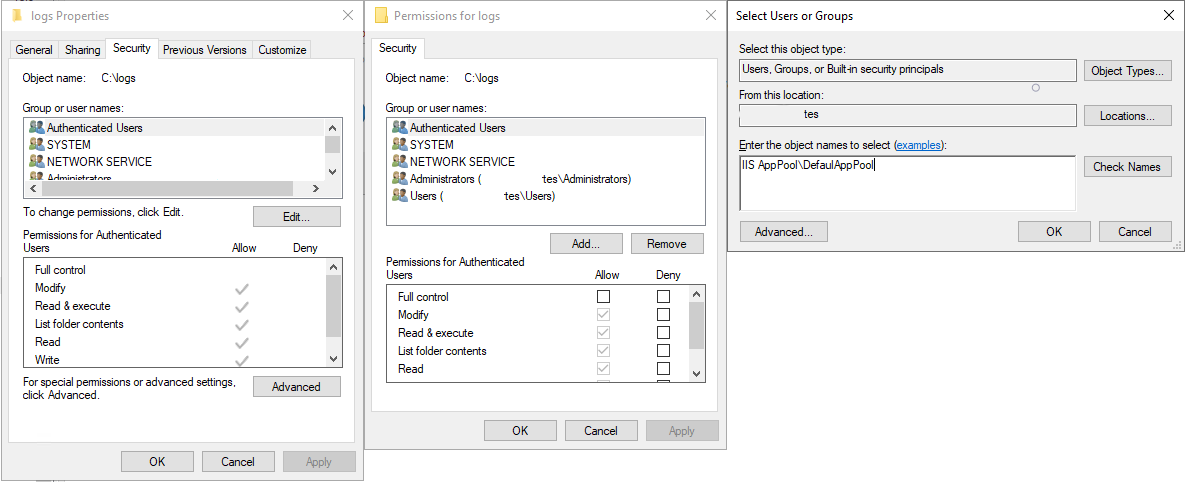
Create the following folders to store logs and files:
- C:\Logs\ – Store log files here. These files can be viewed by using Service Trace Viewer Tool.
- C:\Files\ – Store all the response files here.
In File Explorer, grant NETWORK SERVICE and IIS AppPool\SdiAppPool (or IIS AppPool\DefaultAppPool if you're using the default pool) access to the Logs and Files folders:
- Select and hold (or right-click) one of the folders, and then select Properties.
- In the Properties dialog box, on the Security tab, select Edit.
- Add the users if they aren't listed.
- Repeat steps 1 through 3 for the other folder.
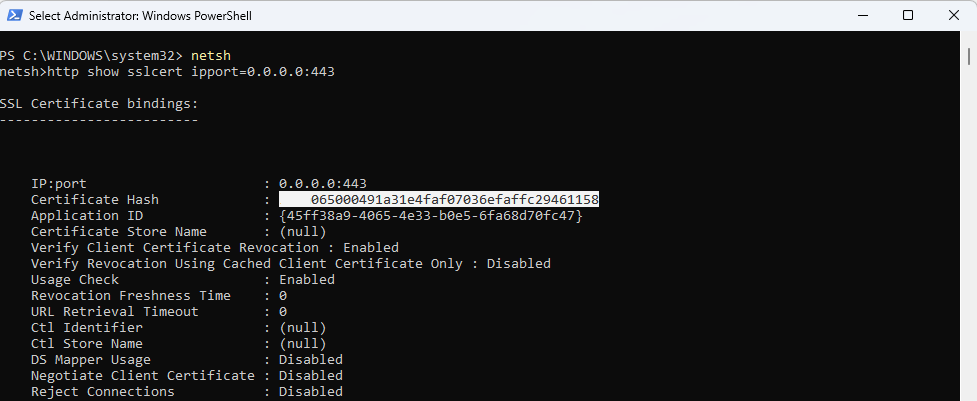
Enable client certificate renegotiation:
Run Windows PowerShell as an administrator.
Run the following command to open Network Shell (netsh).
netshRun the following command to view the current binding parameters.
http show sslcert ipport=0.0.0.0:443Copy the Certificate hash value from the output, and ensure that it equals the server certificate thumbprint.
Run the following command to remove the current binding.
http delete sslcert ipport=0.0.0.0:443Run the following command to add a new binding that has the same certificate but different parameters. Substitute the CertificateThumbprint placeholder in the command with the Certificate hash value from previous commands, but remove any spaces or other symbols.
http add sslcert ipport=0.0.0.0:443 certhash=CertificateThumbprint appid={4dc3e181-e14b-4a21-b022-59fc669b0914} certstorename=My verifyclientcertrevocation=Disable VerifyRevocationWithCachedClientCertOnly=Disable clientcertnegotiation=Enable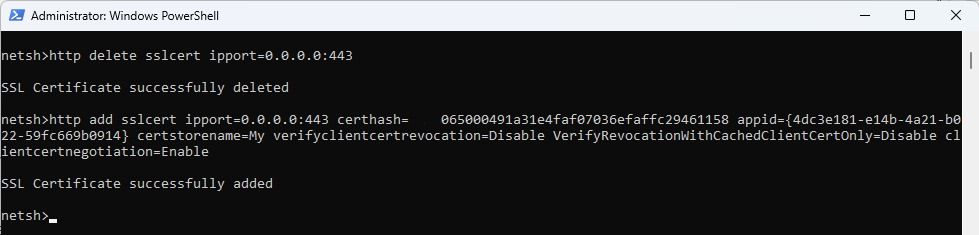
Run the following command to restart IIS.
exit
iisreset
Rotate certificates
To rotate certificates, follow these steps.
Rotate the app registration S2S authentication certificate:
- Generate a new certificate by running the PowerShell script from the Create an app registration section of this article.
- In the Azure portal, go to App registrations, and find the app that was created for S2S.
- Go to Certificates & secrets, select Upload certificate, and upload the .cer file for S2S authentication.
- Go to Azure Key Vault, and select the certificate that you previously uploaded, and that was referred to as the App Registration Certificate. Select New Version.
- Select Method of certificate creation = Import, specify the path of the .pfx file and the password, and then select Create.
Rotate the proxy server certificate:
Request a new server certificate from the tax authority portal.
Install the .pfx certificate file into Local Machine\Personal storage.
Open IIS Manager. In the tree on the left, select the proxy website. On the right, select Bindings.
Select the existing binding, and then select Edit.
In the SSL certificate field, select the newly added certificate. Then select OK.
In the web.config file, find the following line, and add the thumbprint of the proxy server certificate.
<serviceCertificate findValue="[certificate thumbprint]" storeLocation="LocalMachine" storeName="My" x509FindType="FindByThumbprint">Complete the Enable client certificate renegotiation step in the Set up the SDI Proxy service in IIS section of this article.
Rotate the client identity certificate:
- Request a new client certificate from the tax authority portal.
- In the Azure portal, go to Key Vaults, and find the key vault that is linked to the service.
- In the Certificates section, find and select the client identity certificate. Then select New Version.
- Select Method of certificate creation = Import, specify the path of the .pfx file and the password, and then select Create.
Privacy notice
Enabling the Italian electronic invoice feature might require that limited data is sent. This data includes the organization's tax registration ID. An administrator can enable and disable the Italian electronic invoice feature. To disable the feature, follow these steps.
- Go to Organization administration > Setup > Electronic document parameters.
- On the Features tab, select the rows that contain the Italian electronic invoice feature, and then select Disable now.
Data that is imported from these external systems into this Dynamics 365 online service are subject to our privacy statement. For more information, go to the "Privacy notice" section in country/region-specific feature documentation.