Cómo: Crear un objeto GeometryDrawing
En este ejemplo se muestra cómo crear y mostrar un objeto GeometryDrawing. Un objeto GeometryDrawing permite crear una forma con un relleno y un contorno asociando un objeto Pen y Brush con Geometry. Geometry describe la estructura de la forma, Brush describe el relleno de la forma y Pen describe el contorno de la forma.
Ejemplo
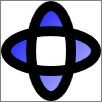
En el ejemplo siguiente se usa GeometryDrawing para representar una forma. La forma se describe mediante GeometryGroup y dos objetos EllipseGeometry. El interior de la forma se pinta con LinearGradientBrush y su contorno se dibuja con un BlackPen. GeometryDrawing se muestra mediante ImageDrawing y un elemento Image.
using System;
using System.Windows;
using System.Windows.Controls;
using System.Windows.Media;
using System.Windows.Media.Animation;
using System.Windows.Shapes;

namespace SDKSample
{
    public class GeometryDrawingExample : Page
    {
        public GeometryDrawingExample()
        {

            //
            // Create the Geometry to draw.
            //
            GeometryGroup ellipses = new GeometryGroup();
            ellipses.Children.Add(
                new EllipseGeometry(new Point(50,50), 45, 20)
                );
            ellipses.Children.Add(
                new EllipseGeometry(new Point(50, 50), 20, 45)
                );

            //
            // Create a GeometryDrawing.
            //
            GeometryDrawing aGeometryDrawing = new GeometryDrawing();
            aGeometryDrawing.Geometry = ellipses;

            // Paint the drawing with a gradient.
            aGeometryDrawing.Brush =
                new LinearGradientBrush(
                    Colors.Blue,
                    Color.FromRgb(204,204,255),
                    new Point(0,0),
                    new Point(1,1));

            // Outline the drawing with a solid color.
            aGeometryDrawing.Pen = new Pen(Brushes.Black, 10);

            //
            // Use a DrawingImage and an Image control
            // to display the drawing.
            //
            DrawingImage geometryImage = new DrawingImage(aGeometryDrawing);

            // Freeze the DrawingImage for performance benefits.
            geometryImage.Freeze();

            Image anImage = new Image();
            anImage.Source = geometryImage;
            anImage.Stretch = Stretch.None;
            anImage.HorizontalAlignment = HorizontalAlignment.Left;

            //
            // Place the image inside a border and
            // add it to the page.
            //
            Border exampleBorder = new Border();
            exampleBorder.Child = anImage;
            exampleBorder.BorderBrush = Brushes.Gray;
            exampleBorder.BorderThickness = new Thickness(1);
            exampleBorder.HorizontalAlignment = HorizontalAlignment.Left;
            exampleBorder.VerticalAlignment = VerticalAlignment.Top;
            exampleBorder.Margin = new Thickness(10);

            this.Margin = new Thickness(20);
            this.Background = Brushes.White;
            this.Content = exampleBorder;
        }
    }
}
<Page
  xmlns="http://schemas.microsoft.com/winfx/2006/xaml/presentation"
  xmlns:x="http://schemas.microsoft.com/winfx/2006/xaml"
  xmlns:PresentationOptions="http://schemas.microsoft.com/winfx/2006/xaml/presentation/options"
  xmlns:mc="http://schemas.openxmlformats.org/markup-compatibility/2006"
  mc:Ignorable="PresentationOptions"
  Margin="20" Background="White">

  <Border BorderBrush="Gray" BorderThickness="1"
    HorizontalAlignment="Left" VerticalAlignment="Top"
    Margin="10">
    <Image Stretch="None" HorizontalAlignment="Left">
      <Image.Source>
        <DrawingImage PresentationOptions:Freeze="True">
          <DrawingImage.Drawing>

            <GeometryDrawing>
              <GeometryDrawing.Geometry>

                <!-- Create a composite shape. -->
                <GeometryGroup>
                  <EllipseGeometry Center="50,50" RadiusX="45" RadiusY="20" />
                  <EllipseGeometry Center="50,50" RadiusX="20" RadiusY="45" />
                </GeometryGroup>
              </GeometryDrawing.Geometry>
              <GeometryDrawing.Brush>

                <!-- Paint the drawing with a gradient. -->
                <LinearGradientBrush>
                  <GradientStop Offset="0.0" Color="Blue" />
                  <GradientStop Offset="1.0" Color="#CCCCFF" />
                </LinearGradientBrush>
              </GeometryDrawing.Brush>
              <GeometryDrawing.Pen>

                <!-- Outline the drawing with a solid color. -->
                <Pen Thickness="10" Brush="Black" />
              </GeometryDrawing.Pen>
            </GeometryDrawing>
          </DrawingImage.Drawing>
        </DrawingImage>
      </Image.Source>
    </Image>
  </Border>


</Page>
En la ilustración siguiente se muestra el elemento GeometryDrawing resultante.

Para crear dibujos más complejos, puede combinar varios objetos de dibujo en un único dibujo compuesto mediante DrawingGroup.
Vea también
.NET Desktop feedback
