Exploración del panel de .NET.NET Aspire
En las próximas secciones, descubrirá cómo crear un proyecto de .NET.NET Aspire y embarcarse en las siguientes tareas:
Investigue las funcionalidades del panel mediante la aplicación generada a partir de la plantilla de proyecto, como se explica en el inicio rápido de : Compilación del primer proyecto de .NET.NET Aspire.
Profundizar en las características de la aplicación de panel de .NET.NET Aspire.
Las capturas de pantalla destacadas en este artículo muestran el tema oscuro. Para obtener más información sobre la selección de temas, vea selección de temas.
Autenticación del panel
Al ejecutar un host de aplicación de .NET.NET Aspire, el orquestador inicia todos los recursos dependientes de la aplicación y, a continuación, abre una ventana del explorador en el panel. El panel de .NET.NET Aspire requiere autenticación basada en tokens para sus usuarios, ya que muestra variables de entorno y otra información confidencial.
Cuando se inicia el panel desde Visual Studio o Visual Studio Code (con la extensión C# Dev Kit), el explorador se inicia sesión automáticamente y el panel se abre directamente. Este es el desarrollador típico experiencia de F5 y el flujo de inicio de sesión de autenticación se automatiza mediante las herramientas de .NET.NET Aspire.
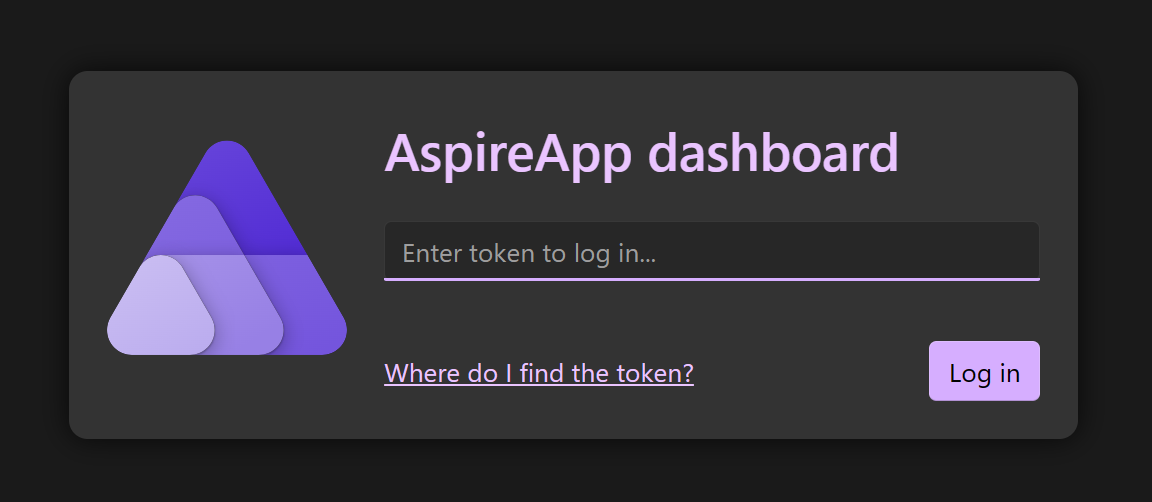
Sin embargo, si inicia el host de la aplicación desde la línea de comandos, se le mostrará la página de inicio de sesión. La ventana de la consola muestra una dirección URL que puede seleccionar para abrir el panel en el explorador.
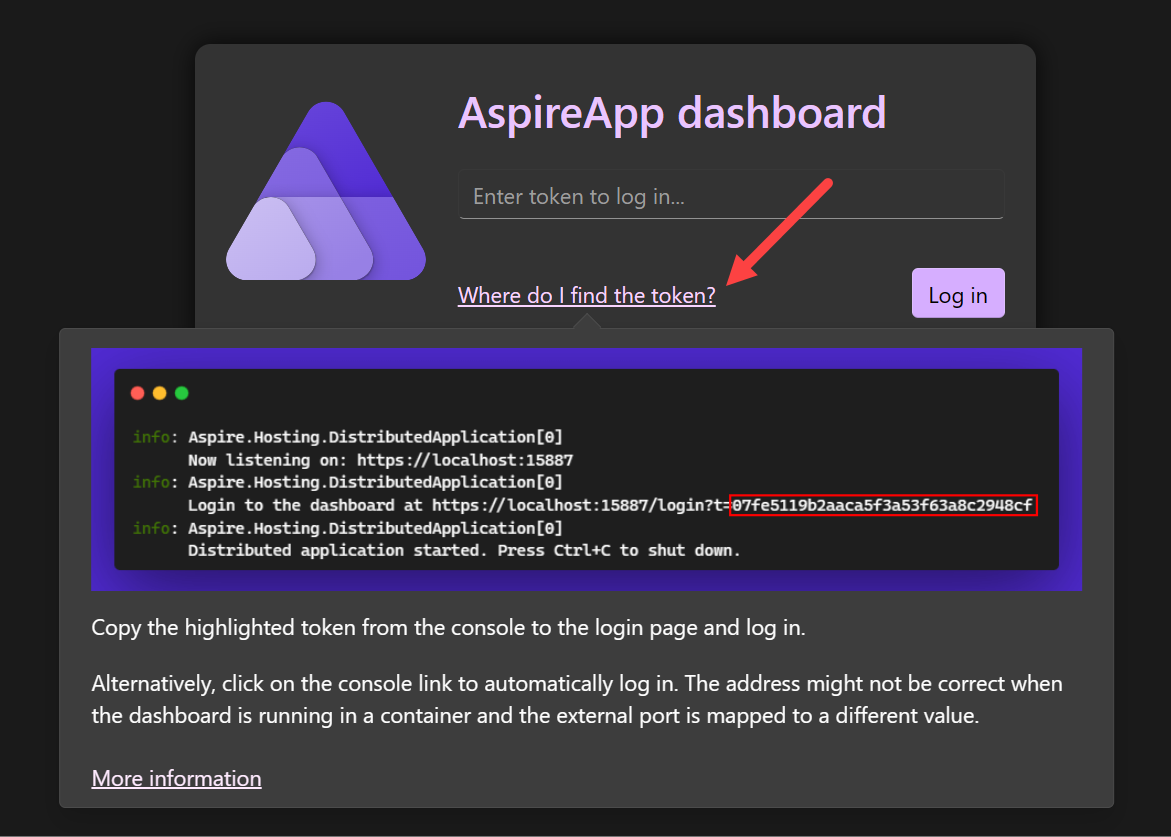
La dirección URL contiene una cadena de consulta de token (con el valor del token asignado al elemento de nombre de t) que se usa para inicio de sesión en al panel. Si la consola lo admite, puede contener la tecla Ctrl
La página de inicio de sesión acepta un token y proporciona instrucciones útiles sobre cómo obtener el token, como se muestra en la captura de pantalla siguiente:
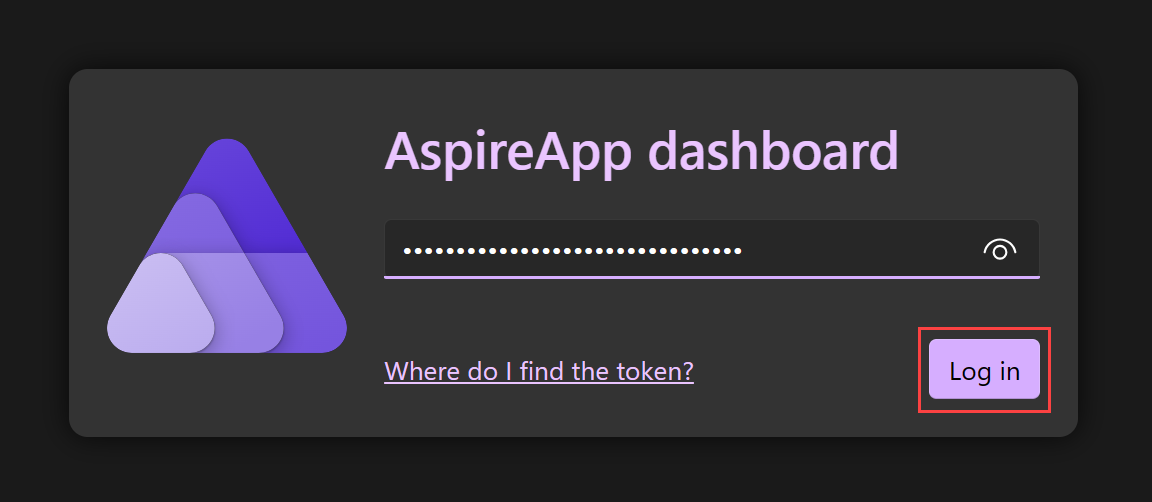
Después de copiar el token desde la consola y pegarlo en la página de inicio de sesión, seleccione el botón Iniciar sesión.
El panel conserva el token como un explorador persistente cookie, que permanece válido durante tres días. Las cookies persistentes tienen una fecha de expiración y permanecen válidas incluso después de cerrar el explorador. Esto significa que los usuarios no necesitan volver a iniciar sesión si cierran y vuelven a abrir el explorador. Para obtener más información, consulte las consideraciones de seguridad de .NET panel de .NET Aspire.
Página Recursos
La página Recursos de
- apiservice: un proyecto de API de back-end creado mediante las API mínimas.
- webfrontend: el proyecto de interfaz de usuario de front-end creado mediante Blazor.
El panel también proporciona detalles esenciales sobre cada recurso:
- Tipo: muestra si el recurso es un proyecto, contenedor o ejecutable.
- Nombre: el nombre del recurso.
-
State: muestra si el recurso se está ejecutando o no.
Errores : dentro de la columna Estado de, los errores se muestran como un distintivo con el recuento de errores. Resulta útil comprender rápidamente qué recursos notifican errores. Al seleccionar el distintivo, se le lleva a los registros semánticos de para ese recurso con el filtro en un nivel de error.
- hora de inicio: cuándo se inició la ejecución del recurso.
- origen: la ubicación del recurso en el dispositivo.
- Puntos de conexión: una o varias direcciones URL para llegar directamente al recurso en ejecución.
- registros: vínculo a la página de registros de recursos.
-
Acciones: conjunto de acciones que se pueden realizar en el recurso:
- detener o iniciar: detenga (o inicie) el recurso, en función del estado de actual.
- Registros de consola: vaya a los registros de consola del recurso.
-
puntos suspensivos: submenú con acciones específicas de recursos adicionales:
- Ver detalles: vea los detalles del recurso.
- registro de consola: vaya a los registros de consola del recurso.
- registros estructurados: vaya a los registros estructurados del recurso.
- seguimientos: vaya a los seguimientos del recurso.
- métricas: vaya a las métricas del recurso.
- Reiniciar: detenga e inicie el recurso.
Tenga en cuenta la siguiente captura de pantalla de la página de recursos:
Acciones de recursos
Cada recurso tiene un conjunto de acciones disponibles que están habilitadas condicionalmente en función del estado actual del recurso. Por ejemplo, si se ejecuta un recurso, la acción detener
Detener o iniciar un recurso
El panel de .NET.NET Aspire le permite detener o iniciar un recurso seleccionando el Detener o botón Iniciar en la columna Acciones. Tenga en cuenta la siguiente captura de pantalla de la página de recursos con el botón Detener seleccionado:
Al seleccionar
Nota
En el caso de los recursos del proyecto, cuando se adjunta el depurador, se vuelve a adjuntar al reiniciar.
A continuación, se habilita el botón Iniciar, lo que le permite volver a iniciar el recurso. Además, el panel muestra una notificación del sistema del resultado de la acción:
Cuando un recurso está en estado no en ejecución, el botón iniciar
Propina
Los recursos que dependen de otros recursos detenidos o reiniciados pueden experimentar errores temporales. Este es el comportamiento esperado y normalmente se resuelve cuando los recursos dependientes están en un estado En ejecución una vez más.
Acciones de submenú de recursos
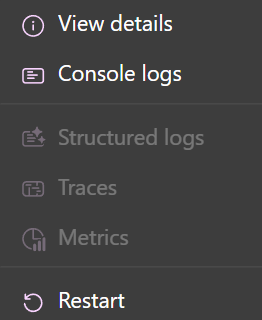
Al seleccionar el icono de puntos suspensivos horizontales de la columna acciones de se abre un submenú con acciones adicionales específicas del recurso. Además de las acciones de submenú de recursos integradas, también puede definir acciones de recursos personalizadas mediante la definición de comandos personalizados. Para obtener más información, consulte comandos de recursos personalizados en .NET.NET Aspire. Para las acciones de submenú de recursos integrados, tenga en cuenta la captura de pantalla siguiente:
Están disponibles las siguientes acciones de submenú:
- Ver detalles: vea los detalles del recurso.
- registro de consola: vaya a los registros de consola del recurso.
- registros estructurados: vaya a los registros estructurados del recurso.
- seguimientos: vaya a los seguimientos del recurso.
- métricas: vaya a las métricas del recurso.
- Reiniciar: detenga e inicie el recurso.
Importante
Puede haber recursos con acciones de submenú deshabilitadas. Están atenuados cuando están deshabilitados. Por ejemplo, en la captura de pantalla siguiente se muestran las acciones de submenú deshabilitadas:
Copiar o abrir en el visualizador de texto
Para ver un visualizador de texto de determinadas columnas, al mantener el puntero, verá un icono de puntos suspensivos verticales. Seleccione el icono para mostrar las opciones disponibles:
- Copiar en el Portapapeles
- abrir en el visualizador de texto
Tenga en cuenta la siguiente captura de pantalla de las opciones de menú de puntos suspensivos:
Al seleccionar la opción Abrir en el visualizador de texto, se abre un cuadro de diálogo modal con el texto mostrado en un formato mayor. Tenga en cuenta la siguiente captura de pantalla del cuadro de diálogo modal del visualizador de texto:
Algunos valores tienen el formato JSON o XML. En estos casos, el visualizador de texto permite que el menú desplegable Seleccionar formato cambie entre los diferentes formatos.
Detalles del recurso
Para obtener detalles completos sobre cada recurso, seleccione el botón de puntos suspensivos en la columna acciones de y, a continuación, seleccione Ver detalles. La página Detalles proporciona una vista completa del recurso:
La barra de búsqueda de la esquina superior derecha del panel también proporciona la opción de filtrar la lista, lo que resulta útil para .NET.NET Aspire proyectos con muchos recursos. Para seleccionar los tipos de recursos que se muestran, coloque la flecha a la izquierda del cuadro de texto filtro:

En este ejemplo, solo se muestran los contenedores en la lista. Por ejemplo, si habilita Usar Redis para almacenar en caché al crear un proyecto de .NET Aspire, debería ver un contenedor de Redis en la lista:
Los ejecutables son procesos independientes. Puede configurar un proyecto de .NET.NET Aspire para ejecutar un ejecutable independiente durante el inicio, aunque las plantillas de inicio predeterminadas no incluyen ningún archivo ejecutable de forma predeterminada.
En la captura de pantalla siguiente se muestra un ejemplo de un proyecto que tiene errores:
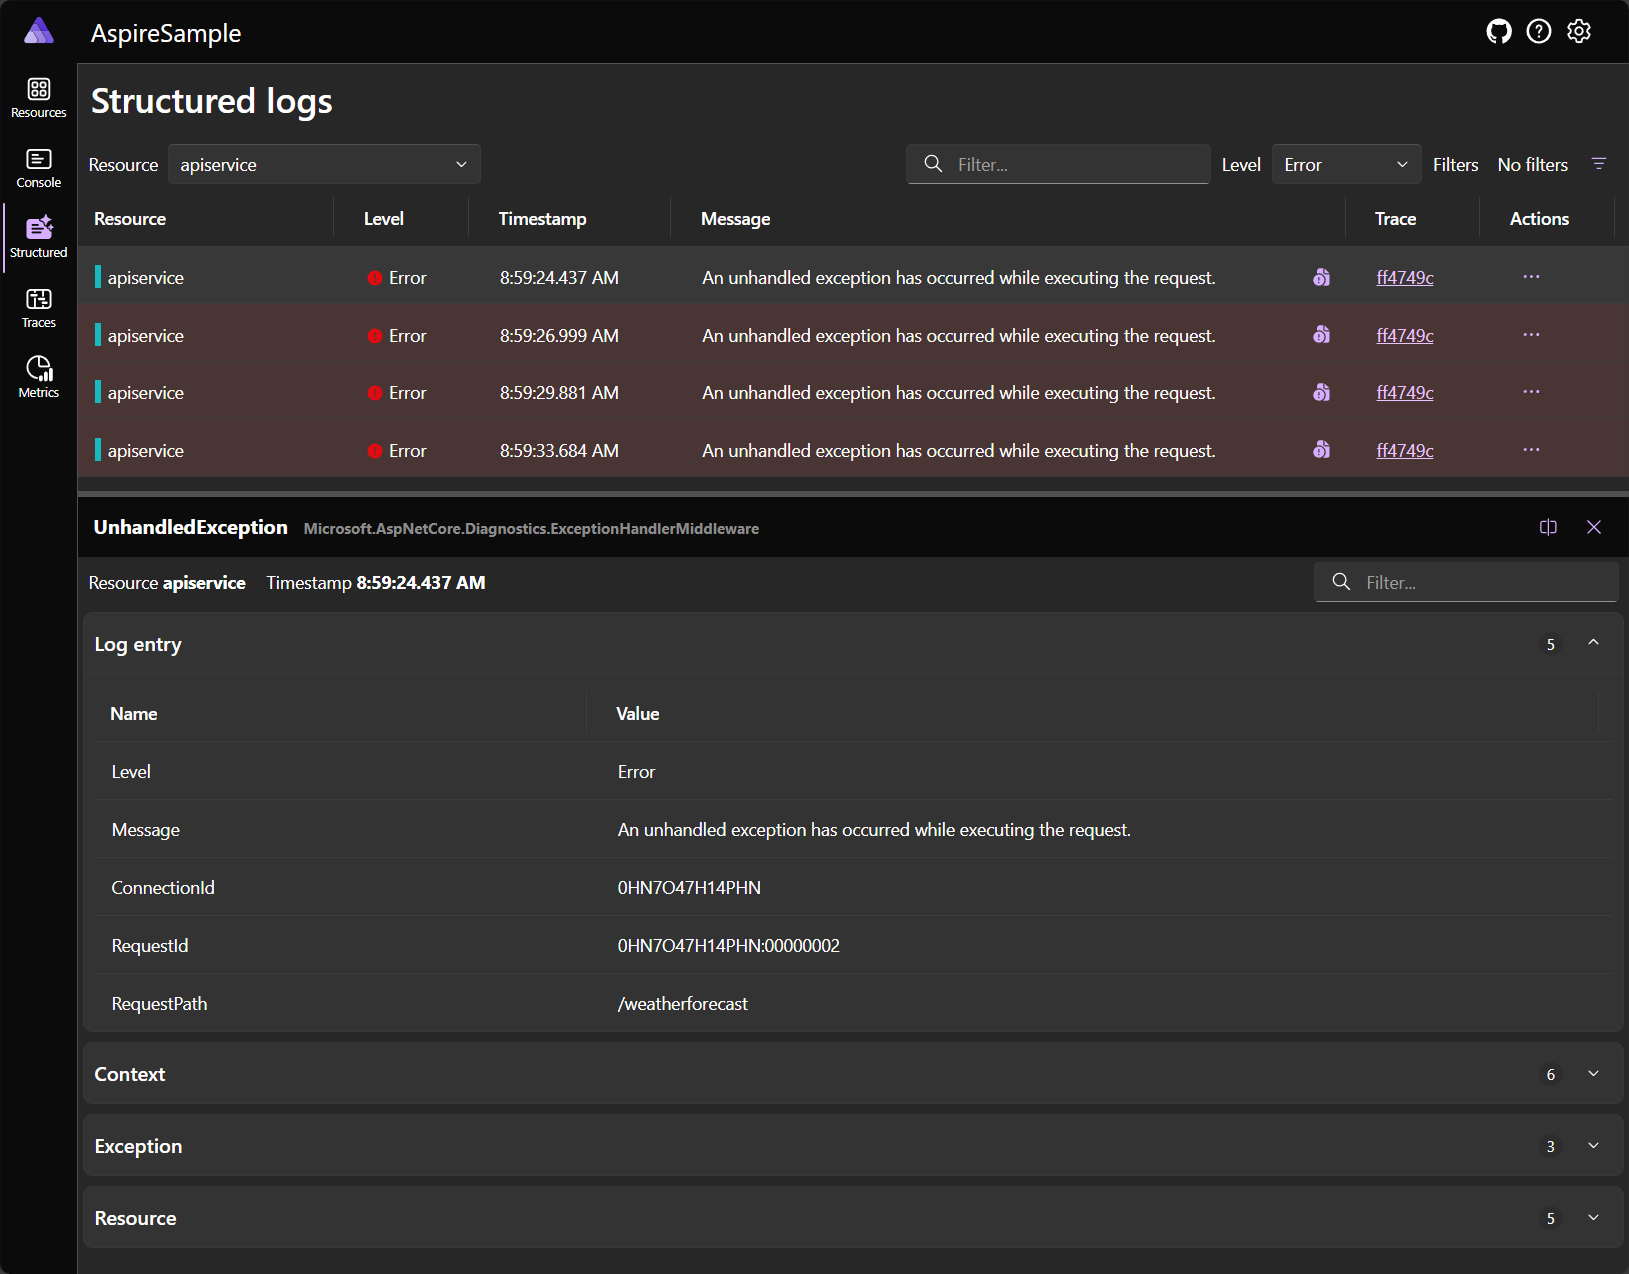
Al seleccionar el distintivo de recuento de errores, se desplaza a la página registros estructurados con un filtro aplicado para mostrar solo los registros pertinentes para el recurso:
Para ver la entrada de registro en detalle del error, seleccione el botón Ver
Para obtener más información y ejemplos de registros estructurados, consulte la página registros estructurados sección.
Nota
La página de recursos no está disponible si el panel se inicia sin un servicio de recursos configurado. El panel se inicia en la página registros estructurados en su lugar. Esta es la experiencia predeterminada cuando el panel se ejecuta en modo independiente sin configuración adicional.
Para obtener más información sobre cómo configurar un servicio de recursos, consulte Configuración del panel.
Páginas de supervisión
El panel de .NET.NET Aspire proporciona varias maneras de ver los registros, los seguimientos y las métricas de la aplicación. Esta información permite realizar un seguimiento del comportamiento y el rendimiento de la aplicación y diagnosticar los problemas que surjan.
Página registros de consola
La página registros de la consola de
Al abrir la página Registros de consola, debe seleccionar un origen en el Seleccionar un recurso lista desplegable.
Si selecciona un proyecto, los registros activos se representan con un conjunto estilizado de colores que corresponden a la gravedad del registro; verde para obtener información como ejemplo. Considere la captura de pantalla de ejemplo siguiente de los registros de proyecto con el proyecto de apiservice seleccionado:
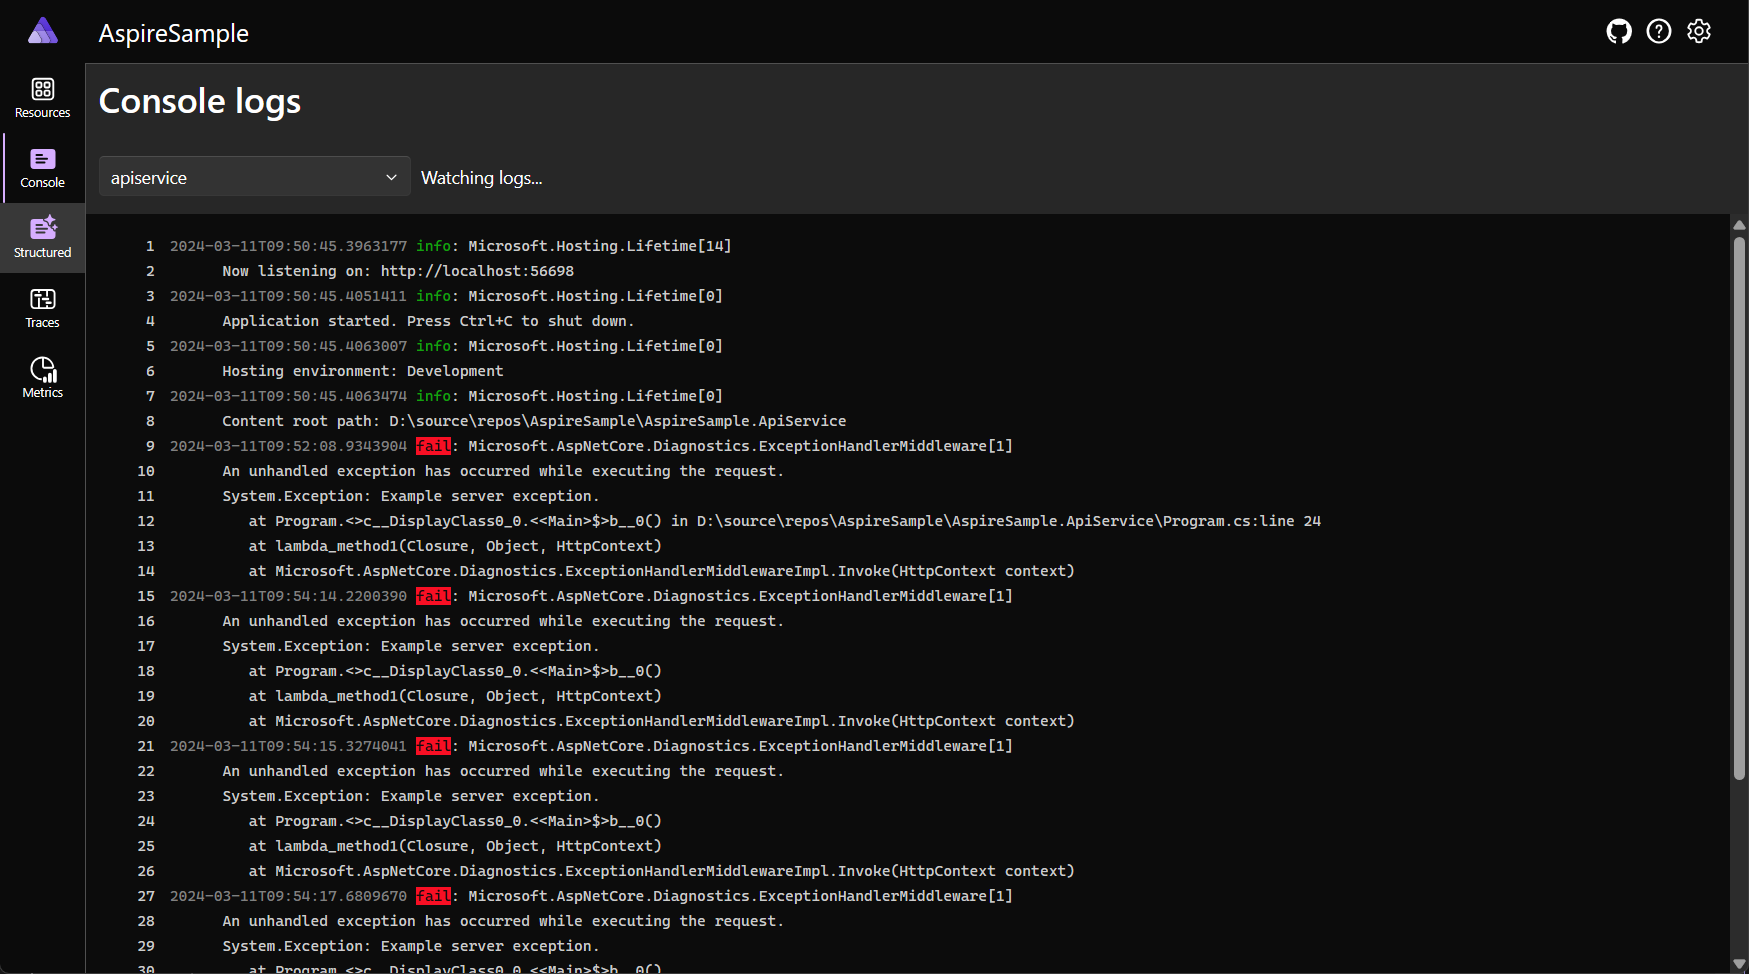
Cuando se producen errores, se les aplica un estilo en los registros para que sean fáciles de identificar. Considere la siguiente captura de pantalla de ejemplo de los registros de proyecto con errores:
Si selecciona un contenedor o archivo ejecutable, el formato es diferente de un proyecto, pero la información detallada del comportamiento sigue estando disponible. Considere la captura de pantalla de ejemplo siguiente de un registro de contenedor con el contenedor cache seleccionado:
Réplicas de recursos
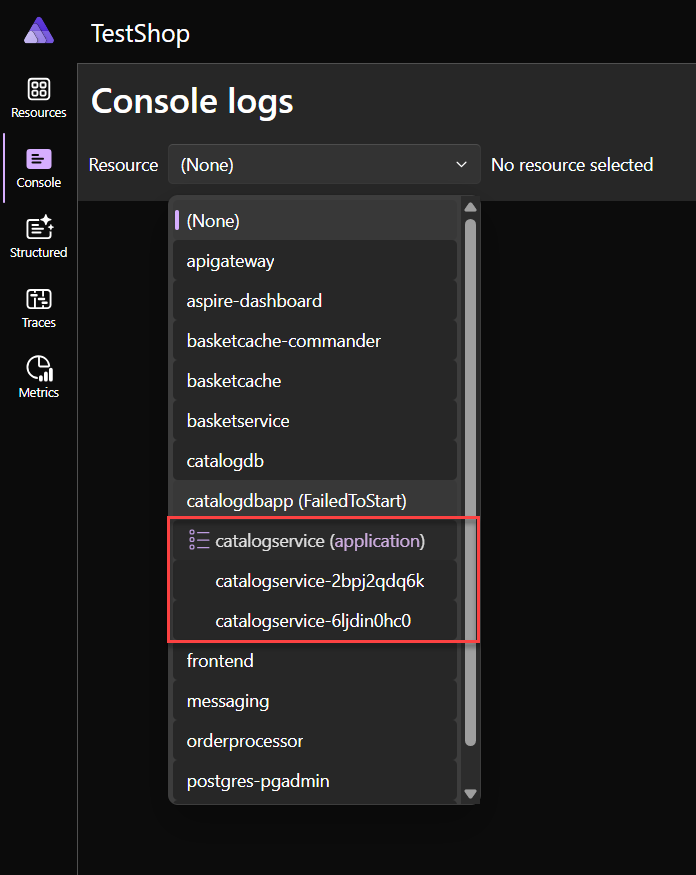
Cuando los recursos del proyecto se replican mediante la API de WithReplicas, se representan en el selector de recursos en una entrada de recursos con nombre de nivel superior con un icono al indicador. Cada recurso replicado aparece en la entrada de recursos de nivel superior, con su nombre único correspondiente. Considere la siguiente captura de pantalla de ejemplo de un recurso de proyecto replicado:
En la captura de pantalla anterior se muestra el proyecto de catalogservice (application) con dos réplicas, catalogservice-2bpj2qdq6k y catalogservice-6ljdin0hc0. Cada réplica tiene su propio conjunto de registros que se pueden ver seleccionando el nombre de la réplica.
Página Registros estructurados
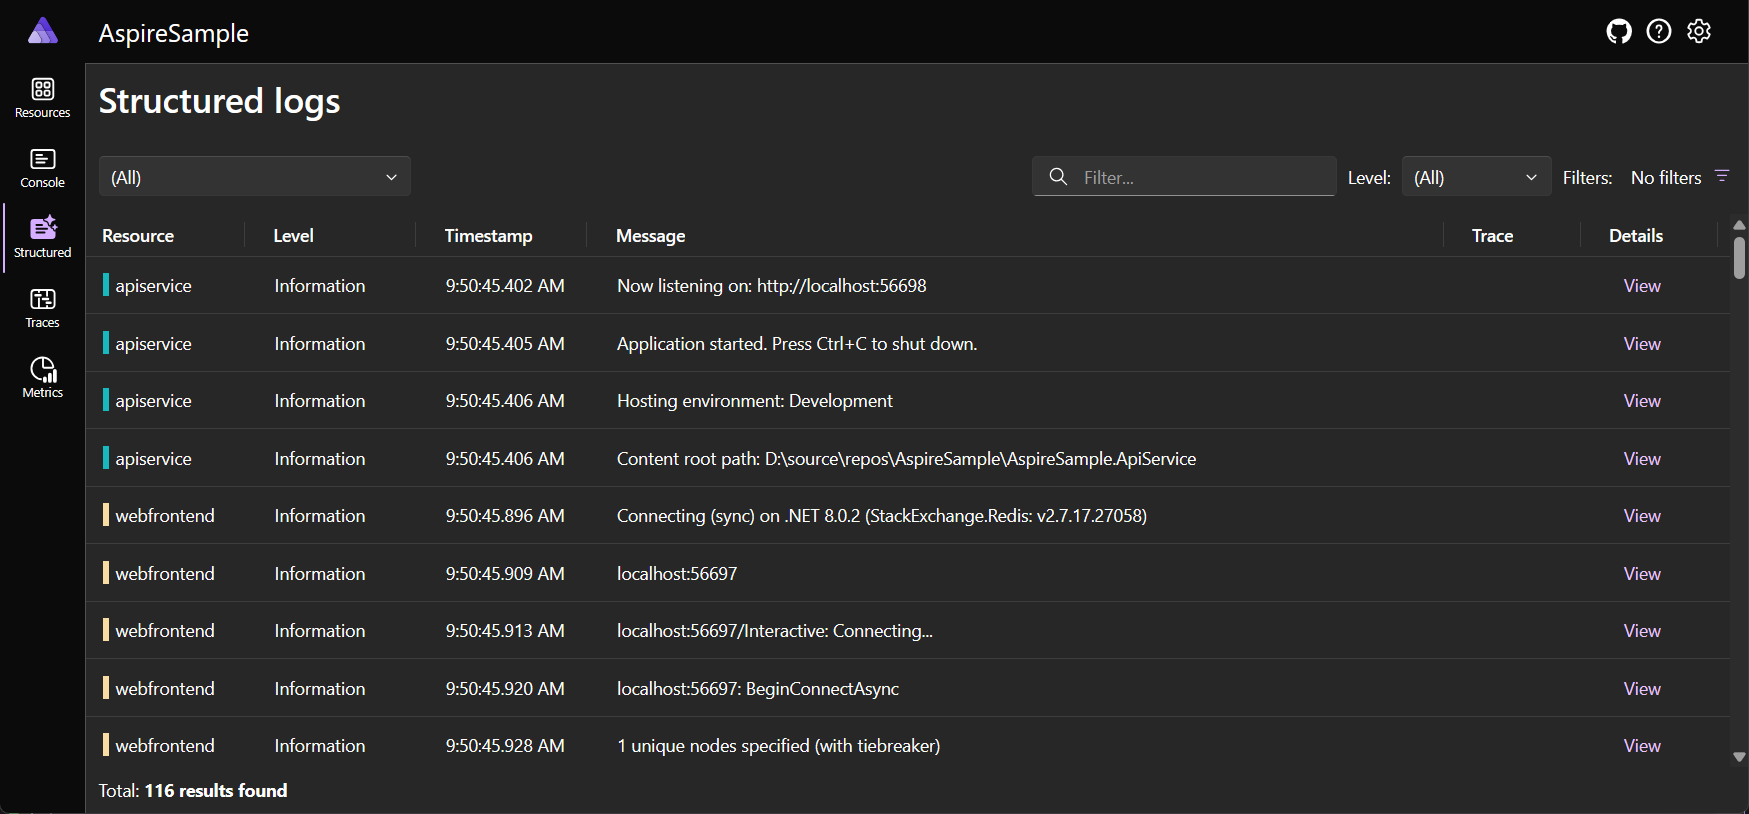
.NET Aspire configura automáticamente los proyectos con el registro mediante OpenTelemetry. Vaya a la página registros estructurados de
- Resource: el recurso del que se originó el registro.
- Nivel: nivel de registro de la entrada, como información, advertencia o error.
- marca de tiempo: la hora en que se produjo el registro.
- mensaje: los detalles del registro.
- seguimiento: un vínculo al seguimiento correspondiente para el registro, si procede.
- Detalles: detalles adicionales o metadatos sobre la entrada de registro.
Considere la siguiente captura de pantalla de ejemplo de registros semánticos:
Filtrado de registros estructurados
La página registros estructurados también proporciona una barra de búsqueda para filtrar los registros por servicio, nivel o mensaje. Use la lista desplegable nivel de
Tenga en cuenta las capturas de pantalla siguientes que muestran los registros estructurados, filtrados para mostrar elementos con "Hospedaje" en el texto del mensaje:
Página Seguimientos
Vaya a la página Seguimientos para ver todos los seguimientos de la aplicación. .NET .NET Aspire configura automáticamente el seguimiento de los diferentes proyectos de la aplicación. El seguimiento distribuido es una técnica de diagnóstico que ayuda a los ingenieros a localizar errores y problemas de rendimiento dentro de las aplicaciones, especialmente aquellos que se pueden distribuir entre varias máquinas o procesos. Para obtener más información, consulte .NET seguimiento distribuido. Esta técnica realiza un seguimiento de las solicitudes a través de una aplicación y correlaciona el trabajo realizado por diferentes integraciones de aplicaciones. Los seguimientos también ayudan a identificar cuánto tiempo tardaron en completarse las distintas fases de la solicitud. La página seguimientos muestra la siguiente información:
- marca de tiempo: cuando se complete el seguimiento.
- Nombre: nombre del seguimiento, prefijo con el nombre del proyecto.
- abarca: los recursos implicados en la solicitud.
- Duración: el tiempo necesario para completar la solicitud. Esta columna incluye un icono radial que ilustra la duración de la solicitud en comparación con las demás de la lista.
Filtrar seguimientos
La página seguimientos también proporciona una barra de búsqueda para filtrar los seguimientos por nombre o intervalo. Aplique un filtro y observe que los resultados del seguimiento se actualizan inmediatamente. Tenga en cuenta la siguiente captura de pantalla de seguimientos con un filtro aplicado a weather y observe cómo se resalta el término de búsqueda en los resultados:
Al filtrar seguimientos en el cuadro de diálogo Agregar de filtro
Combinación de telemetría de varios recursos
Cuando un recurso tiene varias réplicas, puede filtrar la telemetría para ver los datos de todas las instancias a la vez. Seleccione el recurso primario, con la etiqueta (application), como se muestra en la captura de pantalla siguiente:
Después de seleccionar el recurso primario, la página seguimientos muestra la telemetría de todas las instancias del recurso.
Detalles del seguimiento
La página de detalles del seguimiento contiene varios detalles pertinentes para la solicitud, entre los que se incluyen:
- detalles de seguimiento: cuando se inició el seguimiento.
- Duración: el tiempo necesario para completar la solicitud.
- Recursos: el número de recursos implicados en la solicitud.
- profundidad: el número de capas implicadas en la solicitud.
- intervalos totales: el número total de intervalos implicados en la solicitud.
Cada intervalo se representa como una fila de la tabla y contiene un Nombre. Los intervalos también muestran el icono de error si se produjo un error dentro de ese intervalo determinado del seguimiento. Intervalos que tienen un tipo de cliente o consumidor, pero no tienen un intervalo en el servidor, muestran un icono de flecha y, a continuación, la dirección de destino. Esto representa una llamada de cliente a un sistema fuera del proyecto de .NET.NET Aspire. Por ejemplo, una solicitud HTTP a una API web externa o una llamada de base de datos.
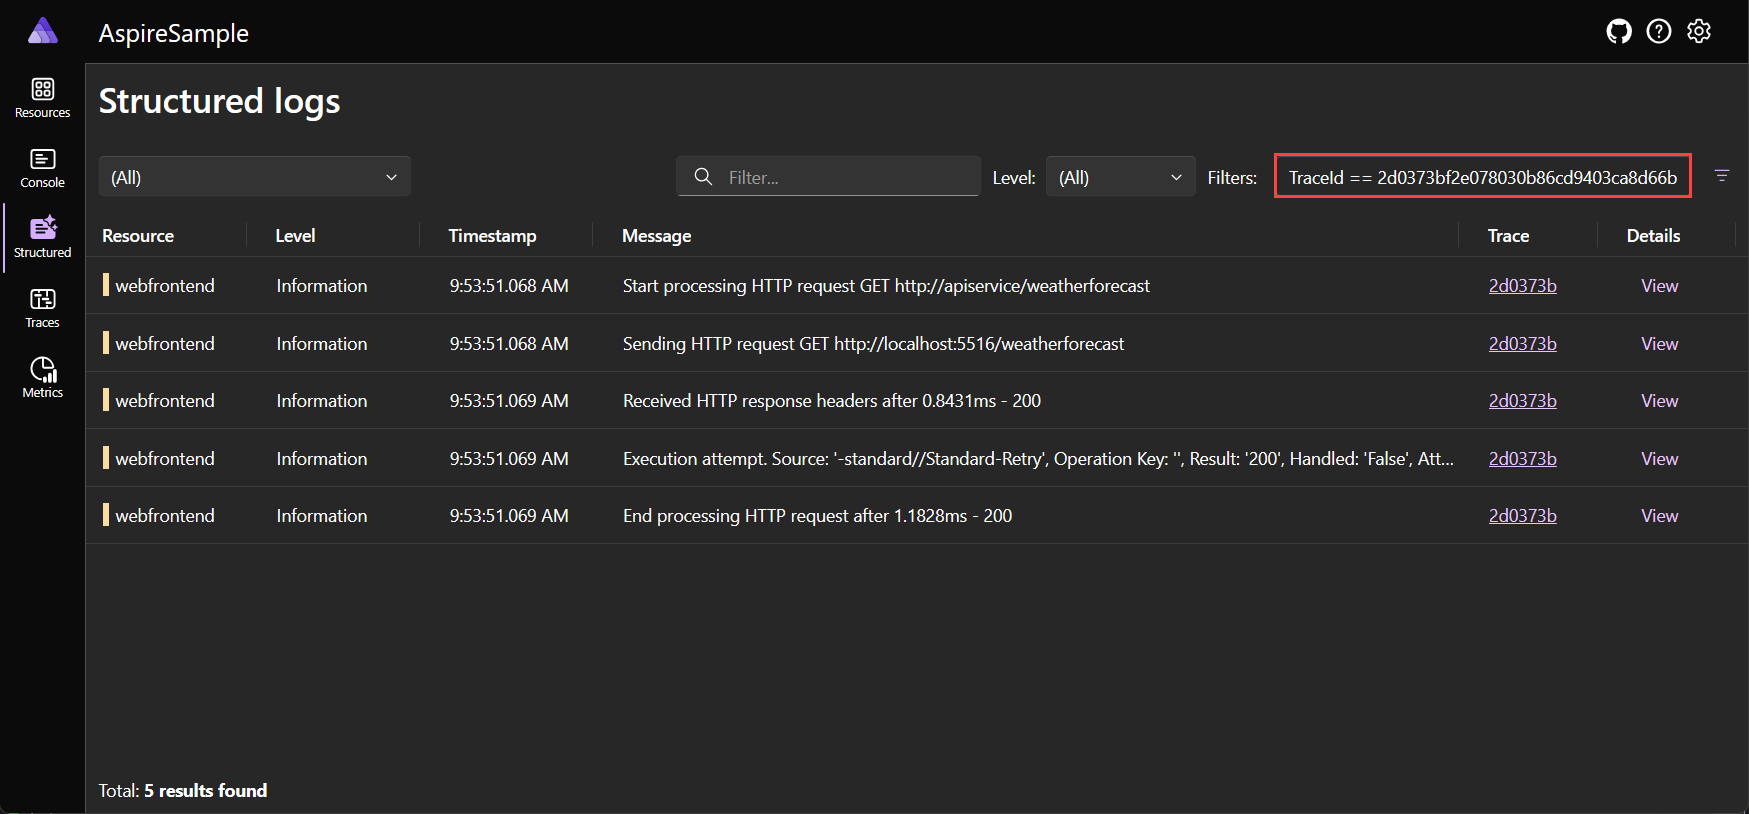
Dentro de la página de detalles de seguimiento, hay un botón Ver registros que le lleva a la página de registros estructurados con un filtro aplicado para mostrar solo los registros pertinentes para la solicitud. Considere una captura de pantalla de ejemplo que muestra la página de registros estructurados con un filtro aplicado para mostrar solo los registros pertinentes para el seguimiento:
La página de registros estructurados se describe con más detalle en la página registros estructurados sección.
Ejemplos de seguimiento
Cada seguimiento tiene un color, que se genera para ayudar a diferenciar entre intervalos, un color para cada recurso. Los colores se reflejan tanto en la página de seguimientos de como en la página de detalles de seguimiento . Cuando los seguimientos representan un icono de flecha, esos iconos también se colorizan para que coincidan con el intervalo del seguimiento de destino. Considere la siguiente captura de pantalla de ejemplo de seguimientos:
También puede seleccionar el botón Ver para ir a una vista detallada de la solicitud y la duración del tiempo dedicado a viajar a través de cada capa de aplicación. Considere una selección de ejemplo de un seguimiento para ver sus detalles:
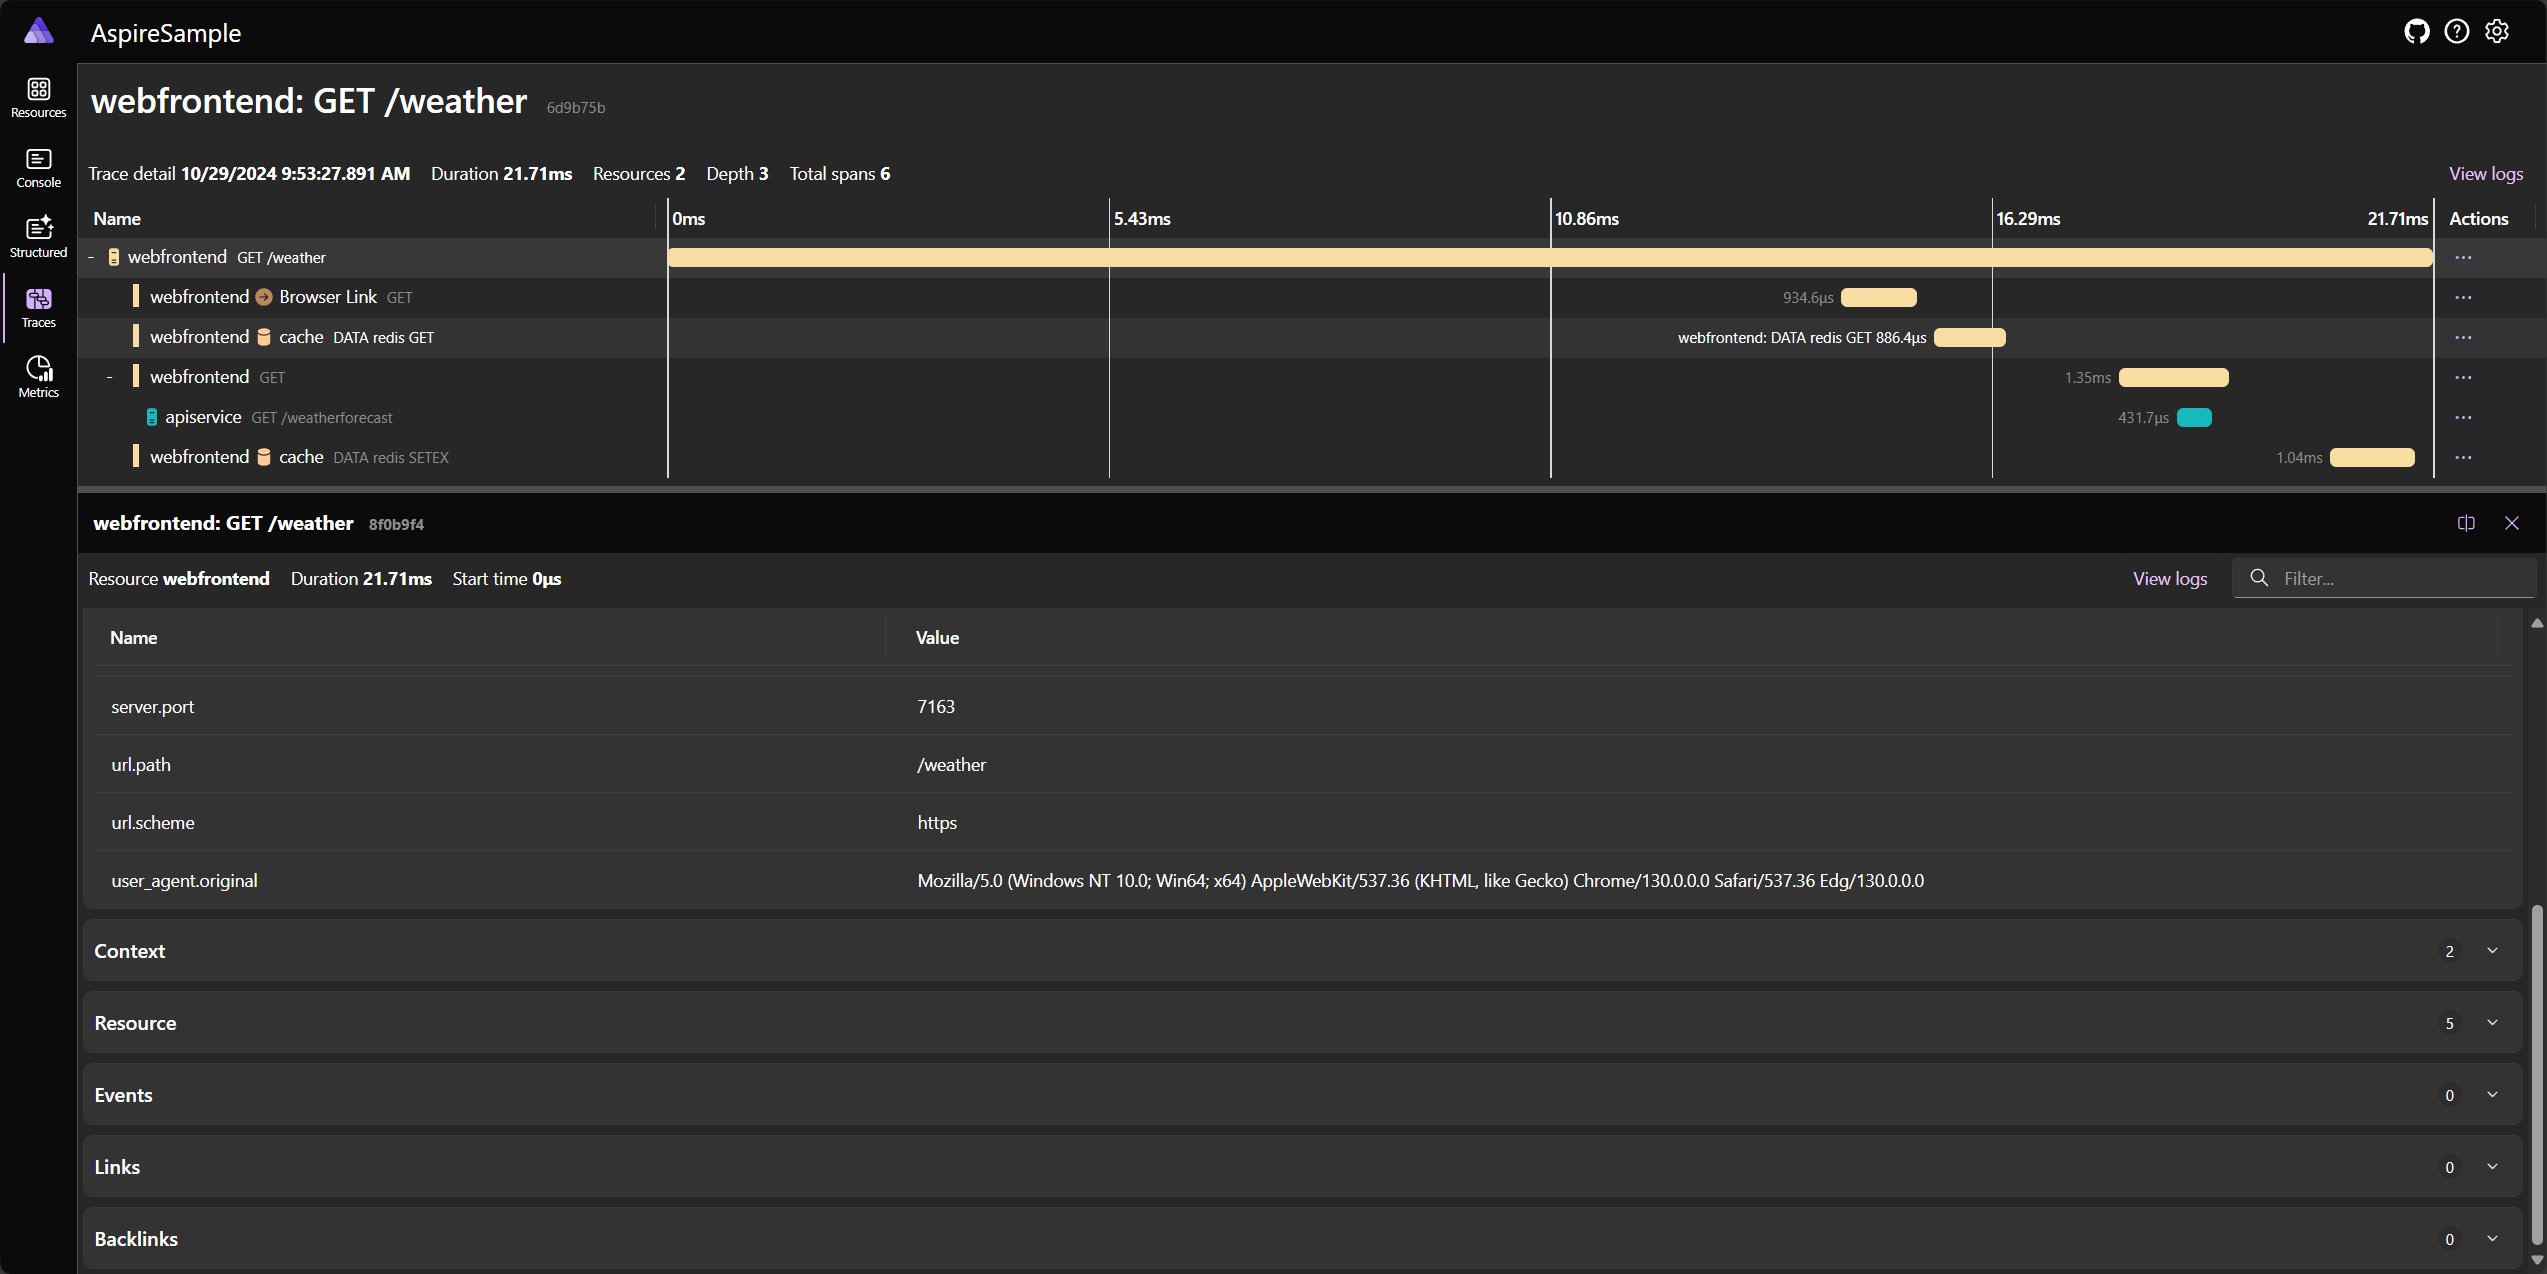
Para cada intervalo del seguimiento, seleccione Ver para ver más detalles:
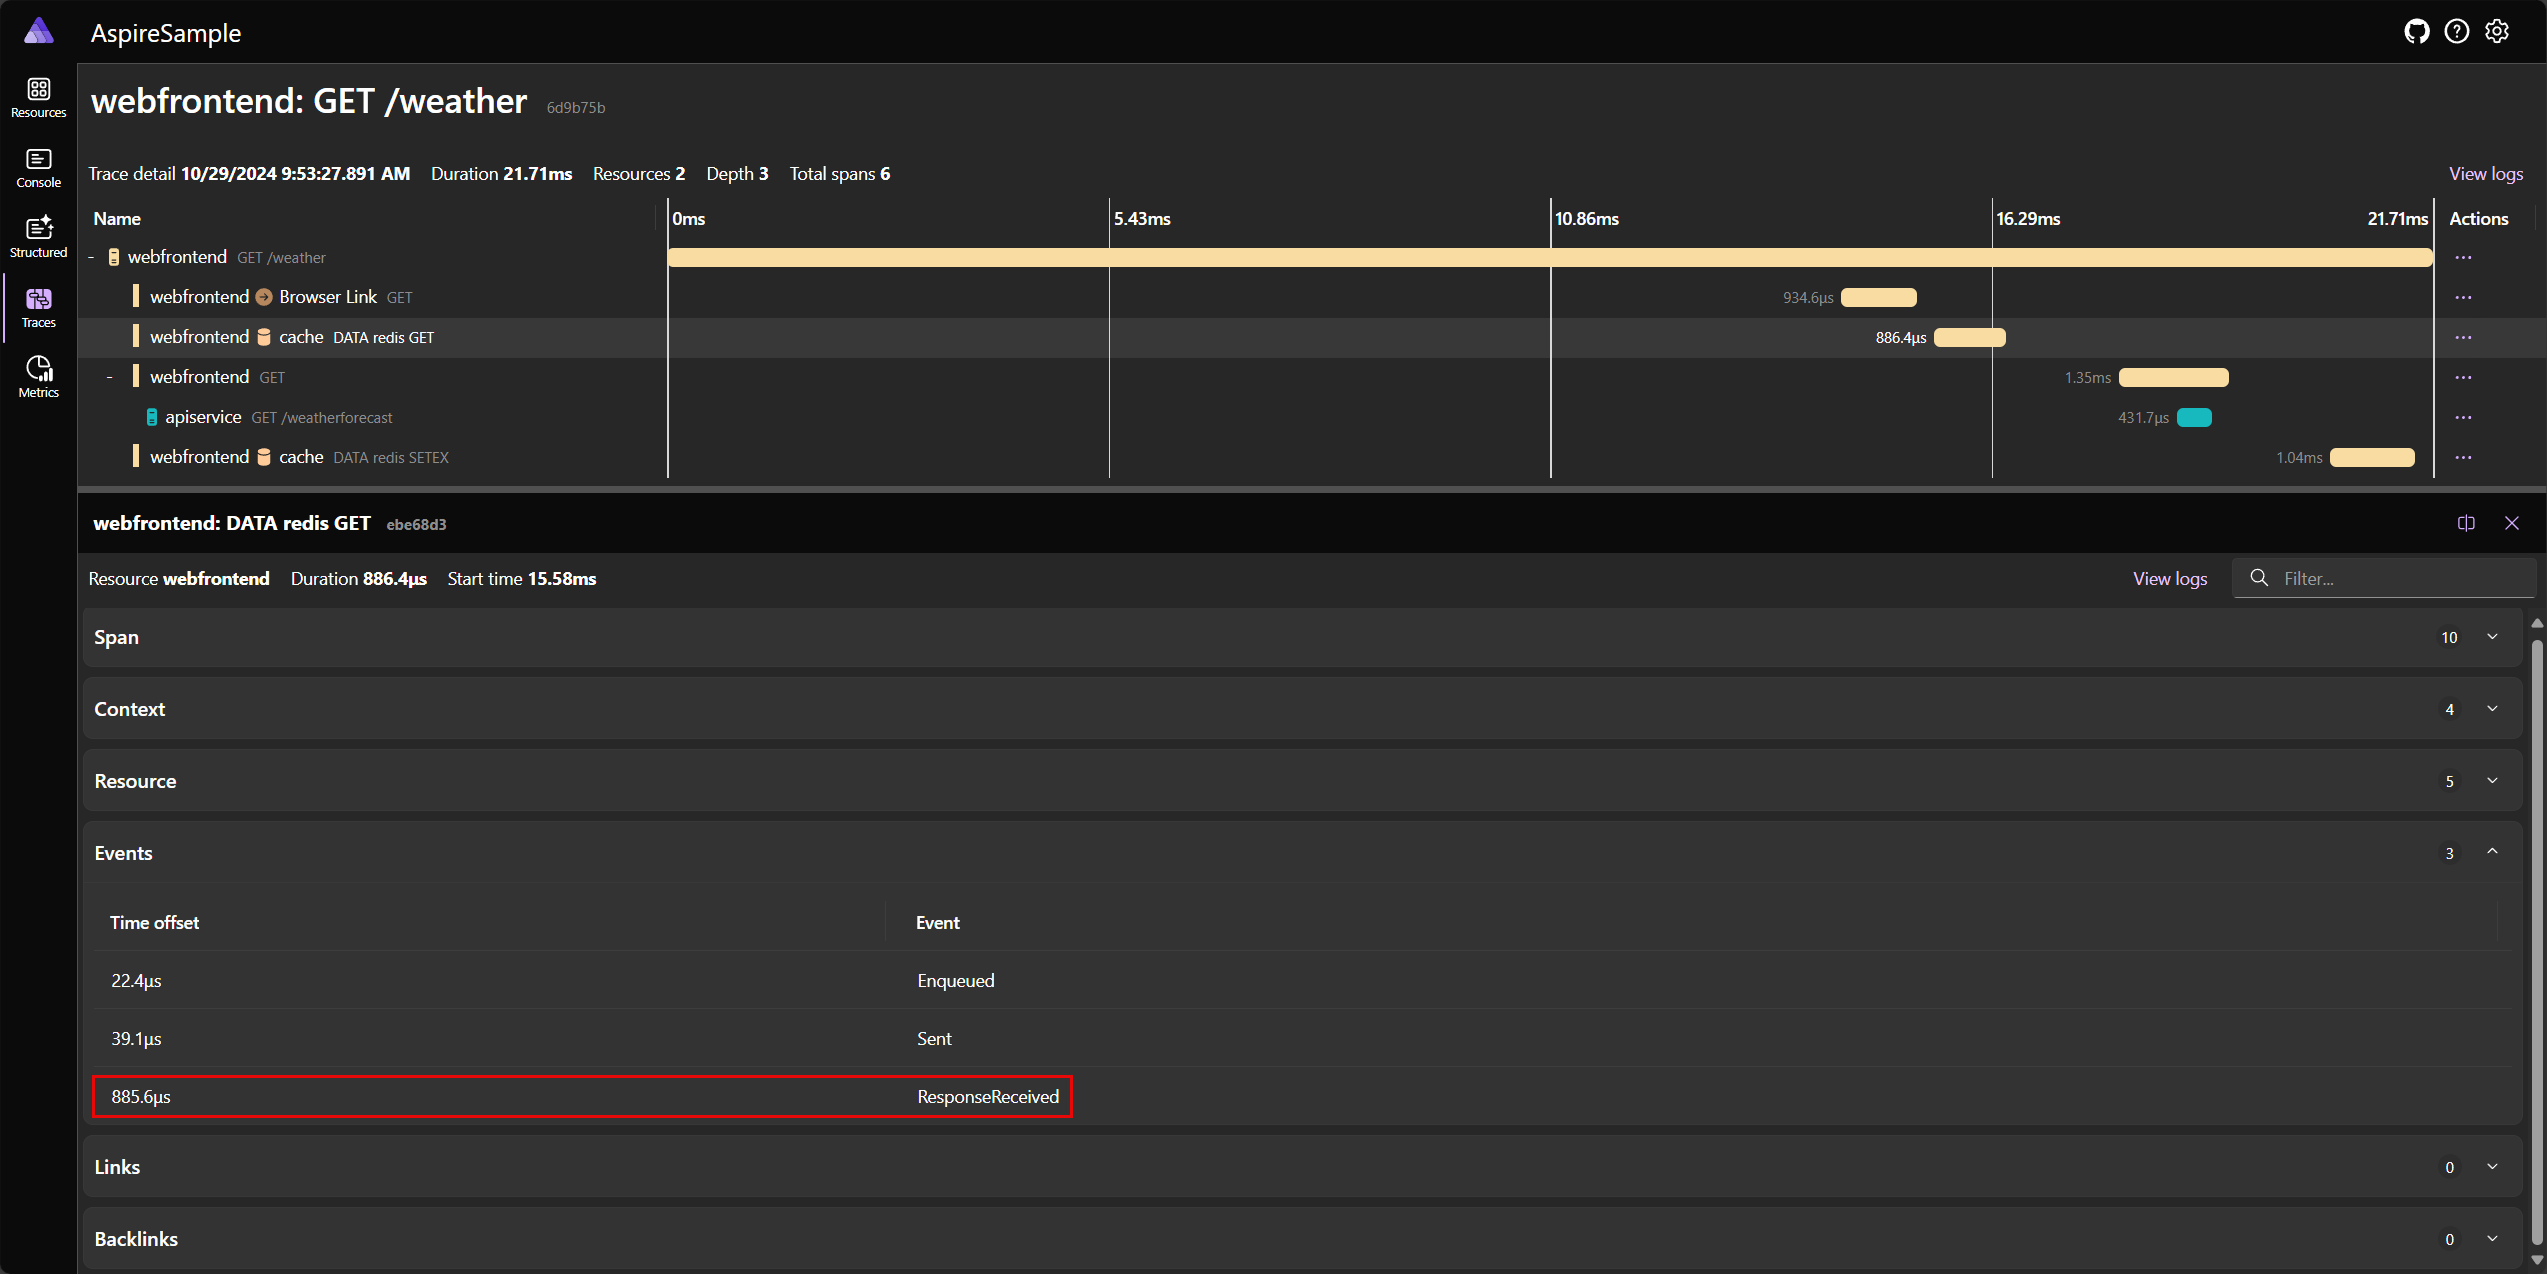
Desplácese hacia abajo en los detalles del intervalo para ver información completa. En la parte inferior del panel de detalles del intervalo, algunos tipos de intervalo, como esta llamada a una memoria caché, muestran los intervalos de eventos de intervalo:
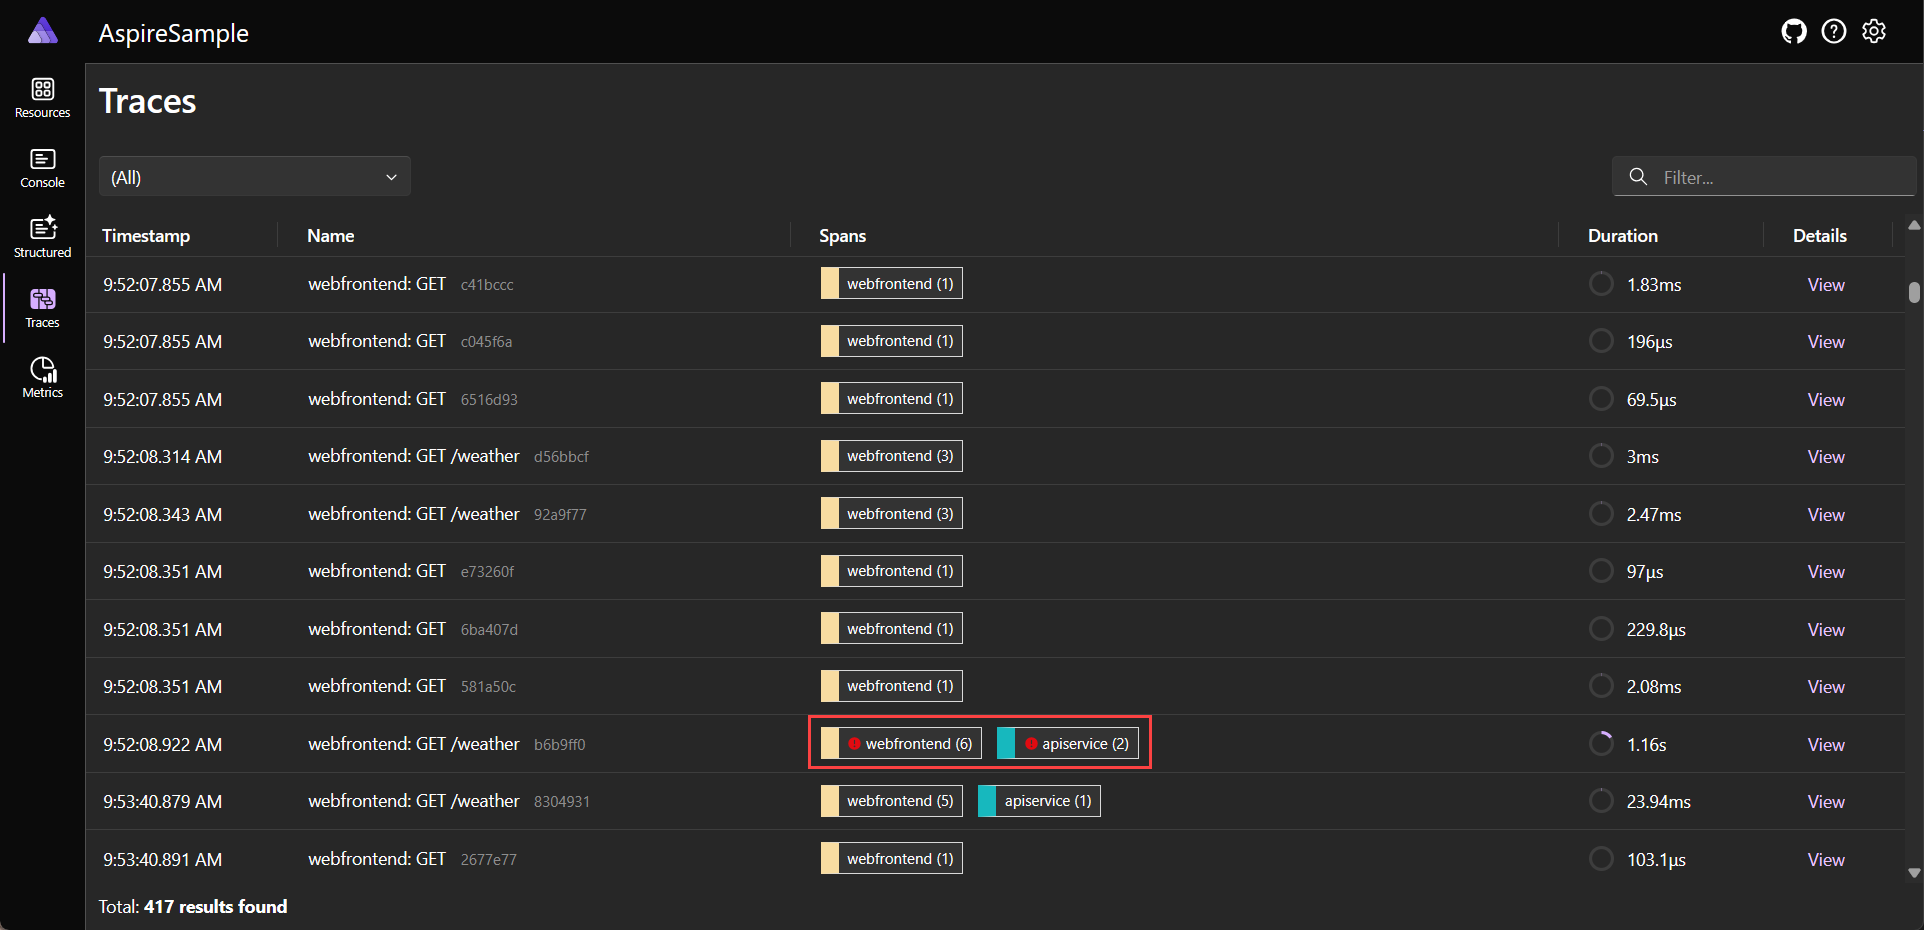
Cuando hay errores, la página representa un icono de error junto al nombre de seguimiento. Considere una captura de pantalla de ejemplo de seguimientos con errores:
Y la vista detallada correspondiente del seguimiento con errores:
Página Métricas
Vaya a la página Métricas para ver las métricas de la aplicación. .NET .NET Aspire configura automáticamente las métricas de los distintos proyectos de la aplicación. Las métricas son una manera de medir el estado de la aplicación y se pueden usar para supervisar el rendimiento de la aplicación a lo largo del tiempo.
Cada proyecto de publicación de métricas de la aplicación tiene sus propias métricas. La página de métricas muestra un panel de selección para cada medidor de nivel superior y los instrumentos correspondientes que puede seleccionar para ver la métrica.
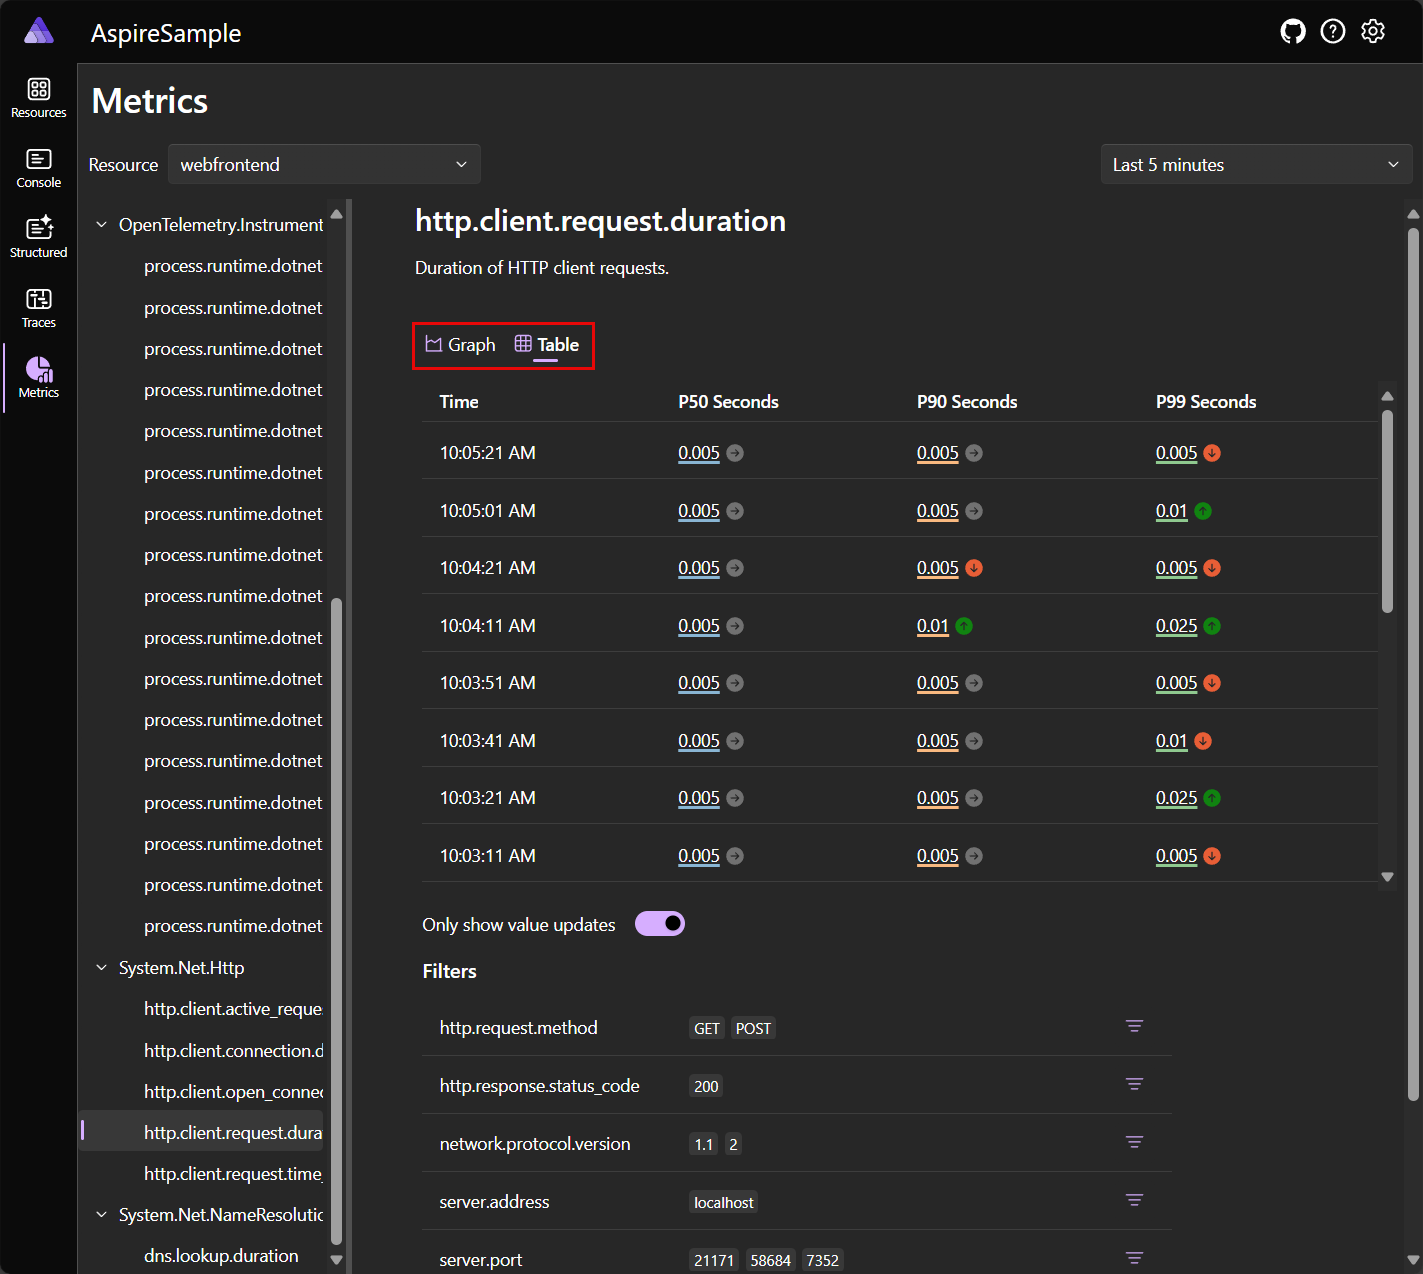
Considere la siguiente captura de pantalla de ejemplo de la página de métricas, con el proyecto de webfrontend seleccionado y la métrica System.Net.Http del medidor de http.client.request.durationSystem.Net.Http seleccionada:
Además del gráfico de métricas, la página de métricas incluye una opción para ver los datos como una tabla en su lugar. Tenga en cuenta la siguiente captura de pantalla de la página de métricas con la vista de tabla seleccionada:
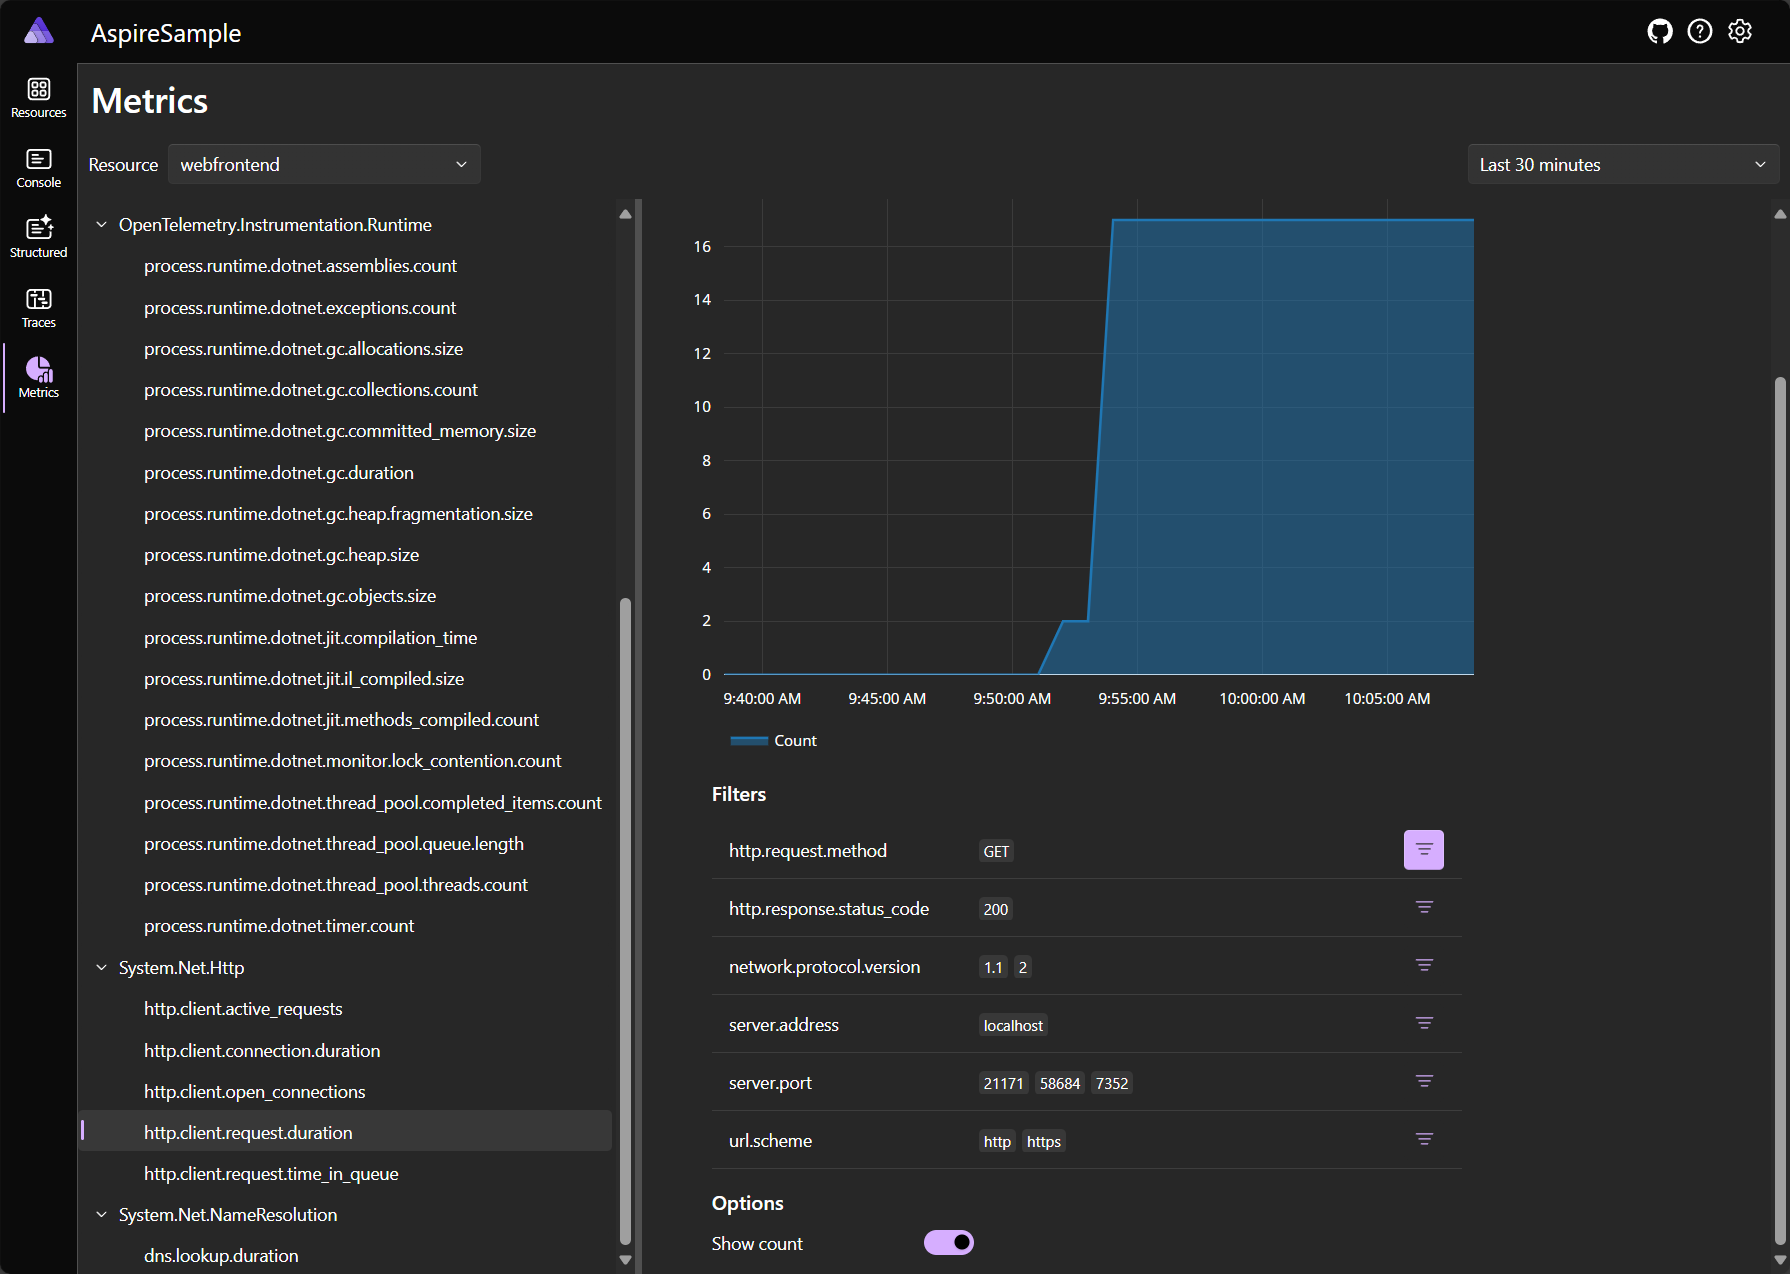
En el gráfico, hay una lista de filtros que puede aplicar para centrarse en los datos que le interesen. Por ejemplo, en la captura de pantalla siguiente, el campo
También puede seleccionar el recuento de la métrica mostrada en el acceso vertical, en lugar de sus valores:
Para obtener más información sobre las métricas, consulte Métricas integradas en .NET.
Ejemplares
El panel de .NET Aspire admite y muestra OpenTelemetryejemplares. Un ejemplar vincula un punto de datos de métrica a la operación que lo registró, que sirve como puente entre métricas y seguimientos.
Los ejemplos son útiles porque proporcionan contexto adicional sobre por qué se registró un valor de métrica específico. Por ejemplo, si observa un pico de latencia en la métrica de http.client.request.duration, un ejemplo podría apuntar a un seguimiento o intervalo específico que provocó el pico, lo que le ayuda a comprender la causa principal.
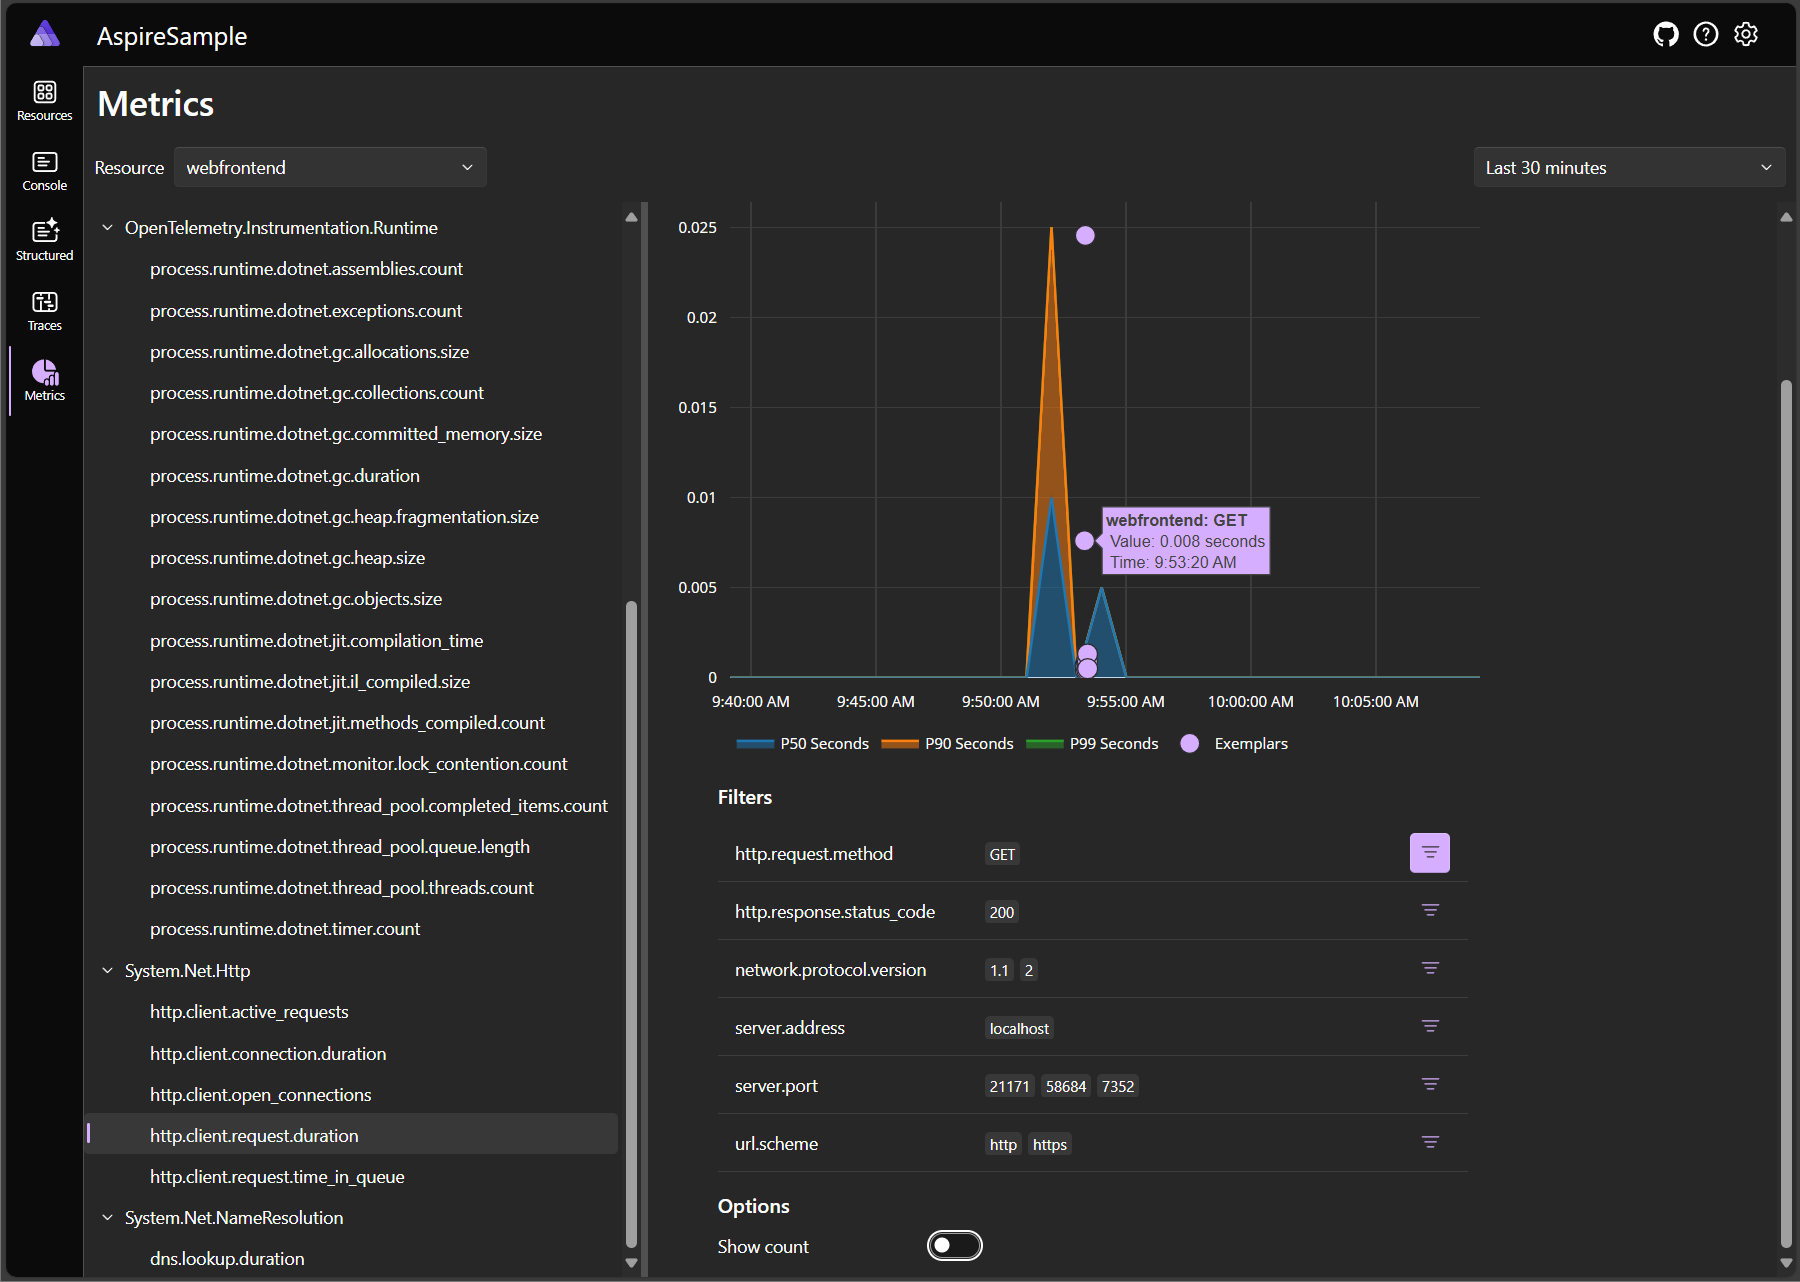
Los ejemplos se muestran en el gráfico de métricas como un pequeño punto redondo junto al punto de datos. Al mantener el puntero sobre el indicador, una información sobre herramientas muestra los detalles de ejemplo, tal como se muestra en la captura de pantalla siguiente:
En la captura de pantalla anterior se muestran los detalles de ejemplo de la métrica http.client.request.duration. Entre los detalles ejemplares se incluyen los siguientes:
- Nombre del recurso.
- Operación realizada, en este caso un HTTP GET en el
/catalog/images/{id}. - Valor correspondiente y marca de tiempo.
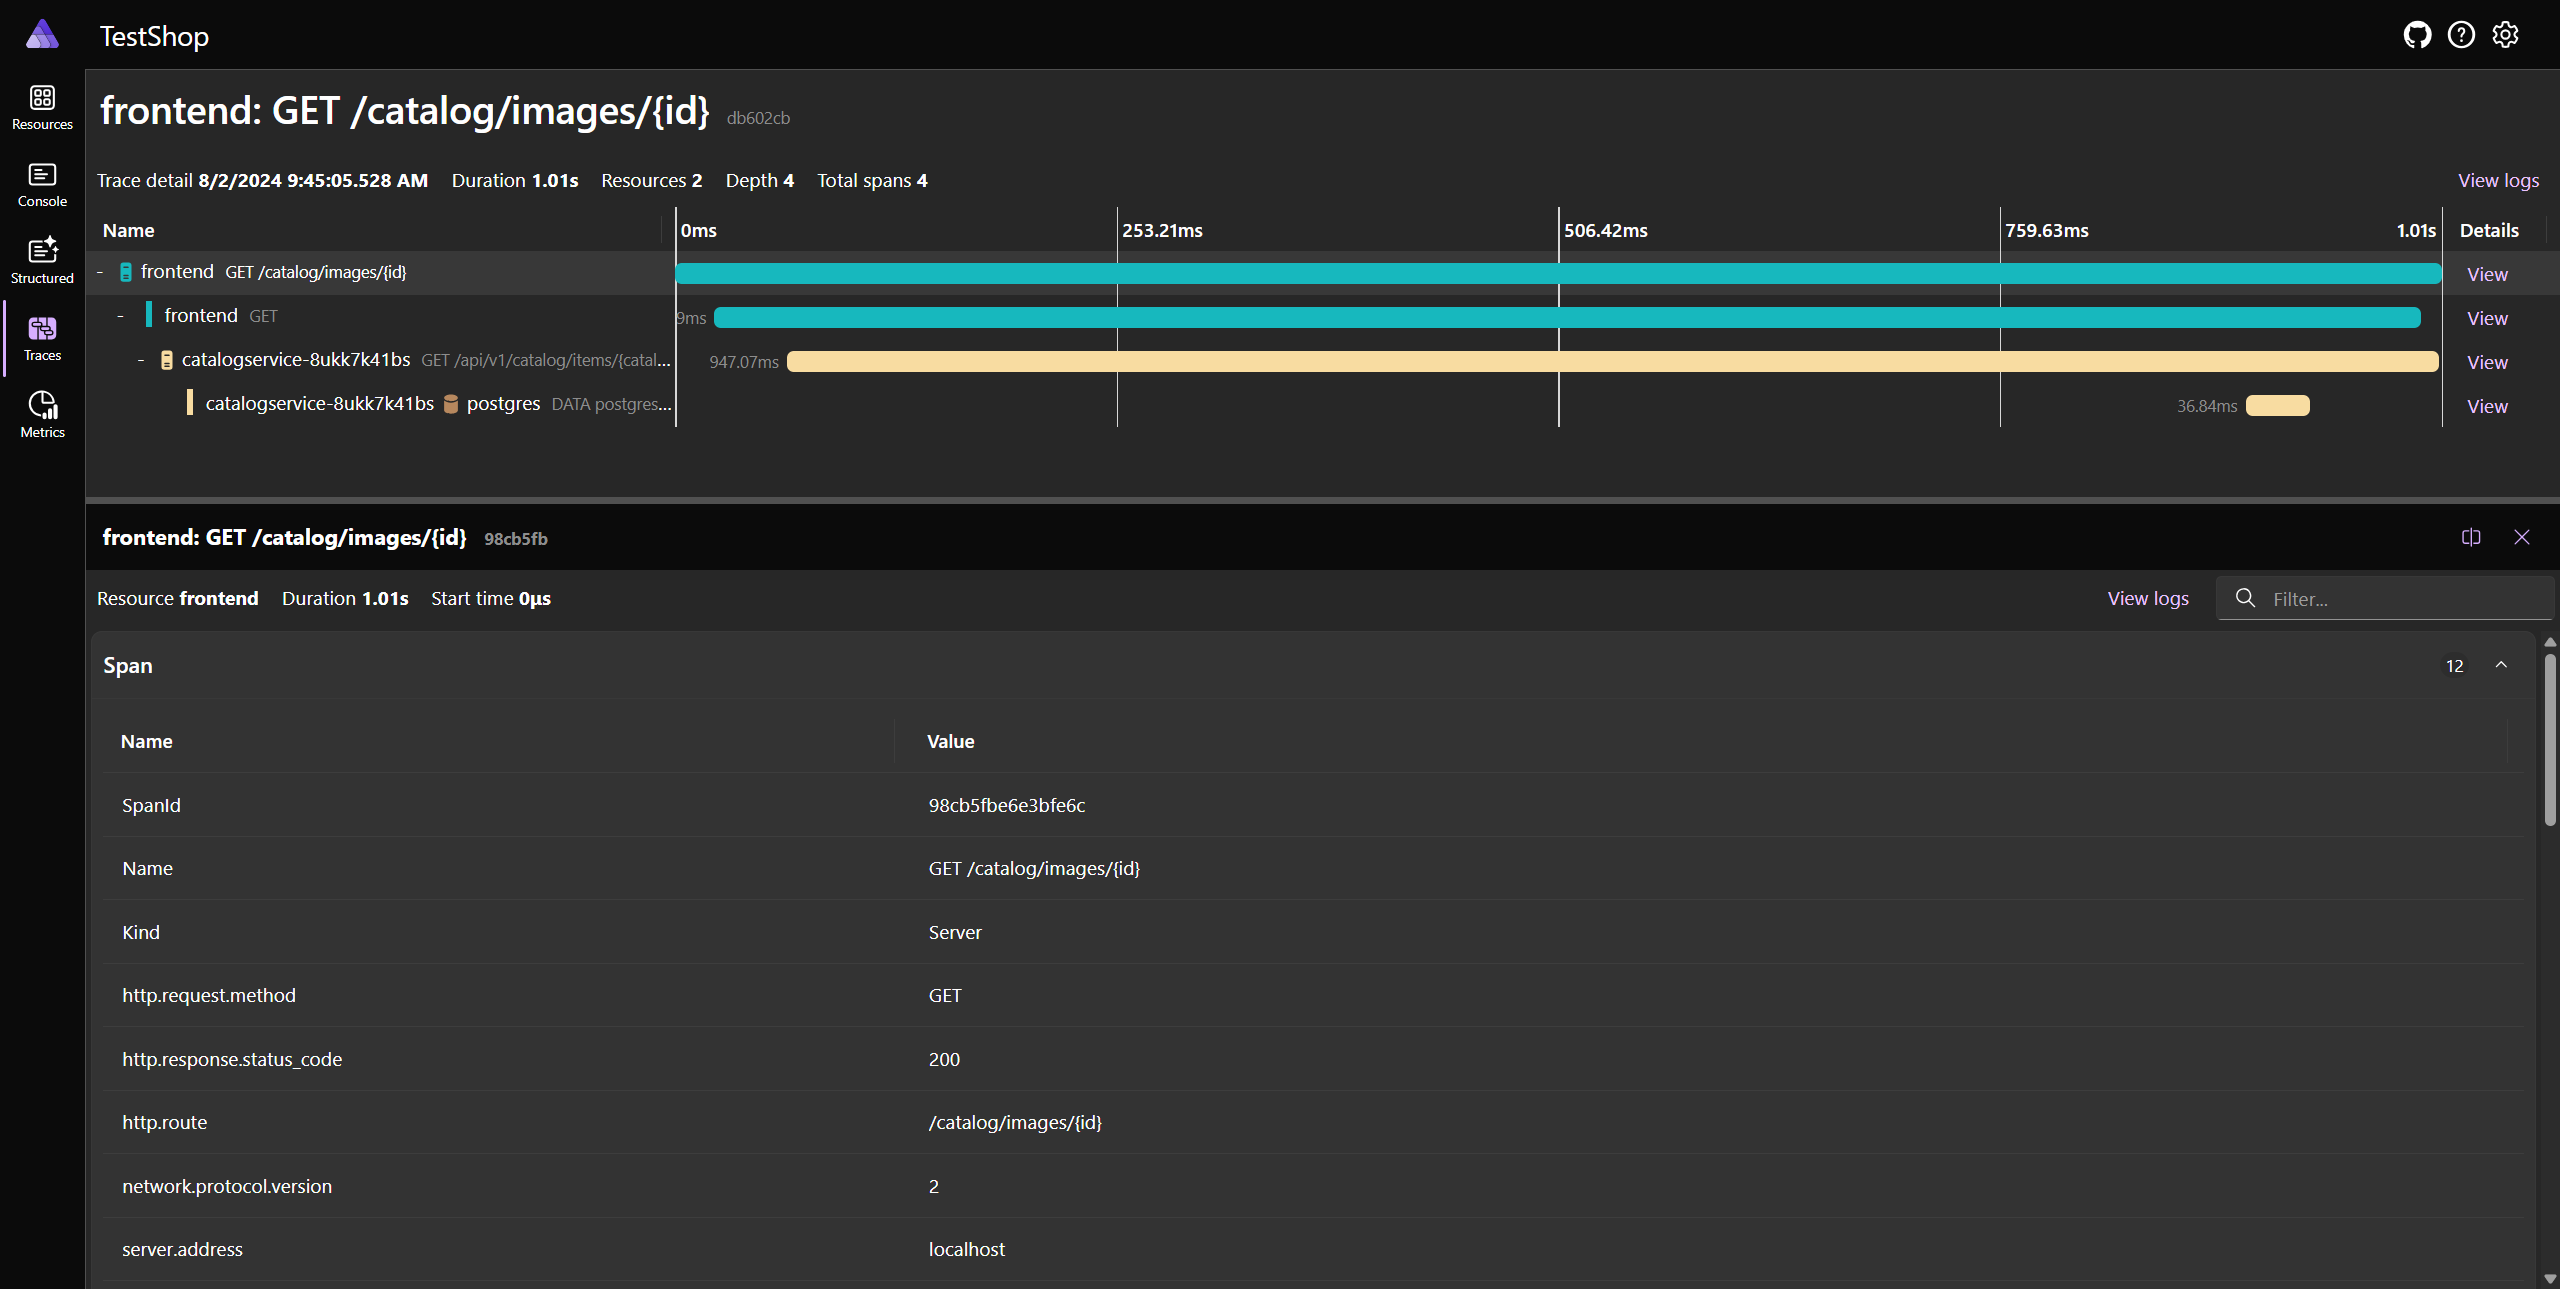
Al seleccionar el indicador ejemplar se abre la página de detalles del seguimiento, donde puede ver el seguimiento asociado, por ejemplo, considere la siguiente captura de pantalla:
Para obtener más información, vea OpenTelemetry Docs: Ejemplares.
Selección de temas
De forma predeterminada, el tema se establece para seguir el tema Del sistema, lo que significa que el panel usa el mismo tema que el sistema operativo. También puede seleccionar el tema Light o Dark para invalidar el tema del sistema. Las selecciones de tema se conservan.
En la captura de pantalla siguiente se muestra el cuadro de diálogo de selección de temas, con el tema del sistema predeterminado seleccionado:
Si prefiere el tema Claro, puede seleccionarlo en el cuadro de diálogo selección de tema:
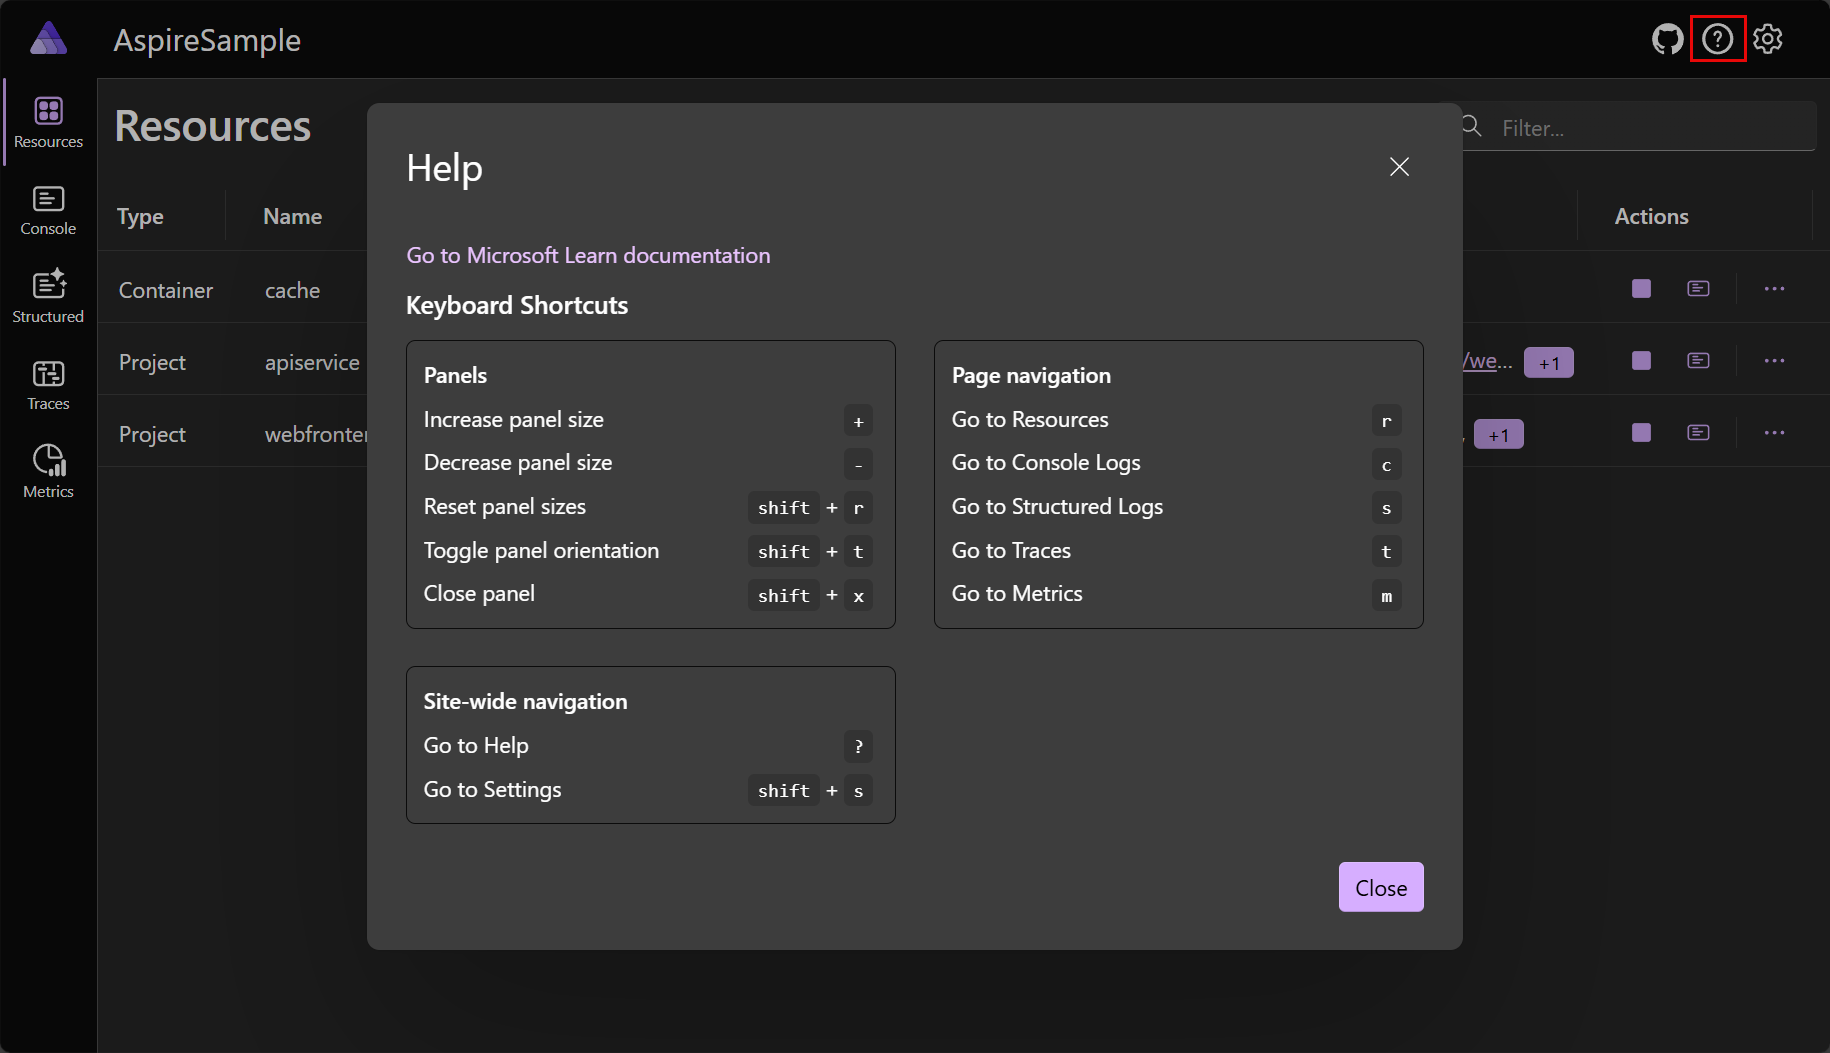
Accesos directos del panel
El panel de .NET.NET Aspire proporciona varios accesos directos para ayuda navegar y controlar diferentes partes del panel. Para mostrar los métodos abreviados de teclado, presione Mayús + ?, o seleccione el icono de signo de interrogación en la esquina superior derecha del panel:
Los siguientes métodos abreviados están disponibles:
paneles de
- +: aumentar el tamaño del panel.
- -: reducir el tamaño del panel.
- Mayús + r: tamaño del panel de eset de R.
- desplazamiento + t: orientación del panel de alternancia T.
- Mayús + x: Cerrar panel.
de navegación de página :
- r: vaya a Resources.
- c: vaya a Cregistros de suela.
- s: vaya a Sregistros tructured.
- t: vaya a carreras deT.
- m: vaya a M.
de navegación en todo el sitio :
- ?: ayuda.
- mayús + s: vaya a Settings.

