Obtener punteros a búfers de datos (C++/CX)
En Windows en tiempo de ejecución, la interfaz Windows::Storage::Streams::IBuffer ofrece un medio basado en streaming e independiente del lenguaje para tener acceso a los búferes de datos. En C++ puedes obtener un puntero sin formato a la matriz de bytes subyacente mediante la interfaz IBufferByteAccess de la biblioteca de Windows en tiempo de ejecución definida en robuffer.h. Con este método, puedes modificar la matriz de bytes en contexto sin necesidad de crear ninguna copia innecesaria de los datos.
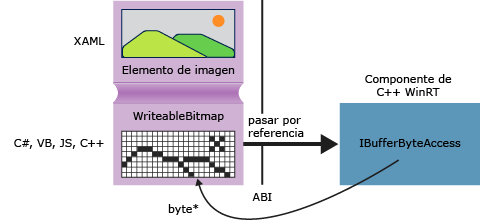
En el diagrama siguiente se muestra un elemento de imagen XAML, cuyo origen es una interfaz Windows::UI::Xaml::Media::Imaging WriteableBitmap. Una aplicación cliente escrita en cualquier lenguaje puede pasar una referencia a la clase WriteableBitmap al código de C++, y este puede usar dicha referencia para tener acceso al búfer subyacente. En una aplicación de la Plataforma universal de Windows escrita en C++, se puede usar la función del ejemplo siguiente directamente en el código fuente sin empaquetarla en un componente de Windows Runtime.

GetPointerToPixelData
El método siguiente acepta una interfaz Windows::Storage::Streams::IBuffer y devuelve un puntero sin formato a la matriz de bytes subyacente. Para llamar a la función, pasa una propiedad WriteableBitmap::PixelBuffer .
#include <wrl.h>
#include <robuffer.h>
using namespace Windows::Storage::Streams;
using namespace Microsoft::WRL;
typedef uint8 byte;
// Retrieves the raw pixel data from the provided IBuffer object.
// Warning: The lifetime of the returned buffer is controlled by
// the lifetime of the buffer object that's passed to this method.
// When the buffer has been released, the pointer becomes invalid
// and must not be used.
byte* Class1::GetPointerToPixelData(IBuffer^ pixelBuffer, unsigned int *length)
{
    if (length != nullptr)
    {
        *length = pixelBuffer ->Length;
    }
    // Query the IBufferByteAccess interface.
    ComPtr<IBufferByteAccess> bufferByteAccess;
    reinterpret_cast<IInspectable*>( pixelBuffer)->QueryInterface(IID_PPV_ARGS(&bufferByteAccess));

    // Retrieve the buffer data.
    byte* pixels = nullptr;
    bufferByteAccess->Buffer(&pixels);
    return pixels;
}
Ejemplo completo
En los pasos siguientes se muestra cómo crear una aplicación de Plataforma universal de Windows de C# que pasa un WriteableBitmap a un DLL del componente C++ de Windows Runtime. El código de C++ obtiene un puntero al búfer de píxeles y realiza una modificación en contexto sencilla en la imagen. Como alternativa, puedes crear la aplicación cliente en Visual Basic, JavaScript o C++ en lugar de en C#. Si usas C++, no necesitas el archivo DLL de componente; puedes agregar estos métodos directamente a la clase MainPage o a alguna otra clase que definas.
Creación del cliente
Use la plantilla de proyecto de aplicación en blanco para crear una aplicación C# de la Plataforma universal de Windows.
En MainPage.xaml
Utiliza este XAML para reemplazar el elemento
Grid:<Grid Background="{StaticResource ApplicationPageBackgroundThemeBrush}"> <StackPanel HorizontalAlignment="Left" Margin="176,110,0,0" VerticalAlignment="Top" Width="932"> <Image x:Name="Pic"/> <Button Content="Process Image" HorizontalAlignment="Stretch" VerticalAlignment="Stretch" Height="47" Click="Button_Click_1"/> </StackPanel> </Grid>
En MainPage.xaml.cs
Agrega estas declaraciones de espacio de nombres:
using Windows.Storage;
using Windows.Storage.FileProperties;
using Windows.UI.Xaml.Media.Imaging;
using Windows.Storage.Streams;
using Windows.Storage.Pickers;
Agrega una variable miembro
WriteableBitmapa la claseMainPagey asígnala el nombrem_bm.private WriteableBitmap m_bm;Utiliza el código siguiente para reemplazar el código auxiliar del método
OnNavigatedTo. Esto abre el selector de archivos al iniciar la aplicación. (Observa que se agrega la palabra claveasynca la signatura de la función).async protected override void OnNavigatedTo(NavigationEventArgs e) { FileOpenPicker openPicker = new FileOpenPicker(); openPicker.ViewMode = PickerViewMode.Thumbnail; openPicker.SuggestedStartLocation = PickerLocationId.PicturesLibrary; openPicker.FileTypeFilter.Add(".jpg"); openPicker.FileTypeFilter.Add(".jpeg"); openPicker.FileTypeFilter.Add(".png"); StorageFile file = await openPicker.PickSingleFileAsync(); if (file != null) { // Get the size of the image for the WriteableBitmap constructor. ImageProperties props = await file.Properties.GetImagePropertiesAsync(); m_bm = new WriteableBitmap((int)props.Height, (int)props.Width); m_bm.SetSource(await file.OpenReadAsync()); Pic.Source = m_bm; } else { // Handle error... } }Agrega el controlador de eventos para el clic de botón. (Dado que la referencia al espacio de nombres
ImageManipCPPno se ha creado aún, es posible que tenga un subrayado ondulado en la ventana del editor).async private void Button_Click_1(object sender, RoutedEventArgs e) { ImageManipCPP.Class1 obj = new ImageManipCPP.Class1(); await obj.Negativize(m_bm); Pic.Source = m_bm; }
Crear el componente C++
Agregue un nuevo componente de Windows Runtime en C++ a la solución existente, y asígnele el nombre
ImageManipCPP. Agrega una referencia a este en el proyecto de C#. Para ello, haz clic con el botón secundario en ese proyecto en el Explorador de soluciones y elige Agregarreferencia.En Class1.h
Agrega este
typedefen la segunda línea, justo después de#pragma once:typedef uint8 byte;Agrega el atributo
WebHostHiddenjusto antes del principio de la declaraciónClass1.[Windows::Foundation::Metadata::WebHostHidden]Agrega esta signatura de método público a
Class1:Windows::Foundation::IAsyncAction^ Negativize(Windows::UI::Xaml::Media::Imaging::WriteableBitmap^ bm);Agrega la signatura del método
GetPointerToPixelDatamostrado en el fragmento de código anterior. Asegúrate de que este método es privado.
En Class1.cpp
Agrega estas directivas
#includey estas declaraciones de espacio de nombres:#include <ppltasks.h> #include <wrl.h> #include <robuffer.h> using namespace Windows::Storage; using namespace Windows::UI::Xaml::Media::Imaging; using namespace Windows::Storage::Streams; using namespace Microsoft::WRL;Agrega la implementación de
GetPointerToPixelDatadel fragmento de código anterior.Agrega la implementación de
Negativize. Este método crea un efecto similar al negativo de una película invirtiendo el valor de cada valor RGB del píxel. El método elegido es el asincrónico porque en imágenes de mayor tamaño puede tardar un tiempo significativo en completarse.IAsyncAction^ Class1::Negativize(WriteableBitmap^ bm) { unsigned int length; byte* sourcePixels = GetPointerToPixelData(bm->PixelBuffer, &length); const unsigned int width = bm->PixelWidth; const unsigned int height = bm->PixelHeight; return create_async([this, width, height, sourcePixels] { byte* temp = sourcePixels; for(unsigned int k = 0; k < height; k++) { for (unsigned int i = 0; i < (width * 4); i += 4) { int pos = k * (width * 4) + (i); temp[pos] = ~temp[pos]; temp[pos + 1] = ~temp[pos + 1] / 3; temp[pos + 2] = ~temp[pos + 2] / 2; temp[pos + 3] = ~temp[pos + 3]; } } }); }Nota:
Este método puede ejecutarse más rápidamente si utilizas AMP o la Biblioteca de patrones de procesamiento en paralelo para paralelizar la operación.
Asegúrate de tener al menos una imagen en la carpeta de imágenes. Presiona F5 para compilar y ejecutar el programa.