Inserción enriquecida de Azure Notification Hubs
Información general
Para interactuar con los usuarios con contenido enriquecido instantánea, una aplicación que desee insertar más allá de texto sin formato. Estas notificaciones promueven las interacciones de los usuarios y presentan contenido, como direcciones URL, sonidos, imágenes o cupones y más. Este tutorial se basa en el tutorial Notificación a los usuarios, y se muestra cómo enviar notificaciones push que incorporan cargas (por ejemplo, imágenes).
Este tutorial es compatible con iOS 7 y 8.

En un alto nivel:
- El back-end de la aplicación:
- Almacena la carga enriquecida (en este caso, la imagen) en el almacenamiento local y la base de datos back-end.
- Envía el identificador de esta notificación enriquecida al dispositivo.
- Aplicación en el dispositivo:
- Se comunica con el back-end que solicita la carga enriquecida con el identificador que recibe.
- Envía notificaciones de usuarios en el dispositivo cuando se completa la recuperación de datos y muestra la carga inmediatamente cuando los usuarios pulsan para obtener más información.
Proyecto WebAPI
En Visual Studio, abra el proyecto AppBackend que creó en el tutorial Notificación a usuarios .
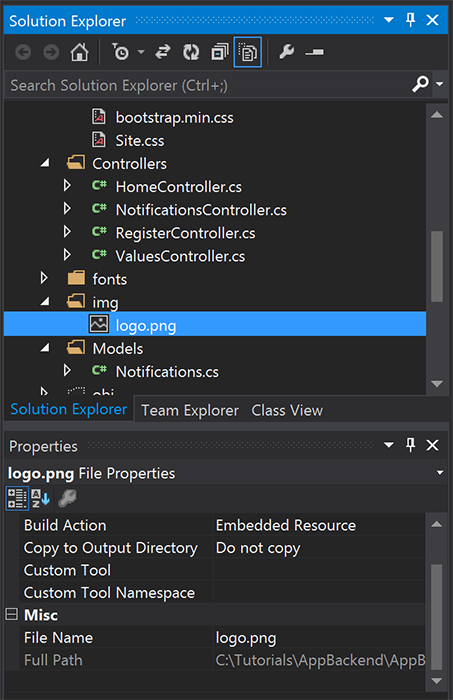
Obtenga una imagen con la que le gustaría notificar a los usuarios y póngala e una carpeta img del directorio del proyecto.
Haga clic en Mostrar todos los archivos en el Explorador de soluciones y haga clic con el botón derecho en la carpeta para Incluir en el proyecto.
Con la imagen seleccionada, cambie su Acción de compilación en la ventana Propiedades a Recurso incrustado.

En
Notifications.cs, agregue la instrucciónusingsiguiente:using System.Reflection;Reemplace la clase
Notificationspor el siguiente código. Asegúrese de reemplazar los marcadores de posición con las credenciales del centro de notificaciones y el nombre de archivo de la imagen:public class Notification { public int Id { get; set; } // Initial notification message to display to users public string Message { get; set; } // Type of rich payload (developer-defined) public string RichType { get; set; } public string Payload { get; set; } public bool Read { get; set; } } public class Notifications { public static Notifications Instance = new Notifications(); private List<Notification> notifications = new List<Notification>(); public NotificationHubClient Hub { get; set; } private Notifications() { // Placeholders: replace with the connection string (with full access) for your notification hub and the hub name from the Azure Classics Portal Hub = NotificationHubClient.CreateClientFromConnectionString("{conn string with full access}", "{hub name}"); } public Notification CreateNotification(string message, string richType, string payload) { var notification = new Notification() { Id = notifications.Count, Message = message, RichType = richType, Payload = payload, Read = false }; notifications.Add(notification); return notification; } public Stream ReadImage(int id) { var assembly = Assembly.GetExecutingAssembly(); // Placeholder: image file name (for example, logo.png). return assembly.GetManifestResourceStream("AppBackend.img.{logo.png}"); } }En
NotificationsController.cs, vuelva a definirNotificationsControllercon el código siguiente. Esto envía al dispositivo un identificador de notificación enriquecida silencioso inicial y permite la recuperación de la imagen en el cliente:// Return http response with image binary public HttpResponseMessage Get(int id) { var stream = Notifications.Instance.ReadImage(id); var result = new HttpResponseMessage(HttpStatusCode.OK); result.Content = new StreamContent(stream); // Switch in your image extension for "png" result.Content.Headers.ContentType = new System.Net.Http.Headers.MediaTypeHeaderValue("image/{png}"); return result; } // Create rich notification and send initial silent notification (containing id) to client public async Task<HttpResponseMessage> Post() { // Replace the placeholder with image file name var richNotificationInTheBackend = Notifications.Instance.CreateNotification("Check this image out!", "img", "{logo.png}"); var usernameTag = "username:" + HttpContext.Current.User.Identity.Name; // Silent notification with content available var aboutUser = "{\"aps\": {\"content-available\": 1, \"sound\":\"\"}, \"richId\": \"" + richNotificationInTheBackend.Id.ToString() + "\", \"richMessage\": \"" + richNotificationInTheBackend.Message + "\", \"richType\": \"" + richNotificationInTheBackend.RichType + "\"}"; // Send notification to apns await Notifications.Instance.Hub.SendAppleNativeNotificationAsync(aboutUser, usernameTag); return Request.CreateResponse(HttpStatusCode.OK); }Ahora, vuelva a implementar esta aplicación en un sitio web de Azure a fin de que sea accesible desde todos los dispositivos. Haga clic con el botón derecho en el proyecto AppBackend y, a continuación, seleccione Publicar.
Seleccione Sitio web de Azure como destino de publicación. Inicie sesión con su cuenta de Azure, seleccione un sitio web nuevo o existente y anote la propiedad Dirección URL de destino en la pestaña Conexión. Más tarde en este tutorial haremos referencia a esta dirección URL como punto de conexión de back-end. Seleccione Publicar.
Modificación del proyecto iOS
Ahora que ha modificado el back-end de la aplicación para enviar solo el identificador de una notificación, cambie la aplicación iOS para controlar ese identificador y recuperar el mensaje enriquecido desde el back-end:
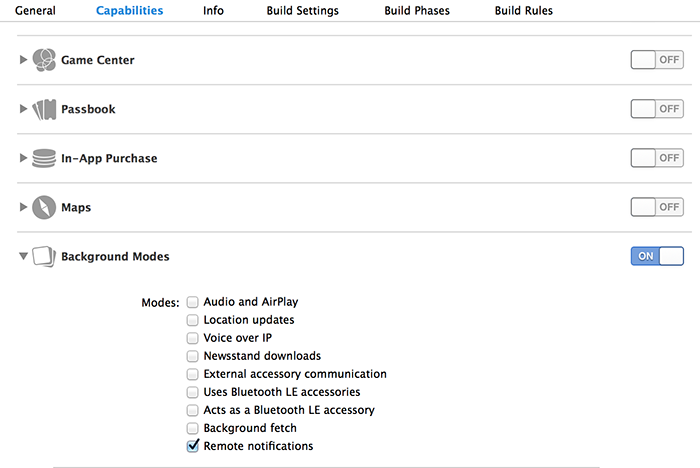
Abra el proyecto iOS y habilite las notificaciones remotas yendo a su destino de la aplicación principal en la sección Destinos .
Seleccione Capacidades, habilite los Modos en segundo plano y active la casilla Notificaciones remotas.

Abra
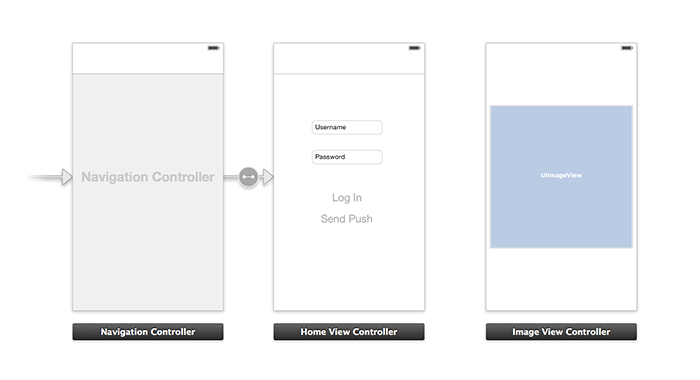
Main.storyboardy asegúrese de que dispone de un Controlador de vista (al que se hace referencia en este tutorial como Controlador de vista de inicio) del tutorial Notificación a los usuarios.Agregue un Controlador de navegación al guion gráfico y mantenga presionada la tecla Control mientras lo arrastra al Controlador de vista de inicio para convertirlo en la vista raíz de la navegación. Asegúrese de que esté seleccionado Is Initial View Controller en el Inspector de atributos solo para el Controlador de navegación.
Agregue un Controlador de vista al guion gráfico y agregue una Vista de imagen. Esta es la página que verán los usuarios una vez que deseen obtener más información al hacer clic en la notificación. El guión gráfico debe tener el aspecto siguiente:

Haga clic en el Controlador de vista de inicio en el guion gráfico y asegúrese de que tiene homeViewController como su Clase personalizada e Id. de guion gráfico en el Inspector de identidad.
Haga lo mismo para el Controlador de vista de imagen, como imageViewController.
Luego cree una clase de controlador de vista denominada imageViewController para controlar la interfaz de usuario que acaba de crear.
En imageViewController.h, agregue el código siguiente a las declaraciones de la interfaz del controlador. Asegúrese de mantener presionada la tecla Control mientras arrastra la vista de la imagen del guión gráfico a estas propiedades para vincularlas:
@property (weak, nonatomic) IBOutlet UIImageView *myImage;
@property (strong) UIImage* imagePayload;
En
imageViewController.m, agregue el siguiente código al final deviewDidload:// Display the UI Image in UI Image View [self.myImage setImage:self.imagePayload];En
AppDelegate.m, importe el controlador de imagen que ha creado:#import "imageViewController.h"Agregue una sección de interfaz con la siguiente declaración:
@interface AppDelegate ()

@property UIImage* imagePayload;
@property NSDictionary* userInfo;
@property BOOL iOS8;

// Obtain content from backend with notification id
- (void)retrieveRichImageWithId:(int)richId completion: (void(^)(NSError*)) completion;

// Redirect to Image View Controller after notification interaction
- (void)redirectToImageViewWithImage: (UIImage *)img;

@end
En
AppDelegate, asegúrese de que la aplicación se registra para notificaciones silenciosas enapplication: didFinishLaunchingWithOptions:// Software version self.iOS8 = [[UIApplication sharedApplication] respondsToSelector:@selector(registerUserNotificationSettings:)] && [[UIApplication sharedApplication] respondsToSelector:@selector(registerForRemoteNotifications)]; // Register for remote notifications for iOS8 and previous versions if (self.iOS8) { NSLog(@"This device is running with iOS8."); // Action UIMutableUserNotificationAction *richPushAction = [[UIMutableUserNotificationAction alloc] init]; richPushAction.identifier = @"richPushMore"; richPushAction.activationMode = UIUserNotificationActivationModeForeground; richPushAction.authenticationRequired = NO; richPushAction.title = @"More"; // Notification category UIMutableUserNotificationCategory* richPushCategory = [[UIMutableUserNotificationCategory alloc] init]; richPushCategory.identifier = @"richPush"; [richPushCategory setActions:@[richPushAction] forContext:UIUserNotificationActionContextDefault]; // Notification categories NSSet* richPushCategories = [NSSet setWithObjects:richPushCategory, nil]; UIUserNotificationSettings *settings = [UIUserNotificationSettings settingsForTypes:UIUserNotificationTypeSound | UIUserNotificationTypeAlert | UIUserNotificationTypeBadge categories:richPushCategories]; [[UIApplication sharedApplication] registerUserNotificationSettings:settings]; [[UIApplication sharedApplication] registerForRemoteNotifications]; } else { // Previous iOS versions NSLog(@"This device is running with iOS7 or earlier versions."); [[UIApplication sharedApplication] registerForRemoteNotificationTypes: UIRemoteNotificationTypeAlert | UIRemoteNotificationTypeBadge | UIRemoteNotificationTypeSound | UIRemoteNotificationTypeNewsstandContentAvailability]; } return YES;Sustituya la siguiente implementación para que
application:didRegisterForRemoteNotificationsWithDeviceTokentenga en cuenta los cambios en la interfaz de usuario del guion gráfico:// Access navigation controller which is at the root of window UINavigationController *nc = (UINavigationController *)self.window.rootViewController; // Get home view controller from stack on navigation controller homeViewController *hvc = (homeViewController *)[nc.viewControllers objectAtIndex:0]; hvc.deviceToken = deviceToken;Liego, agregue los siguientes métodos a
AppDelegate.mpara recuperar la imagen desde el punto de conexión y enviar una notificación local cuando la recuperación se complete. Asegúrese de sustituir el marcador de posición{backend endpoint}por el extremo del back-end:NSString *const GetNotificationEndpoint = @"{backend endpoint}/api/notifications"; // Helper: retrieve notification content from backend with rich notification id - (void)retrieveRichImageWithId:(int)richId completion: (void(^)(NSError*)) completion { UINavigationController *nc = (UINavigationController *)self.window.rootViewController; homeViewController *hvc = (homeViewController *)[nc.viewControllers objectAtIndex:0]; NSString* authenticationHeader = hvc.registerClient.authenticationHeader; // Check if authenticated if (!authenticationHeader) return; NSURLSession* session = [NSURLSession sessionWithConfiguration:[NSURLSessionConfiguration defaultSessionConfiguration] delegate:nil delegateQueue:nil]; NSURL* requestURL = [NSURL URLWithString:[NSString stringWithFormat:@"%@/%d", GetNotificationEndpoint, richId]]; NSMutableURLRequest* request = [NSMutableURLRequest requestWithURL:requestURL]; [request setHTTPMethod:@"GET"]; NSString* authorizationHeaderValue = [NSString stringWithFormat:@"Basic %@", authenticationHeader]; [request setValue:authorizationHeaderValue forHTTPHeaderField:@"Authorization"]; NSURLSessionDataTask* dataTask = [session dataTaskWithRequest:request completionHandler:^(NSData *data, NSURLResponse *response, NSError *error) { NSHTTPURLResponse* httpResponse = (NSHTTPURLResponse*) response; if (!error && httpResponse.statusCode == 200) { // From NSData to UIImage self.imagePayload = [UIImage imageWithData:data]; completion(nil); } else { NSLog(@"Error status: %ld, request: %@", (long)httpResponse.statusCode, error); if (error) completion(error); else { completion([NSError errorWithDomain:@"APICall" code:httpResponse.statusCode userInfo:nil]); } } }]; [dataTask resume]; } // Handle silent push notifications when id is sent from backend - (void)application:(UIApplication *)application didReceiveRemoteNotification:(NSDictionary *)userInfo fetchCompletionHandler:(void (^)(UIBackgroundFetchResult result))handler { self.userInfo = userInfo; int richId = [[self.userInfo objectForKey:@"richId"] intValue]; NSString* richType = [self.userInfo objectForKey:@"richType"]; // Retrieve image data if ([richType isEqualToString:@"img"]) { [self retrieveRichImageWithId:richId completion:^(NSError* error) { if (!error){ // Send local notification UILocalNotification* localNotification = [[UILocalNotification alloc] init]; // "5" is arbitrary here to give you enough time to quit out of the app and receive push notifications localNotification.fireDate = [NSDate dateWithTimeIntervalSinceNow:5]; localNotification.userInfo = self.userInfo; localNotification.alertBody = [self.userInfo objectForKey:@"richMessage"]; localNotification.timeZone = [NSTimeZone defaultTimeZone]; // iOS8 categories if (self.iOS8) { localNotification.category = @"richPush"; } [[UIApplication sharedApplication] scheduleLocalNotification:localNotification]; handler(UIBackgroundFetchResultNewData); } else{ handler(UIBackgroundFetchResultFailed); } }]; } // Add "else if" here to handle more types of rich content such as url, sound files, etc. }Controle la notificación local anterior abriendo el controlador de la vista de imagen en
AppDelegate.mcon los siguientes métodos:// Helper: redirect users to image view controller - (void)redirectToImageViewWithImage: (UIImage *)img { UINavigationController *navigationController = (UINavigationController*) self.window.rootViewController; UIStoryboard *mainStoryboard = [UIStoryboard storyboardWithName:@"Main" bundle: nil]; imageViewController *imgViewController = [mainStoryboard instantiateViewControllerWithIdentifier: @"imageViewController"]; // Pass data/image to image view controller imgViewController.imagePayload = img; // Redirect [navigationController pushViewController:imgViewController animated:YES]; } // Handle local notification sent above in didReceiveRemoteNotification - (void)application:(UIApplication *)application didReceiveLocalNotification:(UILocalNotification *)notification { if (application.applicationState == UIApplicationStateActive) { // Show in-app alert with an extra "more" button UIAlertView *alert = [[UIAlertView alloc] initWithTitle:@"Notification" message:notification.alertBody delegate:self cancelButtonTitle:@"OK" otherButtonTitles:@"More", nil]; [alert show]; } // App becomes active from user's tap on notification else { [self redirectToImageViewWithImage:self.imagePayload]; } } // Handle buttons in in-app alerts and redirect with data/image - (void)alertView:(UIAlertView *)alertView clickedButtonAtIndex:(NSInteger)buttonIndex { // Handle "more" button if (buttonIndex == 1) { [self redirectToImageViewWithImage:self.imagePayload]; } // Add "else if" here to handle more buttons } // Handle notification setting actions in iOS8 - (void)application:(UIApplication *)application handleActionWithIdentifier:(NSString *)identifier forLocalNotification:(UILocalNotification *)notification completionHandler:(void (^)())completionHandler { // Handle richPush related buttons if ([identifier isEqualToString:@"richPushMore"]) { [self redirectToImageViewWithImage:self.imagePayload]; } completionHandler(); }
Ejecución de la aplicación
- En XCode, ejecute la aplicación en un dispositivo iOS físico (las notificaciones de inserción no funcionarán en el simulador).
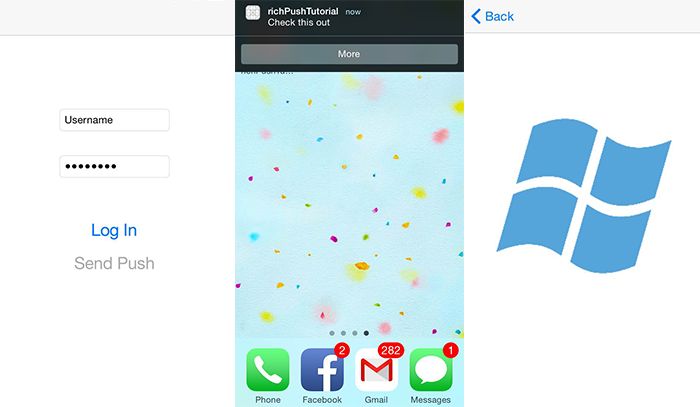
- En la interfaz de usuario de aplicación de iOS, escriba un nombre de usuario y una contraseña del mismo valor para la autenticación y haga clic en Iniciar sesión.
- Haga clic en Enviar inserción y deberá ver una alerta en la aplicación. Si hace clic en Más, verá la imagen que eligió para incluirla en el back-end de la aplicación.
- También puede hacer clic en Enviar inserción y presionar inmediatamente el botón de inicio del dispositivo. En unos momentos recibirá una notificación de inserción. Si pulsa en ella o hace clic en Más, verá la aplicación y el contenido de imagen enriquecida.