Tutorial: Migrate JBoss EAP Application Server to Azure Virtual Machines with high availability and disaster recovery
This tutorial shows you a straightforward and effective way to implement high availability and disaster recovery (HA/DR) for Java using JBoss EAP on Azure Virtual Machines (VMs). The solution illustrates how to achieve a low Recovery Time Objective (RTO) and Recovery Point Objective (RPO) using a simple database-driven Jakarta EE application running on the JBoss EAP application server. HA/DR is a complex topic, with many possible solutions. The best solution depends on your unique requirements. For other ways to implement HA/DR, see the resources at the end of this article.
In this tutorial, you learn how to:
- Set up the JBoss EAP cluster on Azure VMs.
- Use Azure optimized best practices to achieve high availability and disaster recovery.
- Set up a Microsoft Azure SQL Database failover group in paired regions.
- Set up disaster recovery for the cluster using Azure Site Recovery.
- Set up an Azure Traffic Manager.
- Test failover from primary to secondary.
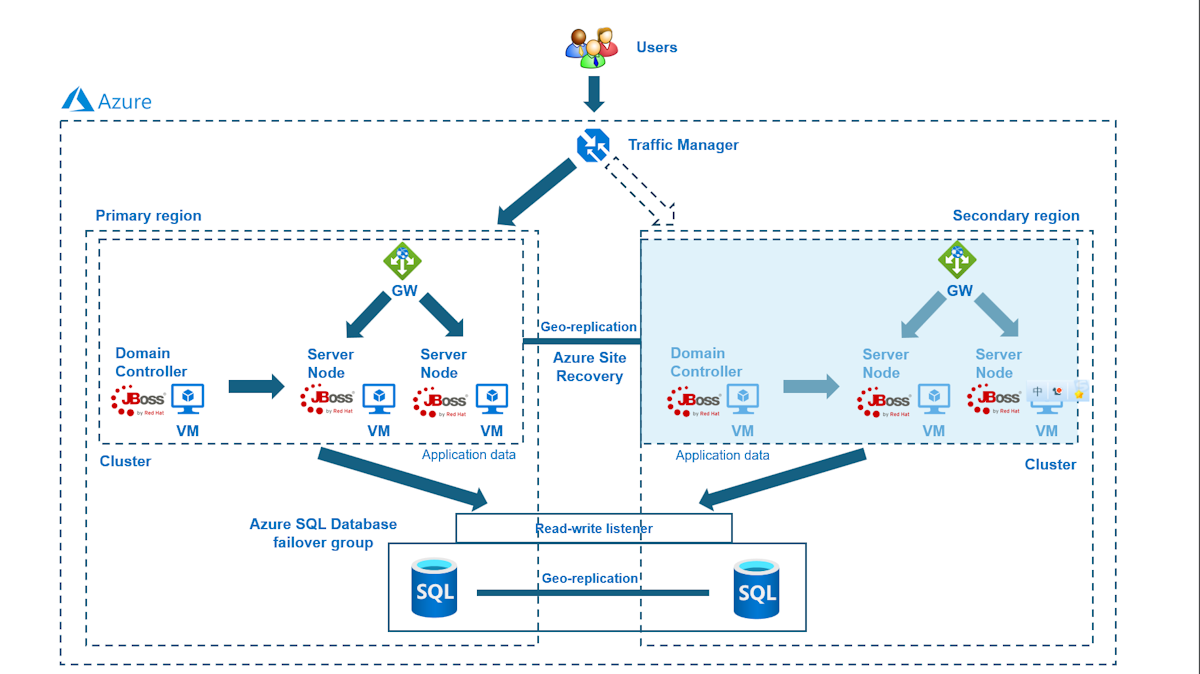
The following diagram illustrates the architecture that you build:
Azure Traffic Manager checks the health of your regions and routes the traffic accordingly to the application tier. The primary region has a full deployment of the JBoss EAP cluster. After the primary region is protected by Azure Site Recovery, you can restore the secondary region during the failover. As a result, the primary region is actively servicing network requests from the users, while the secondary region is passive and activated to receive traffic only when the primary region experiences a service disruption.
Azure Traffic Manager detects the health of the app deployed in the JBoss EAP cluster to implement the conditional routing. The geo-failover RTO of the application tier depends on the time for shutting down the primary cluster, restoring the secondary cluster, starting VMs, and running the secondary JBoss EAP cluster. The RPO depends on the replication policy of Azure Site Recovery and Azure SQL Database because the cluster data is stored and replicated in the local storage of the VMs and application data is persisted and replicated in the Azure SQL Database failover group.
The preceding diagram shows Primary region and Secondary region as the two regions comprising the HA/DR architecture. These regions need to be Azure paired regions. For more information on paired regions, see Azure cross-region replication. The article uses East US and West US as the two regions, but they can be any paired regions that make sense for your scenario. For the list of region pairings, see the Azure paired regions section of Azure cross-region replication.
The database tier consists of an Azure SQL Database failover group with a primary server and a secondary server. The read/write listener endpoint always points to the primary server and is connected to the JBoss EAP cluster in each region. A geo-failover switches all secondary databases in the group to the primary role. For geo-failover RPO and RTO of Azure SQL Database, see Overview of Business Continuity.
This tutorial was written with Azure Site Recovery and Azure SQL Database service because the tutorial relies on the HA features of these services. Other database choices are possible, but the HA features of whatever database you chose must be considered.
Prerequisites
- If you don't have an Azure subscription, create a free account before you begin.
- Make sure you have the
Contributorrole in the subscription. You can verify the assignment by following the steps in List Azure role assignments using the Azure portal. - Prepare a local machine with Windows, GNU/Linux, or macOS installed.
- Install and set up Git.
- Install a Java SE implementation, version 17 or later - for example, the Microsoft build of OpenJDK.
- Install Maven, version 3.9.3 or later.
Set up an Azure SQL Database failover group in paired regions
In this section, you create an Azure SQL Database failover group in paired regions for use with your JBoss EAP clusters and app.
First, create the primary Azure SQL Database by following the Azure portal steps in Quickstart: Create a single database - Azure SQL Database. Follow the steps up to, but not including Clean up resources. Use the following directions as you go through the article, then return to this article after you create and configure the Azure SQL Database.
When you reach the section Create a single database, use the following steps:
In step 4 for creating new resource group, write down the Resource group name value - for example,
sqlserver-rg-gzh032124.In step 5 for database name, write down the Database name value - for example,
mySampleDatabase.In step 6 for creating the server, use the following steps:
- Fill in a unique server name - for example,
sqlserverprimary-gzh032124. - For Location, select (US) East US.
- For Authentication method, select Use SQL authentication.
- Write down the Server admin login value - for example,
azureuser. - Write down the Password value.
- Fill in a unique server name - for example,
In step 8, for Workload environment, select Development. Look at the description and consider other options for your workload.
In step 10, for Compute tier, select Provisioned.
In step 11, for Backup storage redundancy, select Locally-redundant backup storage. Consider other options for your backups. For more information, see the Backup storage redundancy section of Automated backups in Azure SQL Database.
In step 14, in the Firewall rules configuration, for Allow Azure services and resources to access this server, select Yes.
When you reach the section Query the database, use the following steps instead of the steps in the other article:
In step 3, enter your SQL authentication server admin sign-in information to sign in.
Note
If sign-in fails with an error message similar to Client with IP address 'xx.xx.xx.xx' is not allowed to access the server, select Allowlist IP xx.xx.xx.xx on server <your-sqlserver-name> at the end of the error message. Wait until the server firewall rules complete updating, then select OK again.
After you run the sample query in step 5, clear the editor and enter the following query, then select Run again:
  CREATE TABLE ispn_entry_sessions_javaee_cafe_war (
    id VARCHAR(255) PRIMARY KEY,  -- ID Column to hold cache entry ids
    data VARBINARY(MAX),          -- Data Column to hold cache entry data
    timestamp BIGINT,             -- Timestamp Column to hold cache entry timestamps
    segment INT
    );
After a successful run, you should see the message Query succeeded: Affected rows: 0.
The database table
ispn_entry_sessions_javaee_cafe_waris used for storing session data for your JBoss EAP cluster.
Then, create an Azure SQL Database failover group by following the Azure portal steps in Configure a failover group for Azure SQL Database. You just need the following sections: Create failover group and Test planned failover. Use the following steps as you go through the article, then return to this article after you create and configure the Azure SQL Database failover group:
When you reach the section Create failover group, use the following steps:
In step 5 for creating the failover group, enter and write down the unique failover group name - for example,
failovergroup-gzh032124.In step 5 for configuring the server, select the option to create a new secondary server and then use the following steps:
- Enter a unique server name - for example,
sqlserversecondary-gzh032124. - Enter the same server admin and password as your primary server.
- For Location, select (US) West US 2.
- Make sure Allow Azure services to access server is selected.
- Enter a unique server name - for example,
In step 5 for configuring the Databases within the group, select the database you created in the primary server - for example,
mySampleDatabase.
After you complete all the steps in the section Test planned failover, keep the failover group page open and use it for the failover test of the JBoss EAP clusters later.
Note
This article guides you to create an Azure SQL Database single database with SQL authentication for simplicity because the HA/DR setup this article focuses on is already very complex. A more secure practice is to use Microsoft Entra authentication for Azure SQL for authenticating the database server connection.
Set up the primary JBoss EAP cluster on Azure VMs
In this section, you create the primary JBoss EAP clusters on Azure VMs using the JBoss EAP Cluster on VMs offer. The secondary cluster is restored from the primary cluster during the failover using Azure Site Recovery later.
Deploy the primary JBoss EAP cluster
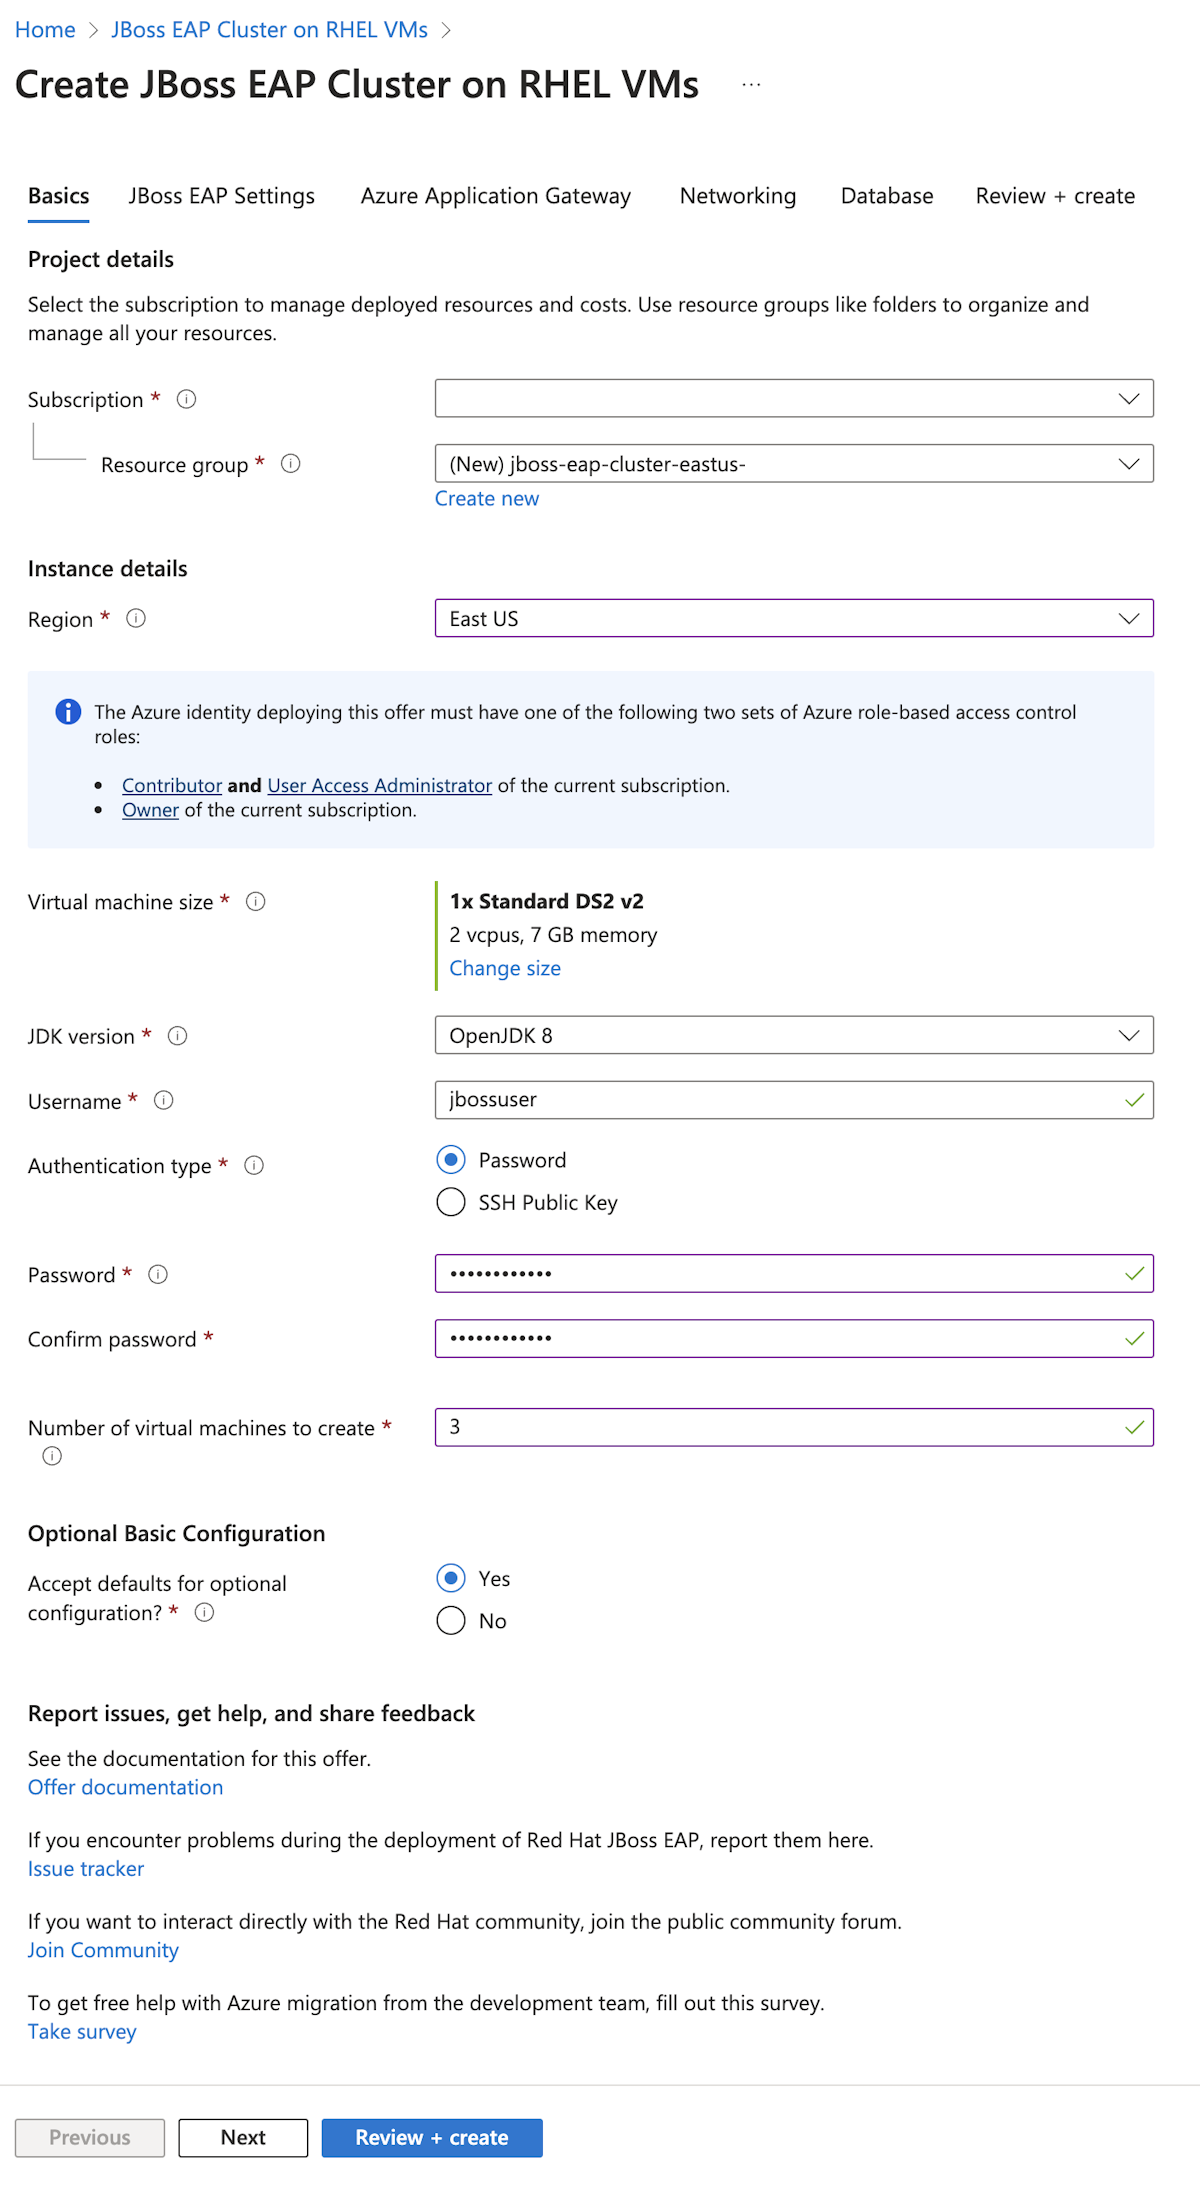
First, open the JBoss EAP Cluster on VMs offer in your browser and select Create. You should see the Basics pane of the offer.
Use the following steps to fill out the Basics pane:
- Ensure that the value shown for Subscription is the same one that has the roles listed in the prerequisites section.
- You must deploy the offer in an empty resource group. In the Resource group field, select Create new and fill in a unique value for the resource group - for example,
jboss-eap-cluster-eastus-gzh032124. - Under Instance details, for Region, select East US.
- Provide a password for Password and use the same value for Confirm password.
- For Number of virtual machines to create, input 3.
- Leave other fields at their default values.
- Select Next to go to the JBoss EAP Settings pane.
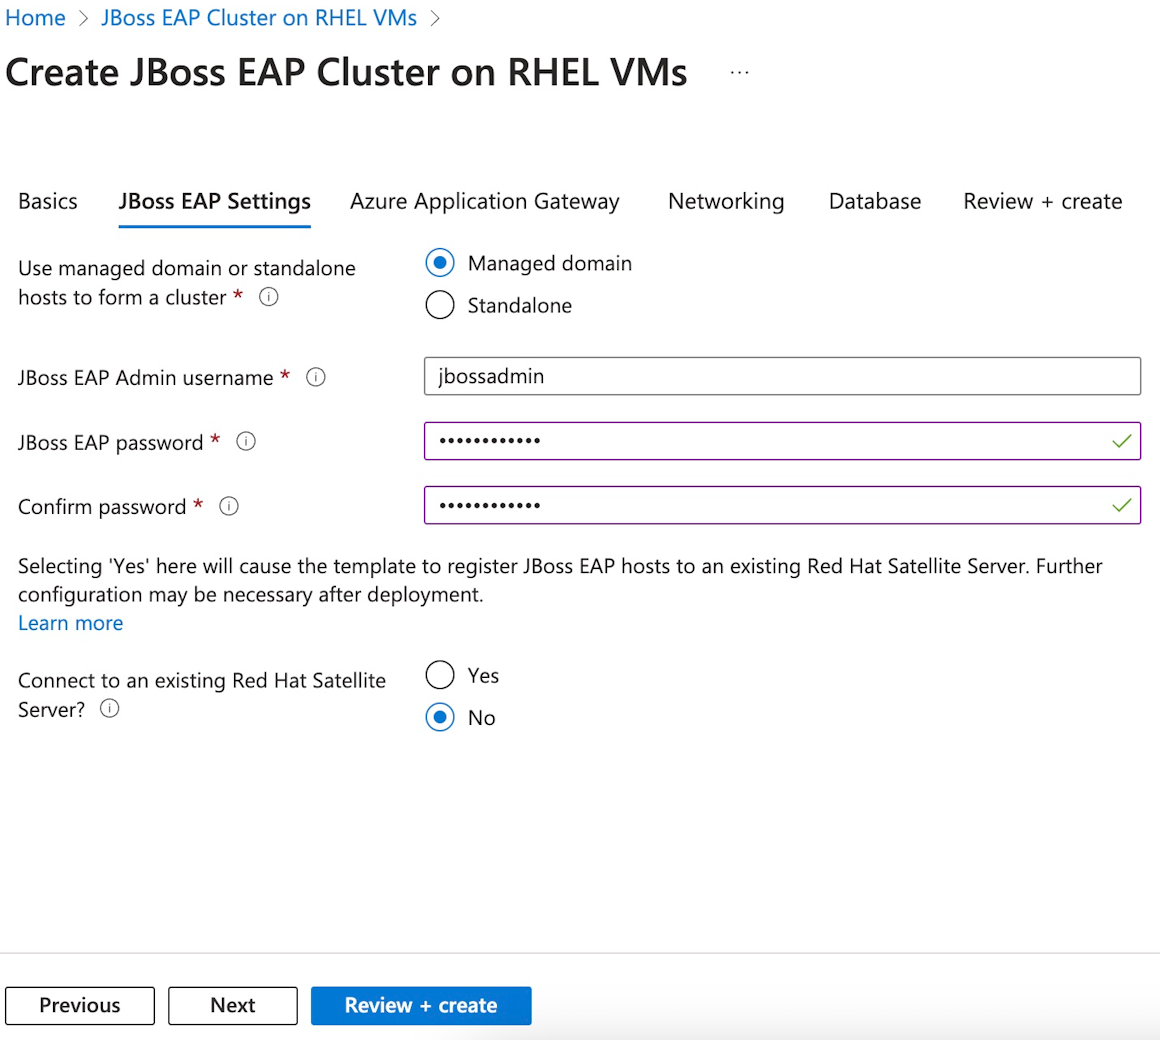
Use the following steps to fill out the JBoss EAP Settings pane:
- Provide a JBoss EAP password for JBoss EAP password. Use the same value for Confirm password. Write down the value for later use.
- Leave other fields at their default values.
- Select Next to go to the Azure Application Gateway pane.
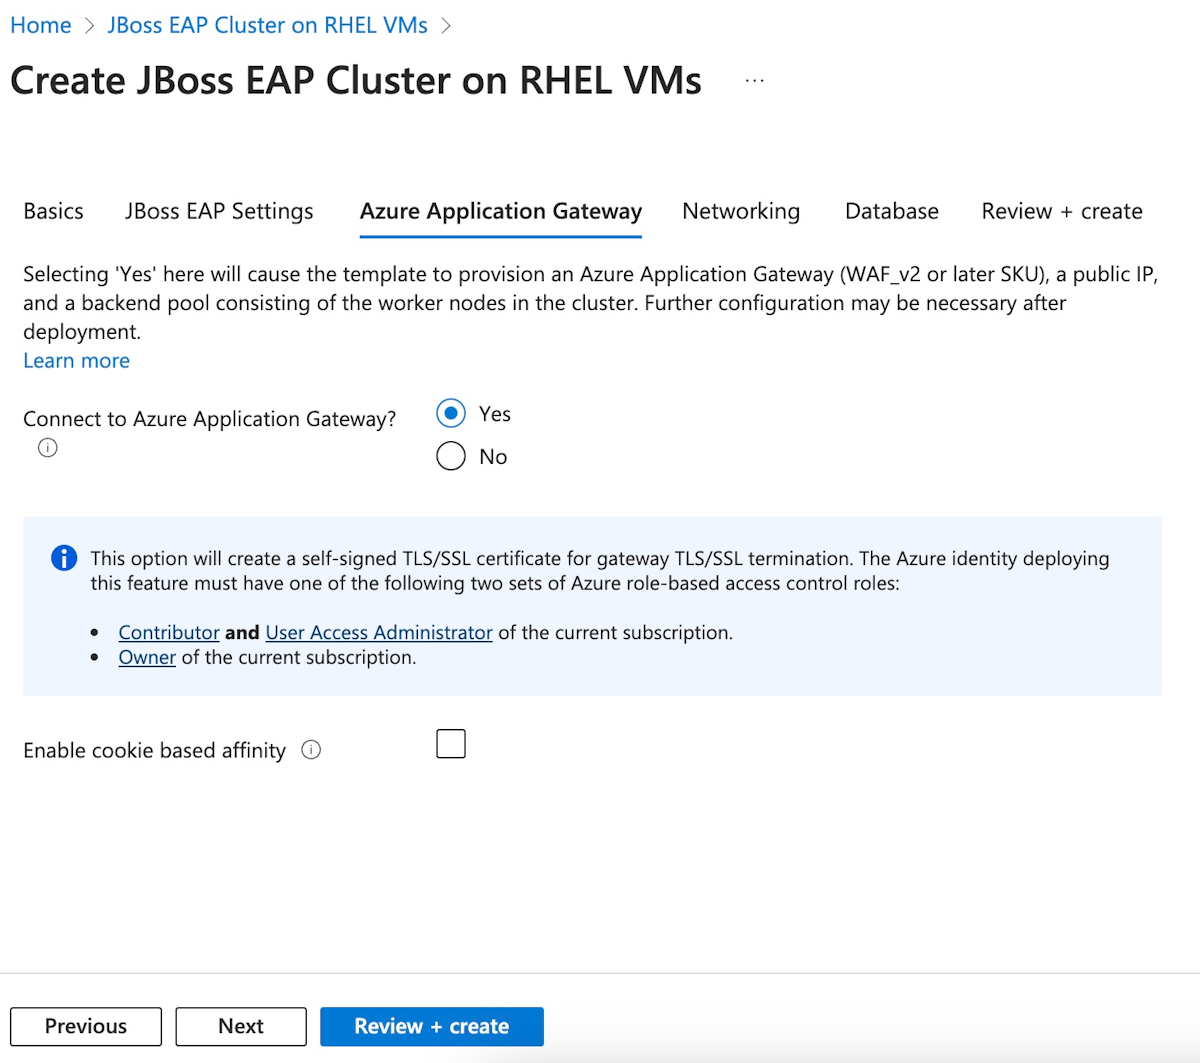
Use the following steps to fill out the Azure Application Gateway pane:
- For Connect to Azure Application Gateway?, select Yes.
- Leave other fields at their default values.
- Select Next to go to the Networking pane.
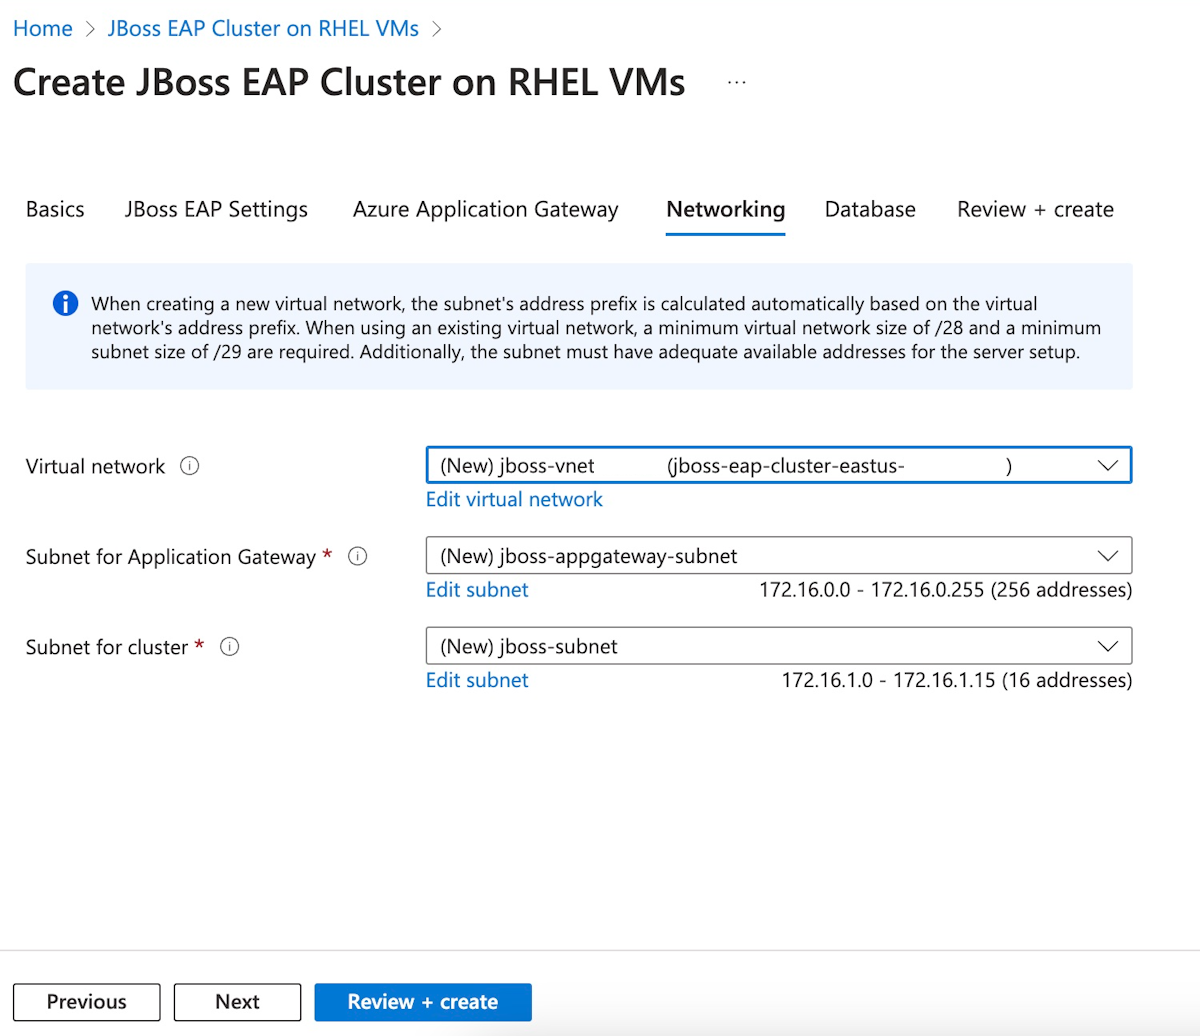
You should see all fields prepopulated with the default values in the Networking pane. Select Next to go to the Database pane.
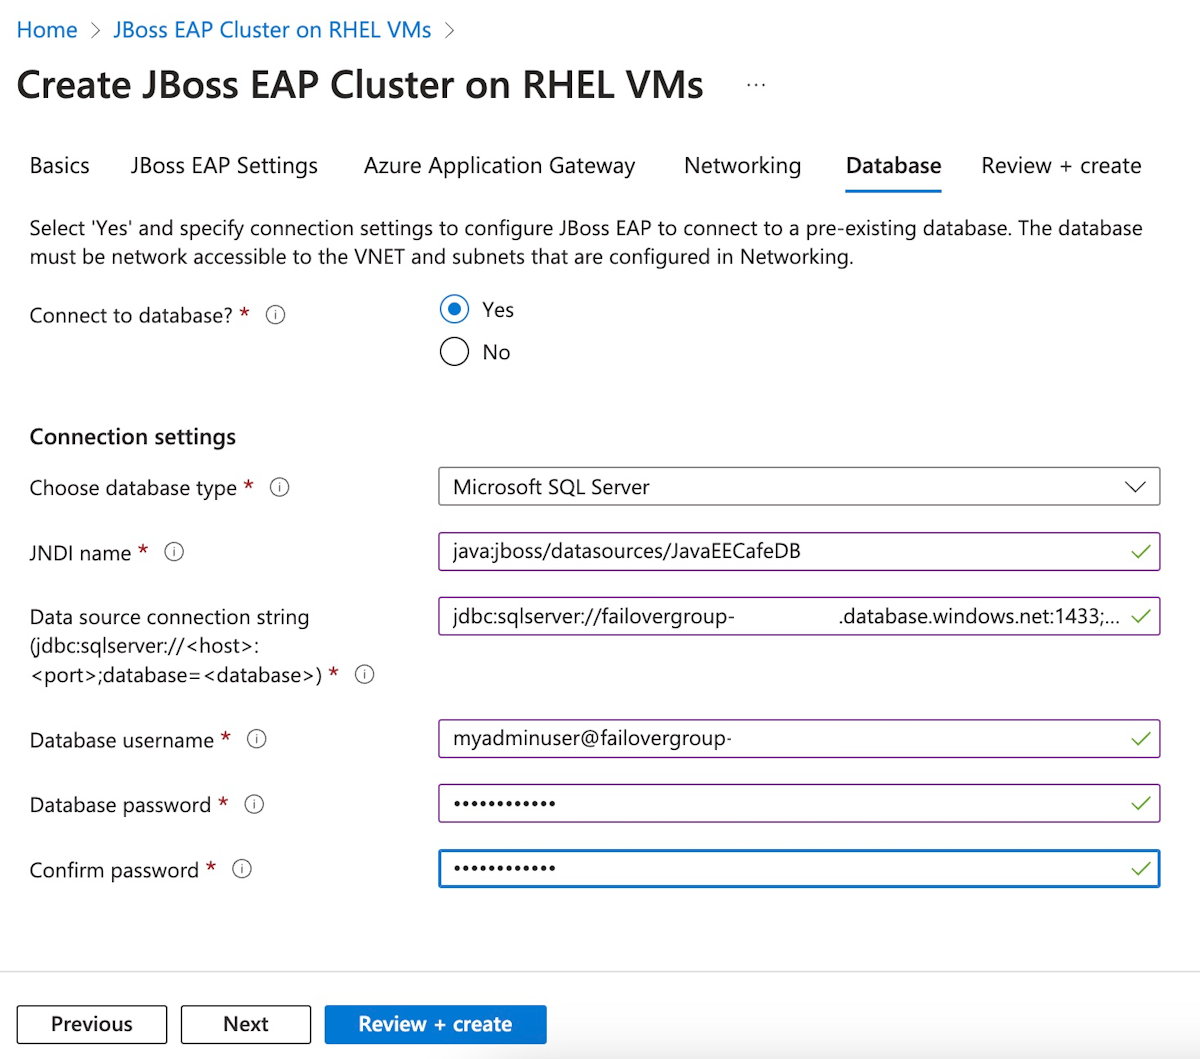
Use the following steps to fill out the Database pane:
- For Connect to database?, select Yes.
- For Choose database type, select Microsoft SQL Server .
- For JNDI Name, enter java:jboss/datasources/JavaEECafeDB.
- For Data source connection string (jdbc:sqlserver://<host>:<port>;database=<database>), replace the placeholders with the values you wrote down from the preceding section for the failover group of Azure SQL Database - for example,
jdbc:sqlserver://failovergroup-gzh032124.database.windows.net:1433;database=mySampleDatabase. - For Database username, enter the server admin sign-in name and the failover group name you wrote down from the preceding section - for example,
azureuser@failovergroup-gzh032124. - Enter the server admin sign-in password that you wrote down before for Database Password. Enter the same value for Confirm password.
- Select Review + create.
- Wait until Running final validation... successfully completes, then select Create.
After a while, you should see the Deployment page where Deployment is in progress is displayed.
Note
If you see any problems during Running final validation..., fix them and try again.
Depending on network conditions and other activity in your selected region, the deployment can take up to 35 minutes to complete. After that, you should see the text Your deployment is complete displayed on the deployment page.
Verify the functionality of the deployment
Use the following steps to verify the functionality of the deployment for a JBoss EAP cluster on Azure VMs from the Red Hat JBoss Enterprise Application Platform management console:
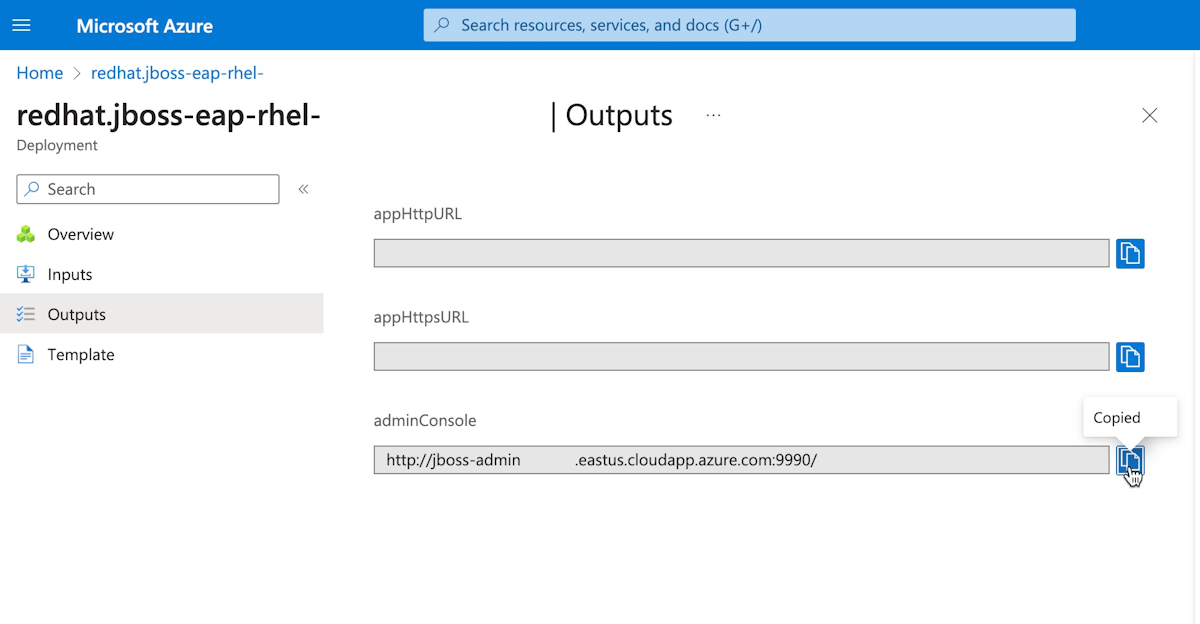
On the page Your deployment is complete, select Outputs.
Select the copy icon next to adminConsole.
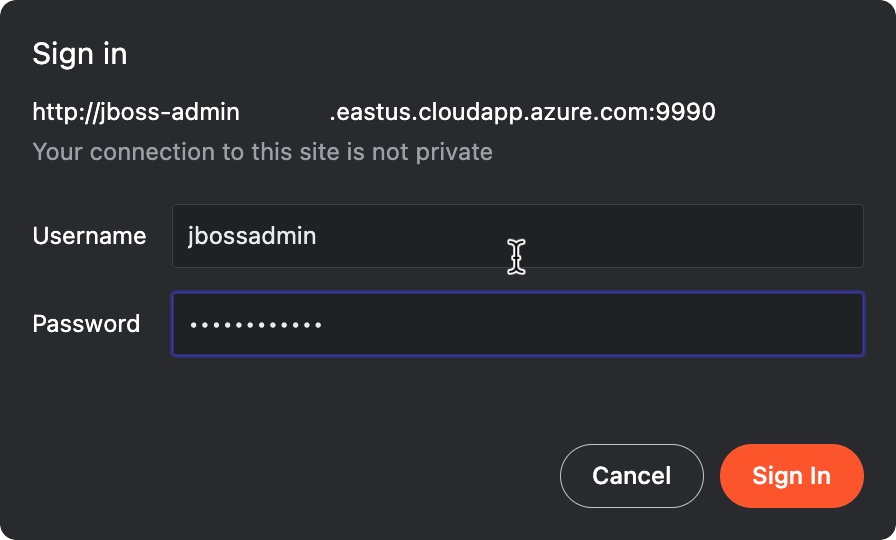
Paste the URL into an internet-connected web browser and press Enter. You should see the familiar Red Hat JBoss Enterprise Application Platform management console sign-in screen, as shown in the following screenshot.
Fill in jbossadmin for JBoss EAP Admin username Provide the value for JBoss EAP password that you specified before for Password, then select Sign in.
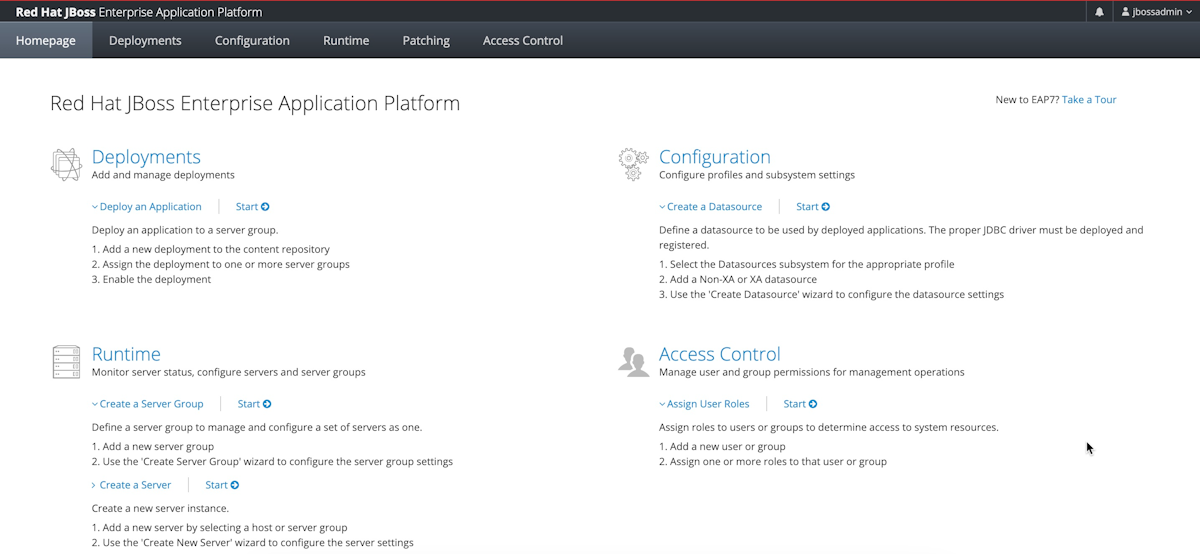
You should see the familiar Red Hat JBoss Enterprise Application Platform management console welcome page as shown in the following screenshot.
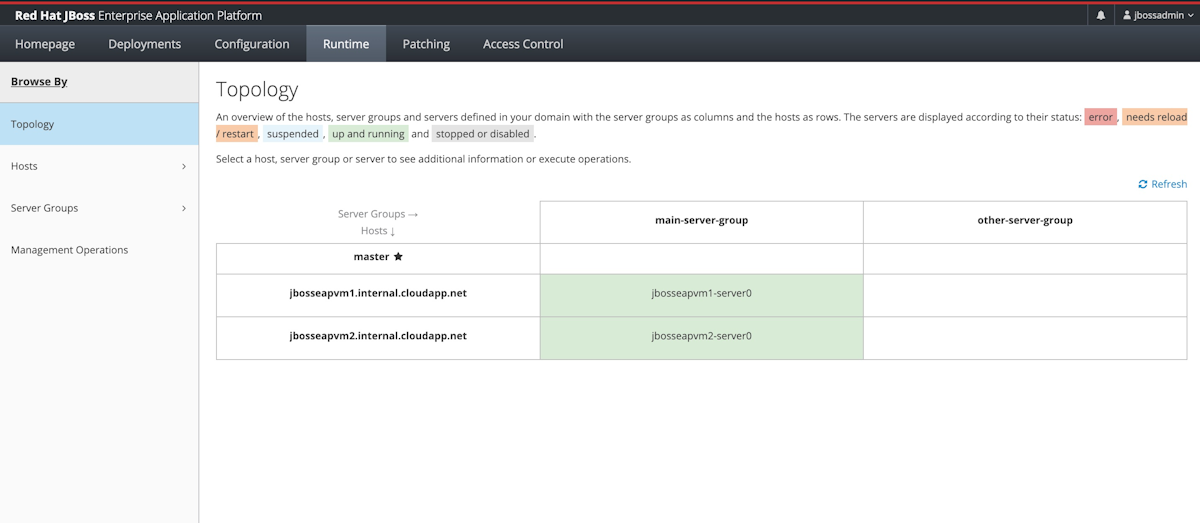
Select the Runtime tab. In the navigation pane, select Topology. You should see that the cluster contains one domain controller master and two worker nodes, as shown in the following screenshot:
Leave the management console open. You use it to deploy a sample app to the JBoss EAP cluster in the next section.
Configure the cluster
Use the following steps to configure database distributed sessions for all application servers:
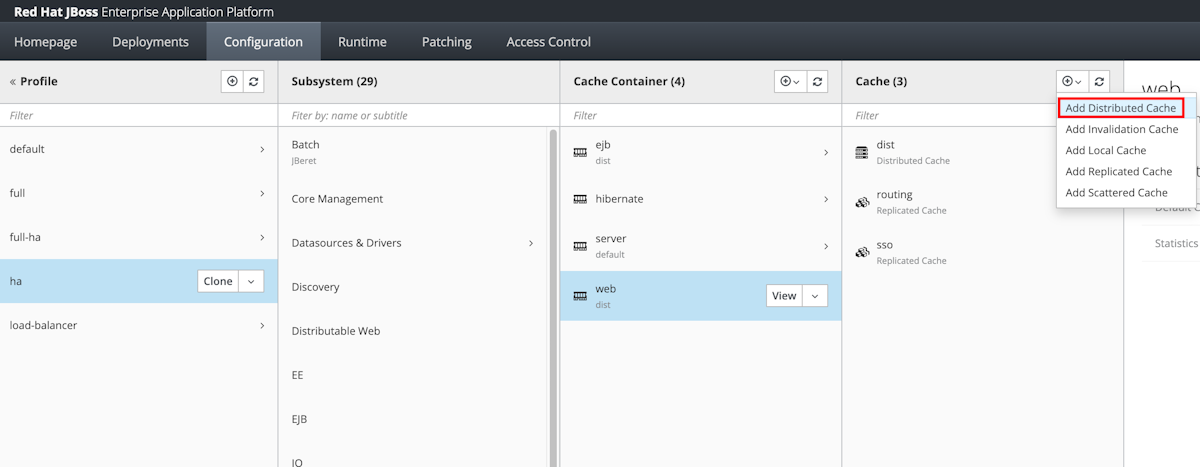
Select Configuration in the navigation panel. Then, select Profiles > ha > Infinspan > Web.
In the Cache column, select Add Distributed Cache.
For Name, enter azure-session and then select Add.
You should see the message Distributed Cache azure-session successfully added. If you don't see this message, check the notification center. You must see this message before proceeding.
After the cache is added, select azure-session > View.
Select Store.
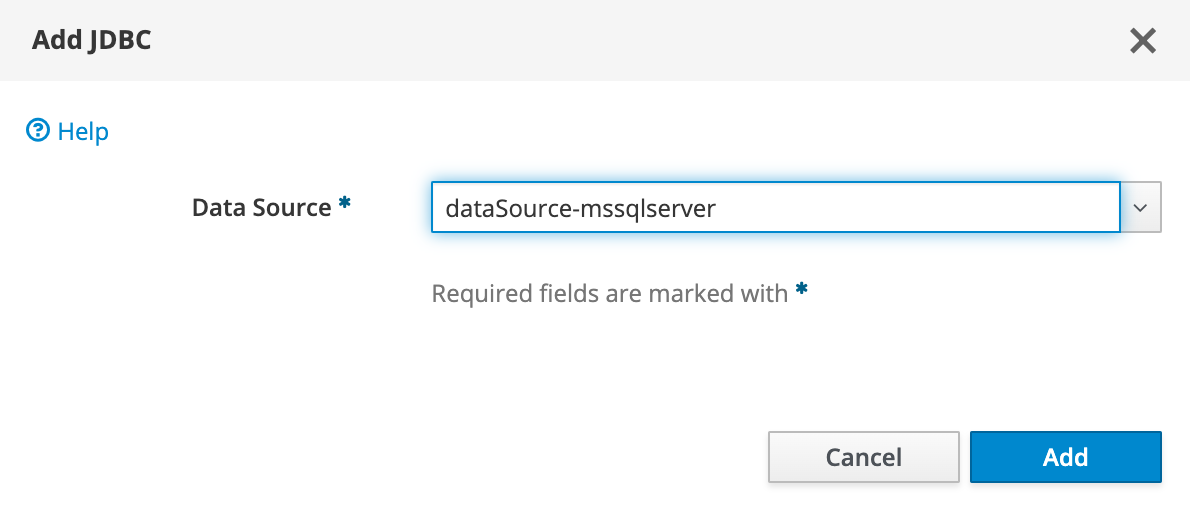
Change the drop-down menu to show JDBC and then select Add.
For Data source, select dataSource-mssqlserver and then select Add.
You should see the message JDBC successfully added. If you don't see this message, check the notification center. You must see this message before proceeding.
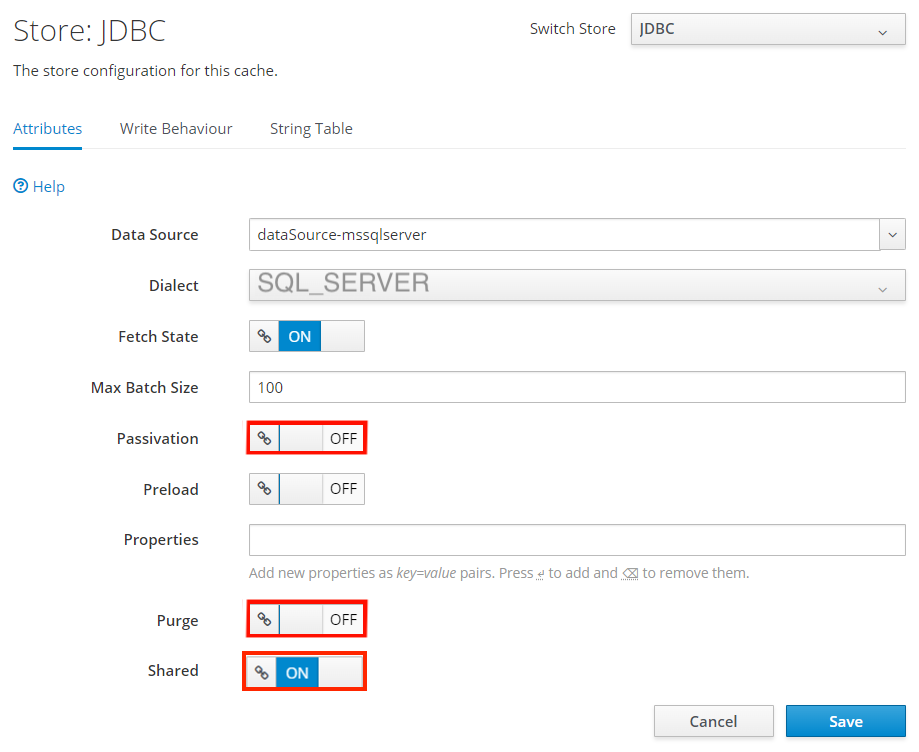
On the Store: JDBC page, select Edit. Set the following property values:
- Set Dialect to SQL_SERVER.
- Set Passivation to OFF.
- Set Purge to OFF.
- Set Shared to ON.
Select Save.
You should see the message JDBC successfully modified. If you don't see this message, check the notification center. You must see this message before proceeding.
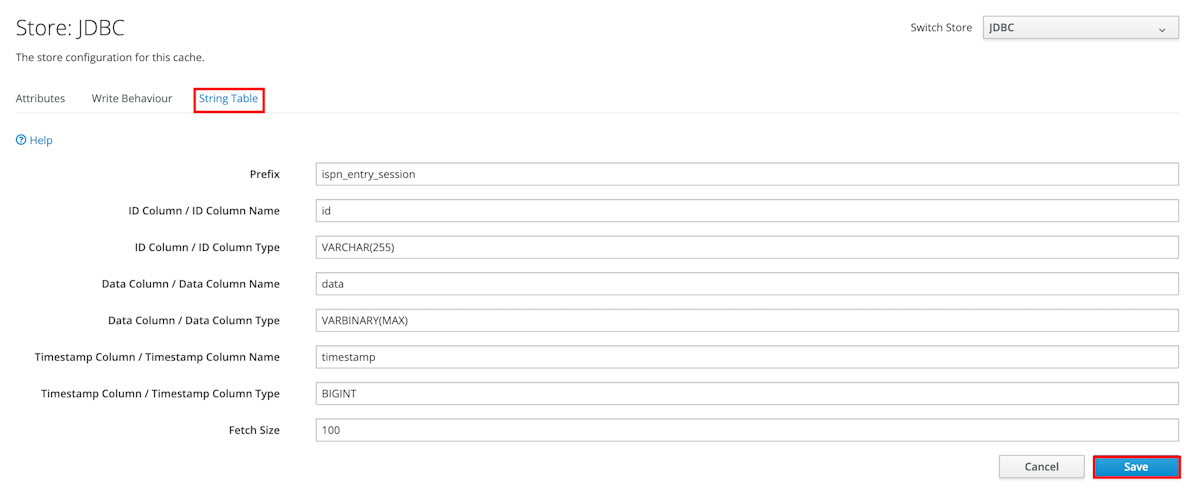
Edit the string table by selecting String Table > Edit. Fill in the following values and then select Save:
- Set Prefix to ispn_entry_sessions.
- Set ID Column / ID Column Name to id.
- Set ID Column / ID Column Type to VARCHAR(255).
- Set Data Column / Data Column Name to data.
- Set Data Column / Data Column Type to VARBINARY(MAX).
- Set Timestamp Column / Timestamp Column Name to timestamp.
- Set Timestamp Column / Timestamp Column Type to BIGINT.
Any typos here cause the whole system to fail. Inspect the filled-in values carefully before proceeding.
Select Save.
You should see the message String Table successfully modified. If you don't see this message, check the notification center. You must see this message before proceeding.
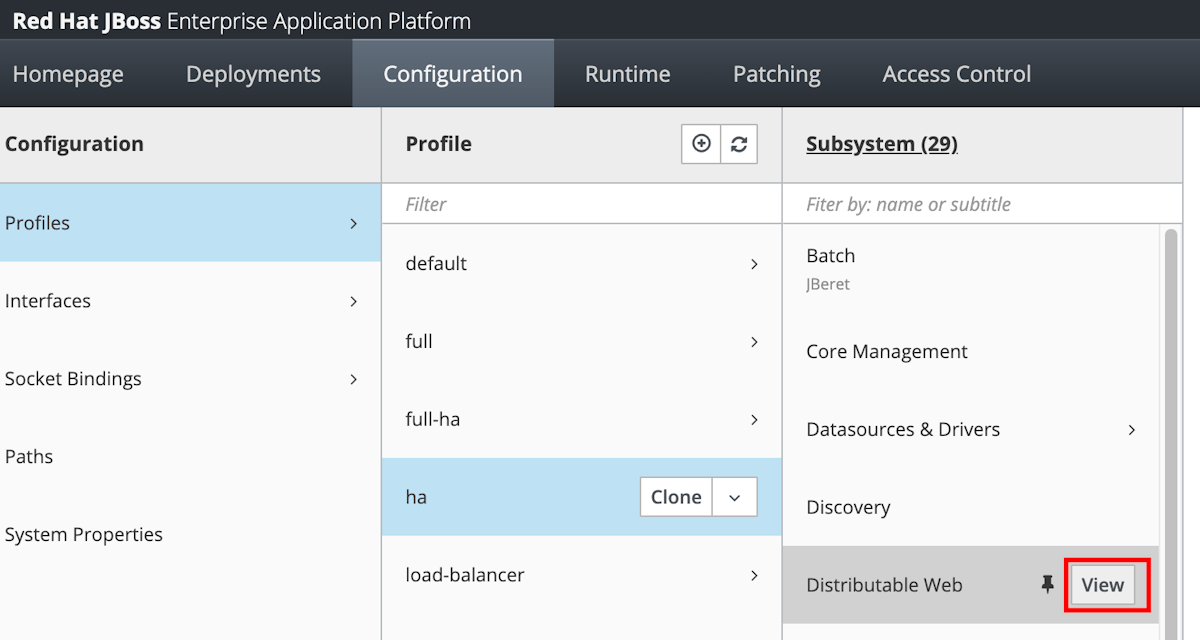
Select Configuration in the top navigation panel. Then, select Profiles > ha > Distributable Web > View.
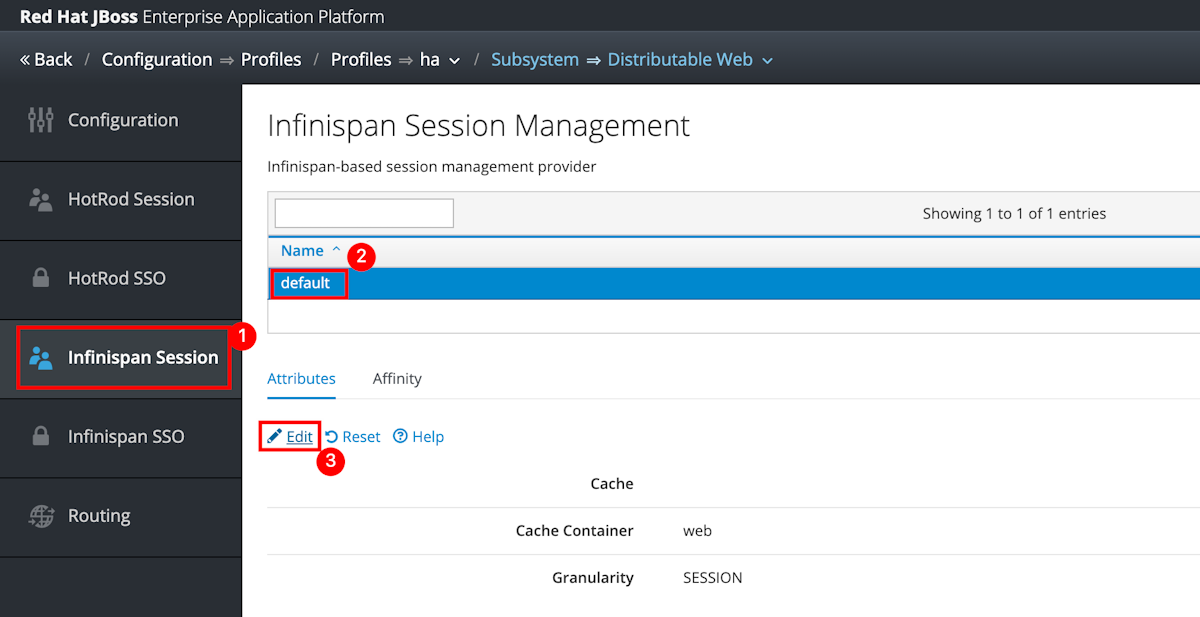
Select Infinspan SSO > default > Edit.
Set the value of Cache to azure-session and then select Save.
You should see the message Infinispan Single Sign On Management default successfully modified. If you don't see this message, check the notification center. You must see this message before proceeding.
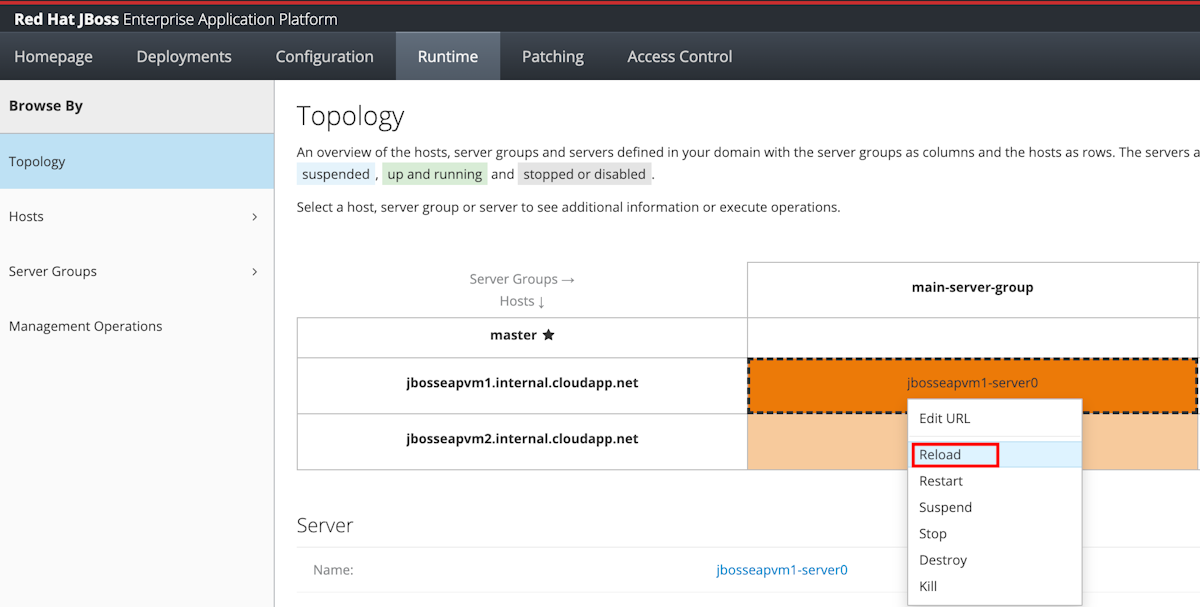
Use the topology to reload or restart affected servers.
Select Runtime in the navigation panel and then select Topology.
For each row in the main-server-group column, select the server and then select Reload.
The reloaded cells should now show the color green.
Deploy the app to the JBoss EAP cluster
Use the following steps to deploy the JavaEE Cafe sample application to the Red Hat JBoss EAP cluster:
Use the following steps to build the Java EE Cafe sample. These steps assume that you have a local environment with Git and Maven installed.
Use the following command to clone the source code from GitHub and check out the tag corresponding to this version of the article:
git clone https://github.com/Azure/rhel-jboss-templates.git --branch 20240904 --single-branchIf you see an error message with the text
You are in 'detached HEAD' state, you can safely ignore it.Use the following command to build the source code:
mvn clean install --file rhel-jboss-templates/eap-coffee-app/pom.xmlThis command creates the file rhel-jboss-templates/eap-coffee-app/target/javaee-cafe.war. You upload this file in the next step.
Use the following steps in the Red Hat JBoss Enterprise Application Platform management console to upload the javaee-cafe.war to the Content Repository:
From the Deployments tab of the Red Hat JBoss EAP management console, select Content Repository in the navigation panel.
Select Add and then select Upload Content.
Use the browser file chooser to select the javaee-cafe.war file.
Select Next.
Accept the defaults on the next screen and then select Finish.
Select View content.
Use the following steps to deploy an application to
main-server-group:
You're now finished deploying the JavaEE application. Use the following steps to access the application and validate all the settings:
In the search box at the top of the Azure portal, enter Resource groups and select Resource groups in the search results.
Select the name of resource group - for example,
jboss-eap-cluster-eastus-gzh032124.Select the Application Gateway resource in the resource group.
Copy the Frontend public IP address from the Overview pane.
Construct a URL with the IP address and path - for example,
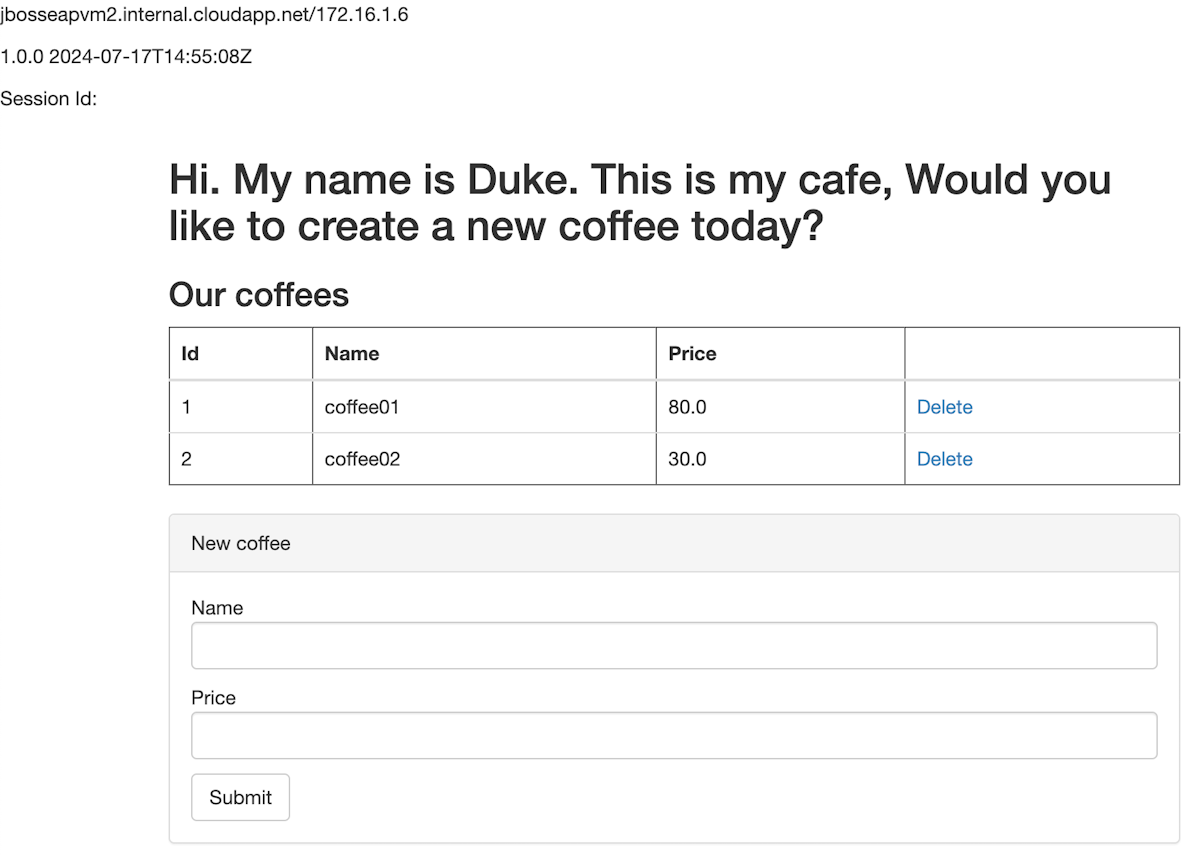
http://40.88.26.22/javaee-cafe.Paste the URL into a web browser navigation bar and then press Enter. You should see the JavaEE Cafe application home page.
Create two coffees with different names and prices. You should see a page similar in the following screenshot:
Set up the secondary JBoss EAP cluster on Azure VMs
Deploy the secondary JBoss EAP cluster
Follow the steps in Deploy the primary JBoss EAP cluster to deploy the secondary JBoss EAP cluster in the paired region. This example uses West US 2. When you use the offer, the secondary JBoss EAP cluster is configured so that you can use Azure Site Recovery to restore the topology.
Open the JBoss EAP Cluster on VMs offer in your browser and select Create. You should see the Basics pane of the offer.
Use the following steps to fill out the Basics pane:
In the Resource group field, select Create new and fill in a unique value for the resource group - for example,
jboss-eap-cluster-westus-gzh032124.Under Instance details, for Region, select West US 2.
Leave others the same as the primary cluster.
For the JBoss EAP Settings pane, keep it same as the primary cluster.
For the Azure Application Gateway pane, keep it same as the primary cluster.
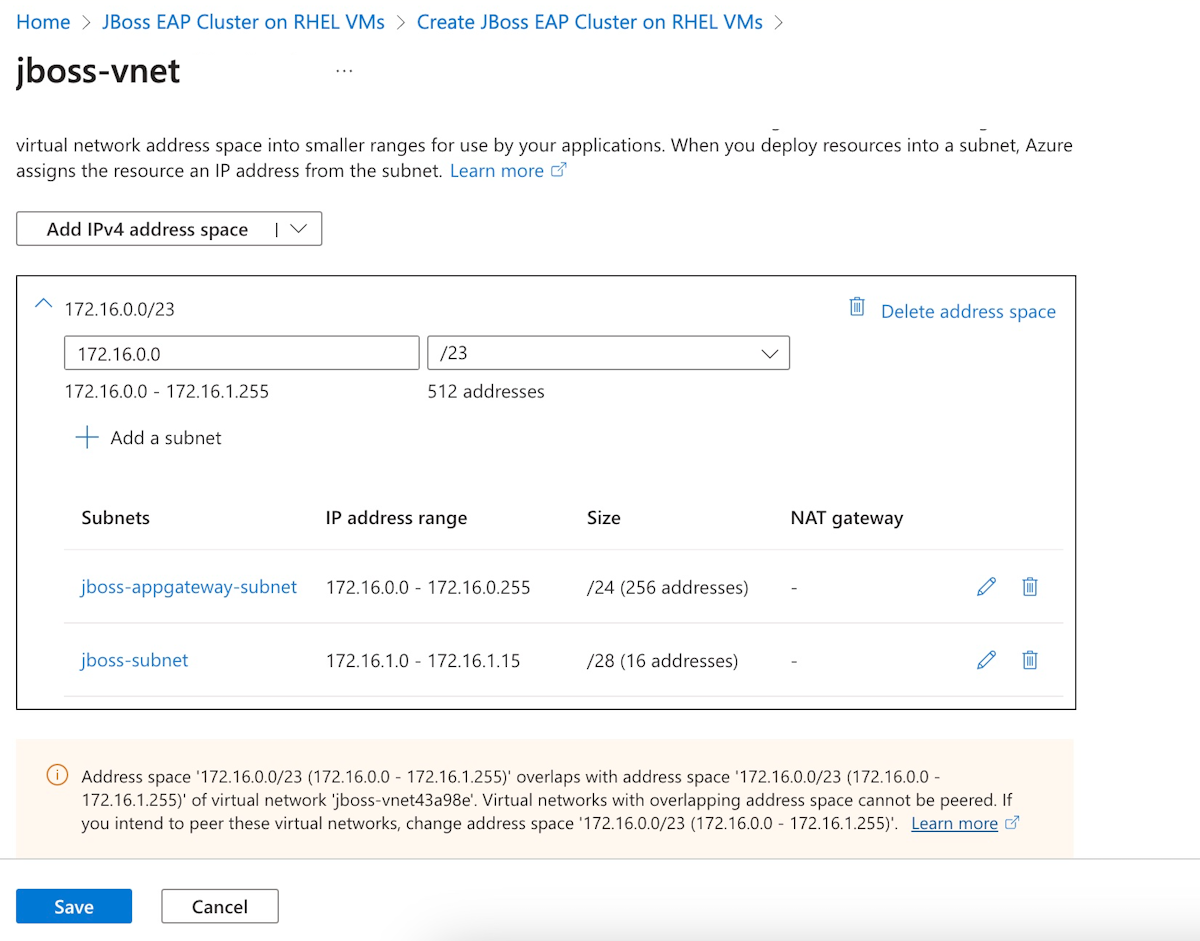
For the Networking pane, open the Virtual network setting and input the address space, which is the same as value for the primary cluster.
Use the following steps for the Database pane:
- Keep it same as the primary cluster.
- Select Review + create.
- Wait until Running final validation... successfully completes, then select Create.
After a while, you should see the Deployment page where Deployment is in progress is displayed.
Clean up unused resources in the secondary region
Use the following steps to clean up resources in the resource group named jboss-eap-cluster-westus-gzh032124 that aren't used and are going to be replicated by Azure Site Recovery service in the primary region later. This approach might seem wasteful, but it ensures that the secondary resource group has the identical configuration to the primary. A production grade solution would use more infrastructure-as-code technologies to ensure identical configuration, but that's beyond the scope of this article.
In the search box at the top of the Azure portal, enter Resource groups and then select Resource groups in the search results.
Select the name of resource group for your newly created secondary region.
Next to the text area labeled Filter for any field..., select the X to remove all filters.
Select Add filter. Set Filter to Type. Set Operator to Equals.
Select the dropdown menu next to the field Value.
Toggle the Select all checkbox until no values are selected.
Ensure that all of the following types are selected:
- Virtual machine
- Disk
- Private endpoint
- Network interface
- Storage account
Select the dropdown menu next to the field Value to close the dropdown. You must see 5 resource types as the value of Value.
Select Apply.
Select the checkbox next to the label Name at the top of the filtered list.
Select Delete.
Enter delete to confirm deletion then select Delete. Monitor the process in notifications until it completes.
Set up disaster recovery for the cluster using Azure Site Recovery
In this section, you set up disaster recovery for Azure VMs in the primary cluster using Azure Site Recovery, by following the steps in Tutorial: Set up disaster recovery for Azure VMs. You just need the following sections: Create a Recovery Services vault and Enable replication. Pay attention to the following steps as you go through the article, then return to this article after the primary cluster is protected:
When you reach the section Create a Recovery Services vault, use the following steps:
In step 5 for Resource group, create a new resource group with a unique name in your subscription - for example,
recovery-service-westus-gzh032124.In step 6 for Vault name, provide a vault name - for example,
recovery-service-vault-westus-gzh032124.In step 7 for Region, select West US 2.
Before selecting Review + create in step 8, select Next: Redundancy. In Redundancy pane, select Geo-redundant for Backup Storage Redundancy and Enable for Cross Region Restore.
Note
Make sure you select Geo-redundant for Backup Storage Redundancy and Enable for Cross Region Restore in Redundancy pane. Otherwise, the storage of the primary cluster can't be replicated to the secondary region.
Enable Site Recovery by following the steps in section Enable Site Recovery.
When you reach the section Enable replication, use the following steps:
Use the following steps to select the source settings:
For Region, select East US.
For Resource group, select the resource where the primary cluster is deployed - for example,
jboss-eap-cluster-eastus-gzh032124.Note
If the desired resource group is not listed, you can select West US 2 for Region first, and then switch back to East US.
Leave other fields at their default values
Select the VMs. In Virtual machines, select all VMs listed - for example, there are 3 VMs deployed in the primary cluster for this tutorial.
Use the following steps when you review the replication settings:
For Target location, select West US 2.
For Target resource group, select the resource group where the service recovery vault is deployed - for example,
jboss-eap-cluster-westus-gzh032124.If the expected resource group isn't shown, select another region, then return to West US 2.
Note down the new failover virtual network and failover subnet, which are mapped from ones in the primary region.
Leave the default values for the other fields.
Use the following steps for Manage:
For Replication policy, use the default policy 24-hour-retention-policy. You can also create a new policy for your business.
Leave the default values for the other fields.
Use the following steps for Review:
After selecting Enable replication, notice the message Creating Azure resources. Don't close this blade. displayed at the bottom of the page. Do nothing and wait until the pane closes automatically. You're redirected to the Site Recovery page.
Under Protected items, select Replicated items. Initially, there are no items listed because the replication is still in progress. The replication takes time to complete - about 1 hour for this tutorial. Refresh the page periodically until you see all VMs are Protected, as shown in the following screenshot:
Next, create a recovery plan to include all replicated items so they can fail over together. Use the instructions in Create a recovery plan, with the following customization:
- In step 2, enter a name for the plan - for example,
recovery-plan-gzh032124. - In step 3, select East US for Source and West US 2 for Target.
- In step 4 for Select items, select all protected items - for example, the 3 protected VMs for this tutorial.
Keep the page open to use later for testing failover.
Set up an Azure Traffic Manager
In this section, you create an Azure Traffic Manager for distributing traffic to your public facing applications across Azure regions. The primary endpoint points to the public IP address of the Application Gateway in the primary region, and the secondary endpoint points to the public IP address of the Application Gateway in the secondary region.
Create an Azure Traffic Manager profile by following the instructions in Quickstart: Create a Traffic Manager profile using the Azure portal. You just need the following sections: Create a Traffic Manager profile and Add Traffic Manager endpoints. Use the following steps as you go through these sections, then return to this article after you create and configure the Azure Traffic Manager.
When you reach the section Create a Traffic Manager profile, in step 2 Create Traffic Manager profile, use the following steps:
- Write down the unique Traffic Manager profile name for Name - for example,
tm-profile-gzh032124. - Write down the new resource group name for Resource group - for example,
myResourceGroupTM1.
- Write down the unique Traffic Manager profile name for Name - for example,
When you reach the section Add Traffic Manager endpoints, use the following steps:
After you open the Traffic Manager profile in step 2, in the Configuration page, use the following steps:
For DNS time to live (TTL), enter 10.
Under Fast endpoint failover settings, use the following values:
- For Probing internal, select 10.
- For Tolerated number of failures, enter 3.
- For Probe timeout, 5.
Select Save. Wait until it completes.
In step 4 for adding the primary endpoint
myPrimaryEndpoint, use the following steps:For Target resource type, select Public IP address.
Select the Choose public IP address dropdown and enter the name of the public IP address of the Application Gateway in the East US region. You should see one entry matched. Select it for Public IP address.
In step 6 for adding a failover secondary endpoint
myFailoverEndpoint, use the following steps:For Target resource type, select Public IP address.
Select the Choose public IP address dropdown and enter the name of the public IP address of the Application Gateway in the West US 2 region. You should see one entry matched. Select it for Public IP address.
Wait for a while. Select Refresh until the Monitor status for endpoint
myPrimaryEndpointis Online and Monitor status for endpointmyFailoverEndpointis Degraded.
Next, use the following steps to verify that the sample app deployed to the primary JBoss EAP cluster can be accessed from the Traffic Manager profile:
Select Overview of the Traffic Manager profile you created.
Check and copy the DNS name of the Traffic Manager profile. Append /javaee-cafe/ to it. For example,
http://tm-profile-gzh032124.trafficmanager.net/javaee-cafe/.Open the URL in a new tab of the browser. You should see that the coffee you created before is listed in the page.
If your UI doesn't look similar, troubleshoot and resolve the problem before you continue. Keep the console open and use it for failover test later.
Now you can set up the Traffic Manager profile. Keep the page open and so you can use it for monitoring the endpoint status change in a failover event later.
Test failover from primary to secondary
The steps in this section test failover by manually failing over your Azure SQL Database server and cluster from primary to secondary and then back again using the Azure portal.
Failover to the secondary site
First, use the following steps to failover the Azure SQL Database from the primary server to the secondary server:
- Switch to the browser tab of your Azure SQL Database failover group - for example,
failovergroup-gzh032124. - Select Failover > Yes.
- Wait until it completes.
Next, use the following steps to failover the JBoss EAP cluster with the recovery plan:
In the search box at the top of the Azure portal, enter Recovery Services vaults and select Recovery Services vaults in the search results.
Select the name of your Recovery Services vault - for example,
recovery-service-vault-westus-gzh032124.Under Manage, select Recovery Plans (Site Recovery). Select the recovery plan you created - for example,
recovery-plan-gzh032124.Select Failover. Select I understand the risk. Skip test failover.. Leave the defaults for the other values. Select OK.
Note
Optionally, you can run Test failover and Cleanup test failover to make sure everything works as expected before Failover. For more information, see Tutorial: Run a disaster recovery drill for Azure VMs. This tutorial uses Failover directly to simplify the exercise.
Monitor the failover in notifications until it completes. It takes about 10 minutes for the exercise of this tutorial.
Commit the failover
Ensure that the steps in the previous section completed successfully. Then, use the following steps to commit the failover:
In the search box at the top of the Azure portal, type Recovery Services vaults and select it from the search results.
Select your Recovery Services vault - for example,
recovery-service-vault-westus-gzh032124.Under the Manage section, select Recovery Plans (Site Recovery).
Select the recovery plan - for example,
recovery-plan-gzh032124.Select Commit, then OK.
Monitor the notifications until it completes.
Select Items in recovery plan. You should see 3 items listed as Failover committed.
Disable the replication
Use the following steps to disable the replication for items in recovery plan and to delete the recovery plan:
- For each item in Items in recovery plan, right-click the item, then select Disable Replication.
- If you're prompted to provide a reason or reasons for disabling protection for this virtual machine, select the one you prefer - for example, I completed migrating my application. Select OK.
- Repeat step 1 until you disable replication for all items.
- Monitor the process in notifications until it completes.
- Select Overview > Delete. Select Yes to confirm the deletion.
Reprotect the failover site
Now the secondary region is the failover site and active, you should reprotect it in your primary region.
First, clean up resources in the resource group named jboss-eap-cluster-eastus-gzh032124 that aren't used anymore.
In the search box at the top of the Azure portal, enter Resource groups and then select Resource groups in the search results.
Select the name of resource group for your newly created secondary region.
Next to the text area labeled Filter for any field..., select the X to remove all filters.
Select Add filter. Set Filter to Type. Set Operator to Equals.
Select the dropdown menu next to the field Value.
Toggle the Select all checkbox until no values are selected.
Ensure that all of the following types are selected:
- Virtual machine
- Disk
- Private endpoint
- Network interface
- Storage account
Select the dropdown menu next to the field Value to close the dropdown. You must see 5 resource types as the value of Value.
Select Apply.
Select the checkbox next to the label Name at the top of the filtered list.
Select Delete.
Enter delete to confirm deletion then select Delete. Monitor the process in notifications until it completes.
Next, use the same steps in the Set up disaster recovery for the cluster using Azure Site Recovery in the primary region, except for the following differences:
For Create a Recovery Services vault, use the following steps:
- Select the resource group deployed in the primary region - for example,
jboss-eap-cluster-eastus-gzh032124. - Enter a different name for service vault - for example,
recovery-service-vault-eastus-gzh032124. - Select East US for Region.
- Select the resource group deployed in the primary region - for example,
For Enable replication, use the following steps:
For Region in Source, select West US 2.
In Replication settings, use the following steps:
For Target resource group, select the existing resource group deployed in the primary region - for example,
jboss-eap-cluster-eastus-gzh032124.For Failover virtual network, select the existing virtual network in the primary region.
For Create a recovery plan, for Source, select West US 2 and for Target, select East US.
Note
You might notice that Azure Site Recovery supports reprotecting VMs when the target VM exists. For more information, see the Reprotect the VM section of Tutorial: Fail over Azure VMs to a secondary region. However, it doesn't work when the only changes between the source disk and the target disk are synchronized for the JBoss EAP cluster, based on the verification result. This tutorial establishes a new replication from the secondary site to the primary site after failover, in which the entire disks are copied from the failed over region to the primary region. For more information, see the section What happens during reprotection? in Reprotect failed over Azure virtual machines to the primary region.
Fail back to the primary site
Use the same steps in the Failover to the secondary site section to fail back to the primary site, including the database server and cluster, except for the following differences:
Select the recovery service vault deployed in the primary region - for example,
recovery-service-vault-eastus-gzh032124.Select the resource group deployed in the primary region - for example,
jboss-eap-cluster-eastus-gzh032124.In the section Commit the failover, select your Recovery Services vault deployed in the primary - for example,
recovery-service-vault-eastus-gzh032124.In the Traffic Manager profile, you should see that endpoint
myPrimaryEndpointbecomes Online and endpointmyFailoverEndpointbecomes Degraded.In the section Reprotect the failover site, use the following steps:
The primary region is your failover site and active, so you should reprotect it in your secondary region.
Clean up resource deployed in your secondary region - for example, resources deployed in
jboss-eap-cluster-westus-gzh032124.Use the same steps in the Set up disaster recovery for the cluster using Azure Site Recovery for protecting the primary region in the secondary region, except for the following steps:
Skip the steps in Create a Recovery Services vault because you already created a Recovery Services vault - for example,
recovery-service-vault-westus-gzh032124.For Enable replication > Replication settings > Failover virtual network, select the existing virtual network in the secondary region.
Clean up resources
If you're not going to continue to use the JBoss EAP clusters and other components, use the following steps to delete the resource groups to clean up the resources used in this tutorial:
Enter the resource group name of Azure SQL Database servers - for example,
sqlserver-rg-gzh032124- in the search box at the top of the Azure portal. Then, select the matched resource group from the search results.Select Delete resource group.
For Enter resource group name to confirm deletion, enter the resource group name.
Select Delete.
Repeat steps 1-4 for the resource group of the Traffic Manager - for example,
myResourceGroupTM1.In the search box at the top of the Azure portal, enter Recovery Services vaults and then select Recovery Services vaults in the search results.
Select the name of your Recovery Services vault - for example,
recovery-service-vault-westus-gzh032124.Under Manage, select Recovery Plans (Site Recovery). Select the recovery plan you created - for example,
recovery-plan-gzh032124.Use the same steps in section Disable the replication to remove locks on replicated items.
Repeat steps 1-4 for the resource group of the primary JBoss EAP cluster - for example,
jboss-eap-cluster-westus-gzh032124.Repeat steps 1-4 for the resource group of the secondary JBoss EAP cluster - for example,
jboss-eap-cluster-eastus-gzh032124.
Next steps
In this tutorial, you set up an HA/DR solution consisting of an active-passive application infrastructure tier with an active-passive database tier, and in which both tiers span two geographically different sites. At the first site, both the application infrastructure tier and the database tier are active. At the second site, the secondary domain is restored with Azure Site Recovery service, and the secondary database is on standby.
Continue to explore the following references for more options to build HA/DR solutions and run JBoss EAP on Azure:
