How to Support Windows Authentication for ASP.NET Core in IIS
When we are debugging and testing Windows Authentication based ASP.NET Core application in development environment, it is very straightforward. We can just use Windows Authentication based template to create the application without any code change. The launchSettings.json contains the following section to enable windows authentication and disable anonymous authentication.
 "iisSettings": {
     "windowsAuthentication": true,<br>    "anonymousAuthentication": false,
    "iisExpress": {
      "applicationUrl": "https://localhost:55962/",
      "sslPort": 0
    }
}
While, launchSettings.json is only useful in development environment with IIS Express; in this article, we will see how to support windows authentication for ASP.NET Core in IIS.
Install .NET Core Windows Server Hosting
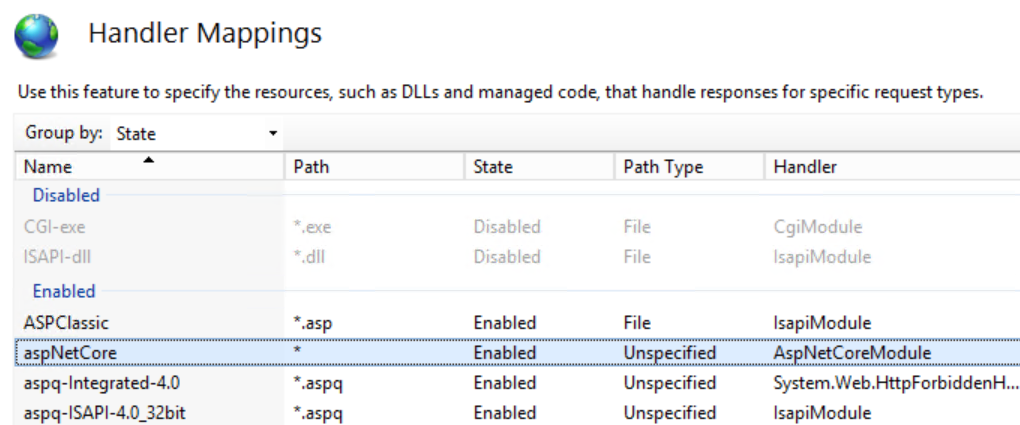
Firstly, enable IIS role on the host server. After that, we need install .NET Core Windows Server Hosting from https://go.microsoft.com/fwlink/?linkid=844461. Basically, for ASP.NET application, IIS will play more like a reverse proxy instead of web server, the above server hosting is actually a native handler to play between the IIS and kestrel. After the installation, let's create a new web site in IIS with default setting, and then make sure the corresponding application pool's ".NET CLR version" is changed to "No Managed Code" as there is no managed coding running in IIS pipeline in this scenario. Now, open the handler mappings pane in the new web site, you should be able to see aspNetCore handler shown below.

Setting IISOptions for IISIntegration
To configure IISIntegration service options, include a service configuration for IISOptions in ConfigureServices and set ForwardWindowsAuthentication to be true. Then, authentication middleware will attempt to authenticate using platform handler windows authentication.
 public void ConfigureServices(IServiceCollection services)
{
    services.Configure<IISOptions>(options => options.ForwardWindowsAuthentication = true);
    // Add framework services.
    services.AddMvc();
}
Modify web.config and applicationHost.config
By default, an ASP.NET Core project doesn't contain a web.config file, and visual studio will generate one with default value in publish phase. We can also add it to the root directory of the ASP.NET Core project manually with the below settings. Notice that forwardWindowsAuthToken="true" is must requirement to forward the token.
<?xml version="1.0" encoding="utf-8"?>
<configuration>
<system.webServer>
<aspNetCore forwardWindowsAuthToken="true" processPath="%LAUNCHER_PATH%" arguments="%LAUNCHER_ARGS%" />
<handlers>
<add name="aspNetCore" path="*" verb="*" modules="AspNetCoreModule" resourceType="Unspecified" />
</handlers>
</system.webServer>
</configuration>
We also need modify applicationHost.config to enable windows authentication and disable anonymous authentication, and definitely we can make it from IIS console's Authentication pane. Now, we can publish the application from visual studio and copy the content to the host server, the authentication should be working fine.
In most condition, our web application need authenticate or authorize domain users by their alias or group. In ASP.NET Core, the easiest way to make it is to write your own middleware. For example, the below code has blocked a user whose name is contoso\testuser, you can extend the functionality for more complex checking.
public class SampleAuthorizationMiddleware
{
   private readonly RequestDelegate _next;
   public SampleAuthorizationMiddleware(RequestDelegate next)
   {
     _next = next;
   }

   public async Task Invoke(HttpContext context)
   {
      if(0 == string.Compare(@"contoso\testuser".ToLower(), context.User.Identity.Name.ToLower()))
      {
         context.Response.StatusCode = 403;<br>         return;
      }

     await _next.Invoke(context);
  }
}
Comments
- Anonymous
June 27, 2017
code sample should include "ISOptions":services.Configure(options => { options.ForwardWindowsAuthentication = true; }); - Anonymous
June 28, 2017
The comment has been removed - Anonymous
June 29, 2017
Reminder -> Windows Authentication needs to be added as a Security option when adding the IIS role. Then on your web app, in IIS Manager, in Authentication, enable Windows authentication and disable Anonymous with. - Anonymous
June 29, 2017
Thanks Paul and Craig, have fixed the sample code for "Setting IISOptions for IISIntegration" section - Anonymous
July 05, 2017
I installed .NET Core Windows Server Hosting per the url provided but the handler is not present in the list. Reboot didn't help.- Anonymous
July 26, 2017
Probably the .NET Core Windows Server Hosting is not installed successfully. Basically, the package need VC++ 2015 redis, if the machine can't access internet to fetch the VC++ 2015 redis, the installation will fail. You may check whether it has been installed in control panel program list
- Anonymous
- Anonymous
July 12, 2017
The problem isn't the lack of windows authentication, it is that once you have the username there is no directoryservices within dotnetcore to check it against AD for security group membership.. - Anonymous
July 17, 2017
How would I capture when the user is authenticated to do a one time load of the claims? I see very little talk about claims when behind the scenes, they're really used. And with windows auth, it gets even worse since it's loading a lot of sids for group memberships instead of the actual names. Kind of worthless. And is there a way to hook into a PostAuthenticate event? I used to do this with an http Module. What I need to do is query our database and load some settings into the claim object after they have logged in. - Anonymous
July 19, 2017
it would be helpful to link the link, put the web.config in a code block as well. - Anonymous
July 27, 2017
HiThanks for this. There is one problem though. The web.config will be overwritten on the next build/publish. Will this need to be manually fixed every time or am I missing something?regards,Olafur - Anonymous
March 06, 2018
Important to note that this is for .net core 1.0 and 1.1 only.