Treasure hunting with Microsoft Computer Vision – a Hack Cambridge Project
Guest blog by Microsoft Student Partner Team Lead, Shu Ishida, University of Oxford
About me
My name is Shu Ishida, and I am a third year engineering student at the University of Oxford and team lead for the Microsoft Student Partner Chapter at Oxford. I am into web development and design, and my ambition is to help break down educational, cultural and social barriers by technological innovation. My current interest is in applications of Artificial Intelligence to e-Learning. I also have passion towards outreach and teaching, and have mentoring experiences in summer schools as an Oxford engineering student ambassador.
LinkedIn: https://www.linkedin.com/in/shu-ishida
Introduction
Microsoft Cognitive Services provides amazing tools for image recognition – Computer Vision API, Face API, Emotion API, Video Indexer API and Custom Vision Service. Today, I am going to introduce you to the flow of developing on these APIs in a fun and interactive way – treasure hunting!
With this demo, you can immerse yourself in the API user experience (how responsive and accurate it is, what kind of images they are good at detecting, etc.) by playing the game.
Objective of the treasure hunt
We have a treasure box we want to open, but it requires many keys in different colours to open. These keys could be found in Google Street View (yes, I made it easy for you nerdy developers to work on real life scenarios i.e. outdoor images without having to leave your computer!). You are given a list of objects / landscapes to look for in the Street View within a given time limit. Once you find an item of interest in the Street View, press the “Analyse Image” button, which will then send the view to the Microsoft Cognitive Services Computer Vision API. If you found the correct item, you acquire a key!
Demo
There is a final twist in this game for you to get familiar with Microsoft Custom Vision Service. This service will allow you to build image classification models of your choice, just by feeding in labelled data.
What is the final twist?
Guess how the colour of the keys are decided! (Hint: it doesn’t depend on which object you’ve found – we want you to be able to play this game at your location of choice!)
Where to find my project
Check out my hackathon submission at https://devpost.com/software/streasure-hunt where you would be able to find my demo video, project description and an online working demo. (this might be disabled when the API key expires as its currently running the FREE service which has limited API calls)
Getting started - creating your treasure map
The first stage of the project is to import Google Street View and Google Maps (or treasure map, as I like to think of it) and linking them up. This documentation shows how to show Google Maps and Google Street View side-by-side. Navigating around either of them will automatically refresh the view shown on the other, which is very convenient for our treasure hunt.
Another thing we have to do is to capture the image shown on the Street View whenever the user presses the “Analyse Image” button. Conveniently, Google provides an API to retrieve a street view as an image by posting information of the position and orientation you desire. Go to the Google Street View Image API documentation and write a function that retrieves the thumbnail image URL whenever the user presses the “Analyse Image” button. You will need position and orientation parameters such as POV, heading, pitch and FOV. How to obtain these are shown here. The tricky bit is to obtain FOV.
 function getViewUrl(){
     var position = panorama.getPosition()+'';
     position = position.replace(/[()]/g, "").replace(" ","");
     var heading = panorama.getPov().heading;
     var pitch = panorama.getPov().pitch;
     var zoom = panorama.getZoom();
     var fov = 180 / Math.pow(2,zoom);
     var imageUrl = "https://maps.googleapis.com/maps/api/streetview?size=640x640&location="+position+"&heading="+heading+"&pitch="+pitch+"&fov="+fov+"&key="+MAP_API_KEY;
     return imageUrl;
 }
Go to https://console.developers.google.com/apis/library and enable Google Street View Image API and Google Maps JavaScript API. Then activate your API key and insert it into your code where it says YOUR_API_KEY. Now we have everything we need from Street View.
Microsoft Azure Computer Vision API
Now let’s get started with Microsoft Computer Vision API to analyse images we got from Street View!
Here is the documentation of the API using JavaScript. The use of the API is simple – just insert your own API key where it says “subscription key”, and parse the JSON response. You can get the API key here. For our scenario, we just need the “tags” under “description”.
I created a visual representation of the tags and compared them with the item list on the left. If there is a match, the item is added to the key gallery below. Creating the item list was the major part of the work. Check out how to make a to-do list at w3schools.
Microsoft Custom Vision Service
Finally, the little twist I mentioned at the beginning. I made the game a little complicated by assigning colours to the keys you acquire so that you have to play clever when you find the keys.
I thought of different ways of using Custom Vision Service, which is an amazing tool to create an original classifier that is trained for a specific purpose. Compared to the Computer Vision API which is trained to identify “what is in the picture” (objects, landscapes, etc.), custom vision Service could be useful when you want to classify images in specific scenarios. It may be because you want to nail down the exact type of object you are inspecting, or it may be because you are interested in classifying objects based on properties that are not the “name” of the object.
For this game, I chose a specific property that could be used because of the nature of how we acquire the data. All images are taken from Google Street View, which means that no matter where in the world you want to play this game, the image will always include either a road or a roadside view. The blue keys mean the road extends forwards, the yellow ones mean you have the road at an angle, and the red ones mean you are looking into the roadside.
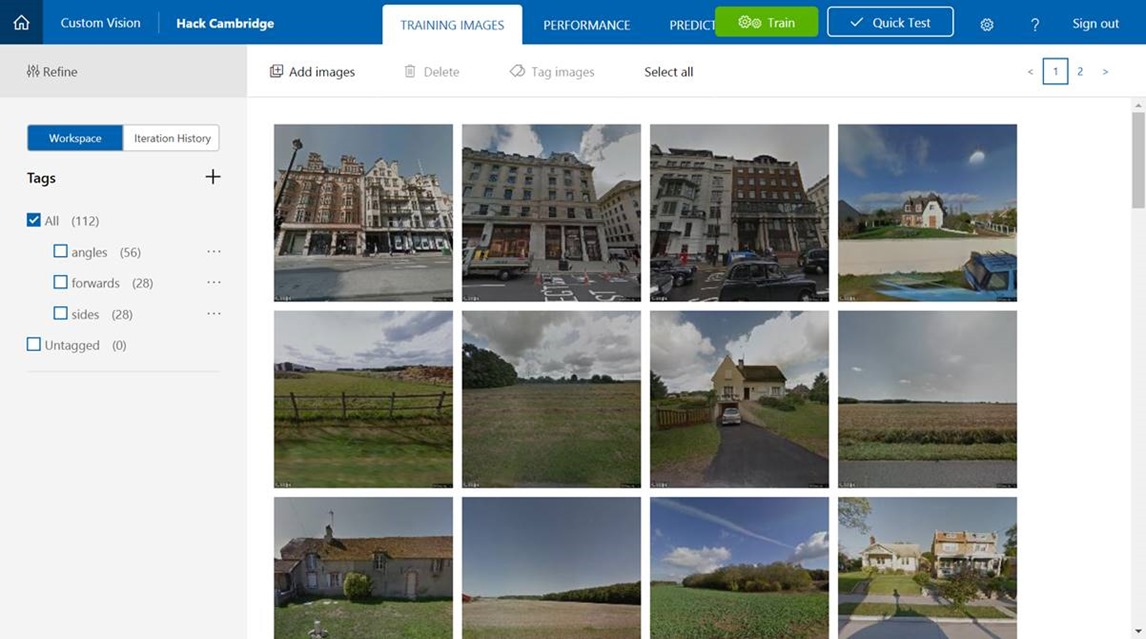
To start using Custom Vision Service, register at https://www.customvision.ai/ and create a project. Near the top of your workspace, there is a button named “Add images”. You can upload your pictures of your choice and tag them differently depending on how you want to classify your images. For my game, I uploaded around 100 Google Street View images with tags of “forwards”, “angles” and “sides”.
If your interested in working through a custom vision tutorial/workshop see the following Microsoft Imagine Workshop resources https://github.com/MSFTImagine/computerscience/tree/master/Workshop/AI%20and%20Machine%20Learning/Custom%20Vision%20Service
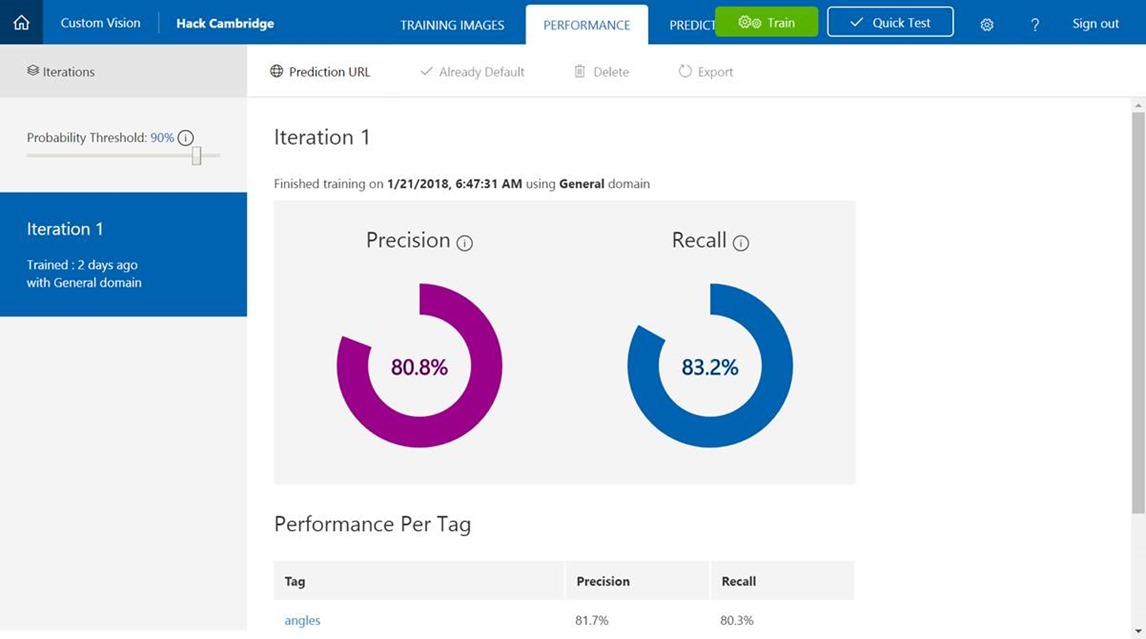
Once you feed the data-set, now is the time to train your model. Click on the green button on the top. On the performance tab, we can see how well the prediction is by looking at the precision and recall of the model. We could try improving the model by feeding in more image data (the maximum number of images we could feed is 1000).
Initially my idea was to make the model identify whether the road is going straight, leaning to the left, leaning to the right or out of sight. When I started training the model with these tags, it stubbornly gave me a precision and recall of about 60%, and failed to predict the right turning and left turning images. It took me an hour of frantic Google Street View image capture before it occurred to me that the Custom Vision Service is probably trained by mirrored image set as well as the original image set. Upon integrating the two tags, the performance of the model rose significantly.
Once the model is trained, click the “Prediction URL” in the “performance” page. The API key to request predictions will be shown. Although there isn’t a written example of using the API with JavaScript in the documentation, how you make a request to the API is basically the same as the Computer Vision API (or most APIs in fact). Below is an example of retrieving the response and finding the tag with the maximum probability.
 function classifyImage(imageUrl) {
     var subscriptionKey = MS_Custom_KEY;
     var request_url = "https://southcentralus.api.cognitive.microsoft.com/customvision/v1.1/Prediction/7cee6b20-c5d1-45bc-8f3f-ccab49d66910/url";
     // Perform the REST API call.
     $.ajax({
         url: request_url,
         // Request headers.
         beforeSend: function(xhrObj){
             xhrObj.setRequestHeader("Content-Type","application/json");
             xhrObj.setRequestHeader("Prediction-Key", subscriptionKey);
         },
         type: "POST",
         // Request body.
         data: '{"Url": ' + '"' + imageUrl + '"}',
     })

     .done(function(data) {
         var res = data["Predictions"];
         var i;
         var max = 0;
         var tag = "";
         for(i in res){
             var temp = parseFloat(res[i]["Probability"]);
             if(max < temp){
                 max = temp;
                 tag = res[i]["Tag"];
             }
         }
         addTag(tag);
     })

     .fail(function(jqXHR, textStatus, errorThrown) {
         // Display error message.
         var errorString = (errorThrown === "") ? "Error. " : errorThrown + " (" + jqXHR.status + "): ";
         errorString += (jqXHR.responseText === "") ? "" : jQuery.parseJSON(jqXHR.responseText).message;
         console.log(errorString);
     });
 };
Final comments
Hack Cambridge was a very exciting and fulfilling experience for me, especially because it was my first hack out of Oxford, and because it was my first time competing as an individual hacker. My main objective for this hack was to come up with an interesting and fun project using Microsoft Cognitive Services that could be reused as Microsoft Student Partner tech workshops.
Coming up with the concept of this treasure hunt game was the most difficult part, and took up a significant amount of time.
I hope this project makes learning how to use Microsoft APIs an interactive and enjoyable experience.

![clip_image002[4] clip_image002[4]](https://msdntnarchive.z22.web.core.windows.net/media/2018/01/clip_image0024_thumb5.jpg)

