Tips and Tricks to Save money when using Azure
A few months ago I wrote this post https://blogs.msdn.microsoft.com/uk_faculty_connection/2017/03/31/if-your-not-using-your-infrastructure-turn-if-off-saving-costs-on-azure-2/ in this post I want to share the top 8 tips for saving your Azure Account $/£ or Azure credit via https://www.MicrosoftAzurePass.com or services being used under Visual Studio Dev Essentials which you get as part of Microsoft Imagine
Tip 1. If your not using it De-allocate VMs when not in use:
By De-allocating (or stopping) your VM when they’re not in use, you can save a tremendous amount funds.
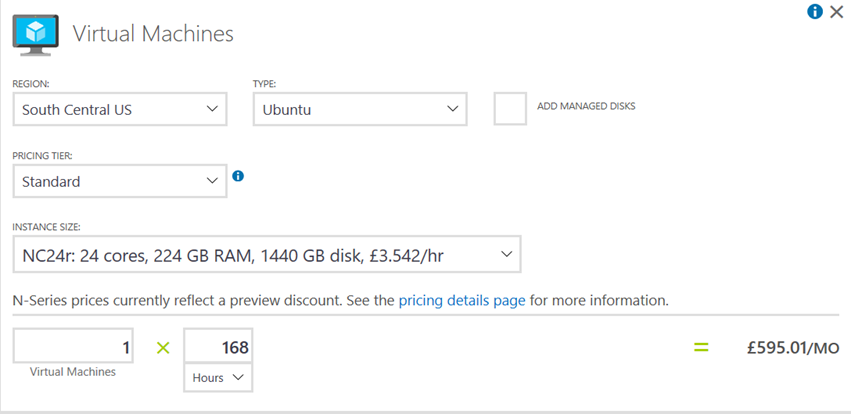
So as an Example if I wanted to run a High Spec GPU VM for Data Science works such as CNTK or Tensorflow the cost for 168 Hours of Compute would be £595.01 this is a fixed cost for the resource
If I only used the VM for the time which I was completing experiments and reduced the time to 34 hours the cost would be £120.42 this is a saving of over £474.59 by simply turning off the machine when not in use.
So a saving of $3.54 per hour. By De-allocating the Virtual Machine the CPU, Memory and other hardware reserved for the VM is released. Then when you need to use the VM again, you can simple start it back up again and get to work.
Manually Stop (De-allocate)
The first option is to go into the Azure Portal, navigate to the Virtual Machine blade for the VM in question and then click the “Stop” button. This will essentially work to turn off your VM, and it will de-allocate the resources for the VM as well.
Virtual Machines can also be Stopped this way to de-allocate resources through the use of the Azure CLI (Cross-Platform Command-line) or the Azure PowerShell cmdlets.
The key thing to remember is you will still face cost charges when a Machine is de-allocated as you will still has associated storage costs for the VM disk Image. see https://blogs.msdn.microsoft.com/uk_faculty_connection/2017/03/31/if-your-not-using-your-infrastructure-turn-if-off-saving-costs-on-azure-2/ on how to fully remove your associated storage.
Tip 2. Configure Auto-shutdown of resources via portal.azure.com
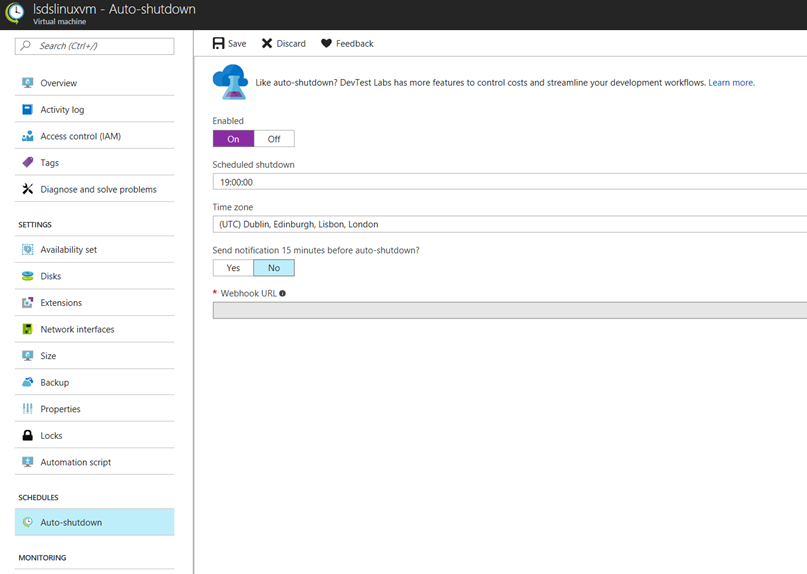
Configure the Auto-shutdown feature of the Virtual Machine you wish to Stop and De-allocate. With VM Auto-shutdown you’re able to configure a specific Time (including Time Zone) when Azure is to automatically shutdown the VM and de-allocate it’s resources again this is perfect for your lab environments and managed services.
Tip 3. use Azure Automation
Using an automation account is the easiest way to shutdown the machines. The basic automation account is available for free. which is more than enough to automatically shutdown or start services.
Use Azure automation to run VMs during office hours: https://blogs.endjin.com/2016/03/using-azure-automation-to-run-vms-during-office-hours-only-using-graphical-runbooks/
Azure-Automation – Schedule the shutdown of Azure VMs with PowerShell: https://www.techdiction.com/2015/03/25/microsoft-azure-automation-schedule-virtual-machines-to-shutdown-using-powershell/
Azure Automation scenario – starting and stopping virtual machines: https://azure.microsoft.com/en-us/documentation/articles/automation-solution-startstopvm-graphical/
See Sample PowerShell Scripts https://gallery.technet.microsoft.com/scriptcenter/Stop-Azure-ARM-VMs-1ba96d5b)
Tip 4. Use Dev Test Labs
Another option is to use DevTest-Labs. When you create them, then you can already select a schedule when to shutdown your virtual machines. That is the best way how to do it if you have development or test environments. You can create multiple DevTest-Labs with different schedules.
Azure Dev Test Labs: https://www.clemensreijnen.nl/post/2016/06/23/Azure-DevTest-Labs
DevTest-Labs overview: https://azure.microsoft.com/en-us/documentation/articles/devtest-lab-overview/
Tip 5. Research Azure Region Pricing for services
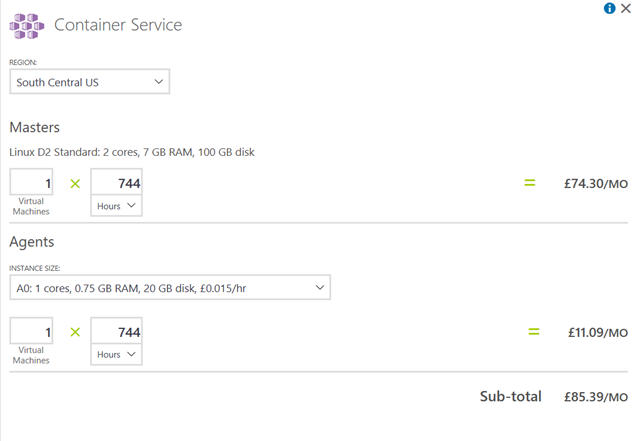
Not all Azure Regions will have the same pricing for the same resources. General tips are you should always try to provision your resources within the closest Azure Region to your users, you may find there to be a pricing benefit of choosing one Azure Region over another. Here is a quick example using the Azure Pricing Calculator https://azure.microsoft.com/en-us/pricing/calculator/ for a simple Container service to demostrate the costs differences
Western Europe – £0.125 per hour
South Central US - £0.09 per hour
Tip 6. Use Azure Storage for SMB File Shares
If you need storage DO NOT use/spin up a VM! This simply incurs additional management overhead and costs.
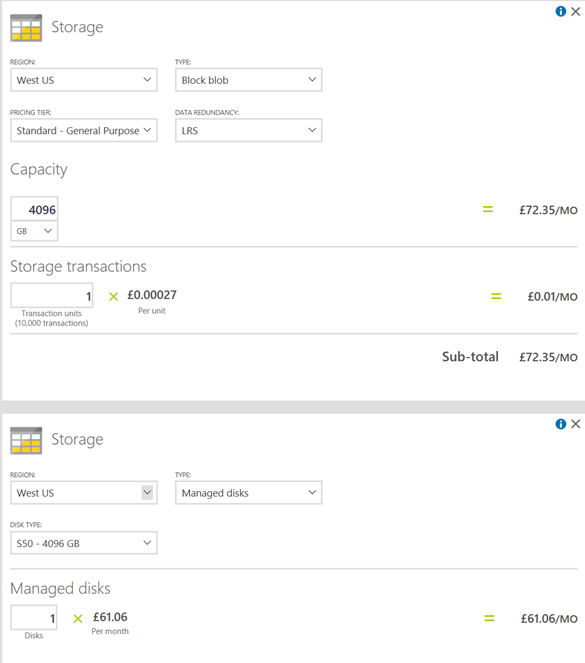
Azure Storage PaaS (Platform as a Service) https://azure.microsoft.com/en-gb/services/storage/files/ features for creating an Azure File Share. Azure Storage File Shares, you don’t need to maintain any Virtual Machines additionally you get data redundancy (in triplicate) as a built-in feature of the Azure Storage service.
Tip 7. Delete Unnecessary Resources
Unused resources like VMs, Storage Accounts, Web Apps, and on, and on will keep costing you money, if you keep them around. If you’ll need them in the future then it may be necessary. However, if you will never need them again, then you should probably remove or delete those resources from your Azure Subscription.
Removing or Deleting resources in an Azure Subscription can easily be performed within the Azure Portal, or using the scripting tools like the Azure Resource Manager, Azure PowerShell cmdlets and Azure CLI (Cross-Platform Command-line interface)
Azure PowerShell Module
Once you have logged in to your Azure account (using “add-azureaccount” ), ensure you’re connected to the correct subscription if you have multiple subscriptions (use “Get-AzureSubscription” and check that the subscription you wish to use is set to True against the “IsCurrent” field) and then run the following command:
 # Define Resource Group
$ResourceGroupId = "/subscriptions/<subscriptionID>/resourceGroups/<sourceResourceGroupName>"

Remove-AzureResource -ResourceId $ResourceGroupId -ApiVersion 2014-04-01 -Force
Replace <subscriptionID> and <ResourceGroupName> with the relevant values for your environment and don’t forget the “ -Force” parameter which is the crucial bit when deleting a Resource Group with associated resources.
It’s important to note at this point that EVERYTHING associated with the Resource Group will be deleted. If you have a Storage Account associated with the Resource Group, this will also be deleted along with ALL CONTENT – that includes your blobs, tables, EVERYTHING. You have been warned!!
Azure Resource Explorer
To delete a Resource Group:
- Simply browse to the Azure Resource Explorer site: https://resources.azure.com/
- Select your tenant from the drop-down at the top of the page (if you have multiple tenancies)
- Ensure the Azure Resource Explorer is in “Read/Write” mode
- Browse to the Resource Group you want to delete, under:
subscriptions > subscriptionName > resourceGroups > ResourceGroupName - Click “Delete” to delete the Resource Group and all associated resources
- Click “Yes” on the confirmation
Tip 8 . Moving Azure Resources to a resource group
Keeping your resources neat and tidy, this is a key aspect of managing resource and managing costs. Resource groups provide a way to monitor, control access, provision and manage billing for collections of assets that are required to run an application, or used by a client or company department.
Using Azure Powershell
 # Define source Resource Group
$sourceResourceGroupId = "/subscriptions/<subscriptionID>/resourceGroups/<sourceResourceGroupName>"

#Define target Resource Group and resource(s) to move
$ParametersObject = @{
  targetResourceGroup = "/subscriptions/<subscriptionID>/resourceGroups/<targetResourceGroupName>";
  resources =
    "<resourceID_1>",
    "<resourceID_2>",
    "<resourceID_3>"
}

# Invoke action to move resource to target Resource Group
Invoke-AzureResourceAction -ResourceId $sourceResourceGroupId -Action moveResources -Parameters $ParametersObject -ApiVersion 2014-04-01 -Force
Note the formatting of the array “ $ParametersObject” above which uses a semi-colon instead of a comma after the “targetResourceGroup” variable (the Microsoft examples I’ve found to date show a comma which is incorrect), and the inclusion of comma separated values for entering multiple resource IDs when moving multiple resources in a single operation.
It’s worth noting at this point that I’ve been coming across the following error when trying to move a single resource using the above method (it works fine when moving multiple resources):
 Invoke-AzureResourceAction : {     "Error": {         "Code": "InvalidRequestContent",         "Message": "The request content was invalid and could not be deserialized: 'Error converting value         "/<resourceID>" to   type 'System.String[]'. Path 'resources', line x, position y.'.",         "Target": null,         "Details": null     }
}
Using Azure Resource Explorer
To move a resource to another Resource Group:
- Simply browse to the Azure Resource Explorer site: https://resources.azure.com/
- Select your tenant from the drop-down at the top of the page (if you have multiple tenancies)
- Ensure the Azure Resource Explorer is in “Read/Write” mode
- Browse to the Resource Group you want to move resource from, under:
subscriptions > subscriptionName > resourceGroups > ResourceGroupName - Using the code box, enter the details of the “targetResourceGroup” you wish to move the resources to and the “resources” you wish to move
- Click “moveResources” to move the resources to the target Resource Group
- Click “Yes” on the confirmation
Note that the targetResourceGroup and resources entries must be entered as a fully qualified resource ID that starts with “ /subscriptions/<subscriptionId> “. This can be easily retrieved from Azure Resource Explorer by browsing to the resource or Resource Group and viewing the ID field on the “Data (Get, PUT)” tab:
When moving multiple resources, this can be achieved by creating a comma separated list of IDs like the following code snippet:
 {
   "targetResourceGroup": "/subscriptions/<subscriptionID>/resourceGroups/<targetResourceGroupName>",
   "resources": [
     "/subscriptions/<subscriptionID>/resourceGroups/<ResourcePath>/<ResourceName1>",
     "/subscriptions/<subscriptionID>/resourceGroups/<ResourcePath>/<ResourceName2>",
     "/subscriptions/<subscriptionID>/resourceGroups/<ResourcePath>/<ResourceName3>"
   ]
}


