How to Develop and Host a Proof-of-Concept Prototype on Azure App Services for Web Apps
Guest blog from Microsoft Student Partner Fangfang Hu from Imperial College London.
Fangfang Hu is an Electrical and Electronic Engineering student at Imperial College London
Introduction
I will be starting my second year in fall. I am from Singapore, where I had worked with a few research institutions and corporations in areas relating to hardware and software. Working with different types of technologies on various platforms has always been of great interest to me, and over the years I have since been involved in using technology for purposes ranging from commercial to research and social entrepreneurship.
LinkedIn: https://www.linkedin.com/in/fangfanghu/
GitHub: https://github.com/ffhu1
In this tutorial, you will be introduced to creating a proof-of-concept prototype for a web app, specifically a static HTML site, and subsequently hosting it on Azure App Services.
We will be using Visual Studio Community 2017 as our editor.
Setting Up Your Project
Before you begin, ensure that you sign into your Azure account so as to be able to host your web app on Azure.
Start by creating a new project in Visual Studio.
Under Visual C# , select Web, then ASP.NET Web Application. Name your project and proceed by clicking OK.
For our purposes, we will be creating a static HTML page that utilises basic HTML, CSS and JavaScript through Bootstrap, hence an Empty template would suffice.
Bootstrap
Bootstrap is an open-source front-end web framework for developing responsive web sites, utilising HTML, CSS and JavaScript. It is ideal for designing and creating websites and web applications that can serve as proof-of-concept prototypes for presenting your idea.
In this tutorial, we will be creating our web site using Bootstrap in Visual Studio.
In the Solution Explorer, select your project (which is named MyWebApp in this tutorial).
Under the menus, under Project, select Manage NuGet Packages.
In the NuGet tab, go under Browse and search bootstrap. Select bootstrap and click Install.
After installation, you will see now files added for Bootstrap under Content. You will be referencing these files when as you create the pages for your web site.
Creating a Page
Right-click your project and choose Add,then New Item. Select HTML Page and click OK.
Under the <head> element, we need include these tags.
 <meta charset="utf-8"/>
<meta name="viewport" content="width=device-width, initial-scale=1"/>
<link rel="stylesheet" href="Content/bootstrap.min.css"/>
<script src="Scripts/bootstrap.min.js"></script>
<link rel="stylesheet" href="Content/bootstrap-theme.min.css"/>
The first link tag loads in the Bootstrap CSS files, while the script tag loads in the JavaScript elements.
The last link tag retrieves the Bootstrap default theme. This can be changed depending on the design you have in mind for you page.
The title
This is how your <head> element should look like which will allow you to refer to Bootstrap files when creating your page.
Designing Your Page
Bootstrap allows for responsive web design, which means that your page will change depending on the size of the browser used to view the page.
This is done by dividing the page into 12 columns where text or other elements can appear. For more details about the various components you can use in your HTML page through Bootstrap, visit the link below.
Bootstrap components: https://getbootstrap.com/components/
Example
Here is an example of a static HTML page created using Bootstrap.
Source code: https://github.com/ffhu1/DONACO
Publishing Your Web App on Azure App Service (Visual Studio)
First, ensure that you are signed in to your Azure account.
Under your project name, go to Connected Services, then Publish.
Select Microsoft Azure App Service and Create New,then click Publish.
Here, you can deploy your web app on Azure App Services.
Additional resources offered through Azure are stated under the Services tab. For our purpose in this tutorial whereby we are deploying a simple static HTML page, this is not required.
Click Create once you are finished.
The URL of your web app deployed through Azure App Services will be:
https://[name of your app].azurewebsites.net/
Deploying Your Web App (Azure Portal - GitHub)
The Azure portal also allows for the deployment of your Web App through a number of ways, including through your GitHub repository.
For this tutorial, we will now look at deploying an ASP.NET app in a GitHub repository on Azure App Services (previously, we looked at direct deployment through Visual Studio).
Under App Services, select Add. Choose Web App.
Click Create.
Enter the name of your web app, and click Create.
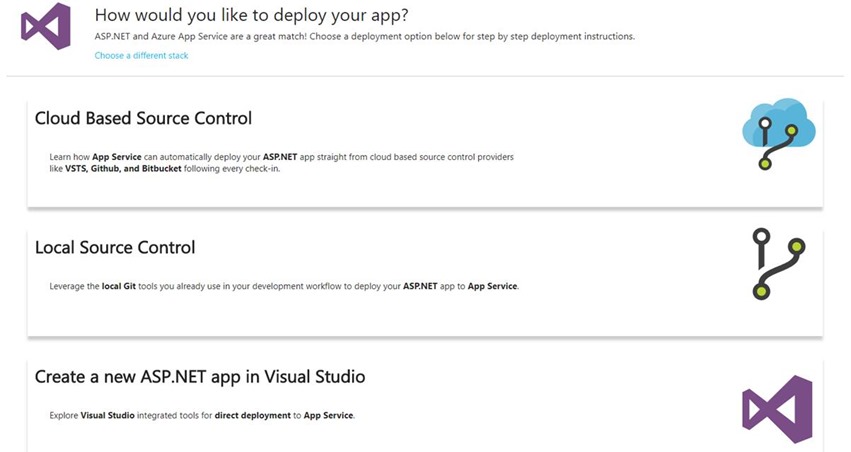
You will then be able to access an overview of your App Service on the Azure portal. Under Deployment, go to Quickstart. Here, you will be able to choose which development stack to use to deploy your app.
For our tutorial, we select ASP.NET.
Here, we can automatically deploy our app (which in this case is an ASP.NET app) from GitHub (or any other such providers) by selecting Cloud Based Source Control.
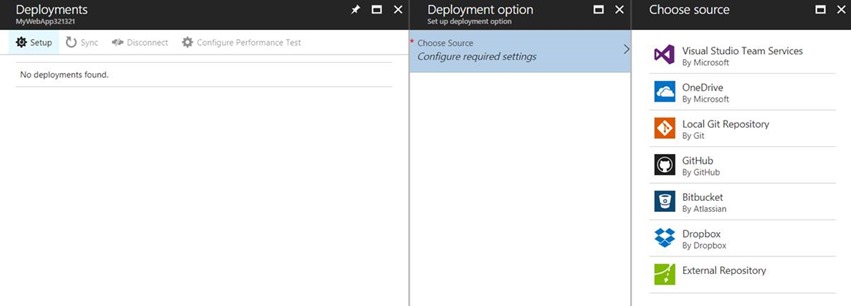
As can be seen, we can select GitHub under Deployment Option.
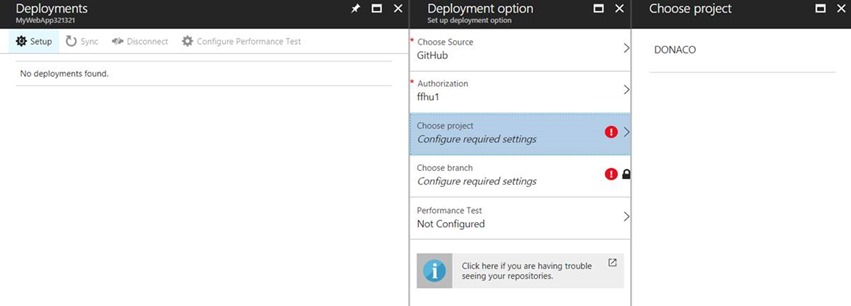
Set up authorization for your GitHub account, then you will be able to choose the repository which you would like to deploy your web app from.
Conclusion
In this tutorial, we looked at using Bootstrap to create a simple proof-of-concept prototype for a web app as well as how to host your web app on Azure App Services, either through Visual Studio or through the Azure portal. The variety of Azure services available for web apps and other applications allows for the creation of simple yet comprehensive solutions. Coupled with the comparatively low cost of said services, it is thus easy for one to deploy one’s own solutions on the cloud.
References
Learn more about Azure Web Apps:
Get your FREE Student Azure Account https://imagine.microsoft.com/en-us/Catalog/Product/99
Develop in the cloud at no cost with Azure App Services, Notification Hubs, SQL database, and more.
Activate your Visual Studio Dev Essentials Account https://www.visualstudio.com/dev-essentials/
Free access to cloud services such as compute and storage, backend services for your mobile or web apps, services for IoT, machine learning, and analytics.
- Azure credit ($300/year)*
- Visual Studio Team Services account with five users*
- App Service free tier
- HockeyApp free tier
- Application Insights free tier


