Tokenization with Release Management
This article provides a demo of processing tokens as part of the build and release, using Release Management.
Why use tokens?
Tokenization comes in handy when you want to replace a value in your web or app.config file, automatically, based on the stage to which the release is happening. For example, my application uses an app.config file, which has a database connection string. Let us assume that DEVDB, TESTDB and PRODDB are the names of the database servers in Development, Test and Production environments. Tokenization allows us to replace the value of the database servers in the app.config file automatically based on the stage to which deployment is happening. This eliminates the need for manual intervention.
Demo
Note: Versions of TFS and Release Management used are both 2013 update 4.
Create the project and check-in to TFS
For demo purpose, I am creating a sample console application, which reads and displays the database server name from the app.config file. This is just an example, to show how tokenization works with release management, practical usage will depend on your application.
I have named my application as DatabaseConnection. I have also added a config file with the name: DatabaseConnection.exe.config to my project. You could choose to create an app.config file instead, but the reason why I have specifically renamed the config file to <appname>.exe.config is that even if you include an app.config file, during build, a config file with the name <appname>.exe.config is created, and the application will be referencing this file. Hence, the token replacement should actually happen in the <appname>.exe.config file, and not the app.config file.
DatabaseConnection.exe.config: The config file has one entry, as follows:
By default, database server name points to DEVDB.
Make a copy of the config file, and rename it to DatabaseConnection.exe.config.token.
Replace the value of DatabaseServerName, with a configuration variable, starting and ending with double underscore. I have named the variable as “__DBNAME__”
Upon execution, the application will just read this from the config file and display the database server name. Sample output as follows:
I have also checked in the code to one of the team projects in TFS.
Create the build definition
Before creating the build definition, you would have to get a copy of the ReleaseTfvcTemplate.12.xaml file, and check it in to source control (if not already done), as we will be using this template for the build.
Note: The Release templates can be found in the below location on your Release Management server:
Program Files (x86)\Microsoft Visual Studio 12.0\Release Management\bin
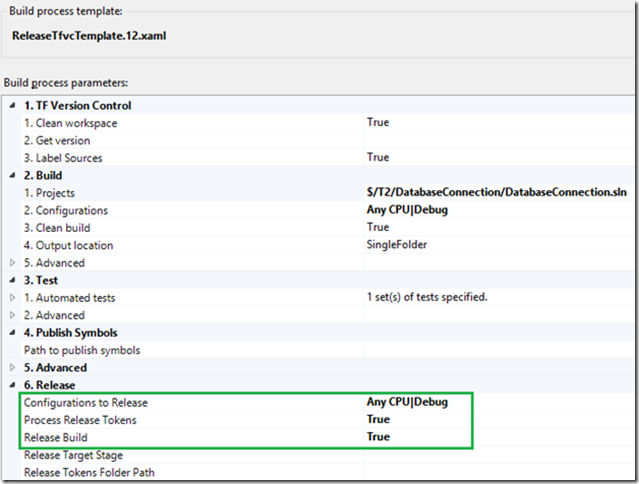
Create a new build definition using the release template, and set the below properties:
Configurations to Release, Process Release Tokens and Release Build.
Create the Release Template
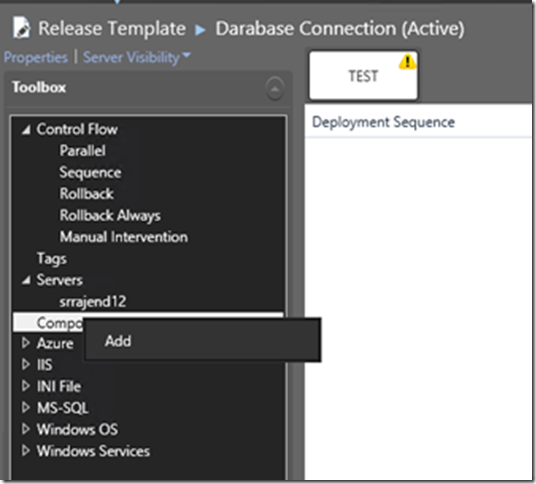
Create a new release template, set the Release Path and select the build definition that we created.
I will be using this template to Release the build to test environment. My Release path has one stage called Test, and the end goal would be to modify the DatabaseConnection.exe.config to change the value of DatabaseServerName variable to ‘TESTDB’, as part of the release, by processing tokens.
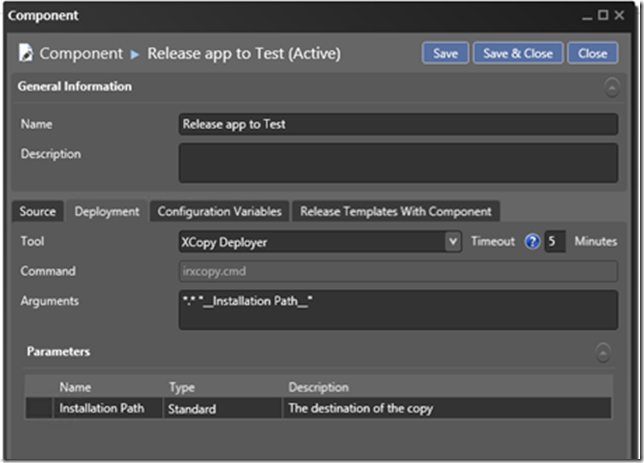
Add the target server and choose and add a component to do the release. I will be using XCopyDeployer tool, to copy the build outputs to the target Test server.
Select Builds with application in the source tab. In the deployment tab, I have chosen XCopy Deployer as the tool.
Switch to the Configuration Variables tab and then add the variable name. Please note that this should be the same variable we have added to the DatabaseConnection.exe.config.token file (in my case it was called DBNAME).
Variable replacement mode is set to ‘After Installation’ – this indicates that the variables will be replaced after the execution of the XCopy Command. The files originally being coped to the server (before executing XCopy) will not contain the right values, but rather the files contained in the ‘Installation Path’ folder will have the appropriate values.
More information on variable replacement mode can be found in this article.
Set the file extension filter to *.config – this would mean that the variable replacement logic will look through all the config files.
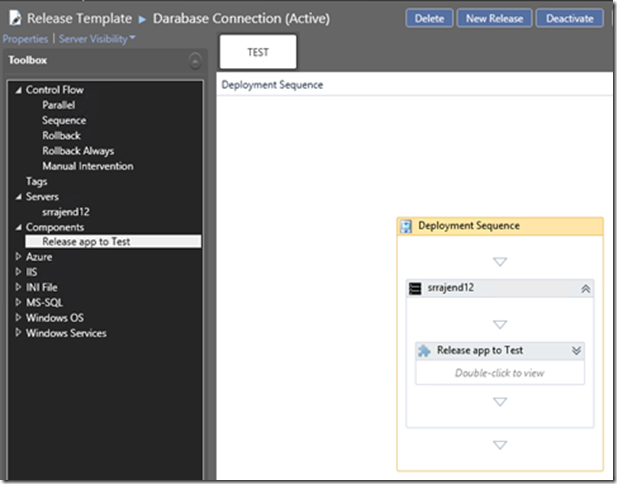
Drag the server name to the release sequence and then add the component that we created.
Double click on the component to set the variable values.
I have set the below values. The value ‘TESTDB’ for DBNAME indicates that the value of DBNAME variable will be replaced with ‘TESTDB’. This would have been the name of the actual test server, in a real scenario.
Build and output validation
Queue a build and wait for the build and release to complete.
In my case, once the build is complete, I connect to my test server and check the installation path (C:\DatabaseConnection). We can see that the files have been copied over:
I run the exe to verify the output:
If I open the DatabaseConnection.exe.config file now, we can see that the value of the key DatabaseServerName has been replaced by ‘TESTDB’ (it was set to DEVDB in my application)
You can choose to add more stages, and different values can be assigned to the sever names and other variables, based on the stage/environment that you are releasing to, without updating the values manually.
Same technique can be used to tokenize web.config files as well.
Hope this helps!
Content Created By : Sreeraj Rajendran
Content Reviewed By : Romit Gulati
Feel free to let us know if you needed any clarifications/improvements.


