Debugging an Addin in visual studio
Syed Aslam Basha here from the Information Security Tools team.
Most of us have probably done some debugging, but debugging an Add-in in Visual Studio poses some challenges.
This is how I do it:
- Delete all bin and obj files
- Copy paste any snk file where it is required
- Set appropriate debug type you want for the project
- Right click on addins project , set “addin project” as startup project
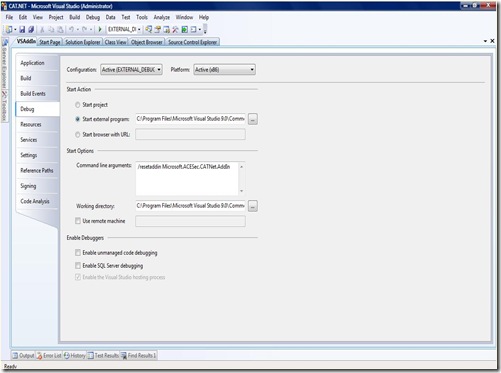
- Right click on “addins project”, select properties and set as shown in the screen shot below
- Set Start external program C:\Program Files\Microsoft Visual Studio 9.0\Common7\IDE\devenv.exe
- Set Command line arguments /resetaddin addin filename
- Set working directory C:\Program Files\Microsoft Visual Studio 9.0\Common7\IDE
- Create folder addins in C:\Users\syed\Documents\Visual Studio 2008\Addins
- Copy paste the addin definition file and set the parameter <Assembly> as <Assembly>Path to AddIn.dll</Assembly>
- Build solution
At this step you should not be getting any errors.
Launch Visual studio, open your project, set break points and run. One more instance of Visual Studio is launched and as you work with this it would stop at break points and you can debug your addin.
See the screen shots attached.
-Syed Aslam Basha ( syedab@microsoft.com )
Microsoft Information Security Tools (IST) Team
Test Lead
---------------------------------------------------------
Please leave a comment if the blog post has helped you.
Comments
Anonymous
July 11, 2013
Worked like a charm for me, thank you :)Anonymous
April 23, 2014
Thank you very much! It works also for Visual Studio 2013.Anonymous
May 09, 2014
Thanks! Works also for VS 2013 :) (with modified paths)
