Teaching ASP.NET Web API to WADL
** UPDATE – I’ve added a NuGet package to make it easier to add WADL support to your APIs **
** UPDATE 2 - This was a fun experiment, but if you want to do this sort of thing then check out Swashbuckle . It's an awesome project that gives you Swagger and loads of options!
Introduction
One of the criticisms often cited for HTTP-based services (including REST services) is the lack of documentation/metadata. This is something that ideas such as WADL and Swagger are looking to address.
Recently I’ve been working with Azure API Management which was announced at TechEd recently. Adding the endpoints for your API is one of the first steps that you need to do with API Management, and if you have a large API this can take a while. To help me with this I wanted a quick, lightweight WADL endpoint that integrated with the in-built Web API help pages to add a WADL endpoint. In this post I’ll walk you through the steps to get a basic WADL endpoint wired up.
NOTE: this isn’t a feature complete WADL endpoint (see the list at the end of the post for more details), but it worked for my needs! If it doesn’t do everything that you need then it will hopefully provide a starting point that you can customise to add the extra functionality.
Getting Started
If you have an existing ASP.NET Web API project (or are familiar with Web API) then feel free to skip to the next section. For this post I’m using Visual Studio 2013 and ASP.NET Web API 2.
Create a new Web Application project and choose the Web API template:
This will create a sample Web API controller:
As indicated by the comments, if you run the project and navigate to /api/values you will see the following output:
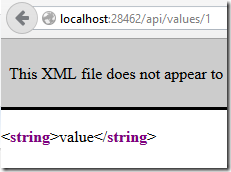
Navigating to /api/values/1 will instead show:
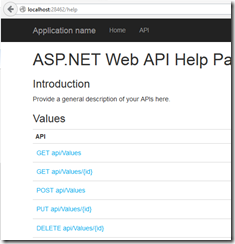
Having comments that tell you what the URLs are is all well and good, but it isn’t discoverable for consumers! To help with this, Web API exposes Help Pages. If you navigate to /help you will see the auto-generated documentation pages:
Clicking on the links allows you to drill into the documentation for individual endpoints:
More information on Web API help pages (including how to link in XML comment documentation) can be found on the ASP.NET Web API site: https://www.asp.net/web-api/overview/creating-web-apis/creating-api-help-pages.
Whilst the help pages are very useful, they are intended for human consumption. Wouldn’t it be nice if it exposed the information in a format that was machine-consumable? The rest of this post will take a look at how we can start to add this functionality
WADL 101
In a nutshell, WADL is an xml format for describing HTTP-based services. If (like me) WADL isn’t something that you’ve worked with before then you may want to take a look at some of the following links:
- WADL home page: https://wadl.java.net/
- Current WADL specification: https://www.w3.org/Submission/wadl/
The specification has a number of examples. I’ve included one below from https://www.w3.org/Submission/wadl/#x3-40001.3:
<?xml version="1.0"?>
<application xmlns:xsi="https://www.w3.org/2001/XMLSchema-instance"
xsi:schemaLocation="https://wadl.dev.java.net/2009/02 wadl.xsd"
xmlns:tns="urn:yahoo:yn"
xmlns:xsd="https://www.w3.org/2001/XMLSchema"
xmlns:yn="urn:yahoo:yn"
xmlns:ya="urn:yahoo:api"
xmlns="https://wadl.dev.java.net/2009/02">
<grammars>
<include
href="NewsSearchResponse.xsd"/>
<include
href="Error.xsd"/>
</grammars><resources base="https://api.search.yahoo.com/NewsSearchService/V1/">
<resource path="newsSearch">
<method name="GET" id="search">
<request>
<param name="appid" type="xsd:string"
style='query' required='true'/>
<param name="query" type="xsd:string"
style='query' required='true'/>
<param name="type" style='query' default='all'>
<option value="all"/>
<option value="any"/>
<option value="phrase"/>
</param>
<param name="results" style='query' type='xsd:int' default='10'/>
<param name="start" style='query' type='xsd:int' default='1'/>
<param name="sort" style='query' default='rank'>
<option value="rank"/>
<option value="date"/>
</param>
<param name="language" style='query' type='xsd:string'/>
</request>
<response status="200">
<representation mediaType="application/xml"
element="yn:ResultSet"/>
</response>
<response status="400">
<representation mediaType="application/xml"
element="ya:Error"/>
</response>
</method>
</resource>
</resources>
</application>
Adding WADL output
The first step is to add a new action to the Help controller (this is in a separate HelpPage area as shown below)
Add the following action to the controller (you’ll need to add the “using System.Linq” directive):
 public ActionResult Wadl(string controllerDescriptor)
{     var apiDescriptions = Configuration.Services.GetApiExplorer().ApiDescriptions;
      var apisWithHelp = apiDescriptions.Select(api => Configuration.GetHelpPageApiModel(api.GetFriendlyId()));
      return View(apisWithHelp);
}
Before we add the corresponding View, we’ll add a small class with supporting code. I added this under a Helpers folder in my project:
 public static class XmlTypeExtensions
{
     private static readonly Dictionary<Type, string> TypeMappings = new Dictionary<Type, string>()
     {
         // TODO - need to verify the type mappings!
         {typeof(string), "string" },
        {typeof(bool), "boolean" },
        {typeof(decimal), "decimal" },
        {typeof(float), "float" },
        {typeof(double), "double" },
        {typeof(int), "int" },
        {typeof(DateTime), "datetime" },
        {typeof(Guid), "guid" },
     };
     public static string ToXmlTypeString(this Type type)
     {
         string typeString;
if (TypeMappings.TryGetValue(type, out typeString)) { return typeString; } return null; } }
Now we can add the view for the Wadl action. Adding a view might not seem particularly intuitive here, but we’re generating xml output, and Razor works well with angle brackets! The full source for the Wadl.cshtml view is here – you will need to change the namespaces to match your project (unless you called it WebApiWadl like me!).
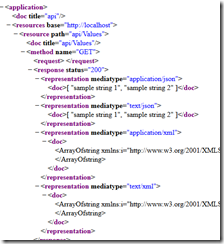
Build and run the project again, and this time navigate to /help/wadl and you should see a page of xml describing your api!
Importing into Azure API Management
The next step is to create the API in API Management. If you are new to Azure API Management then take a look at the Getting Started guide.
From within the management console (linked to on the dashboard for the API Management instance in the Azure portal), select Import API:
This gives the option to choose WADL or Swagger (clearly we’ll pick WADL at this point). You can then choose to paste in the WADL, upload it as a file, or enter the URL to the WADL (if it is publically accessible).
Once you’ve done this then API Management will import your API as shown below.
Adding form url encoded samples
If you look through the help pages you may notice that the samples for form url encoded requests are missing. This is a limitation of the formatter that is used to handle form url encoded data - it only has support for parsing the format, not generating it. As a quick workaround you can add entries to the HelpPageConfig (under Areas\HelpPage\App_Start):
config.SetSampleForType("My Sample String", new MediaTypeHeaderValue("application/x-www-form-urlencoded"), typeof(string));
To read more about configuring the Help Pages, see https://www.asp.net/web-api/overview/creating-web-apis/creating-api-help-pages and https://blogs.msdn.com/b/yaohuang1/archive/2012/10/13/asp-net-web-api-help-page-part-2-providing-custom-samples-on-the-help-page.aspx. These articles discuss how to link the api documentation up with the xml code comments, and how to customise the sample data.
Summary
It took relatively few steps to get the WADL output up and running. There are a couple of areas that may need a bit of work (depending on your needs):
- Automatically adding form encoded samples. I’d prefer this to happen automatically as I then I wouldn’t have to remember to update the documentation samples if I change the request/response format)
- Describing non-200 responses. I haven’t even looked at whether this is something that the ApiExplorer exposes!
Even with the short list above, I was pleased with how quickly I could produce the WADL. It definitely saved me some time importing my API into Azure API Management!
Comments
Anonymous
May 20, 2014
Awesome! In a few short years you'll have completely reinvented SOAP and then we'll have to find something else to reinvent from scratch.Anonymous
May 24, 2014
Mike, that was exactly my thought too. LOL.Anonymous
May 29, 2014
@Mike, Lachlan - welcome aboard! Maybe I should have put a note at the top of the post that you can stick with SOAP if you want to? ;-)Anonymous
October 13, 2014
The comment has been removedAnonymous
February 02, 2015
Do you plan to support also params from body and not only from URI?Anonymous
September 07, 2015
@James/Stan - As well as WADL, there is swagger as a competing specification. For .NET, the swashbuckle library is awesome - seriously worth checking out as it has loads more functionality :-) Swagger - http://swagger.io/ Swashbuckle - github.com/.../Swashbuckle


