Configuring and Customizing Remote Web Access on Windows Server 2012 R2 Essentials
[This post comes to us courtesy of Maanavi Bisaria and Rituraj Choudhary from Global Business Support]
We will cover the following aspects of Remote Web Access (RWA) on Windows Server 2012 R2 Essentials in this blog:
- Configuring Remote Web Access
- Customizing Remote Web Access
Configuring Remote Web Access
To configure RWA, open the HOME tab on the Windows Server Essentials Dashboard. On the Get Started page, click Set up Anywhere Access, and then click Click to configure Anywhere Access.
This will open Set up Anywhere Access wizard. On the first screen, if you don’t have a UPnP router, you should check the option Skip router setup. I want to set up my router manually as indicated below, and then click Next.
You would then see a Getting Started page. Click Next to proceed. On the following screen, check the box I want to set up a new domain name.
The wizard would search for the available domain name service providers on the next screen and presents you with these two options:
The first option Purchase professional domain name from a supported provider offers GoDaddy.com and eNomCentral as the supported domain name service providers. However, if you don’t intend to pay for the domain name services, choose the second option Get a personalized domain from Microsoft.
Once you hit Next on this screen, you need to sign in to your Microsoft account with your Live ID. Accept the Privacy Statement and Agreement, and then type a name for your domain (remotewebaccess.com is provided as a default domain name suffix). Click on the Check Availability button to check the availability of the domain name. Click on Set Up when you find a suitable domain name available for use.
Once your domain name has been set up, you may configure Remote Web Access. To do so, check the box Remote Web Access and click Next. You may also choose to enable VPN in this step, however, we will discuss VPN on a separate blog post.
This step in the background installs and configures Network Policy Server, Remote Desktop Gateway, Client Certificate Mapping Authentication, and RPC over HTTP Proxy. You may verify these roles/features in the Server Manager.
Once this is completed successfully, your Remote Web Access has been set up successfully and can be browsed at https:// <yourdomainname>.remotewebaccess.com.
Customizing Remote Web Access
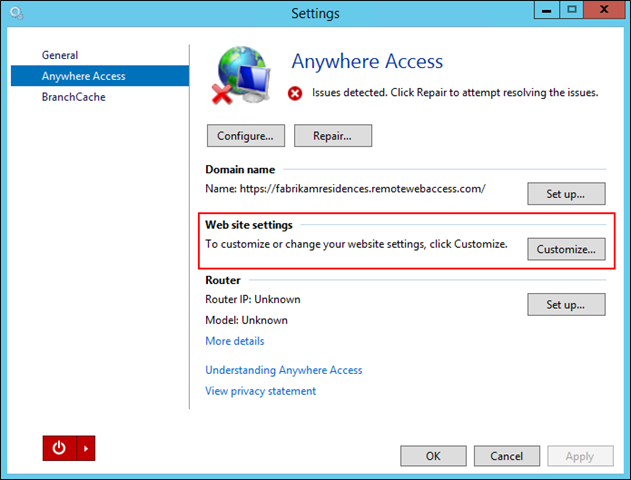
Once the Anywhere Access Wizard has been completed, open the HOME tab on the Windows Server Essentials Dashboard. On the Get Started page, click Set up Anywhere Access, and then click Click to configure Anywhere Access. This will open the Settings page of Anywhere Access. Please note that once we have configured RWA, you can view the status of Anywhere Access at the top of this window, along with Configure and Repair options.
Let’s now click Customize in the Web site settings section to see what it holds.
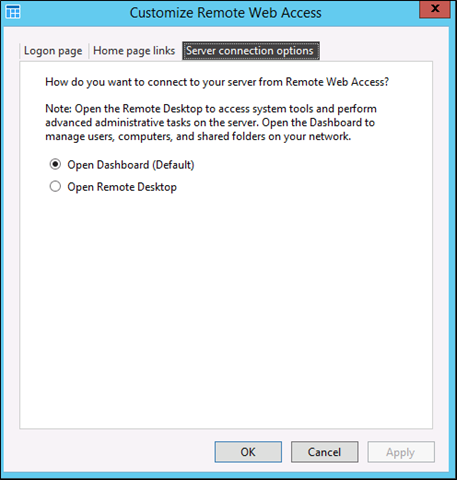
On the Customize Remote Web Access window, you can customize the Logon page, Home page links and Server Connection options. Click on Logon page tab to customize Web site title, Background image and Web site logo.
The Home page links tab offers you option of adding or removing links that appear on the RWA home page.
The Server connection options page provides the way RDP connection is made to the Server. The default option is Open Dashboard (Default) . You may choose to connect to the Server normally by selecting Open Remote Desktop.
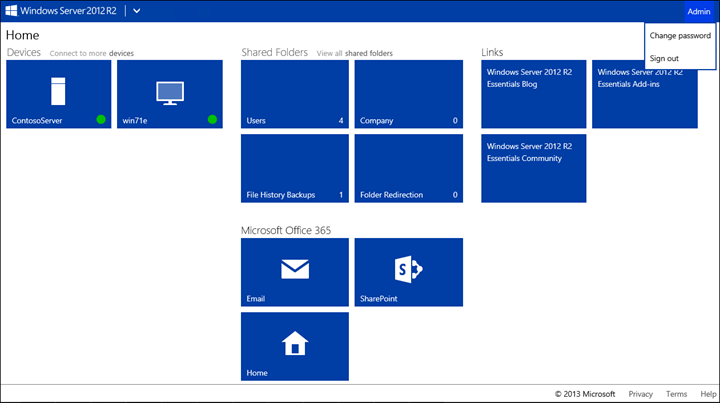
To sum up, configuration and customization of Remote Web Access on Windows Server 2012 R2 Essentials is a stress-free procedure, and the result is a clutter free RWA user interface:
The Devices tile group contains the computers you have rights to connect to. There are similar tiles for Shared Folders, Links and Microsoft Office 365. If you click the user account on the top-right of the page, you have an option to change your user account password. We will discuss these features with time. In the meantime you may refer to this TechNet.
Comments
- Anonymous
January 01, 2003
thank you - Anonymous
January 01, 2003
I am experimenting with Essentials 2012 R2 eval. I have successfully set up RWA and went with the *.remotewebaccess.com option. Now, I'd like to set up my server for real and use the same domain name and associated cert. How do I go about doing that? - Anonymous
January 01, 2003
I have same question as Faster Connections! How do we customise the shares, I've lost Folder Redirection share on RWA and don't know how to get it back. - Anonymous
January 01, 2003
GRAVITYSYSTEMS: You state your ANTISPAM But yet you are spamming this forum with your spam, that has no relevance to any question on this board - Anonymous
January 01, 2003
This feature has been there with the Essentials family; and yes in it does eliminate the need to buy and install a trusted third party certificate. The wizard also attaches and configures the certificate for the RWA web site, VPN and DirectAccess. - Anonymous
January 01, 2003
Thank you, great article. - Anonymous
May 07, 2014
The option to get a domain name from Microsoft for RWA is new, I think. Does the wizard take care of setting up an SSL certificate - and does this eliminate the need to buy and install a third-party certificate? If so, that's quite a nice improvement for small businesses - simplifies setup and reduces cost. - Anonymous
May 08, 2014
Pingback from Blog Post: Configuring and Customizing Remote Web Access on Windows Server 2012 R2 Essentials | NextOff - Anonymous
May 08, 2014
Pingback from Blog Post: Configuring and Customizing Remote Web Access on Windows Server 2012 R2 Essentials | Gradegood - Anonymous
May 08, 2014
The comment has been removed - Anonymous
May 10, 2014
I have same question as Faster Connections! How do we customise the shares, I've lost Folder Redirection share on RWA and don't know how to get it back. - Anonymous
May 14, 2014
227 Microsoft Team blogs searched, 62 blogs have new articles. 164 new articles found searching from - Anonymous
May 21, 2014
Pingback from Understanding VPN configuration in Windows Server 2012 R2 Essentials - The Windows Server Essentials and Small Business Server Blog - Site Home - TechNet Blogs - Anonymous
May 21, 2014
[This post comes to us courtesy of Rituraj Choudhary from Global Business Support]
In this post we - Anonymous
June 11, 2014
Produktový tým Windows Serveru Essentials začal na svém blogu vydávat sérii - Anonymous
August 11, 2014
These are the top Microsoft Support solutions for the most common issues experienced when you use Windows - Anonymous
August 11, 2014
Hi, How to deploy app on to RWA ? some RDW Access ? - Anonymous
August 12, 2014
These are the top Microsoft Support solutions for the most common issues experienced when you use Windows - Anonymous
August 16, 2014
These are the top Microsoft Support solutions for the most common issues experienced when you use Windows - Anonymous
August 22, 2014
The comment has been removed - Anonymous
September 12, 2014
using windows 7 home pc to RWA Windows Storage Server 2008 R2. Until two days ago, RWA was no issue. Since last two days (when I updated windows) cannot access the server remotely on two computers, although it works fine on other computers. The message i get is 'Critical Error - Cannot connect to remote Web Access. Please contact the person who manages the server' message
Remote web access works on firefox, chrome and Iphone, but obviously those browsers don't allow me to connect to computers although I can see, and download/upload files in shared folders with those browsers too - Anonymous
January 23, 2015
Is there anyway to modify the RWA site with HTML or to create your own using HTML/CSS code? - Anonymous
February 24, 2015
Anyone can tell me how to add more devices so that it will show under Devices panel i.e. my other computer or workstation?
Thanks! - Anonymous
March 02, 2015
WIlliam, you would use the domain name to connect more devices locally.
I.E. .com/connect.
It will ask to install a file, log in with your account. and that device will show up as well.
Way I got it to work anyways, issues with this is if you are not using (windows 7 Pro +) or windows 8 that allows for domain connections Remote access will be a pain to get working.
Non local, there is another way, through the website you set up. then /connect as well. steps migth be the same. Havent bothered adding this feature myself yet. Hope this helps - Anonymous
March 03, 2015
The comment has been removed - Anonymous
March 05, 2015
Gravity Systems, we are an Managed IT Services provider, our main aim is to support business IT outsourcing, we provide these services " Network Services ,Technical Support , In House IT Services , Server Solutions , Anti-Spam , Online backup , Gravity Office Suite ,Work from Home Solutions , IT Planning & Installation , MPLS options , Managed It for your Phoenix Business ,Cloud Services”. For more details www.GravityUSA.com and Tel: 512-684-3263 - Anonymous
March 10, 2015
do I have to run DHCP on the Server or can I run it on the Router? - Anonymous
March 12, 2015
Can anyone suggest a two factor authentication solution for Server 2012R2 Essentials RWA? We used Scorpion Software's AuthAnvil for years and were very happy with the simplicity and reliability, but they will not support 2012R2 Essentials. - Anonymous
April 08, 2015
The comment has been removed - Anonymous
April 24, 2015
We looked at this but clients really wanted more features such as opening files directly for edit and mapping drives remotely using webdav. We created a new product that is windows based for this: www.myworkdrive.com - Anonymous
May 13, 2015
Can't see any computers listed in the devices area. Even urder User Properties / Computer Access tab, I see no computers/devices to allow access too. Very frustrating. - Anonymous
May 15, 2015
These are the top Microsoft Support solutions for the most common issues experienced when you use Windows - Anonymous
June 24, 2015
Well explained, each and every steps are perfectly demonstrated. If anybody is looking for custom RD web access than, you can visit the sitehttp://bit.ly/198UksS - Anonymous
July 13, 2015
Will there be problems when i try to run the Outlook Web App and Remote Web Access on the same Server? - Anonymous
September 17, 2015
After installing SharePoint Foundation 2013 on WSE 2012 R2, Anywhere Access ability is corrupted and will not repair or configure correctly again.
Any ideas? - Anonymous
October 19, 2015
How do you customise the RWA (Remote Web Access) to accept the UPN (User Principal Name) logon format in addition to the Down-Level logon format? - Anonymous
December 16, 2015
Can you post how to do this on Windows 2012 Standard? - Anonymous
December 30, 2015
Is there a way to customize Windows Server Essentials’ Remote Web Access (RWA) to allow logon using the User Principal Name (UPN) aka email address format? - Anonymous
January 07, 2016
http://www.happynewyear2016wishesimagessms.com/hindu-festival-2016/
http://www.happynewyear2016wishesimagessms.com/lohri-pics-lohri-sms-lohri-wallpapers/
http://www.happynewyear2016wishesimagessms.com/happy-lohri-images/
http://www.happynewyear2016wishesimagessms.com/happy-lohri-quotes/
http://www.happynewyear2016wishesimagessms.com/happy-lohri-wishes/
http://www.happynewyear2016wishesimagessms.com/happy-lohri-wallpaper/
http://www.happynewyear2016wishesimagessms.com/lohri-greetings/
http://www.happynewyear2016wishesimagessms.com/lohri-images/
http://www.happynewyear2016wishesimagessms.com/lohri-songs/
http://www.happynewyear2016wishesimagessms.com/lohri-wishes/
http://www.happynewyear2016wishesimagessms.com/lohri-festival/
http://www.happynewyear2016wishesimagessms.com/happy-lohri-bonfire-festival/
http://www.happynewyear2016wishesimagessms.com/lohri-bonfire-festival/
http://www.happynewyear2016wishesimagessms.com/lohri-the-bonfire-festival/
http://www.happynewyear2016wishesimagessms.com/up-helly-aa-event-in-scotland/
http://www.happynewyear2016wishesimagessms.com/dinagyang-festival/
http://www.happynewyear2016wishesimagessms.com/sundance-film-festival-2016/
http://www.happynewyear2016wishesimagessms.com/wwe-in-india-wwe-live-event-in-new-delhi/
http://www.happynewyear2016wishesimagessms.com/lohri-wishes-for-friends-family/
http://www.happynewyear2016wishesimagessms.com/cowboy-poetry/
http://www.happynewyear2016wishesimagessms.com/ati-atihan-festival-full-information/
http://www.happynewyear2016wishesimagessms.com/holy-ship-2016/
http://www.happynewyear2016wishesimagessms.com/things-to-do-in-banff-town-canada/
http://www.happynewyear2016wishesimagessms.com/rainbow-serpent-festival/
http://www.happynewyear2016wishesimagessms.com/sundance-film-festival-winners/
http://www.happynewyear2016wishesimagessms.com/junkanoo-parade/
http://www.happynewyear2016wishesimagessms.com/hogmanay-2016/
http://www.happynewyear2016wishesimagessms.com/ice-sculpture-snow-sculpture-festival/
http://www.happynewyear2016wishesimagessms.com/carnevale-di-venezia/
http://www.happynewyear2016wishesimagessms.com/bpm-festival-what-bpm-festival-is/
http://www.happynewyear2016wishesimagessms.com/thaipusam-thaipusam-is-a-hindu-festival/
http://www.happynewyear2016wishesimagessms.com/holy-ship-unveils-massive-lineups-for-2016-cruises/
http://www.happynewyear2016wishesimagessms.com/quebec-winter-carnival/
http://www.happynewyear2016wishesimagessms.com/jam-cruise/
http://www.happynewyear2016wishesimagessms.com/things-to-do-in-edinburgh/
http://www.happynewyear2016wishesimagessms.com/harbin-ice-festival/
http://www.happynewyear2016wishesimagessms.com/the-sundance-film-festival-a-program-of-the-sundance-institute/ - Anonymous
January 07, 2016
http://www.republicdayimagesi.com/republic-day-songs/
http://www.republicdayimagesi.com/republic-day-status-republic-day-wallpaper/
http://www.republicdayimagesi.com/republic-day-information-republic-day-photos/
http://www.republicdayimagesi.com/republic-day-pictures-republic-day-pics/
http://www.republicdayimagesi.com/republic-day-messages-republic-day-sms/
http://www.republicdayimagesi.com/republic-day-in-hindi/
http://www.republicdayimagesi.com/essay-on-republic-day/
http://www.republicdayimagesi.com/what-is-republic-day/
http://www.republicdayimagesi.com/republic-day-wishes/
http://www.republicdayimagesi.com/speech-on-republic-day-in-hindi-speech-for-republic-day/
http://www.republicdayimagesi.com/republic-day-speech-in-hindi/
http://www.republicdayimagesi.com/republic-day-image/
http://www.republicdayimagesi.com/india-republic-day/
http://www.republicdayimagesi.com/republic-day-quotes/
http://www.republicdayimagesi.com/images-of-republic-day-pics-of-republic-day/
http://www.republicdayimagesi.com/speech-on-republic-day/
http://www.republicdayimagesi.com/republic-day-2016/
http://www.republicdayimagesi.com/republic-day-india/
http://www.republicdayimagesi.com/republic-day-speech/
http://www.republicdayimagesi.com/republic-day-images/
http://www.republicdayimagesi.com/happy-republic-day/
http://www.republicdayimagesi.com/republic-day/
http://www.republicdayi.com/republic-day-songs/
http://www.republicdayi.com/republic-day-status-republic-day-wallpaper/
http://www.republicdayi.com/republic-day-information-republic-day-photos/
http://www.republicdayi.com/republic-day-pictures-republic-day-pics/
http://www.republicdayi.com/republic-day-messages-republic-day-sms/
http://www.republicdayi.com/speech-on-republic-day-in-hindi-speech-for-republic-day/
http://www.republicdayi.com/republic-day-in-hindi/
http://www.republicdayi.com/essay-on-republic-day/
http://www.republicdayi.com/what-is-republic-day/
http://www.republicdayi.com/republic-day-wishes/
http://www.republicdayi.com/republic-day-speech-in-hindi/
http://www.republicdayi.com/republic-day-image/
http://www.republicdayi.com/india-republic-day/
http://www.republicdayi.com/republic-day-quotes/
http://www.republicdayi.com/images-of-republic-day/
http://www.republicdayi.com/speech-on-republic-day/
http://www.republicdayi.com/republic-day-2016/
http://www.republicdayi.com/republic-day-india/
http://www.republicdayi.com/republic-day-speech/
http://www.republicdayi.com/republic-day-images/
http://www.republicdayi.com/happy-republic-day/
http://www.republicdayi.com/republic-day/ - Anonymous
January 07, 2016
http://www.happylohrii.com/lohri-pics-lohri-sms-lohri-wallpapers/
http://www.happylohrii.com/happy-lohri-images/
http://www.happylohrii.com/hindu-festival-2016/
http://www.happylohrii.com/happy-lohri-quotes/
http://www.happylohrii.com/happy-lohri-wishes/
http://www.happylohrii.com/happy-lohri-wallpaper/
http://www.happylohrii.com/lohri-greetings/
http://www.happylohrii.com/lohri-images/
http://www.happylohrii.com/lohri-songs/
http://www.happylohrii.com/lohri-wishes/
http://www.happylohrii.com/lohri-festival/
http://www.happylohrii.com/happy-lohri-bonfire-festival/
http://www.happylohrii.com/lohri-bonfire-festival/


