Just enough BGP to get your Azure dual-redundancy, active-active VPN gateways up and running
I'd last dabbled in Azure Site to Site (S2S) VPN or Virtual Network Gateways when the configuration was straightforward, but the feature-set was lacking. Given an opportunity to get back into configuring VPN Gateways recently, I dove straight in. With new features like support for BGP and full-mesh high-availability connectivity, the humble Azure Virtual Network Gateway was finally cool.
Before we begin, this blog post is a walk-through to configure the dual-redundancy: active-active VPN gateways for both Azure and on-premises networks option to connect your Azure Virtual Network to your on-premises network using the Azure Virtual Network Gateway. No Azure ExpressRoute here.
For the purpose of this walk-through, my entire setup is in Azure however you could replace the second Azure Virtual Network Gateway (in VNET2) with your on-premises VPN device. I am not using VNET Peering specifically to illustrate how Azure to on-premises connectivity can be configured.
This post also assumes some familiarity with basic networking concepts such as IP addresses, address spaces, subnets and Azure services such as Azure Virtual Networks and Virtual Network Gateways. If you're not familiar with the Azure Virtual Network Gateway, you can get started with the official Azure documentation for this service.
We will use the Azure Portal, as I see cross-premises connectivity configuration as a one-time or one-off configuration and potentially not worth the effort required to understand Azure PowerShell, if you're not already familiar with it. That said, I'm a big fan of the Azure CLI, Azure PowerShell and ARM templates for any task that has even the slightest possibility of being repeatable. You could also argue that maintaining a record of the configuration is much easier to do with these technologies than with screenshots of the Azure Portal (which is bound to change over time), in which case, the article you should peruse is this one.
Before beginning the configuration, I needed to understand what BGP - Border Gateway Protocol and ASN - Autonomous System Number are, and what I had to enter into my Azure Virtual Network Gateway configuration for the BGP and ASN fields.
Without giving you the "Network Guru" version (I'm as far from one as can be), BGP is the protocol that network routers (on the internet and also on private networks) use to "exchange" routes and router "availability" information. As far as router availability goes, there's nothing for us to configure here and so we move on to the routes that are exchanged. It also helps to take note of the fact that you're almost certainly configuring this on a private network - your "private" Azure Virtual Network to your "private" on-premises network. This internet/private difference matters, as we'll see later on, with ASN.
The aforementioned routes that need to be exchanged are nothing but the address spaces/networks/subnets behind your Azure Virtual Network Gateway. Before BGP, these were the static "Address Prefixes" you'd include in your "Local Network Gateway" to let the router at the other end know that to reach these networks, they'd need to route the traffic via you. With BGP, there is no need to statically specify these address spaces/networks/subnets. BGP automatically exchanges this information with your router's "peers". So what you need to specify instead of a static address space, is actually the "BGP Peer IP address" of the router being represented by the "Local Network Gateway" in CIDR format (example: 192.168.0.228/32). For your on-premises VPN device (router), your network admin should give you this. This address is a private IP address and differs from the public IP addresses of the on-premises VPN devices and Azure Virtual Network Gateway that are used to set up the IPsec tunnel.
Coming to ASN (or AS Number), my "just enough" explanation is that this is a unique number assigned to your on-premises VPN device (router) as well as Azure VPN Gateway by your on-premises network admin/team. Why should it be issued by them? Because just like an IP address space/network/subnet, this needs to be unique across your entire private/corporate network. Why does it need to be unique? When BGP on a router learns about a route that has its own ASN in its path then it will be discarded.
On then, to the key difference between an Internet ASN and a private ASN. The former can only be issued by IANA, while the latter is issued by your network team (or for testing, you could use a private ASN except these. I generally use 65516 for one Azure VPN Gateway and 65521 for the other one that mimics my on-premises VPN device).
With that lengthy but necessary primer out of the way, it's time to move on to the walk-through.
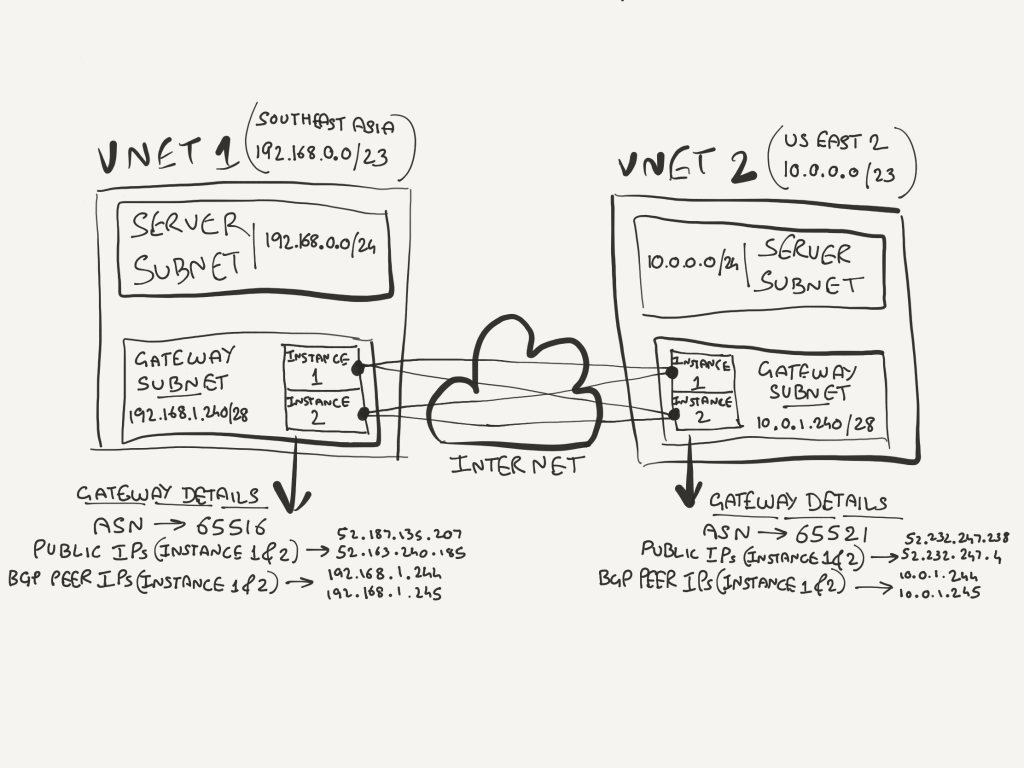
This is our proposed network architecture:
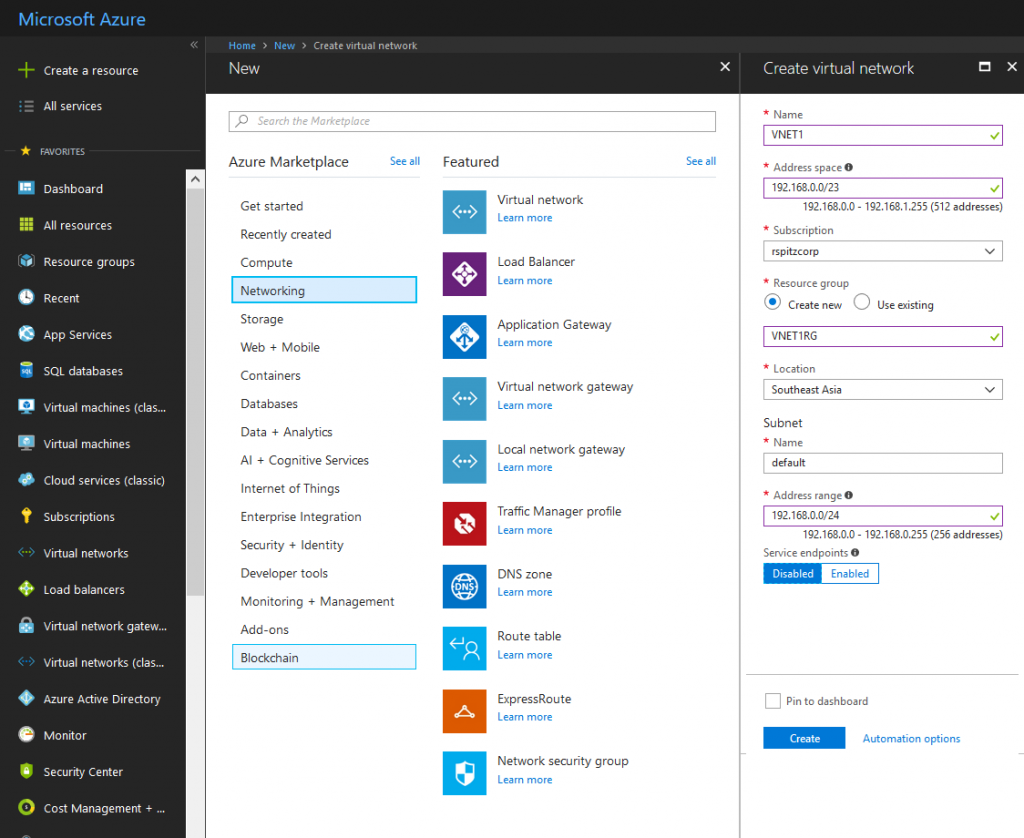
We start by creating our Virtual Networks, VNET1 in Southeast Asia and VNET 2 in US East 2.
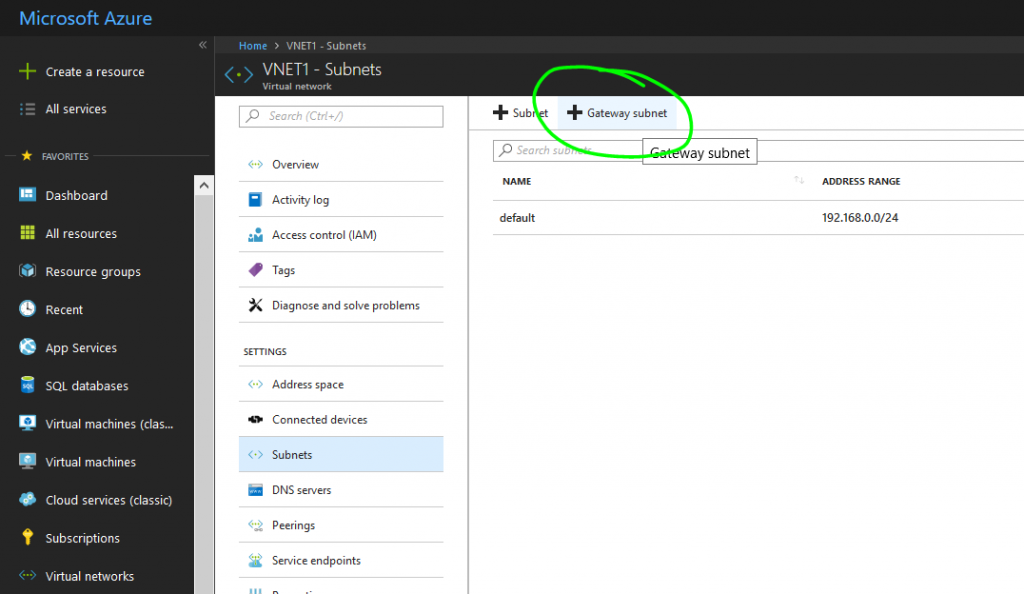
In each Virtual Network, create the Gateway subnet.
Shown below is the Gateway Subnet creation for VNET1. Perform the same set of steps for VNET2, but use 10.0.1.240/28 as the Address range.
Leave other settings at their default values. 

For each of the Virtual Networks, create a Virtual Network Gateway.
Remember to use the VpnGw1 or higher SKU. The lower SKUs don't support this configuration.
Shown below is the Virtual Network Gateway creation for VNET1.Perform the same set of steps for VNET2, but use 65521 as the ASN.
For both Gateways, create new "Basic" Public IPs following the on-screen UI "blades", for First and Second IP configurations. To locate the appropriate VNET, first set the "Location" property to Southeast Asia (VNET1)/East US 2 (VNET2). 

Next we create a "Local Network Gateway" per instance of the remote Azure Virtual Network Gateway. The Local Network Gateway is nothing but a means to save the configuration for the remote (or on-premises) VPN device. Referring to the network architecture diagram at the beginning of this post, each instance of the Azure Virtual Network Gateway on VNET2 is the remote (assume on-premises) VPN device for the Azure Virtual Network Gateway on VNET1.
As the Azure Virtual Network Gateway on VNET2 is active-active, we need to configure two Local Network Gateways, each representing one instance.
The details we configure for our Local Network Gateway to be used by the Azure Virtual Network Gateway in VNET1 are those from the Azure Virtual Network Gateway in VNET2.
LocalNetworkGateway1-SEAsia:
IP Address: 52.232.247.238 (Public IP Address of first instance of remote Azure Virtual Network Gateway)
Address Space: 10.0.1.244/32 (First BGP Peer IP Address in CIDR format)
ASN: 65521 (ASN of Azure Virtual Network Gateway in VNET2)
BGP Peer IP Address: 10.0.1.244 (First BGP Peer IP Address)
Resource Group: VNET1RG (Resource Group of VNET1)
Location: Southeast Asia (location of VNET1)
Next, using the second set of IP addresses, we configure the Local Network Gateway for the second instance of the Azure Virtual Network Gateway in VNET2:
LocalNetworkGateway2-SEAsia:
IP Address: 52.232.247.4 (Public IP Address of second instance of remote Azure Virtual Network Gateway)
Address Space: 10.0.1.245/32 (Second BGP Peer IP Address in CIDR format)
ASN: 65521 (ASN of Azure Virtual Network Gateway in VNET2)
BGP Peer IP Address: 10.0.1.245 (Second BGP Peer IP Address)
Resource Group: VNET1RG (Resource Group of VNET1)
Location: Southeast Asia (location of VNET1)
Now, we create the Local Network Gateways for the Azure Virtual Network Gateway in VNET2, treating the Azure Virtual Network Gateway in VNET1 as the remote VPN device.
Using the guidance above, collate the values from the Azure Portal required for the configuration using the Azure Virtual Network Gateway in VNET1.
LocalNetworkGateway1-EastUS2:
IP Address: 52.187.135.207 (Public IP Address of first instance of remote Azure Virtual Network Gateway)
Address Space: 192.168.1.244/32 (First BGP Peer IP Address in CIDR format)
ASN: 65516 (ASN of Azure Virtual Network Gateway in VNET2)
BGP Peer IP Address: 192.168.1.244 (First BGP Peer IP Address)
Resource Group: VNET2RG (Resource Group of VNET2)
Location: East US 2 (location of VNET2)
LocalNetworkGateway2-EastUS2:
IP Address: 52.163.240.185 (Public IP Address of second instance of remote Azure Virtual Network Gateway)
Address Space: 192.168.1.245/32 (Second BGP Peer IP Address in CIDR format)
ASN: 65516 (ASN of Azure Virtual Network Gateway in VNET2)
BGP Peer IP Address: 192.168.1.245 (Second BGP Peer IP Address)
Resource Group: VNET2RG (Resource Group of VNET2)
Location: East US 2 (location of VNET2)
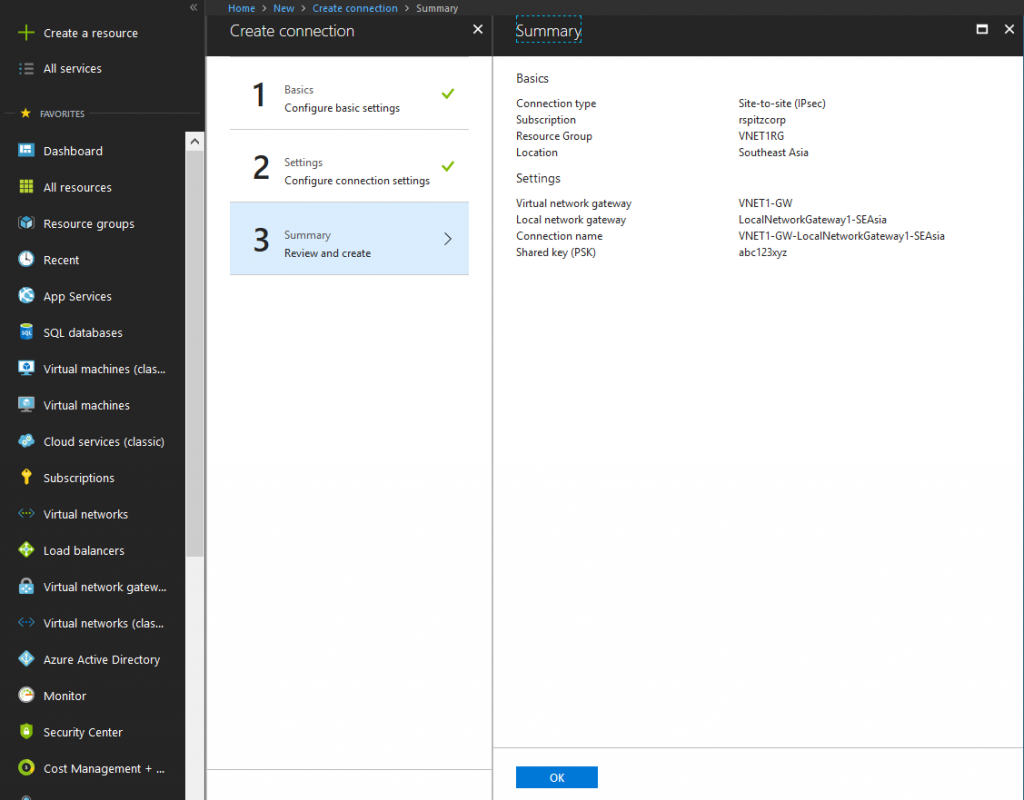
Finally, from a configuration standpoint, we need to create a "Connection" from each Azure Virtual Network Gateway to a Local Network Gateway, which represents each instance of the remote VPN device.
Though we only need to create one "Connection" from the Azure Virtual Network Gateway to one instance of the remote VPN device, internally, the Azure Virtual Network Gateway sets up two IPsec tunnels to the instance of the remote VPN device - one from each instance of the Azure Virtual Network Gateway. This means at the end of the configuration, we have full-mesh connectivity.
First Connection:
Connection type: Site-to-site (IPsec) (Type of tunnel for on-premises VPN device connectivity)
Resource Group: VNET1RG (Resource Group of VNET1)
Location: Southeast Asia (Location of VNET1)
Virtual Network Gateway: VNET1-GW (Azure Virtual Network Gateway in VNET1)
Local Network Gateway: LocalNetworkGateway1-SEAsia (Local Network Gateway representing first instance of Azure Virtual Network Gateway in VNET2)
Connection Name: AUTO POPULATED
Shared key (PSK): USE YOUR OWN STRONG KEY (use SAME value for all subsequent Connections)
Enable BGP: Checked
Similarly, create another connection.
Second Connection:
Connection type: Site-to-site (IPsec) (Type of tunnel for on-premises VPN device connectivity)
Resource Group: VNET1RG (Resource Group of VNET1)
Location: Southeast Asia (Location of VNET1)
Virtual Network Gateway: VNET1-GW (Azure Virtual Network Gateway in VNET1)
Local Network Gateway: LocalNetworkGateway2-SEAsia (Local Network Gateway representing the second instance of Azure Virtual Network Gateway in VNET2)
Connection Name: AUTO POPULATED
Shared key (PSK): USE YOUR OWN STRONG KEY (use SAME value as previous connection)
Enable BGP: Checked
Now, switching over to the Azure Virtual Network Gateway in VNET2, we create two more Connections.
First Connection:
Connection type: Site-to-site (IPsec) (Type of tunnel for on-premises VPN device connectivity)
Resource Group: VNET2RG (Resource Group of VNET2)
Location: East US 2 (Location of VNET2)
Virtual Network Gateway: VNET2-GW (Azure Virtual Network Gateway in VNET2)
Local Network Gateway: LocalNetworkGateway1-EastUS2 (Local Network Gateway representing first instance of Azure Virtual Network Gateway in VNET1)
Connection Name: AUTO POPULATED
Shared key (PSK): USE YOUR OWN STRONG KEY (use SAME value for all subsequent Connections)
Enable BGP: Checked
Second Connection:
Connection type: Site-to-site (IPsec) (Type of tunnel for on-premises VPN device connectivity)
Resource Group: VNET2RG (Resource Group of VNET2)
Location: East US 2 (Location of VNET2)
Virtual Network Gateway: VNET2-GW (Azure Virtual Network Gateway in VNET1)
Local Network Gateway: LocalNetworkGateway2-EastUS2 (Local Network Gateway representing the second instance of Azure Virtual Network Gateway in VNET1)
Connection Name: AUTO POPULATED
Shared key (PSK): USE YOUR OWN STRONG KEY (use SAME value as previous connection)
Enable BGP: Checked
That's it! You should now have dual-redundancy, active-active VPN gateways configured and running.
But wait, you'd like to verify all your hard work, after all. Take a look at both your Azure Virtual Network Gateways. Under connections, this is what you should see:
...and BGP and all that talk about exchanging routes and so on?
Install Azure PowerShell and log into Azure:
Add-AzureRmAccount
Then run:
Get-AzureRmVirtualNetworkGatewayBGPPeerStatus -ResourceGroupName VNET1RG -VirtualNetworkGatewayName VNET1-GW
Bonus Tip:
Check out this Azure PowerShell cmdlet. It generates a VPN device specific configuration script for your Azure Virtual Network Gateway configuration that you could share with your network team to configure the on-premises VPN device.
Get-AzureRmVirtualNetworkGatewayConnectionVpnDeviceConfigScript -DeviceFamily "IOS (ISR, ASR)" -DeviceVendor Cisco -FirmwareVersion "15.x (IKEv2)" -Name VNET1-GW-LocalNetworkGateway1-SEAsia -ResourceGroupName VNET1RG
If you're wondering what VNET1-GW-LocalNetworkGateway1-SEAsia in the command is, it's the auto-generated name for one of the connections we configured. Navigate to Azure Virtual Network Gateway --> Connections to get this value.
To get the supported VPN device details to plug into the command above, run this Azure PowerShell cmdlet:
Get-AzureRmVirtualNetworkGatewaySupportedVpnDevice -ResourceGroupName VNET1RG -Name VNET1-GW
If this article helped you, let me know in the comments section.
Richard Spitz
Cloud Solution Architect
Microsoft
Comments
- Anonymous
February 19, 2018
Great article - Anonymous
February 19, 2018
Very useful guide! Do you have any ARM template to deploy this scenario?- Anonymous
February 23, 2018
Thanks, Dave! I do not have an ARM template for this scenario but my guidance - if you wanted to create one - would be to export the ARM templates from each of the deployed resource groups using the "Automation script" option within that resource group. Edit these templates to create just the virtual network and virtual network gateway. Then use the Public IP Address and BGP Peer IP addresses from the virtual network gateway deployments to create the local network gateway and finally the connection objects. https://docs.microsoft.com/en-us/azure/azure-resource-manager/resource-group-linked-templates I might give this a go when I have some spare time.- Anonymous
March 31, 2018
The comment has been removed- Anonymous
May 23, 2018
The comment has been removed
- Anonymous
- Anonymous
- Anonymous


