Margin, Windows Frame and Glass Window
A couple of weeks ago I tried to implement a glass window in C# application. My first thought is to edit the properties of WinForm. For example, I modified the "BackColor" and "Opacity" of the Form and did see the form became transparent and its color was close to the windows frame. However, it didn't match with the windows frame smoothly and it was not a real glass window! Thus, I read some articles from website and realized the trick of "glass" window is to "Extend the Windows Frame" to the client area on the windows form. Of course it makes a lot of sense. As Vista's windows frame is a glass style, the window certainly will become glass window if we extend its frame to the client area. Further, I had to import the Vista API to my C# by
[DllImport("dwmapi.dll")]
internal static extern void DwmExtendFrameIntoClientArea(System.IntPtr hWnd, ref Margins pMargins);
This API looks simple, but it includes some concepts.
- What is Margin?
- What is Client Area?
- Is that enough to create a glass window by this API?
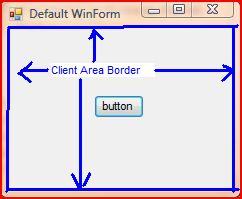
It is easy to find their definitions and information from MSDN. I would like to use some pictures to illustrate the idea.


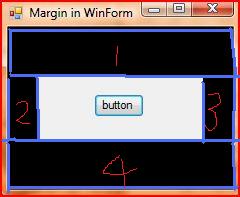
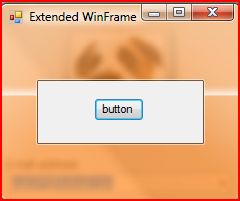
We name the above three pictures from left to right as Figure 1, Figure 2 and Figure 3. The title of every picture (Windows Form) implies what I am trying to illustrate. Figure 1 is the snapshot of a Windows Form that I created by Visual Studio C# Windows Form Application template (only modified its size and addeda button). The client area is the editable area for clients. It excludes the title bar, icon, windows border, etc). Figure 3 is the snapshot of a Glass Window I created. Then, in order to achieve the effect of Figure 3, what I should do?
- Define your margin. The margin structure is defined by its TOP, LEFT, RIGHT, BOTTOM size (the distance from the client area border). For example, Figure 2 displays my defined Margin area by Black color, where its TOP=50, BOTTOM=50, LEFT=30, RIGHT=30
- Call DwmExtendFrameIntoClientArea() API to extend the windows frame to the margin area (passing your above Margin as one of input parameters). Now, the margin area became the extended frames! The black area is extended frame and the white area (much smaller compared with Figure 1) became new client area in Figure 2.
- Paint your Margin (Extended Frame) area as BLACK. How to paint? Divide the margin area into 4 rectangles, refer to Figure 2.
rect_1 = new Rectangle(0, 0, this.ClientSize.Width, m.Top);
rect_2 = new Rectangle(0, m.Top, m.Left, this.ClientSize.Height- m.Top-m.Bottom);
rect_3 = new Rectangle(this.ClientSize.Width - m.Right, m.Top, m.Right, this.ClientSize.Height - m.Top - m.Bottom);
rect_4 = new Rectangle(0, this.ClientSize.Height - m.Bottom, this.ClientSize.Width, m.Bottom);
It is done. Here are the links I think very useful and resourceful.
https://msdn.microsoft.com/en-us/library/bb688195(VS.85).aspx (Custom Window Frame Using DWM)
https://weblogs.asp.net/kennykerr/archive/2006/08/10/Windows-Vista-for-Developers-_1320_-Part-3-_1320_-The-Desktop-Window-Manager.aspx(The Desktop Window Manager)
