Azure Deployments - Speeding up PowerShell DSC by testing locally before using it in an Azure Resource Manager template or from a PowerShell deployment script
Hi Everyone,
As you may know, Azure Virtual Machines relies on Virtual Machine Extensions to perform some critical functionality, PowerShell DSC is one of them and it allows us to execute post installation tasks or to keep existing virtual machines in a state that we require them to be. This blog post shows some quick steps to help testing your DSC configuration locally, just before you add it to the Azure Resource Manager template or in a PowerShell deployment script, which saves time and troubleshooting gets a little bit easier. For more information about available extensions, please refer to this article.
This example shows the steps to execute locally a configuration file that installs an MSI file (Azure PowerShell Module).
In a computer with Powershell 4.0 or greater, copy you DSC configuration file (xyz.PS1) to a folder, e.g. C:\DscTest
Copy any executable or MSI files to the same folder if you’re using it (in this case I’m installing Azure-Powershell.1.5.1.msi, all available module versions can be downloaded from this GitHub link.)
Rename your <xyz>.PS1 file to localhost.ps1
Install any necessary DSC Modules to C:\Program Files\WindowsPowerShell\Modules
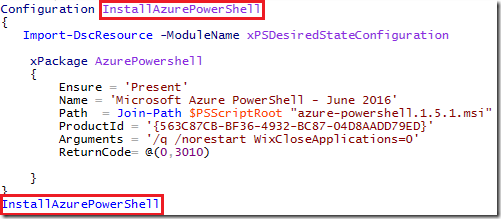
Edit the localhost.ps1 file with Powershell ISE and add the configuration name to the end of the file (must be after the closing curly bracket), like the example below
Execute this file from ISE
You will notice that a MOF file will be created in a folder with the same name as the configuration file and the MOF file will be named localhost.mof, for example:
To execute the DSC just run this cmdlet
Start-DscConfiguration -Path C:\DscTest\InstallAzurePowershell -ComputerName localhost -Force -wait -VerboseNote: the –path argument is the path where your localhost.ps1 resides plus the configuration folder name
This is the resultant output that you can use to identify issues and make necessary corrections, in this example everything is fine and we are good to implement this configuration to our deployment scripts or Azure Resource Manager template.
If you identify any issue with your DSC configuration, just fix your PS1 file and execute steps 6 through 8 again to test it, so it get a new MOF file with the updated configuration.
Troubleshooting
When executing DSC on step 8 you get the following error message
The client cannot connect to the destination specified in the request. Verify that the service on the destination is running and is accepting requests. Consult the logs and documentation for the WS-Management service running on the
destination, most commonly IIS or WinRM. If the destination is the WinRM service, run the following command on the destination to analyze and configure the WinRM service: "winrm quickconfig".
+ CategoryInfo : ConnectionError: (root/Microsoft/...gurationManager:String) [], CimException
+ FullyQualifiedErrorId : HRESULT 0x80338012
+ PSComputerName : localhost
Enable WinRM with the following cmdlet:
Enable-PSRemoting
That’s it for this quick article.
Comments
- Anonymous
December 30, 2016
Great test-before-you-deploy best practices advice Paulo!


