BizTalk ESB: Step by Step Walkthrough Creating a Custom Orchestration Service
Introduction
The BizTalk ESB toolkit is an implementation of an enterprise service bus messaging standard. It allows for separation between message content, processes implementation, and process configuration.
This is using what is called ESB itineraries. An itinerary would define the lifecycle of the message as it goes through the service bus. The itinerary is composed mainly of itinerary services. There are already itinerary services provided with the ESB out of the box, such as the transformation and routing services.
Usually in many situations you would need to provide more business related logic to be executed using BizTalk orchestrations. This is defined as a custom orchestration service.
Step by step guide
To create a custom orchestration extender you should follow the following steps:
Step 1: Create a new BizTalk project in visual studio. For example let’s call this “ESB.Samples.Itinerary.Extenders”.
Step 2: Add references to the ESB assemblies needed which are
Microsoft.Practices.ESB.Adapter
Microsoft.Practices.ESB.ExceptionHandling
Microsoft.Practices.ESB.ExceptionHandling.Schemas.Faults
Microsoft.Practices.ESB.Itinerary
Microsoft.Practices.ESB.Itinerary.Schemas
Microsoft.Practices.ESB.Resolver
Microsoft.Practices.ESB.Resolver.BRE
Microsoft.Practices.ESB.Transform
All these should be added from the server GAC.
Step 3: Add a new orchestration to this assembly and call it (for example) ProcessGWMsg.
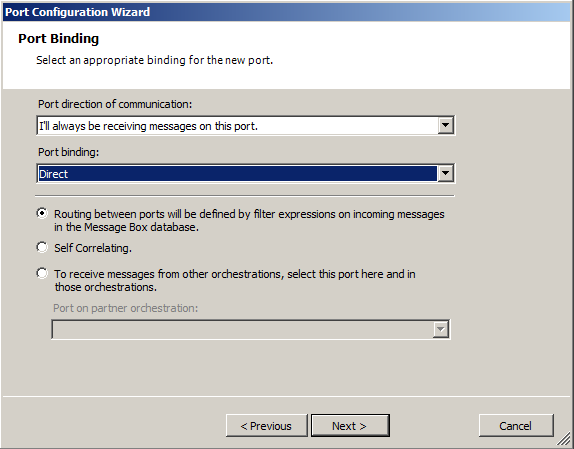
Step 4: Add a direct bound receive port to get the message from the message box database

Step 5: Add a new message with the expected message type you will be processing in this orchestration.
Step 6: Add a receive shape to this orchestration and choose the message variable you will receive the message in and link that to the direct receive port already created and mark the Activate property of this shape to True.
Step 7: Open the editor for the filter expression property of this orchestration.

Step 8: Add a filter expression like the below

The service name should be unique between all your custom orchestrations to make sure there is no multiple-subscription (unless this is needed of course).
Step 9: Give the assembly a strong name, build it, and deploy the assembly to the GAC using the command
gacutil /I ESB.Samples.Itinerary.Extenders.dll
Step 10: Using the command
gacutil /l ESB.Samples.Itinerary.Extenders
Step 11: Mark the strong assembly full name.
Step 12: Open the ESB.Config file in the path “C:\Program Files (x86)\Microsoft BizTalk ESB Toolkit 2.1”
Step 13: Search for the section itineraryServices and add a new line at the end of this section as below:
<itineraryService id="90E44BB1-0952-4EE9-B761-1B07E0EAE974" name="ProcessGWMsg" type=" ESB.Samples.Itinerary.Extenders.ProcessGWMsg, ESB.Samples.Itinerary.Extenders, Version=1.0.0.0, Culture=neutral, PublicKeyToken=3ad832a4e0f593b9" scope="Orchestration" stage="None" />
Where the id actually is a new generated GUID and the ProcessMsg is the name of the orchestration you will be creating later.
Step 14: Close visual studio and start it over.
Step 15: Create a new itinerary called for example “MsgProcessingIti”. Now add to this itinerary all the on-ramp, off-ramp, and itinerary services you want to process your messages. But what we will be interested in is how to call the custom orchestration.
Step 16: Add a new itinerary service

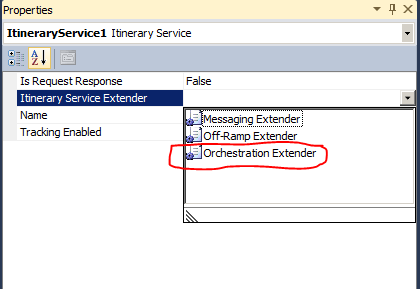
Step 17: Change the extender to be an orchestration extender

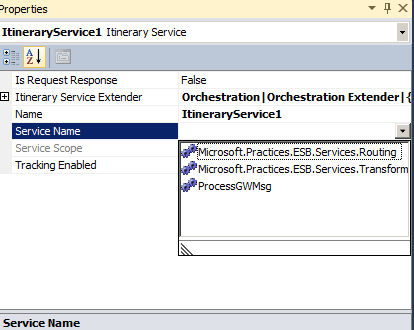
Step 18: Open the service name property and you will find the ProcessGWMsg orchestration. Select that.

Step 19: Now add all the needed resolvers for this itinerary service as needed.
Step 20: Validate, save, and publish the itinerary to the itinerary database.
Step 21: Now revert back to the orchestration and define new variables to handle itinerary operations as below
Variable Name |
Variable Type |
Itinerary |
Microsoft.Practices.ESB.Itinerary.SerializableItineraryWrapper |
resolverDict |
Microsoft.Practices.ESB.Resolver.ResolverDictionary |
resolvers |
Microsoft.Practices.ESB.Itinerary.ResolverCollection |
step |
Microsoft.Practices.ESB.Itinerary.SerializableItineraryStepWrapper |
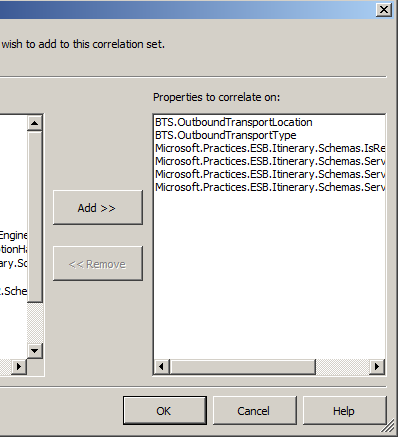
Step 22: Define a new correlation type called “ItineraryAdvance” and define it to include the properties
BTS.OutboundTransportLocation,BTS.OutboundTransportType
Microsoft.Practices.ESB.Itinerary.Schemas.IsRequestResponse
Microsoft.Practices.ESB.Itinerary.Schemas.ServiceName
Microsoft.Practices.ESB.Itinerary.Schemas.ServiceState
Microsoft.Practices.ESB.Itinerary.Schemas.ServiceType
Step 23: Define a new itinerary set of the previously created type in the orchestration with the name “ItineraryAdvanceSet”
Now the real purpose of this correlation set is to promote the itinerary properties to allow the message to be routed to the next itinerary service step.
Step 24: Add a new expression shape to initialize the itinerary variables as below.
itinerary=new Microsoft.Practices.ESB.Itinerary.SerializableItineraryWrapper();
step=new Microsoft.Practices.ESB.Itinerary.SerializableItineraryStepWrapper();
itinerary.Itinerary=Microsoft.Practices.ESB.Itinerary.ItineraryOMFactory.Create(msgRawIn);
step.ItineraryStep=itinerary.Itinerary.GetItineraryStep(msgRawIn);
resolvers=step.ItineraryStep.ResolverCollection;
Step 25: You can access the resolvers in the current executing itinerary service by first making sure we have resolvers by adding a decide shape as below.
Where the “ResolverValid” condition is as below.
resolvers.MoveNext()
Step 26: And to get the resolver dictionary
resolverDict=Microsoft.Practices.ESB.Resolver.ResolverMgr.Resolve(msgIn,resolvers.Current);
Step 27: And to configure a dynamic send port using parameters coming out of the resolver
DynSendGWMsgPort(Microsoft.XLANGs.BaseTypes.Address)=resolverDict.Item("Resolver.TransportLocation");
DynSendGWMsgPort(Microsoft.XLANGs.BaseTypes.TransportType)=resolverDict.Item("Resolver.TransportType");
Step 28: Finally when you done processing and want to advance the itinerary you create a new message that will pass to the next step and while creating this message add a message assignment shape with the code.
itinerary.Itinerary.Advance(msgOut,step.ItineraryStep);
itinerary.Itinerary.Write(msgOut);
Step 29: And when you are sending this message you send it using a direct port to the message box and initialize the correlation set already added to the orchestration previously.

Step 30: Now edit the orchestration to process the messages as you need.
Comments
- Anonymous
November 22, 2011
Master piece, I realy feel lucky to see such a wonderful article that is <a href="www.mlfhardwoodflooringltd.ca ">hardwood floor refinishing toronto</a> what i want.


