Using the Hyper-V integration components with MDT 2008 Update 1 Lite Touch
There have been some blog postings talking about how to add the Hyper-V integration components into Windows PE. The first from Mike Sterling, available at https://blogs.msdn.com/mikester/archive/2008/05/30/using-the-hyper-v-integration-components-in-winpe.aspx, talks about the manual way of going about this. Then the Deployment Guys, specifically David Hornbaker, talked about how to do this with MDT 2008 in his posting at https://blogs.technet.com/deploymentguys/archive/2008/06/12/adding-hyper-v-integration-components-to-winpe-using-mdt-2008.aspx. But with MDT 2008 Update 1, we can improve this process and fix some of the challenges that David alludes to in his post. (I'll point these out below.)
Step #1: Obtaining the drivers
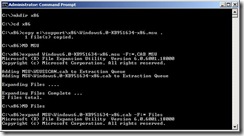
First you need the Hyper-V integration components from the "VMGUEST.ISO". The easiest way to do this is from inside a virtual machine: mount the ISO and extract the needed Windows6.0-KB951634-x86.msu file into a new, empty directory. (See the other blog entries for details.) Then you need to first extract the x86 drivers:
MD MSU
expand Windows6.0-KB951634-x86.msu -F:*.CAB MSUMD Files
expand MSU\Windows6.0-KB951634-x86.cab -F:* Files
(I skipped David's steps that rearranged the files and cleaned up the temporary working directories. You can choose to do those if you like.) Here's what it would look like (except for the output of the final command):
Repeat the steps for the x64 drivers too, using a different new, empty directory because some of the file and directory names will be the same:
MD MSU
expand Windows6.0-KB951634-x64.msu -F:*.CAB MSUMD Files
expand MSU\Windows6.0-KB951634-x64.cab -F:* Files
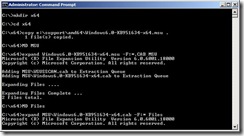
Not surprisingly it will look it looks just like the x86 output, just with different directory and file names:
The final EXPAND command for both x86 and x64 should show 305 files extracted (at least if you are using the Hyper-V RTM integration components; the number may change in the future):
One important note: If you try this on Windows Server 2003 or Windows XP, it may not work properly because these operating systems contain earlier versions of EXPAND.EXE and related DLLs. You won't see any errors or any other indication that the process didn't work; the resulting file count will be much smaller. Ideally, use Windows Vista or Windows Server 2008 to do the extraction. (If you are desperate, you could copy the EXPAND.EXE, DPX.DLL, and MSDELTA.DLL files from a Windows Server 2008 OS or image. Place these files into the empty directories you create above, then make sure you run them by specifying ".\EXPAND.EXE" so that Windows doesn't find them in the system path first.)
Step #2: Adding the drivers to Workbench
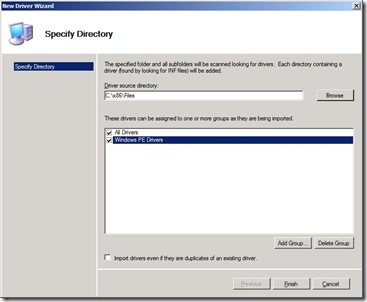
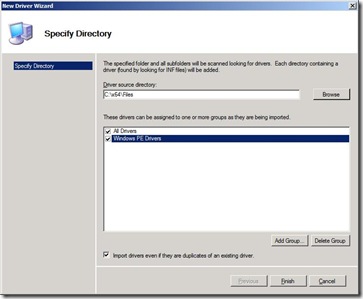
This sounds like it should be really easy, and it almost is. First, import the x86 integration component drivers , pointing to the directory "files" directory you created above (in my case, "C:\x86\Files"). Create a new driver group called "Windows PE Drivers" and be sure to import the drivers into that group:
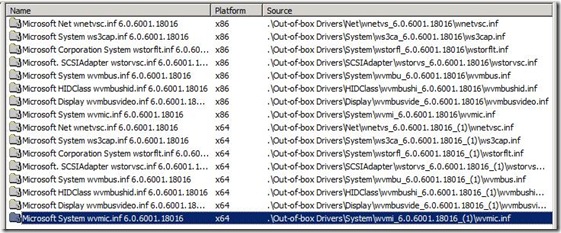
Now look at the results of that import:
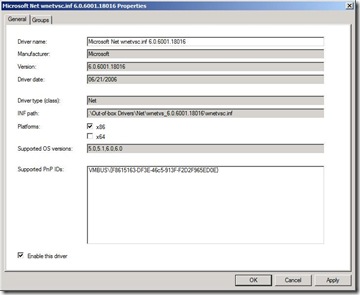
Notice that some of the drivers say that they are for both x86 and x64 platforms. Well, that's not actually true, as these are only x86 drivers. So we'll take advantage of a new MDT 2008 Update 1 feature to de-select the x64 platform for each of these drivers. Right click on each of the drivers and choose "Properties," then uncheck the "x64" checkbox:
Now we need to repeat this same process for x64 drivers, this time selecting the "c:\x64\Files" directory and the "Windows PE Drivers" group created previous. But there's one other important item: You need to check the "Import drivers even if they are duplicates of an existing driver" box:
If you didn't do this, Deployment Workbench will think the drivers are already present and won't import them again. It checks for duplicates based on the class, manufacturer, and version. In this case, all of those values are the same so we wouldn't import the drivers again. By checking the box, they'll all get imported anyway.
You'll notice now that there are again some that say they are for x86 and x64. Uncheck the "x86" checkbox for these newly-imported drivers since they are all x64 drivers.
You should now have this full list of drivers:
Notice the paths for each of the drivers: The ones with the "_(1)" suffix wouldn't have been imported if you didn't check the "import duplicates" box. (This also points out another change in MDT 2008 Update 1: We no longer create driver directories containing spaces in them. This is related to a problem with the processing of [SysprepMassStorage] sections by sysprep.exe on Windows XP or Server 2003. More on that some other time.)
Step #3: Creating new Windows PE images
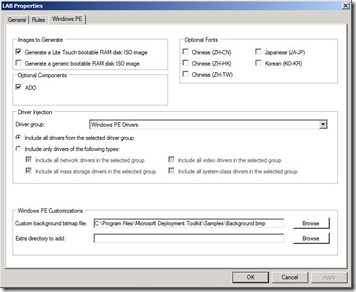
With all the needed drivers in place, we just need to tell Deployment Workbench to use them. Open the properties of the lab deployment point and specify the "Windows PE Drivers" group you created previously. (Be sure to check the "x64" box on the General tab if you want x64 images.) Also specify to "Include all drivers from the selected driver group":
This "include all drivers" checkbox is another new feature in MDT 2008 Update 1. Without this checkbox, we could only inject mass storage, network, video, and system-class drivers. With this, we'll inject all the drivers in the specified group. Why does this matter? Well, in this case we want to be sure to inject the HIDClass drivers you can see in the above list. HID stands for "human interface device." This is the driver that enables mouse integration so that you no longer need to press Control-Shift-Left Arrow all the time you are working in Windows PE.
Also make sure that you have added all the existing drivers, at least for networking and mass storage, into the same "Windows PE Drivers" group, otherwise your Windows PE boot images will work on Hyper-V but not on any machine requiring other out-of-box drivers.
Now, you can "Update" the deployment point to generate the new images containing the drivers that were imported in the previous step and selected in this one. Want to see the proof that they were all injected? Check the %TEMP%\DeployUpdates_x86.log (or %TEMP%\DeployUpdates_x64.log for the x64 boot image) to see each of them being imported. (Search for "/inf=" to find the right lines.)
In David's blog he mentioned that you would need to create the Windows PE images in separate steps. He was talking about using two different driver groups, one for x86 containing the x86 drivers and one for x64 containing the x64 drivers. This was necessary for two reasons:
- There's no way to specify different driver groups for x86 and x64.
- There was no way to alter drivers that didn't specify the right platforms.
The first reason is really needed because of the second. But now since MDT 2008 Update 1 allows you to override the platform on each driver, you can again get back to a single driver group - both problems solved.
Step #4: Exclude the Hyper-V drivers from from the full OS
Now that there are Hyper-V drivers included in Deployment Workbench, they will also be injected into the full OS. That's less than desirable because we really want the Hyper-V drivers to be installed in the full OS using the integration components. So if you want to prevent this, you can create a new driver group containing all the non-Hyper-V drivers. (Yes, if you have lots of drivers this is a fairly painful process as you need to select the new group by opening the properties of each driver individually.)
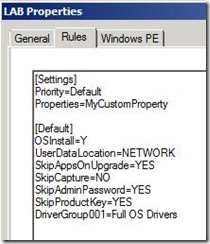
Once you've created this group, e.g. "Full OS Drivers", you need to tell the MDT scripts to only use this group. There's no user interface in the task sequence editor to specify this, but you can add it to CustomSettings.ini (on the Rules tab of the deployment point):
If you skipped this step, it probably wouldn't hurt anything, but you do want to make sure the integration components are installed afterwards.
Step #5: Install the Hyper-V integration components
Now we need to install the integration components themselves. (Yes, this isn't related to Windows PE, but hey, go back and read the title: it's not all about Windows PE). The easiest way to do this is to set them up as an application. In Deployment Workbench, create a new application with source files (so we don't need to worry about mounting the VMGUEST.ISO), pointing to the "e:\support\x86" directory (where E: is my DVD drive in the VM) that contains all the needed files. For the command line, specify "setup.exe /quiet /norestart". After the application has been added, modify the properties to specify "Reboot the computer after installing this application". (If you want, you can also modify the platform restrictions so this application is only seen on supported OSes.)
Repeat the same process for the x64 integration components, pointing to the "e:\support\amd64" directory.
With these applications created, you can now select them in the Lite Touch deployment wizard. If you want to automate this by adding the application into the task sequence, you can certainly do that instead (hiding the applications from the wizard at the same time).
Finally!
With these pieces in place, it should be that much easier to work with MDT 2008 Update 1 and Hyper-V. When I started writing this up (a long time ago, before MDT 2008 Update 1 was even released) I didn't think it would take so long. And I'm sure I didn't need to be quite so verbose...
Comments
Anonymous
January 01, 2003
The comment has been removedAnonymous
January 01, 2003
I have been looking at this for way to long! I figure out my issue with the driver group. I had 'driver group001=' instead of 'drivergroup001='. This fixed my issue with the driver injection. If I inject the Hyper-V drivers into the Server 2008 image, I cannot build the system. I am not sure who else it applies to, but FYI. Thanks for this write up Michael.Anonymous
January 01, 2003
The comment has been removedAnonymous
January 01, 2003
The comment has been removedAnonymous
January 01, 2003
Michael - Thanks for a great step by step write up, just what I have been looking for. Though one issue puzzle me when I initially build a new guest I still need the legacy adapter to do a PXE for OS deployment. Mike's post mentions integrating the IC into WinPE should not require it. Am I doing something incorrect or is this by design? FirdousAnonymous
January 01, 2003
I have tried the steps from all three sites, with the last being Michael's above. I keep having the same issue when trying to deploy a Windows Server 2008 x64 machine on an Hyper-V host. It follows all my task up to the first reboot from WINPE, then when it tries to load Server 2008 setup I get a boot error. It complains about the storflt.sys driver stating: Windows cannot verify the digital signature for this file There was another post on one of the other links with the same issue, but there has not been a response. Can anyone shed some light? Thanks, DavidAnonymous
January 01, 2003
The comment has been removedAnonymous
January 01, 2003
The comment has been removedAnonymous
January 01, 2003
Michael, My Hyper-V Host is running Windows Core Server x64. It is a fresh install with RTM of Hyper-V. The Guest is Windows Server 2008 Standard x64. The version of storflt.sys is 6.0.6001.18016 and the size is 38.0 KB. I have also setup MDT Update 1 with the driver group, so I am not really sure why it is injecting the drivers into the Server 2008 image.Anonymous
January 01, 2003
Only the legacy adapter supports PXE, as PXE requires a boot ROM. This is emulated by the legacy adapter, but the sythetic driver doesn't/can't emulate the boot ROM. So to do PXE, you always need to use a legacy adapter. (The legacy driver is built into just about every OS, so no special work to support that.) -Michael
