[Service Fabric] How to Secure a standalone cluster (On Prem)
This blog post is based on this article -/en-us/azure/service-fabric/service-fabric-cluster-creation-for-windows-server; I ran into issue, so would like to break into step by step for easier reference along with precautions.
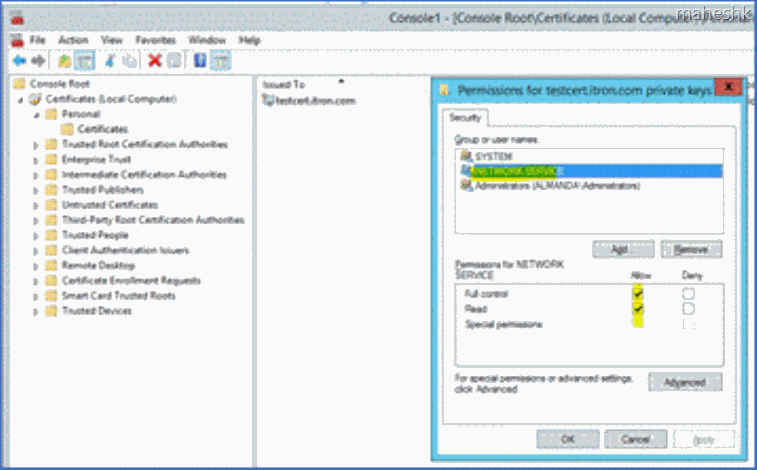
Step 1 and 2 objective is same. All we need here is, just make sure to have NETWORK SERVICE added and have permission set.
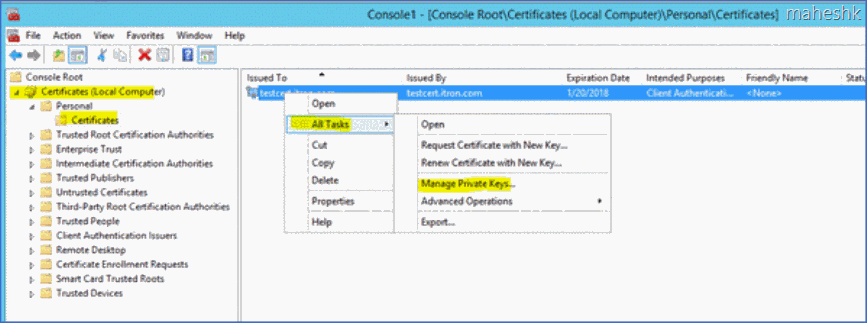
1) Install the certificate in server node :- Console Root > Local Computer > Personal > Certificates > install at this level and hit refresh to confirm
Once after the installation, right click the cert > All tasks > Manage private keys > Add NETWORK SERVICE and provide the default permission as it is and save. we should see “Allow” for Full control & Read permission.
2) Alternatively you could also achieve the same using PS. Open the PS ISE window, run the below PS in Admin mode to make this update. This step is optional if you have already performed the step #1 manually.
param
(
[Parameter(Position=1, Mandatory=$true)]
[ValidateNotNullOrEmpty()]
[string]$pfxThumbPrint,
[Parameter(Position=2, Mandatory=$true)]
[ValidateNotNullOrEmpty()]
[string]$serviceAccount
)
$cert = Get-ChildItem -Path cert:\LocalMachine\My | Where-Object -FilterScript { $PSItem.ThumbPrint -eq $pfxThumbPrint; }
# Specify the user, the permissions and the permission type
$permission = "$($serviceAccount)","FullControl","Allow"
$accessRule = New-Object -TypeName System.Security.AccessControl.FileSystemAccessRule -ArgumentList $permission
# Location of the machine related keys
$keyPath = Join-Path -Path $env:ProgramData -ChildPath "\Microsoft\Crypto\RSA\MachineKeys"
$keyName = $cert.PrivateKey.CspKeyContainerInfo.UniqueKeyContainerName
$keyFullPath = Join-Path -Path $keyPath -ChildPath $keyName
# Get the current acl of the private key
$acl = (Get-Item $keyFullPath).GetAccessControl('Access')
# Add the new ace to the acl of the private key
$acl.SetAccessRule($accessRule)
# Write back the new acl
Set-Acl -Path $keyFullPath -AclObject $acl -ErrorAction Stop
# Observe the access rights currently assigned to this certificate.
get-acl $keyFullPath| fl
----------------------
Parameter:-
On execution, enter your cert thumbprint and service account details as below.
pfxThumbPrint: AA4E00A783B246D53A88433xxxx55F493AC6D7
serviceAccount: NETWORK SERVICE
Output:-
Path : Microsoft.PowerShell.Core\FileSystem::C:\ProgramData\Microsoft\Crypto\RSA\MachineKeys\
Owner : NT AUTHORITY\SYSTEM
Group : NT AUTHORITY\SYSTEM
Access : Everyone Allow Write, Read, Synchronize
NT AUTHORITY\NETWORK SERVICE Allow FullControl
BUILTIN\Administrators Allow FullControl
Audit :
Sddl : O:SYG:SYD:PAI(A;;0x12019f;;;WD)(A;;FA;;;NS)(A;;FA;;;BA)
3) Step (1 or 2) is the only change required at Server side for certificate.
Now start downloading > "Download the Service Fabric standalone package" /en-us/azure/service-fabric/service-fabric-cluster-creation-for-windows-server and extract say C:\WindowsServiceFabricCluster\
4) Pick this template "ClusterConfig.X509.DevCluster" json template file and update with your thumbprint and save it.
Ps:- I have removed secondary certificate and proxy certificate section for simplicity
"security": {
"metadata": "The Credential type X509 indicates this is cluster is secured using X509 Certificates. The thumbprint format is - d5 ec 42 56 b9 d5 31 24 25 42 64.",
"ClusterCredentialType": "X509",
"ServerCredentialType": "X509",
"CertificateInformation": {
"ClusterCertificate": {
"Thumbprint": "AA4E00A783B246D53Axxxxx3203855F493AC6D7",
"X509StoreName": "My"
},
"ServerCertificate": {
"Thumbprint": "AA4E00A783B246D53A8xxxxxx3855F493AC6D7",
"X509StoreName": "My"
},
"ClientCertificateThumbprints": [
{
"CertificateThumbprint": "AA4E00A783B24xxxxx203855F493AC6D7",
"IsAdmin": false
},
{
"CertificateThumbprint": "AA4E00A783B246D5xxxxxx203855F493AC6D7",
"IsAdmin": true
}
]
}
},
5) Now run the PS command let from this directory to create the cluster
PS C:\WindowsServiceFabricCluster >.\CreateServiceFabricCluster.ps1 -ClusterConfigFilePath .\ClusterConfig.X509.DevCluster.json -AcceptEULA
Creating Service Fabric Cluster...
If it's taking too long, please check in Task Manager details and see if Fabric.exe for each node is running. If not, please look at: 1. traces in DeploymentTraces directory and 2. traces in FabricLogRoot
configured in ClusterConfig.json.
Trace folder already exists. Traces will be written to existing trace folder: C:\temp\Microsoft.Azure.ServiceFabric.WindowsServer\DeploymentTraces
Running Best Practices Analyzer...
Best Practices Analyzer completed successfully.
Creating Service Fabric Cluster...
Processing and validating cluster config.
Configuring nodes.
Default installation directory chosen based on system drive of machine 'localhost'.
Copying installer to all machines.
Configuring machine 'localhost'.
Machine localhost configured.
Running Fabric service installation.
Successfully started FabricInstallerSvc on machine localhost
Successfully started FabricHostSvc on machine localhost
Your cluster is successfully created! You can connect and manage your cluster using Microsoft Azure Service Fabric Explorer or Powershell. To connect through Powershell, run 'Connect-ServiceFabricCluster [
ClusterConnectionEndpoint]'.
6) At this stage, we should see the cluster creation success message with that. We are done with cluster creation and securing them.
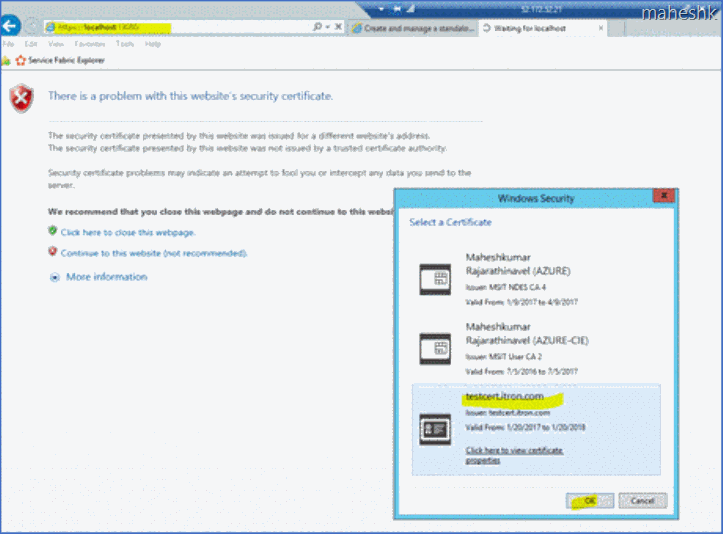
7) Now at client side/end user machine where try to browse the secured cluster over IE, we should see dialog prompt asking for certificate. It means, it is working as expected – so far good.
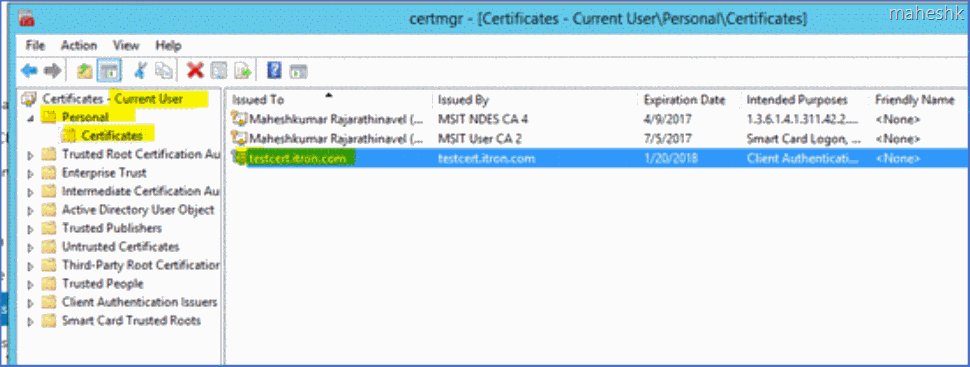
8) Now install the client certificate at your client machine. For simplicity sake, I am using the same machine as Client and Server. But certificate has to be installed under Current User when accessing the cluster over IE.
Certmgr > Current User > Personal > Certificates.
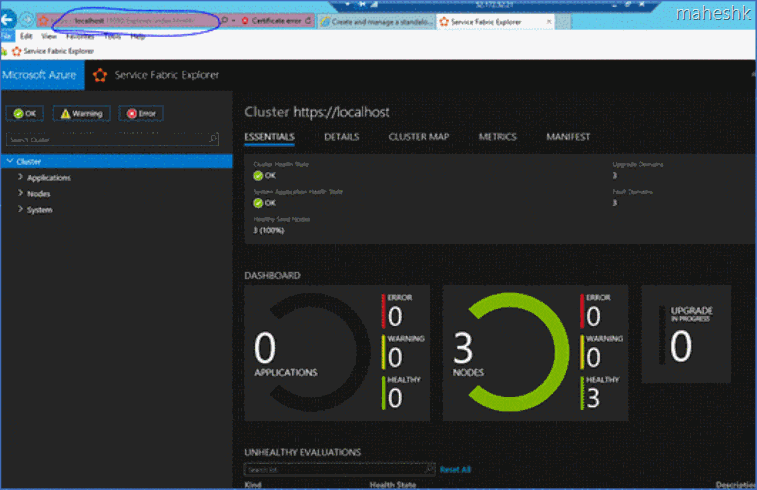
9) Now we are ready to access, browse the cluster url say - https://localhost:19080/, we should see a cert selection dialog displayed.
How to create self signed certificate (PFX):- (Optional)
-----------------------------------------------------------------
1) Open the PS windows > Run this script as .\CertSetup.ps1 -Install.
CertSetup.ps1 script present inside the Service Fabric SDK folder in the directory C:\Program Files\Microsoft SDKs\Service Fabric\ClusterSetup\Secure. You can edit this file if you do not wanted certain things in that PS.
2) Export .cer to PFX
$pswd = ConvertTo-SecureString -String "1234" -Force –AsPlainText
Get-ChildItem -Path cert:\localMachine\my\<Thumbprint> | Export-PfxCertificate -FilePath C:\mypfx.pfx -Password $pswd
Precaution:-
- How to: Retrieve the Thumbprint of a Certificate
https://msdn.microsoft.com/en-us/library/ms734695(v=vs.110).aspx - Remove the invisible chars in Thumbprint (User notepad++ > Encoding > Encode in ANSI to reveal the invisible chars) - Don't use Notepad. https://stackoverflow.com/questions/11115511/how-to-find-certificate-by-its-thumbprint-in-c-sharp
- Couple of this PS will help us to remove the cluster or clean the previous installation \RemoveServiceFabricCluster.ps1 & .\CleanFabric.ps1
- Make sure to use PFX and not the cert. Just in case, if you are run into some environment problem during dev stage, it is better to reimage and retry.
Hope this helps. Let me know if you see/need change in this.
