Connect your GitHub repo to Azure DevTest Labs
If you’ve been following along with this Azure DevTest Labs blog series, then you know how to do the basics to get a dev/test lab set up using what you get by default from the service. Virtual machines are easily created and there’s a large number of artifacts (scripted actions) available in the public Azure DevTest Labs GitHub repository for you to leverage when customizing your VMs.
Ready to take the next step and link your personal GitHub repo to your DevTest Labs setup? Good.
First, a little background for those of you not familiar with GitHub. GitHub is basically a code repository hosting service used by developers with some additional collaboration capabilities. While it’s mostly accessed as a command line tool, you manage GitHub repos at https://github.com/. If you’re still reading this paragraph then chances are you don’t have a personal GitHub repo yet. It’s easy to do, so let's go get that out of the way now. Go to github.com, create an account, and then create a public (or private) repo. Once you’ve done that, create a folder called artifacts (or whatever name you want for your artifacts folder).
Tip: You can get up to speed on GitHub even faster if you review the full bootcamp help documentation.
Back in DevTest Labs, you’re going to need a few pieces of information before adding your GitHub repo. You can get this information on the fly while adding your repo, but I always use trusty old notepad.exe to take a few notes so I’ll have this information handy all at once when I need it.
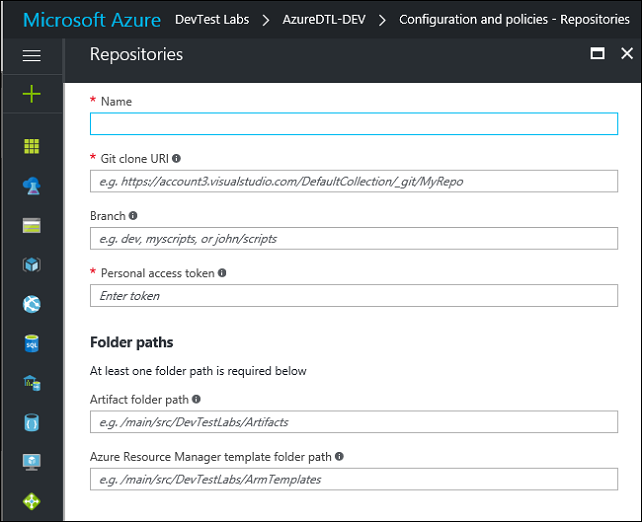
To get started, click into the DevTest Lab that you want to add your repo to, then Configuration and policies > Repositories > +Add. You should now see something like this:
The Name for the custom repo is pretty straightforward. It’s also what will be displayed in the REPOSITORY column when adding an artifact to a formula or VM later on.
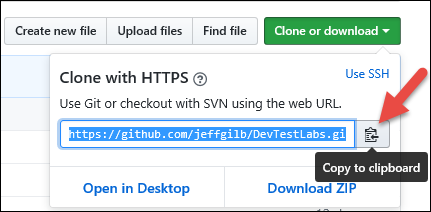
Next, DevTest Labs needs to know where your personal repo is located. In other words, you need to know what’s called the Git clone URI. Sounds complicated, but it’s easy to get from your GitHub repo. Just click the big green Clone or download button like this and then copy the clone URL to clipboard:
The Branch value is the GitHub branch that you want DevTest Labs to stay in sync with. To keep things easy, you can always enter master here (that’s the default branch in GitHub). I usually create and use a dev branch to keep my under-development artifacts separate from my production artifacts over in master. Plus, if someone stumbles upon your GitHub repo you don’t want them cloning it and then getting upset when things go wonky using half-baked artifacts.
Disclaimer: if you stumble upon my public GitHub repo, and clone the artifacts that I use while playing around in my personal lab, you’ll be using them at your own risk. They might not work or could disappear or change tomorrow. So, YMMV, no warranties, etc…
The Personal access token is what DevTest Labs uses to authenticate with your GitHub repo. You get this from your personal GitHub settings by clicking the drop-drop-down by your avatar in the top-right corner, select Settings, and then Security. All the way at the bottom of the list under Developer settings you’ll see an option for Personal access tokens. You guessed it, click that. Now click Generate new token at the top right (you might get prompted for your password at this point), then enter a description, select the appropriate security scope (I just select everything here for my lab), and then click Generate token. Done. Now just copy the personal access token:
The Artifact folder path is the last piece of information you need to add your repo. That’s the folder you made earlier when you first created your GitHub repo remember? We’ll skip how to add the ARM templates folder path for now as you only need one folder path to add a repo. ARM templates are beyond the scope of this post, but I’m sure you can figure that one out anyway if you know what an ARM template is.
Finally, just hit Save and DevTest Labs will verify and save the settings you entered. Your custom repo will now be available to use and grab artifacts from at your leisure. Too easy right?
Tip: if you’d rather use a VSTS Git repository or are looking for more information about how to add a repo to DevTest Labs, check out the official content on docs.microsoft.com.
At this point, you’ll be able to add custom artifacts that you create to your personal repo and apply them to VMs in your lab. You can also clone some other artifact repo, modify the artifacts as you see fit, and then add those to your personal repo too, but that's a different blog post.
Next up, in my next blog post I'll show you how to interact with the files in your personal GitHub artifact repo..
You’ve seen my blog; want to follow me on Twitter too? @JeffGilb.


