Maximize the use of CPU with parallel extensions (+ some WPF stuff)
Since this is my 40th post to this blog I decided to go back to square one… or post one actually :-) I’m going to create Windows Presentation Foundation (WPF) application that solves the Knight’s Tour puzzle. I actually didn’t know about this puzzle before I bought book called Puzzles for Programmers and Pros. That book had interesting puzzle that lead in to this post. So here we go!
I said that I’m going to create WPF application for my UI. You might ask why not the “good old” Windows Forms application...? Well for these simple reasons:
1. I don’t like to write code to OnPaint / MainForm_Paint methods.
2. I wanted to define my user interface and then just say in code “hey knight go there” and it should just draw the UI with the knight in the correct position. But the defined UI must be also scalable.
3. WPF doesn’t have same barriers than Windows Forms does => It’s the face of future applications!
I don’t probably have to explain my reason #1 for you if you have experienced the same that I have :-) You’ll end up writing the UI code a lot and that’s not what you’re trying to do. You’re trying to solve puzzle and you are suddenly focusing for the UI code. That’s wrong approach. Therefore reason #2 goes hand-in-hand with #1.
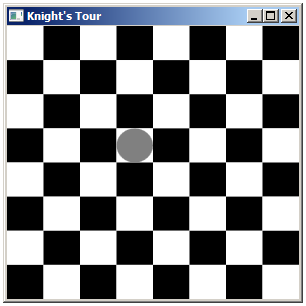
So let’s look the the UI of the running application:
It’s the view of the classic chess board and I decided to take shortcut when creating the knight. I decided to use gray circle instead (or ellipse actually) :-) And for the layout management I just took the easy approach by using Grid and defining Columns and Rows. Here is the XAML for the UI:
|
|
You probably noticed the interesting part of the XAML... and that’s the lines 30 and 31 where Binding is defined. It means that these values coming from the public properties of the DataContext. So let’s look at the code behind that XAML and let’s discuss the binding little bit more:
|
|
You might already noticed that my window also implements INotyfyPropertyChanged interface. And my two properties actually call NotifyPropertyChanged method when they are changed. So what’s this all about? Well if you don’t do this your values will be updated for the first time and after that they don’t actually get “bubbled” up to the ellipse anymore... unless you implement the notify mechanisms yourself. This is quite important and you should probably read more information about it on MSDN.
For the actual solving part I just used classic “old recursion” to solve the puzzle. And this is the part where we finally are going to the title of my post...
Classic one worker thread approach gives “fairly easy to implement but sub-optimal” solution. And you might ask why? And to answer this question I’m going so show you picture of task manager:
This picture was taken when my solver was running in “full speed ahead” –mode. And guess what... I’m not impressed! I’m actually just using single CPU (see the third box where green line has reached the roof)!!! So my worker thread approach is far from optimal resource usage.
Okay... What can I do then? I could do multiple threads and handle them manually but that’s again writing a lot of code that doesn’t have anything to do with the actual solving!? So if I would chosen Windows Forms + manual handling of multiple threads I would have a lot of code and just small fraction of that would actually do work that I was originally planning to do.
This is where Parallel Extensions(download)comes into the game! It’s additional library (System.Threading.dll) sitting on top of .NET Framework 3.5 and it’s currently in CTP phase. But I still highly recommend you to check it out if you want easily get more horse power to your algorithms.
I analyzed my code and noticed part where I could do things differently:
|
|
So I changed code in line 2 to be the code at line 8. What was the result at the task manager then:
Well I believe that I managed to get better use of the available horse power :-) It shows of course in the results:
“foreach”: ~50 solved solutions in ~5 minutes
”Parallel.ForEach”: ~450 solved solutions in < 5 minutes
To summarize... I just changed 1 line of code and I was able to get unbelievable results from it! So if you’re doing something similar then I recommend checking out the parallel extensions first before doing “own custom solution” for that.
I originally thought that I would go little bit deeper into the details of my solver but this post ended up too long even without it so maybe I’ll pass this time... But I’ll include video clip that shows the UI of the application when it’s solving.
Anyways... Happy hacking!
J
P.S. I’m also interested in F# and I’m probably going to do something fun with that too.
Comments
Anonymous
August 26, 2008
PingBack from http://hoursfunnywallpaper.cn/?p=3163Anonymous
August 26, 2008
The comment has been removedAnonymous
October 13, 2008
Great article, thanks for the info!


