Building a hybrid LAN: On-premise + Azure Pack + Azure
In a previous post I've announced that I will cover in details most popular hybrid cloud topics. And the first in the list is Hybrid LAN.
If a company wishes to use Hybrid Cloud and deploy workloads in private cloud, service provider cloud and Microsoft Azure, it will probably wish to have one stretched integrated LAN across these 3 locations. For example, some VMs can run on-prem, some VMs in Azure, and those VMs must be able to communicate with each other. To achieve this, these 3 different networks (on-premise LAN, service provider vNet and Azure vNet) should be integrated with each other and covered by common DNS environment for name resolution.
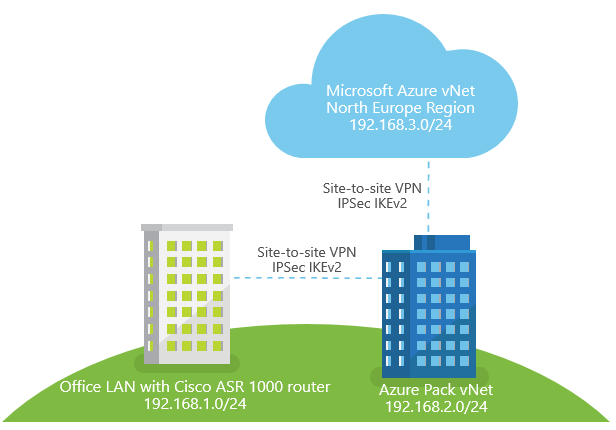
I will use this environment as example to describe the process:
- LAN in customer's office with Cisco ASR 1000-series router on the edge (address space 192.168.1.0/24)
- Azure Pack virtual network in service provider's cloud (I will use InfoboxCloud environment as example, address space 192.168.2.0/24)
- Azure virtual network in Azure North Europe region (subscription purchased via CSP, address space 192.168.3.0/24)
Network topology considerations
So, we need to achieve the following:
- Connect customer's LAN with Azure Pack vNet
- Connect Azure Pack vNet with Azure vNet
- Optional: connect customer's LAN with Azure vNet
I suppose that customer's office is closer to local service provider's datacenter then to the nearest Azure location (this is usually true for Russia, since the closest Azure datacenter for Russia is located in Dublin), so it is easier and cheaper to connect office LAN to service provider's network, and then connect service provider's network to Azure. In this case we use "Star" topology with service provider's network as a hub. And usually network in service provider's DC is much more reliable, then LAN in customer's office - multiple internet connections, highly available network fabric etc. If service provider's datacenter in Tier 3 certified, that it should be true. So using service provider as a hub in our topology to connect from customer's LAN to Azure vNet is OK. That's why I've marked step #3 as Optional.
But if you wish to have "Ring" topology and have a connection between office LAN and Azure vNet even if service provider's network will fail, you can connect office LAN with Azure using the simillar methods. But I don't think that it will be a popular scenario for hybrid environments.
My "Star" topology will look like this:
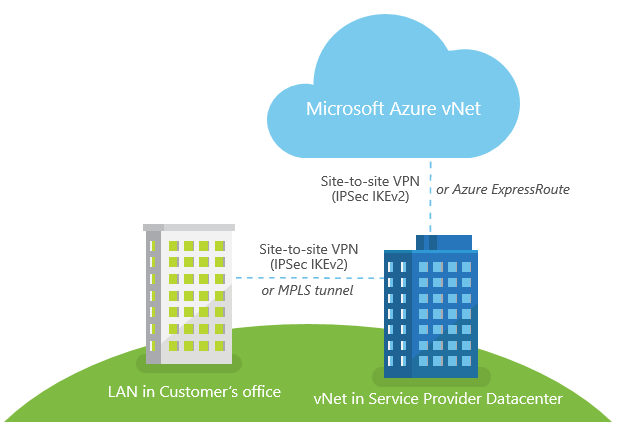
For low and medium network load scenarios when 50-80ms latency is OK, customer can use IPSec IKEv2 Site-to-site VPN over the Internet to connect LAN with Azure Pack vNet in service provider datacenter, and IPSec IKEv1/IKEv2 Site-to-site VPN to connect Azure Pack vNet with Azure vNet.
If a faster network connection with <50ms latency between those 3 sites is required, MPLS tunnel can be used to connect customer's LAN with Azure Pack vNet (typical service provider should be able to offer such service through local telcos), and Azure Pack vNet can be connected with Azure vNet using Azure Express Route.
I don't need high network throughput in my example, so I will use site-to-site VPNs over the Internet:
Connecting customer's LAN with Azure Pack vNet
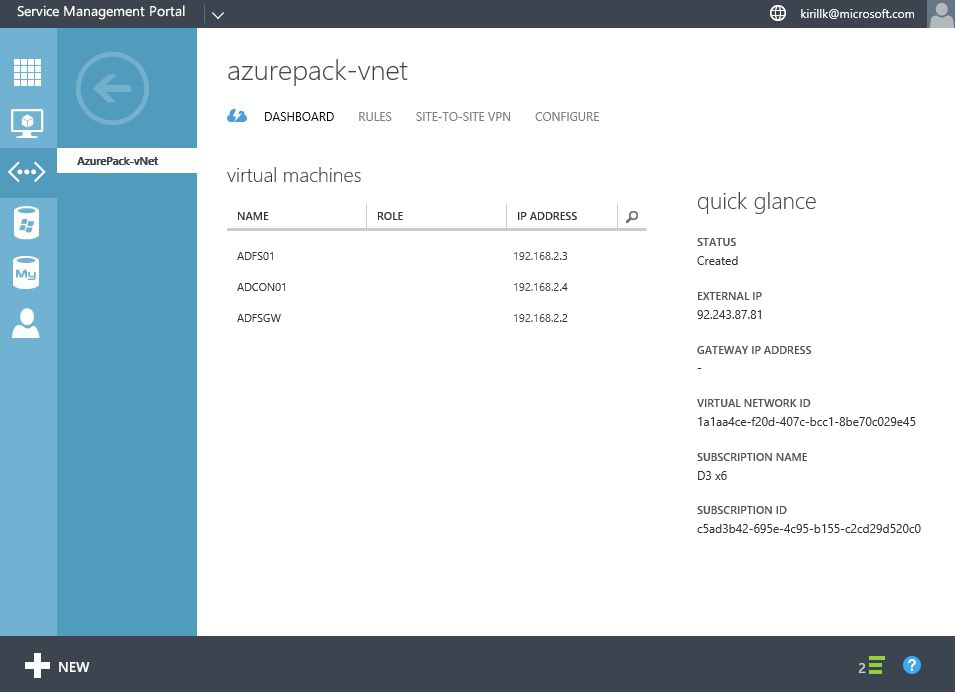
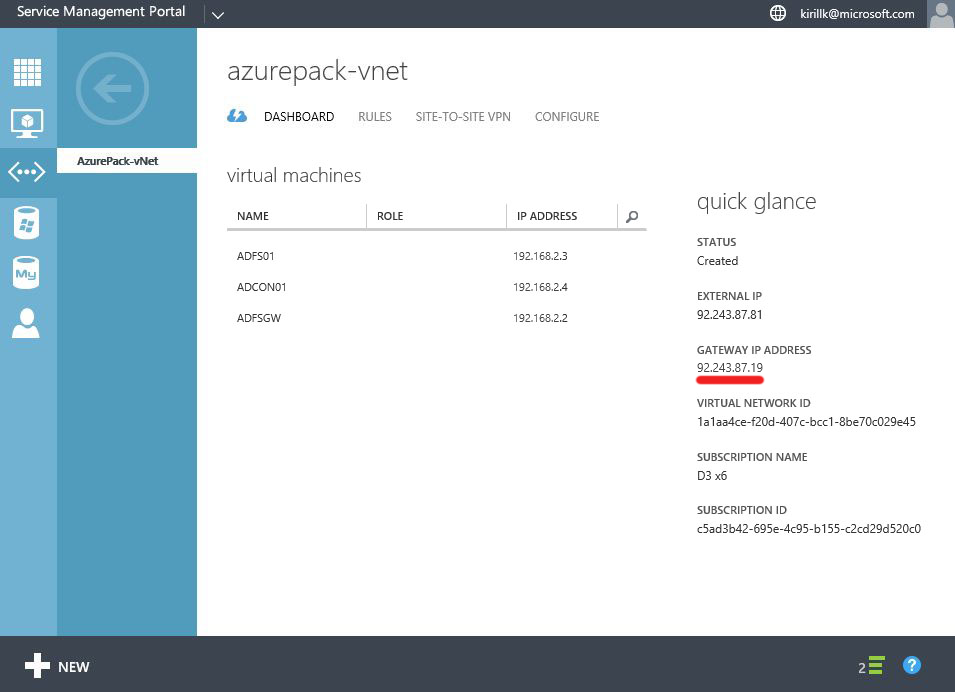
First step - connect LAN with virtual network in Azure Pack cloud in service provider datacenter. In my case I have a virtual network called "AzurePack-vNet" with 192.168.2.0/24 address space. By default Gateway IP field will be blank on the Dashboard, to get the IP we need to create a Site-to-site VPN connection first.
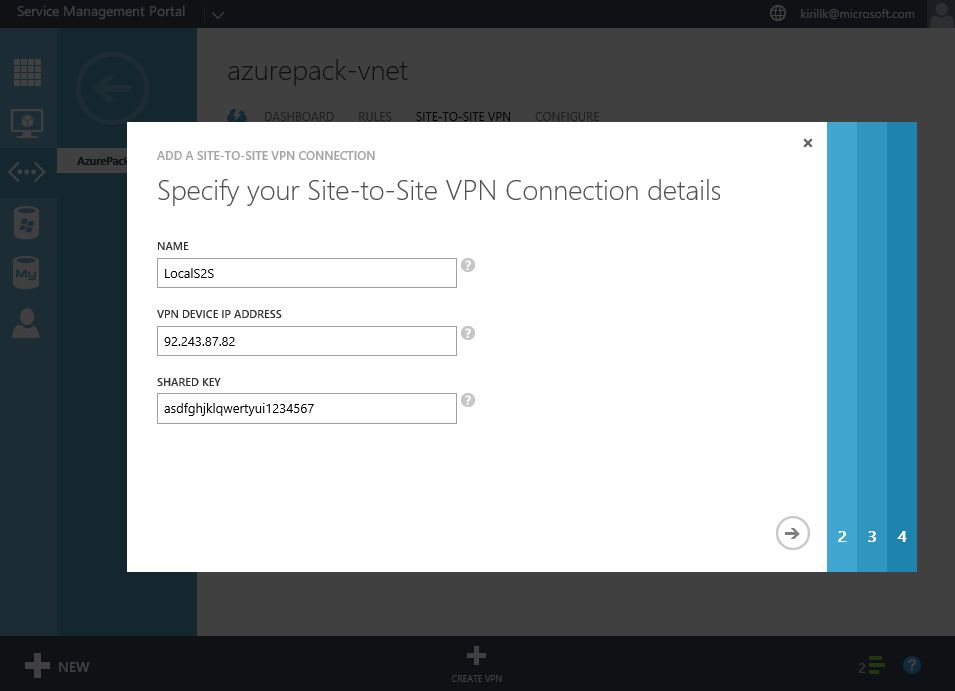
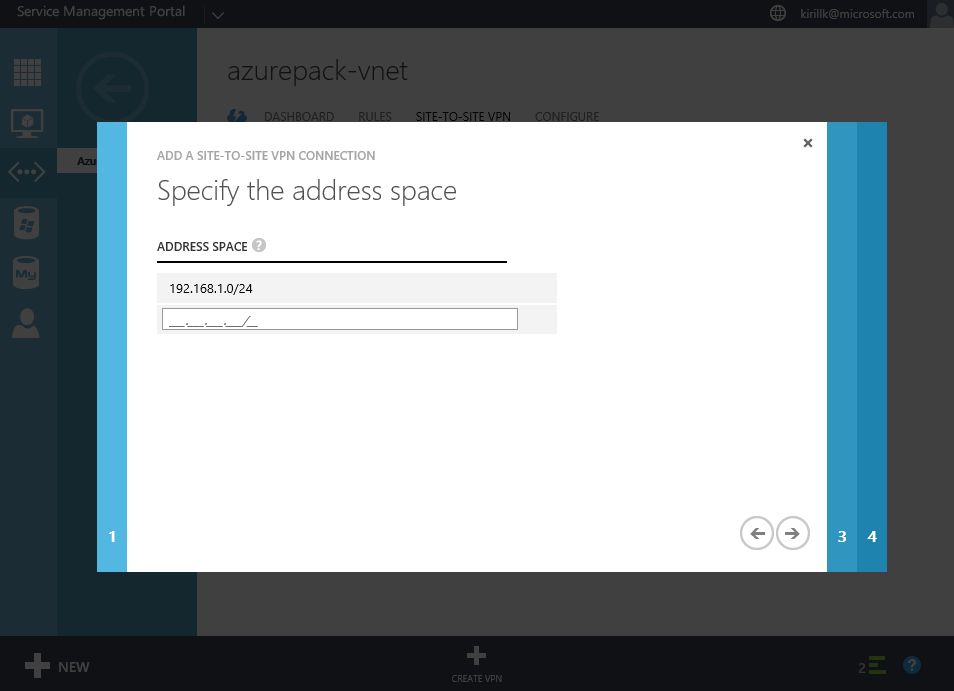
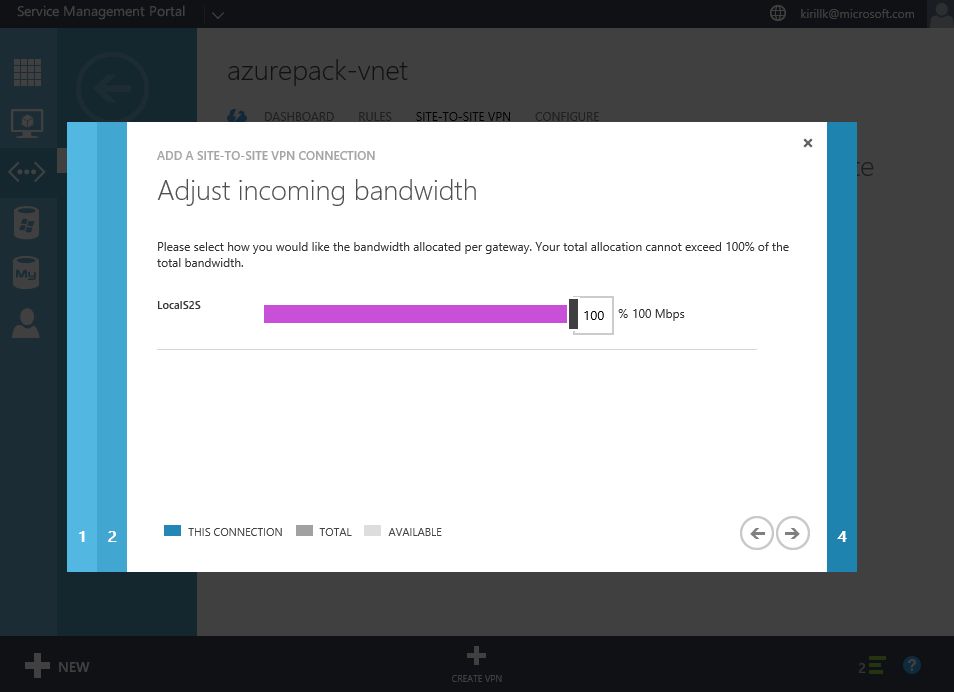
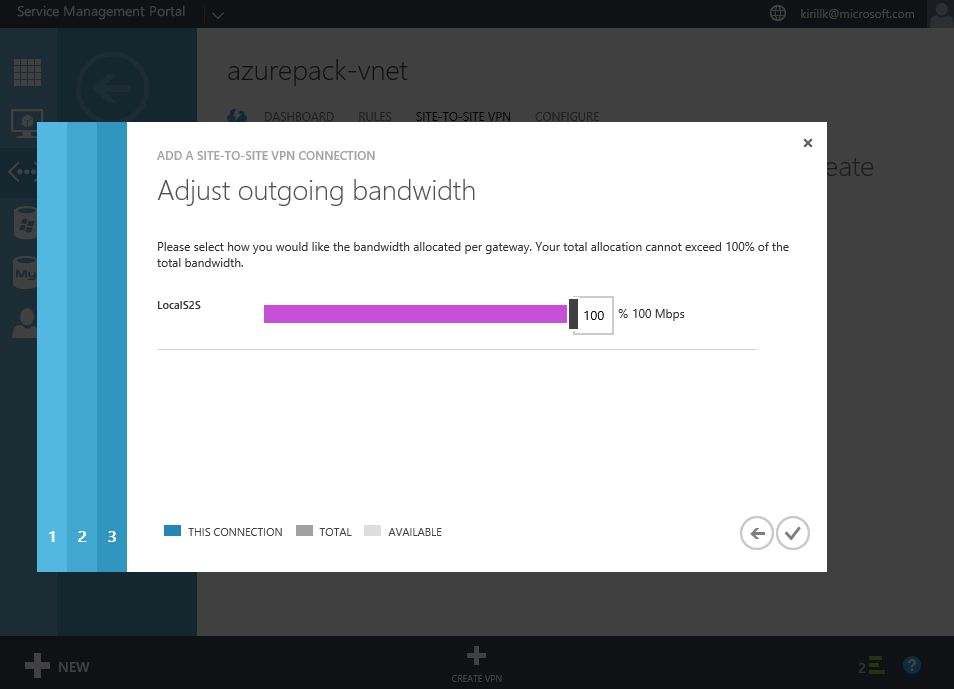
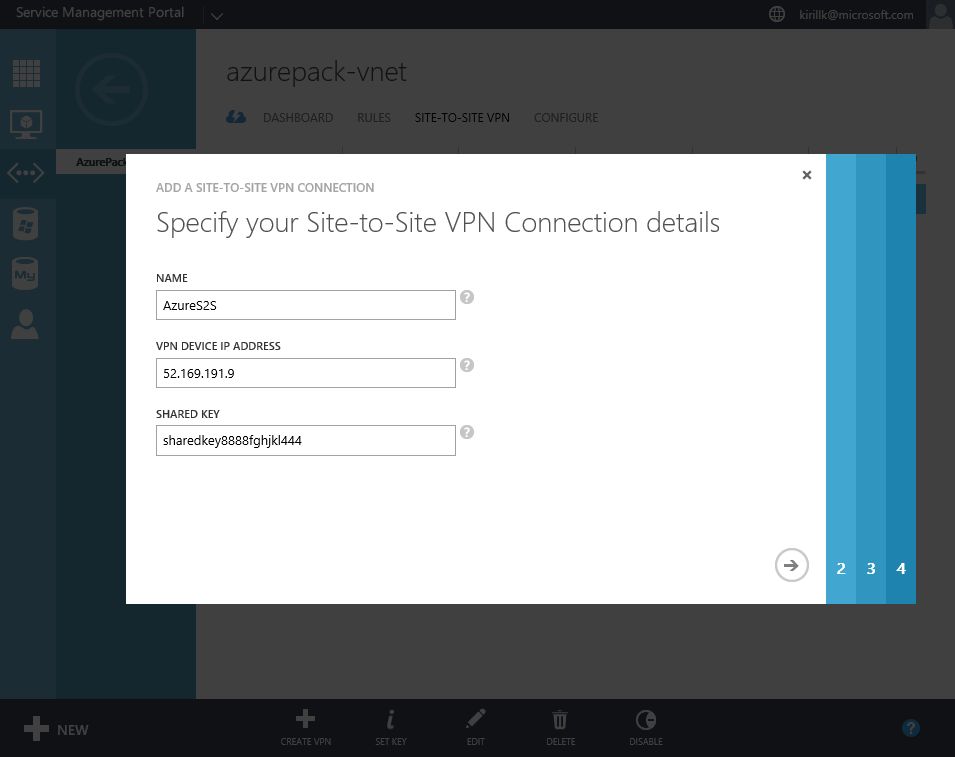
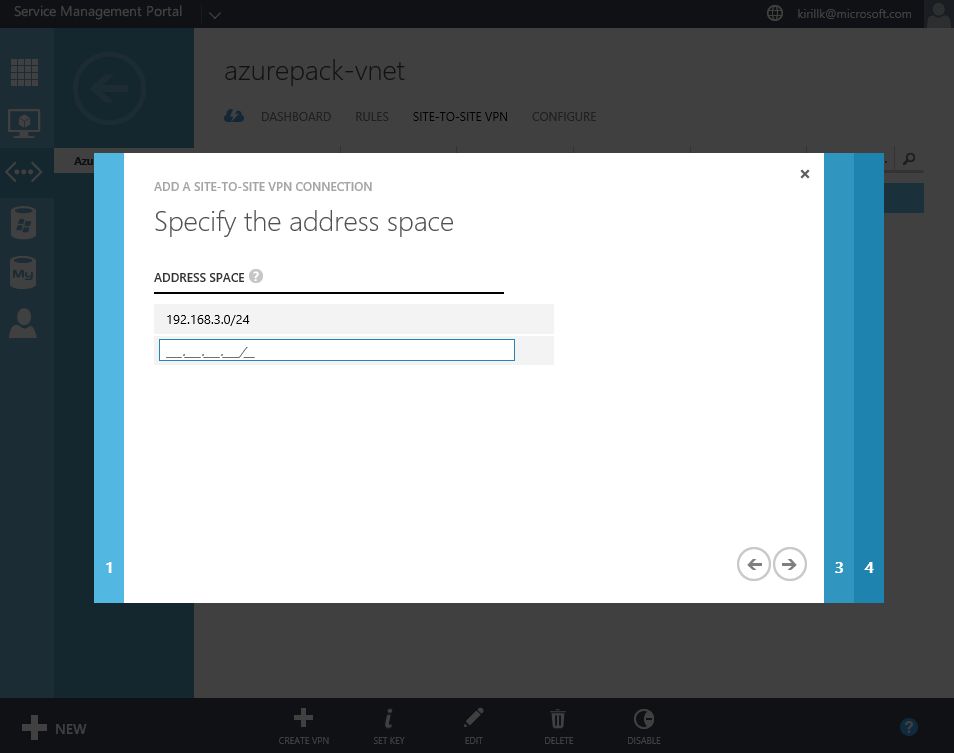
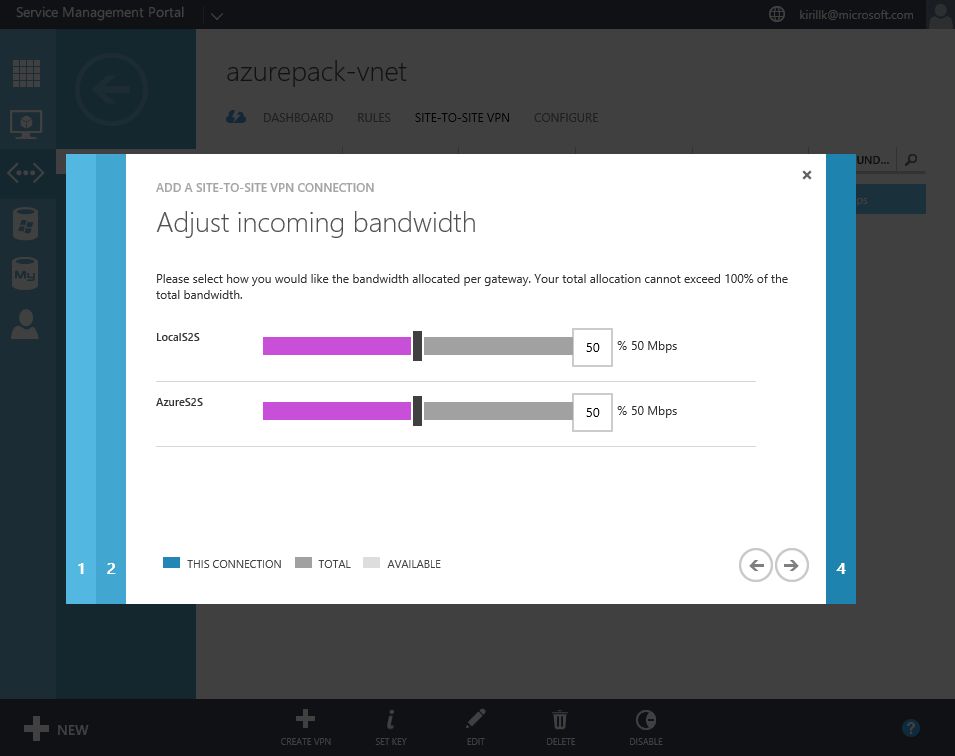
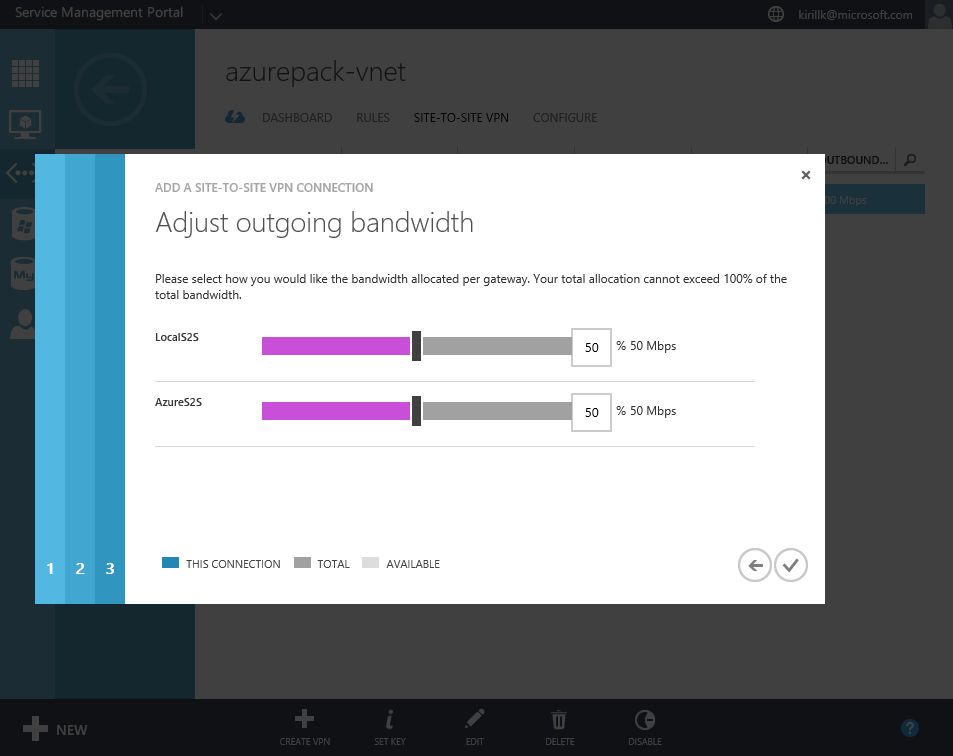
Go to "Site-to-Site VPN" tab in vNet properties and click "Create VPN". You need to specify the external IP of your LAN. Also paste a shared key that will be used for authentication. After that specify address space of the office LAN (I use 192.168.1.0/24) and configure bandwidth limits.
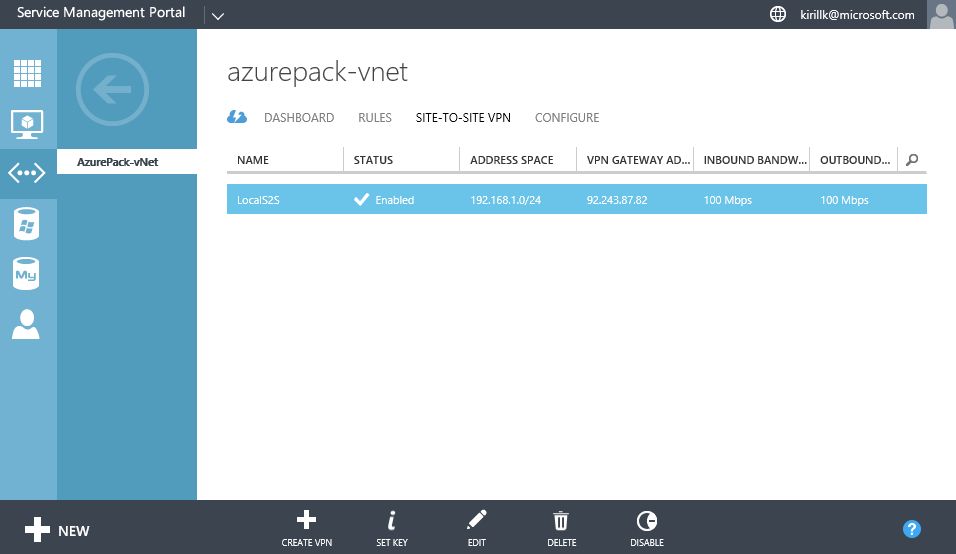
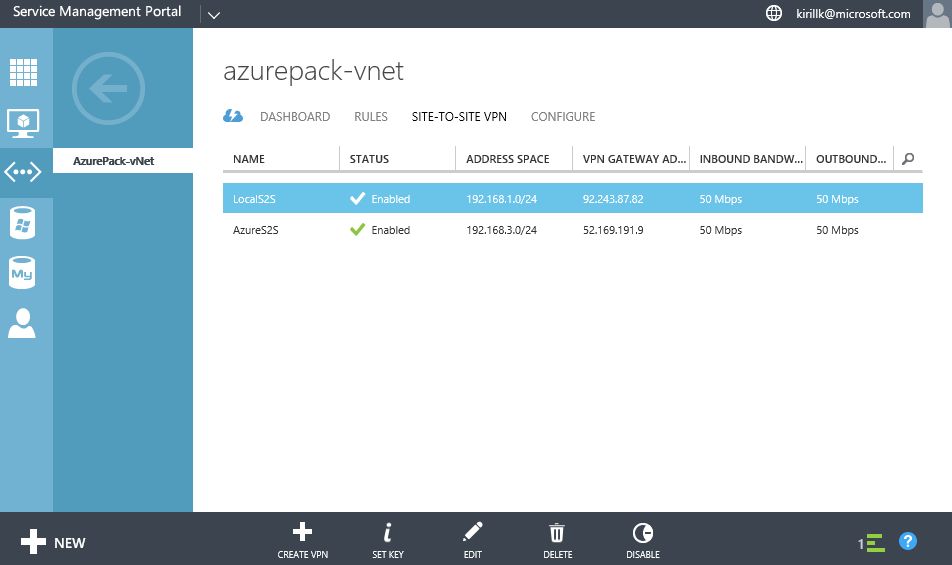
After the Site-to-Site VPN connection is created, you will see Gateway IP on the Dashboard.
OK, that's all we need to do on the Azure Pack side. After that you need to configure the opposite part of the Site-to-Site VPN connection - on the router on the office LAN edge. All you need to know is a service provider Gateway IP (check it on the vNet dashboard, in my case it is 92.243.87.19) and Shared Key (we've created it during the Site-to-site configuration phase, in my case it is asdfghjklqwertyui1234567).
Exact steps depend on the model of the router that you have, so check the vendor manual to know how to create IPsec IKEv2 Site-to-site VPN connection. Instructions for the most popular routers are available here. This manual was created for Azure Gateway, so be careful - you need to use instructions for "Route-based" routing, which is based on IKEv2. "Policy-based" routing uses IKEv1, which is supported in Azure, but not supported by Azure Pack (because Azure Pack uses multi-tenant gateways, and IPsec multi-tenancy is available only with IKEv2). If your router doesn't support IPsec IKEv2, that you can deploy VM with Windows Server (2008 R2 or later) with RRaS role and publish it to the Internet as a software router. Guide is available here.
After this step is completed, VMs in the office LAN and VMs in Azure Pack should be able to communicate with each other.
Connecting Azure Pack vNet with Azure vNet
Second step - connect Azure Pack vNet in service provider datacenter with vNet in Azure region that you use. To achieve that you need to create a Site-to-site VPN connection between Azure Pack vNet and Azure vNet. If you use several Azure regions (e.g. some VMs are deployed in North Europe, some VMs in East US region), then it means you have several vNets in different regions, and you will need to create several Site-to-site VPN connections.
In my case I will use Azure CSP subscription. First of all, you need to connect to your Azure subscription with PowerShell. Run this command and specify a user credentials with a proper access on a subscription level or on a resource group level:
Login-AzureRmAccount
After that run this script towards the selected Azure subscription. It consists of 2 parts - configuration part (paste your data there) and execution part (which you don't need to change). I've prepared this script using this manual and checked it in different environments.
What you need to specify:
- If the existing Resource Group should be used, or script should create a new one. I recommend to create a new Resource Group and put all network objects there. You will be able to connect VMs from other resource groups to this vNet (if those VMs are deployed in the same region in the same Azure subscription).
- What Azure region should be used. I will use "North Europe".
- Specify address space for Azure vNet. I will use 192.168.3.0/24. You will need 2 separate subnets - one for gateway IPs, another for VM IPs.
- Specify the address space of Azure Pack vNet, service provider Gateway IP and a shared key. I've used 192.168.2.0/24 and Gateway IP that I've got was 92.243.87.19. I will use shared key sharedkey8888fghjkl444.
Script will create Site-to-site VPN connection based on IPsec IKEv2 (-VPNType RouteBased) with Basic SKU (you can also use Standard or Premium gateways, but they are more expensive. Check the comparison here). Don't wonder that External IP is set to "Dynamic", this is by design, and it won't change in the future.
#Configuration part
$UseExistingRG= $False $RGName = 'HybridNetwork' $AzureRegion = 'North Europe' $AzureAddressSpace = '192.168.3.0/24' $AzureGatewaySubnet = '192.168.3.0/27' $AzureVMSubnet = '192.168.3.32/27' $LocalSubnet = '192.168.2.0/24' $LocalGatewayIP = '92.243.87.19' $IPSecSharedKey = "sharedkey8888fghjkl444"
#Creation of site-to-site VPN connection
If ($UseExistingRG -eq $False) { New-AzureRmResourceGroup -Name $RGName -Location $AzureRegion }
$subnet1 = New-AzureRmVirtualNetworkSubnetConfig -Name "GatewaySubnet" -AddressPrefix $AzureGatewaySubnet
$subnet2 = New-AzureRmVirtualNetworkSubnetConfig -Name "VMSubnet" -AddressPrefix $AzureVMSubnet
New-AzureRmVirtualNetwork -Name "Azure-vNet" -ResourceGroupName $RGName -Location $AzureRegion -AddressPrefix $AzureAddressSpace -Subnet $subnet1, $subnet2
New-AzureRmLocalNetworkGateway -Name "Local-vNet" -ResourceGroupName $RGName -Location $AzureRegion -GatewayIpAddress $LocalGatewayIP -AddressPrefix $LocalSubnet
$GatewayIP = New-AzureRmPublicIpAddress -Name "GatewayIP" -ResourceGroupName $RGName -Location $AzureRegion -AllocationMethod Dynamic
$vNet = Get-AzureRmVirtualNetwork -Name "Azure-vNet" -ResourceGroupName $RGName
$subnet = Get-AzureRmVirtualNetworkSubnetConfig -Name "GatewaySubnet" -VirtualNetwork $vNet
$gwipconfig = New-AzureRmVirtualNetworkGatewayIpConfig -Name "GWIPConfig1" -SubnetId $subnet.Id -PublicIpAddressId $GatewayIP.Id
New-AzureRmVirtualNetworkGateway -Name "vNetGW1" -ResourceGroupName $RGName -Location $AzureRegion -IpConfigurations $gwipconfig -GatewayType Vpn -VpnType RouteBased -GatewaySku Basic
$azuregw = Get-AzureRmVirtualNetworkGateway -Name "vNetGW1" -ResourceGroupName $RGName
$localgw = Get-AzureRmLocalNetworkGateway -Name "Local-vNet" -ResourceGroupName $RGName
New-AzureRmVirtualNetworkGatewayConnection -Name "SiteToSiteVPN1" -ResourceGroupName $RGName -Location $AzureRegion -VirtualNetworkGateway1 $azuregw -LocalNetworkGateway2 $localgw -ConnectionType IPsec -RoutingWeight 10 -SharedKey $IPSecSharedKey
$GatewayIP = Get-AzureRmPublicIpAddress -Name "GatewayIP" -ResourceGroupName $RGName
Write-Host -ForegroundColor Cyan "Use this destination IP: " $GatewayIP.IPAddress "`nUse this shared key: " $IPSecSharedKey
Check the errors during the execution. In the end you will see the final message with your Azure Gateway External IP. In my case it is 52.169.191.9.
That's all on the Azure side. Now go back to Azure Pack and create another Site-to-Site VPN connection similar to the previous one. Specify Azure Gateway external IP, shared key and Azure vNet address space. Also you'll need to configure bandwidth distribution among Local Site-to-site VPN and Azure Site-to-site VPN if you service provider has limited VPN network bandwidth in your Azure Pack subscription.
OK, now check that all 3 networks can connect to each other and there is connectivity between 3 address spaces (in my case all VMs in 192.168.1.0/24, 192.168.2.0/24 and 192.168.3.0/24 can ping each other).
DNS in a Hybrid LAN
If you use Active Directory based DNS in your local LAN, that I recommend to stretch it to Azure Pack vNet and Azure vNet. My recommendations:
- Deploy additional domain controller in service provider datacenter and connect it to Azure Pack vNet that we've just configured.
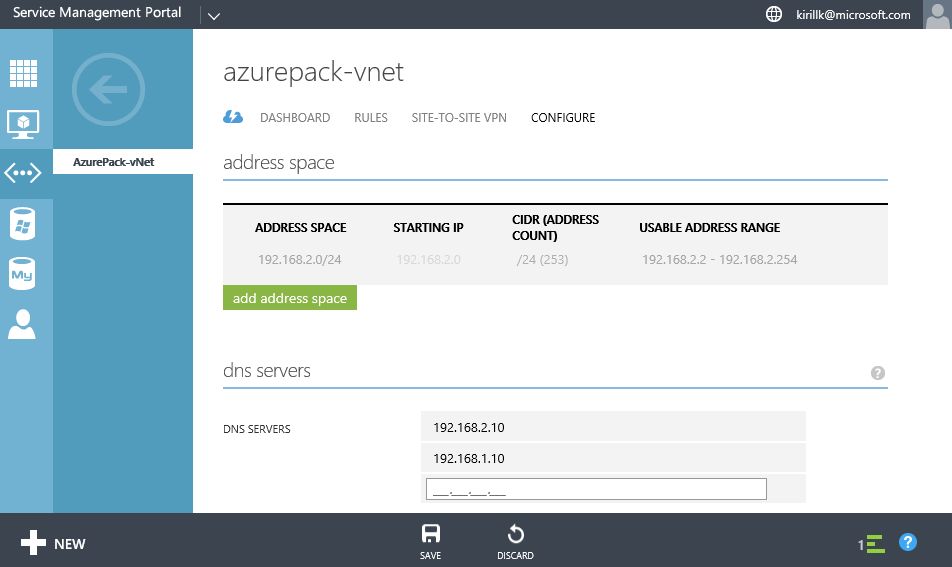
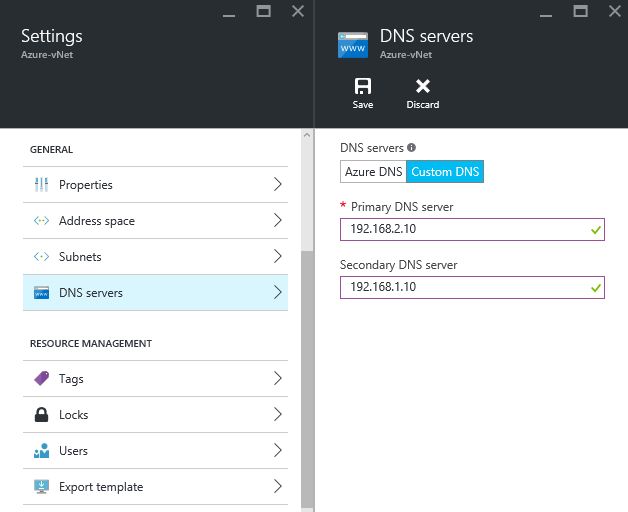
- Configure DNS settings in Azure Pack vNet and Azure vNet to use this new Domain Controller as a primary DNS server and your existing on-premise domain controller as a secondary (I assume that DC, deployed on Azure Pack VM, is more reliable, than a DC on the on-premise VM).
I existing VM called DC01 in the main office with IP address 192.168.1.10 and I've deployed new VM called DC02 in the Azure Pack cloud with IP address 192.168.2.10. So I will specify 192.168.2.10 as a primary DNS server and 192.168.1.10 as a secondary.
After that your existing Active Directory domain can be stretched to VMs in service provider datacenter and to Azure VMs. You can add VMs in Azure and in Azure Pack to your existing Active Directory domain, which will simplify management and increase the overall security.
OK, we've completed the first step and configured a hybrid LAN with a stretched Active Directory domain, that spans across Office LAN, Azure Pack vNet and Azure vNet. On the next step we'll see how we can integrate existing Active Directory with Azure Active Directory to leverage advanced Single Sign On capabilities and integrate the identity with Office 365 or Dynamics CRM Online.
Comments
- Anonymous
July 09, 2016
Very informative article. Very well written.
