How Many Cores for the Job?
That is quite a common question. Experienced systems engineers have accumulated knowledge over the years that they distill into a few rules of thumb, e.g.:
- Given a certain hardware configuration, for software package A with an input size of X, on average you'll need Y cores.
On Azure, the hardware configuration is known and you can deploy as many instances as your subscription allows. It would be useful to capture that knowledge in order to optimize our resource utilization. For instance, we can pass that estimated size to our node manager / autoscaler (e.g. in GeRes, HPC Pack or similar batch scheduler service), let it deploy the cluster and then automatically resize as required if the job turns our to be larger or smaller than estimated.
Azure Machine Learning can be used to provide that initial estimate on the basis of historical utilization data. We'll build an Azure ML service, submit a cue to it (e.g. the type of job to run) and get an estimate in return. The process to set it up can be summarized as follows:
- Collect a representative data sample and save it in CSV format, e.g. {Type of Job, Input Size, N. of Cores required}.
- Build a workflow in Azure ML to train and score an appropriate regression model (several are on offer, e.g. linear, Bayesian, neural networks).
- Evaluate the regression models.
- Publish one (or more) as Azure ML service.
- Use the ML API to pass the cue and retrieve the estimate.
- Use the estimate to deploy the n. of nodes suggested, then let the autoscaler correct as required until the job ends
- Collect the usage data and feed back into the training workflow at the next opportunity.
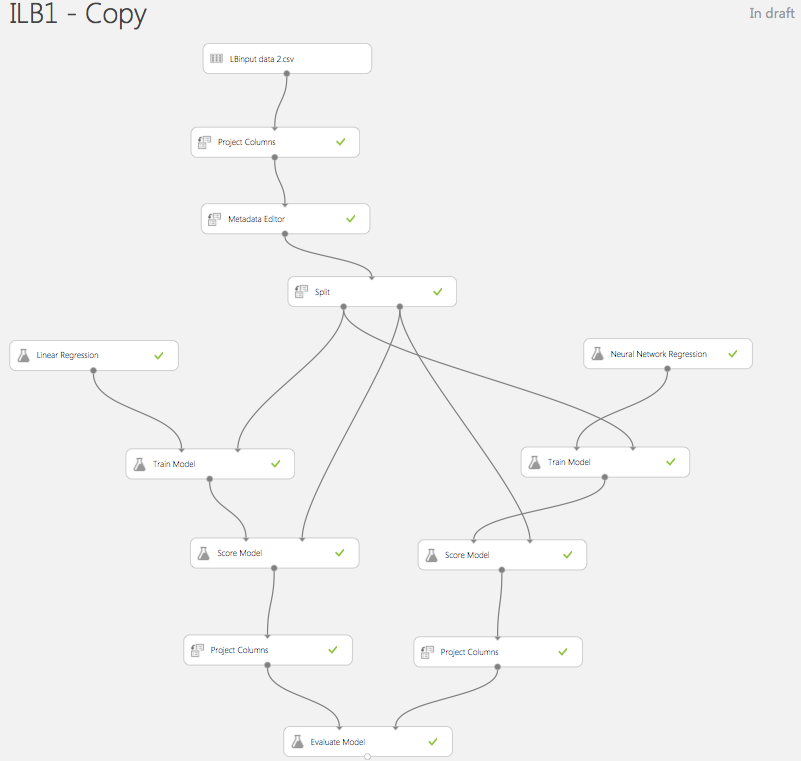
Here is an example of such workflow in ML Studio:
It starts with a simple CSV file containing {Type of Job, Size of Input, N. of Cores Required}.
The "project columns" and "metadata editor" blocks are used to select the columns of interest (or remove empty ones), then change the data description. The job type in our case is a numeric value, but we really want to treat it as a category not to be computed, hence the change in metadata.
We split the data into two parts: one will be used to train the regression algorithm, another to score it, i.e. evaluate the efficacy of its predictions against a set of observed inputs / outputs.
We then initialize two regression models: a linear one and a neural network. This is not strictly necessary in this case. It is just a way to illustrate how you can test several models and then choose the one that provides better predictions. In order to train the models, we supply them with the same portion of the data.
The next step is to score the models, i.e. use them to predict the required n. of cores for the remaining input set, then compare the results against the sampled data.
Here is an example of the scored results for linear regression:
... and for neural networks:
Just by looking at the scatter plot we can see that the neural network is more accurate than simple linear regression.
The evaluation module confirms our finding (the first row in the table is for linear regression, the second one for neural networks):
Now that we have established which technique fits the problem better, we'll save the trained model into our library and publish it as a service.
Click on the "Train Model" block output and select "Save as Trained Model":
With our trained model, we build a simple new workflow.
The "Score Model" block is the one that will provide us with estimates given previous history, so we publish its input and output ports as i/o ports for the prediction service.
Finally we run the model again, check its results and if satisfied we publish it as a service.
In the process of publishing, an API key will be generated that we'll use to access the Azure ML REST API.
Here's some simple Python code to submit a cue and receive an estimate - in our case we submit a job type and receive an estimated number of cores:
import urllib2
import json
import ast
import sys
jobtype = sys.argv[1]
print "Job Type: ",jobtype
data = {
"Id": "score00001",
"Instance": {
"FeatureVector": {
"Type of Job": jobtype,
"Cores Required": "0",
},
"GlobalParameters": {
}
}
}
body = str.encode(json.dumps(data))
url = 'https://ussouthcentral.services.azureml.net/workspaces/be4da4afb11b4eeeac49eb4067e7a8e8/services/68bf2617df6c473595dcc87f66f62346/score'
api_key = 'your api key' # Replace this with the API key for the web service
headers = {'Content-Type':'application/json', 'Authorization':('Bearer '+ api_key)}
req = urllib2.Request(url, body, headers)
response = urllib2.urlopen(req)
result = response.read()
s1=ast.literal_eval(result)
predicted = int(round(float(s1[2])))
print "Predicted n. of cores: ",predicted
Add your own code liberally to interface your autoscaler (e.g. GeReS).
Comments
- Anonymous
September 30, 2014
Very nice job


