Wiring up the Geneva Framework Simple Claims-Aware Web Apps to Geneva Server
Ok, from the previous post, you built a Geneva Server VM for exploration. However, it’s not readily apparent how to wire up the Geneva Framework Simple Claims-Aware Web passive redirect applications. So let’s work that here.
Disclaimer: This blog is not the source for official guidance regarding Microsoft Code Name “Geneva”. Please always refer to the Geneva Team Blog for official information from the product group and post any Geneva questions on the Geneva Forum.
Step 1: Proof Point: Run the Geneva Framework Sample Claims-Aware Web Apps unchanged [6-10 minutes]
- Fire up your Geneva-Server VM.
- If you have not already setup the Simple Claims-Aware Web Applications we’ll just quickly run through doing so here. Otherwise you can skip to Step 2. We want to establish a baseline for what the experience is when using a local STS (i.e. one within the solution) with your application so that you can anticipate what should happen when you wire the application up to Geneva Server.
- Open Windows Explorer and Navigate to C:\Program Files\Microsoft Geneva Framework\Samples\SamplesReadMe.htm.

- When the SamplesReadMe document opens, click the Getting Started link, then click the Simple Claims Aware Web Application link.

- Read the introduction to familiarize yourself with the sample, then follow the Steps needed to to run the sample.
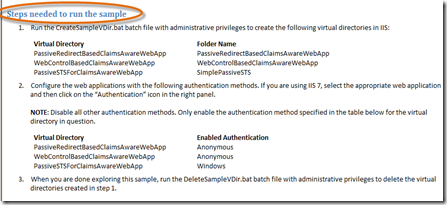
- For the first step, open a Command Prompt and cd to C:\Program Files\Microsoft Geneva Framework\Samples\Getting Started\Simple Claims Aware Web Application. Type CreateSampleVdir.bat and press Enter for any prompts.

- For the second step, Click Start, Administrative Tools, Internet Information Services (IIS) Manager. Then, expand the nodes and click on the PassiveRedirectBasedClaimsAwareWebApp and double-click the Authentication icon.
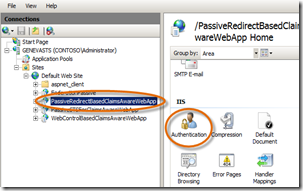
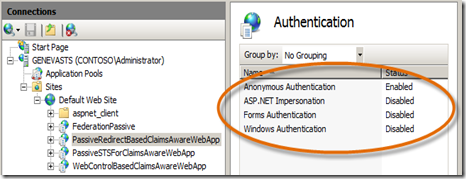
- Per the Virtual Directory settings instructions in the ReadMe for this step, only the Anonymous Authentication should be Enabled for this site. Right-click to Disable any other authentication setting so that the authentication for this site looks like this:
- Now, do the same to Enable/Disable the necessary Authentication settings for the PassiveSTSForClaimsAwareWebApp and WebControlBasedClaimsAwareWebApp per the guidance in the ReadMe document. Only one Authentication type should be enabled for each, all others disabled. Just be sure to enable the correct one or the sample will fail.
- With IIS setup, we can now build the application and run it. In Windows Explorer, navigate to C:\Program Files\Microsoft Geneva Framework\Samples\Getting Started\Simple Claims Aware Web Application, double-click the ClaimsAwareWebApp-VS2008 solution, select Visual Web Developer Express 2008 when prompted and click OK.
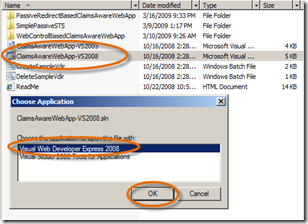
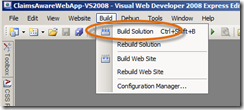
- In 2008, choose Build, Build Solution.
- When the build is complete, click the link on the ReadMe.htm to exercise each of the web applications.

Both these applications simply display the claims provided by the STS and represent a different, yet consistent, way to write your application to retrieve them.
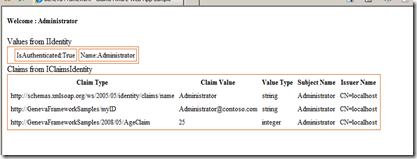
- Fantastic! now we’re ready to move on to Geneva Server.
Step 2: Tweak to Geneva Server’s Default Settings. [3-5 minutes]
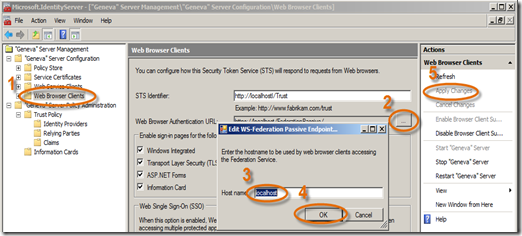
- Because we have chosen to run the Geneva Framework samples on a single VM using localhost with Geneva Server, we need to make a couple simple tweaks to URL defaults that Geneva server sets up. When Geneva server installs, as rightly it should, uses the machine name to build a FQDN for its Web Service Clients and Web Browser Clients endpoints. Therefore we need to change these to use localhost.
- Open Geneva Server Management console.
- Expand the “Geneva” Server Configuration node, click on Web Service Clients, change the Host name to localhost and the STS Identifier to https://localhost/Trust. Click Apply Changes.

- Now, we’ll do the same for the Web Browser Clients, click on this node and then click the “ … ” button following the Web Browser Authentication URL. Type localhost as the Host name, click OK, and Apply Changes.
Step 3: Wire up the PassiveRedirectBasedClaimsAwareWebApp to Trust Geneva Server as its STS. [3-5 minutes]
- If it’s not already open, open the ClaimsAwareWebApp-VS2008 solution in Visual Web Developer Express 2008.
- In the Solution Explorer, double-click the web.config for PassiveRedirectBasedClaimsAwareWebApp.
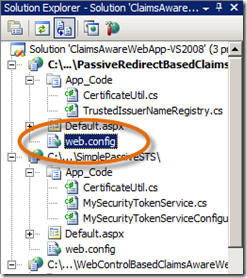
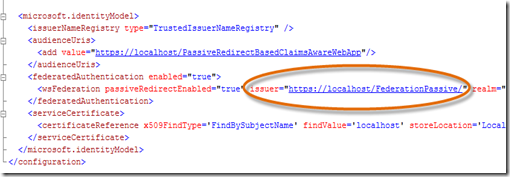
- In the web.config file, scroll down to the microsoft.identityModel element. Then in the federatedAuthentication element, change the issuer= to “https://localhost/FederationPassive/” . This replaces the sample STS’s endpoint as the token issuer with Geneva’s passive federation endpoint as the token issuer.
- In the Solution Explorer, double-click the TrustedIssuerNameRegistry.cs file for the PassiveRedirectBasedClaimsAwareWebApp.
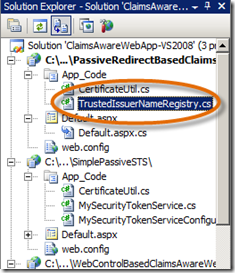
- In the TrustedIssuerNameRegistry.cs file, locate the If statement line that contains “CN=localhost” . Replace “CN=localhost” with
”CN=Geneva Signing Certificate - GENEVASTS” .

This must be keyed exactly as shown, spaces included, or the sample will fail. It’s beyond the scope to discuss the trusted issuer name registry here, but suffice it to say that, architecturally, an application can identify a list of one or more trusted issuers of tokens. Here we are simply saying that if the subject name of the certificate that issued the token is equal to the literal ”CN=Geneva Signing Certificate - GENEVASTS” , we will trust this issuer. And this is the only issuer in our list; a token signed by a certificate with any other subject name will be rejected. - Now we need to deal with the claims. The original STS provided arbitrary claims to the application that Geneva Server can’t produce without additional configuration. So we’ll use some that it can.
- In the Solution Explorer, double-click the Default.aspx.cs file for the PassiveRedirectBasedClaimsAwareWebApp.
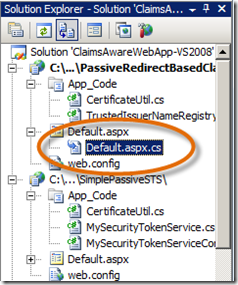
- In the Default.aspx.cs file you’ll see ExpectedClaims which is a String array to designate the claims that we want our application to anticipate. We will replace the myID and AgeClaim with claims Geneva can provide.
Replace the myID claim with System.IdentityModel.Claims.ClaimTypes.Upn
and the AgeClaim with “https://schemas.xmlsoap.org/claims/Group” .

- Rebuild the solution.
- Ok, believe it or not, that’s all we need to do to this application!!
Step 4: Configure Geneva Server with PassiveRedirectBasedClaimsAwareWebApp as a Relying Party application. [3-5 minutes]
- From the Start menu, click Geneva Server Management.
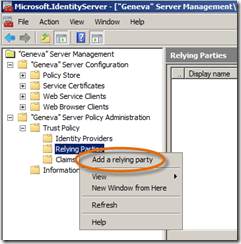
- Expand nodes, right-click on Relying Party and choose Add a relying party.
- On the Welcome panel, click Start.
- On the Select Data Source panel, select Enter data manually and click Next.
- On the Configure Description panel, type PassiveRedirect Web App in the Display name and click Next.
- On the Choose Profile panel, select “Geneva” Server Profile and click Next.
- On the Configure Certificate panel, click Next.
- On the Configure URL panel, select Enable support for Web-browser-based identity federation and enter the URL for the web application, https://localhost/PassiveRedirectBasedClaimsAwareWebApp/ and click Next.

Note: be sure to key this exactly as shown, including case. - On the Configure Identifiers panel, click on the URL showing in the lower window and choose Remove. This will place it in the textbox for editing. Remove the trailing / and click Add.

Confirm that your panel looks like this and click Next.

- On the Configure Claims panel, select only the Group and Name claims, de-select all others and click Next.
- On the Save Relying Party panel, click Save and then Close.
- Now we need to add the UPN claim that the application is expecting as well. Right-click on the PassiveRedirect Web App and choose Properties.
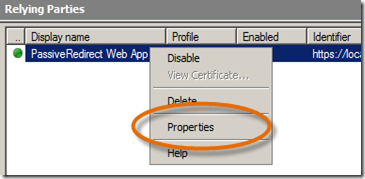
- When the Properties dialog opens, click on the Claims tab and click Add Rule…
- The claims wizard will open. On the Choose Claims panel, select UPN and click Next.
- On the Choose Rule Type panel, select Create this claim using the Attribute Store and click Next.
- On the Specify LDAP Attribute panel, type userPrincipalName and click Next.
- On the Choose Domain Suffix panel, select Send all domain suffices unchanged and click Next.
- On the Finish panel, click Finish after reading the rule’s policy.
- Click Apply and OK.
- And we’re ready to run the app now.
Step 5: Run the PassiveRedirectBasedClaimsAwareWebApp. [1-3 minutes]
- If it’s not open, open the ReadMe.htm again and click the link to run the passive redirect application.
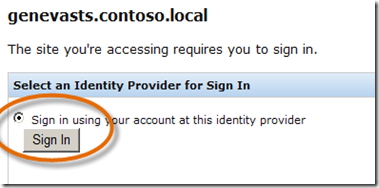
- You will be redirected to Geneva Server for authentication. As a side note, the authentication pages are simply a default look-and-feel, but you can skin/brand these any way you like. They are fully customizable. Select Sign in using your account at this identity provider and click Sign In.
- On the Select Sign In Options page, Geneva Server has several methods available for authentication (these are easily configured but out of scope to discuss here), select Windows Integrated Authentication and click Sign In.
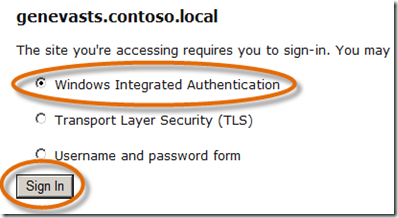
(Next time you run this, select Username and password form just to check out that experience.) - That’s it! A few simple changes to the web app and configuring a relying party application in Geneva Server. We manually setup the relying party application, but if you use the metadata created for the RP by using the FedUtil.exe wizard, Geneva Server will automatically set up the RP – but that’s for another post.
Step 6: Wire up the WebControlBasedClaimsAwareWebApp to Trust Geneva Server as its STS. [3-5 minutes]
- Ok, so now you know the drill and this one will only be slightly different. Therefore, I’ll reduce the images.
- If it’s not already open, open the ClaimsAwareWebApp-VS2008 solution in Visual Web Developer Express 2008.
- In the Solution Explorer, double-click the web.config for WebControlBasedClaimsAwareWebApp. Notice that is does not have the wsFederation element in the file. This is because we are using a control to provide these settings in this example. Close the web.config file.
- In the Solution Explorer, double-click the Default.aspx file.This will open in the Source view, notice in the idfx:FederatedPassiveSignIn element there is an issuer setting like we configured in the previous web.config file. But let’s not configure this in the Source view. Click on Design and the control will render.
- Click once on the Sign In control and the Properties will populate. Scroll to the Issuer property and enter the Geneva Server endpoint, “https://localhost/FederationPassive/” .
- Now you need to make the same change exactly for the ExpectedClaims String array in the Default.aspx.cs file and the “CN=localhost” in the TrustedIssuerNameRegistry.cs file as you made in Step 3.
- That’s it, Rebuild the solution.
Step 7: Configure Geneva Server with WebControlBasedClaimsAwareWebApp as a Relying Party application. [3-5 minutes]
- Start Geneva Server Management if it is not already open.
- Now start the Relying Party wizard and go through the same process to add a relying party as before in Step 4, but this time for the WebControlBasedClaimsAwareWebApp. The only difference is the URL, https://localhost/WebControlBasedClaimsAwareWebApp/ . Be sure to Remove the trailing / on the Configure Identifiers panel as before. You’ll need to add the UPN claim too for this relying party.
- That’s it. Click the link for this application on the ReadMe.htm. When the application starts, click on the Sign in control and see how the passive control now redirects the application to Geneva Server for authentication and a token.
So there you go, two web applications wired up to use Geneva Server in just a few minutes. The cool thing about it, now Geneva Server has the responsibility to authenticate the user and send the appropriate claims. If business needs change so a different authentication method is needed (say smart card auth, or support for an information card auth) then it’s Geneva Server that will implement this – the application will need no changes. Plus a claims-based application, with Geneva Server as its STS, can be accessed by federated Identity Provider partners via interoperable protocols giving the application great reach. A significant win for application design and development!!
Please post any questions relating to the Geneva Framework or Geneva Server on the Geneva Forum. If you have questions about this VM setup, please feel free to post them here. Geneva related resources, including excellent whitepapers, are available at https://microsoft.com/geneva.
Enjoy!
Comments
- Anonymous
March 20, 2009
PingBack from http://blog.a-foton.ru/index.php/2009/03/20/wiring-up-the-geneva-framework-simple-claims-aware-web-apps-to-geneva-server/